How to change hard drive shutdown after idle time in Windows 11
While hard drives are more readily available and faster these days, they still end up consuming a lot of power, especially on laptops. The hard drive consumes more power and ends up draining the laptop's battery faster than it should, so users prefer to turn off the hard drive after idle time. This feature was introduced in the power management options of Windows 10 and helps extend the battery life of your laptop.
While it may be enabled automatically on systems with a Balanced Power Plan or a Power Saver Plan, you can also turn this feature on manually. This will shut down the hard drive whenever your PC is idle for the selected period of time. This, in turn, will automatically use less power, saving your laptop's battery life. However, when you want to get back to using your PC, this can cause a delay in the hard drive booting up and it suddenly realizing it needs to wake up and start working.
Nonetheless, there have been no reports of this feature having any adverse impact on PC performance, so you can turn off the hard drive after the idle time option. However, sometimes you may also want to change the time this feature will turn off the hard drive after idle time changes, for example from 10 minutes to 20 minutes. In this case, you can follow the method we show you here.
Method 1: Via Power Options
This method helps you turn off the hard drive through Power Options in Control Panel after idle time in Windows 11. You can also turn off the hard drive after changing the idle time from the same location. Let's see how:
Step 1: Press the Win R keys simultaneously on your PC to open the "Run Command" window.
Step 2: In the Run Command window, type POWERCFG.CPL in the text field and press Enter to open the Power Options window in Control Panel.
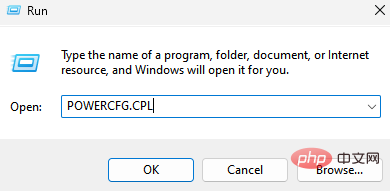
Step 3: In the Control Panel window, navigate to the right and go to Power Plans.
Here, click the Change Plan Settings link next to Active Power Plans on your system.
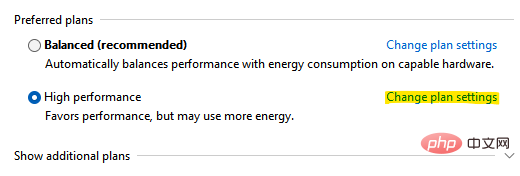
Step 4: In the next window (Edit plan settings), go to the bottom of the window and click Change advanced power settings.
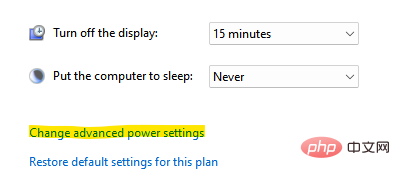
Step 5: It will open the Power Options window.
Here, under the Advanced Settings tab, go to the list and expand the Hard Disk option.
Now, click to expand the "Turn off the hard drive after" option.
Next, change the time of the On battery field and Plugged in field.
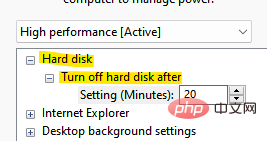
When finished, press Apply and then OK to save changes and exit.
Close the control panel window and the hard drive should now shut down after the idle time you set.
Method 2: Via Command Prompt
However, if you change to a faster way of shutting down the hard drive after idle time, you can use Command Prompt. Follow the instructions below to make changes via the command line:
Step 1: Go to Start, right-click on it and select Run.
Step 2: It will open the “Run” command window.
In the search field, type cmd and press the Ctrl Shift Enter key simultaneously to open a Command Prompt window with administrator privileges.
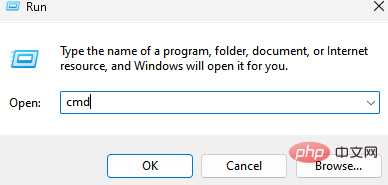
Step 3: In an elevated command prompt window, run the following command and press Enter:
powercfg -change -disk-timeout-dc 0
Now, replace the 0 with what you want The number of minutes after which the hard drive is disabled after idle time.
Step 4: Now, run the following command in the command prompt and press Enter:
powercfg -change-disk-timeout-ac-0
Replace 0 with the number of minutes you want the hard drive to be disabled after idle time
Once completed, close the command prompt window, restart your PC, and now, next time your PC is idle, the hard drive will shut down within the specified time.
The above is the detailed content of How to change hard drive shutdown after idle time in Windows 11. For more information, please follow other related articles on the PHP Chinese website!

Hot AI Tools

Undresser.AI Undress
AI-powered app for creating realistic nude photos

AI Clothes Remover
Online AI tool for removing clothes from photos.

Undress AI Tool
Undress images for free

Clothoff.io
AI clothes remover

Video Face Swap
Swap faces in any video effortlessly with our completely free AI face swap tool!

Hot Article

Hot Tools

Notepad++7.3.1
Easy-to-use and free code editor

SublimeText3 Chinese version
Chinese version, very easy to use

Zend Studio 13.0.1
Powerful PHP integrated development environment

Dreamweaver CS6
Visual web development tools

SublimeText3 Mac version
God-level code editing software (SublimeText3)

Hot Topics
 What is the reason why PS keeps showing loading?
Apr 06, 2025 pm 06:39 PM
PS "Loading" problems are caused by resource access or processing problems: hard disk reading speed is slow or bad: Use CrystalDiskInfo to check the hard disk health and replace the problematic hard disk. Insufficient memory: Upgrade memory to meet PS's needs for high-resolution images and complex layer processing. Graphics card drivers are outdated or corrupted: Update the drivers to optimize communication between the PS and the graphics card. File paths are too long or file names have special characters: use short paths and avoid special characters. PS's own problem: Reinstall or repair the PS installer.
 How to speed up the loading speed of PS?
Apr 06, 2025 pm 06:27 PM
Solving the problem of slow Photoshop startup requires a multi-pronged approach, including: upgrading hardware (memory, solid-state drive, CPU); uninstalling outdated or incompatible plug-ins; cleaning up system garbage and excessive background programs regularly; closing irrelevant programs with caution; avoiding opening a large number of files during startup.
 How to solve the problem of loading when PS is always showing that it is loading?
Apr 06, 2025 pm 06:30 PM
PS card is "Loading"? Solutions include: checking the computer configuration (memory, hard disk, processor), cleaning hard disk fragmentation, updating the graphics card driver, adjusting PS settings, reinstalling PS, and developing good programming habits.
 Is slow PS loading related to computer configuration?
Apr 06, 2025 pm 06:24 PM
The reason for slow PS loading is the combined impact of hardware (CPU, memory, hard disk, graphics card) and software (system, background program). Solutions include: upgrading hardware (especially replacing solid-state drives), optimizing software (cleaning up system garbage, updating drivers, checking PS settings), and processing PS files. Regular computer maintenance can also help improve PS running speed.
 Is PS slow loading related to other programs that are running?
Apr 06, 2025 pm 06:03 PM
The secrets to mastering Office software include: understanding different versions and platforms, correctly installing and configuring, proficient in using the software interface, in-depth understanding of feature operations, application collaboration and sharing functions, utilizing templates and styles, mastering advanced skills, and solving common problems. In addition, you need to choose a version that suits your needs, make good use of templates and styles, develop backup habits, and learn shortcut keys and advanced techniques to improve efficiency.
 How to solve the problem of loading when the PS opens the file?
Apr 06, 2025 pm 06:33 PM
"Loading" stuttering occurs when opening a file on PS. The reasons may include: too large or corrupted file, insufficient memory, slow hard disk speed, graphics card driver problems, PS version or plug-in conflicts. The solutions are: check file size and integrity, increase memory, upgrade hard disk, update graphics card driver, uninstall or disable suspicious plug-ins, and reinstall PS. This problem can be effectively solved by gradually checking and making good use of PS performance settings and developing good file management habits.
 Does mysql need the internet
Apr 08, 2025 pm 02:18 PM
MySQL can run without network connections for basic data storage and management. However, network connection is required for interaction with other systems, remote access, or using advanced features such as replication and clustering. Additionally, security measures (such as firewalls), performance optimization (choose the right network connection), and data backup are critical to connecting to the Internet.
 How to solve the problem of loading when PS is started?
Apr 06, 2025 pm 06:36 PM
A PS stuck on "Loading" when booting can be caused by various reasons: Disable corrupt or conflicting plugins. Delete or rename a corrupted configuration file. Close unnecessary programs or upgrade memory to avoid insufficient memory. Upgrade to a solid-state drive to speed up hard drive reading. Reinstalling PS to repair corrupt system files or installation package issues. View error information during the startup process of error log analysis.


