

Wireless display installation fails in Windows 11: 4 simple tips

Wireless display represents a technology that allows you to project photos, movies, and web content. And any type of media, from a compatible mobile device or computer to another.
Even though it should always work under the right conditions, Windows 11 users are reporting that some wireless display installations fail. This is how they describe the problem in the Microsoft forums:
I installed Windows 11 Pro Version Dev (OS Build 21996.1) on a ProBook 6470b and it shows an error when wirelessly projecting to this PC , and the installation failed when installing the optional feature of wireless display.
Fortunately, there are many ways to easily solve this annoying problem. After all, you already know how Windows 11 compares to Windows 10, and there's no turning back.
We have selected the best options, so be sure to read this article in full to discover which option is best for you.
Important Things to Consider Before Installing a Wireless Monitor
Installing a wireless monitor is always helpful and can actually clear away clutter on your desk. As well as eliminating the wear and tear issues associated with cable connections.
However, your device must have the key component to install, connect, and use a wireless display: Miracast technology.
What is Miracast and what does it do?
Miracast is a standard designed by the Wi-Fi Alliance that allows content to be mirrored wirelessly from a compatible PC. Or smartphone, tablet screen to TV or monitor.
It is often called HDMI over Wi-Fi because it is wireless and can replace all known HDMI cables.
Make sure your device is compatible with Miracast
If you want to project your screen to a wireless display, your device and screen must be Miracast-compatible with the wireless broadcast technology.
To see if your device is compatible with Miracast, go to Settings and click System in the left pane, then select Projection from the right pane Go to this PC option.
If you see a screen like the one below, the message This device does not support receiving Miracast, so you cannot cast to it wirelessly, means your device does not have this capability.
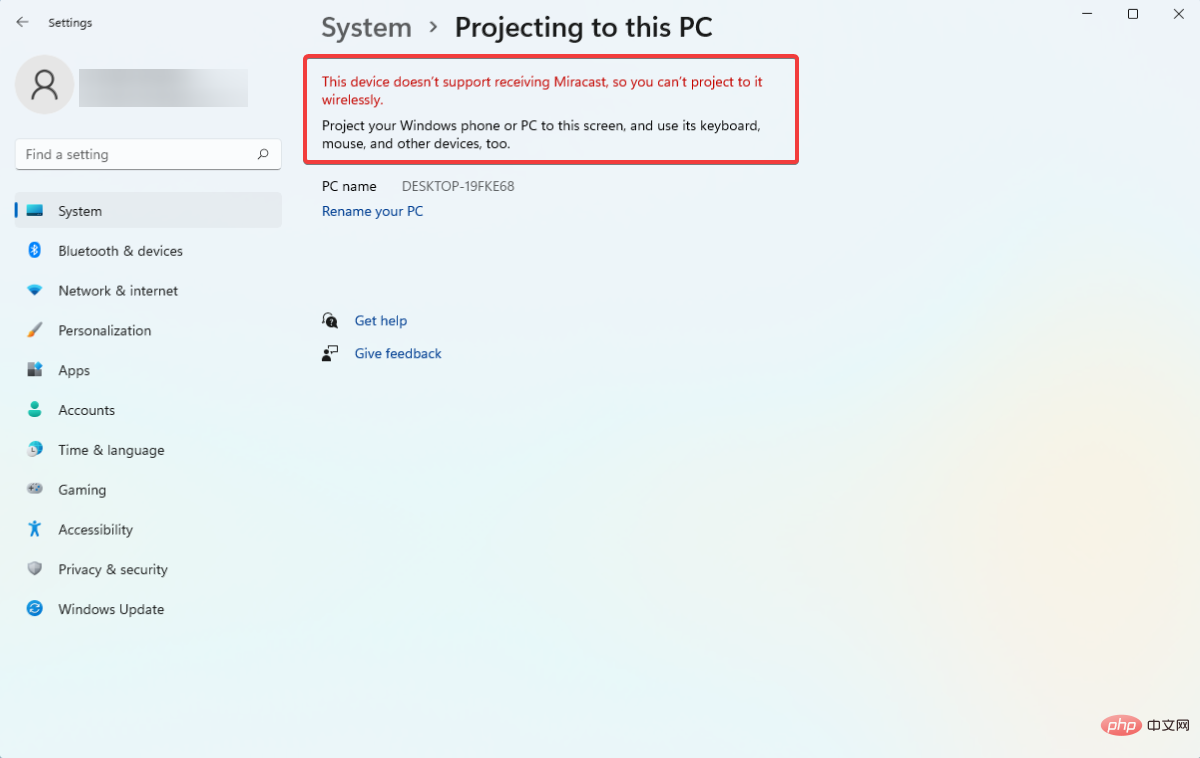
The fact that your device does not have Miracast capabilities may prevent you from installing a wireless display, so you should still check this.
If your device doesn't have this feature, you can always buy a separate Miracast dongle, connect it to your device and use it, but make sure the monitor is also Miracast-compatible.
With that said, let’s jump into the list of solutions and note that they will also fix the wireless monitor installation failure issue in Windows 10.
What should I do if the wireless display installation fails?
1. Connect to the Internet
In addition to Windows 11 not running on a device without Internet access, on a In some cases, users forget to connect to the Internet before attempting to perform the installation. This should be the fastest and easiest way to install the wireless monitor add-on feature.
If you are having trouble trying to connect to a network in Windows 11, check out the linked article to learn how to fix it. After this, Windows 11 wireless display not working issue will be resolved.
Therefore, we strongly recommend trying to connect to it and then reload the process. However, if the first option doesn't work, continue reading this tutorial.
2. Try different internet resources
If the first solution fails, it could still be a random error and poor internet connection the reason. The second thing is to try connecting to a different Internet source.
As you can see, the first two options only take a few seconds to fix, and they can help you make sure everything is ready for your wireless monitor installation.
3. Turn off metered connections
- Hold the and keys to open Settings, then go to Network and Internet and click on Properties. WindowsI

- Scroll down and click the toggle button to set MeteredConnection to Off .
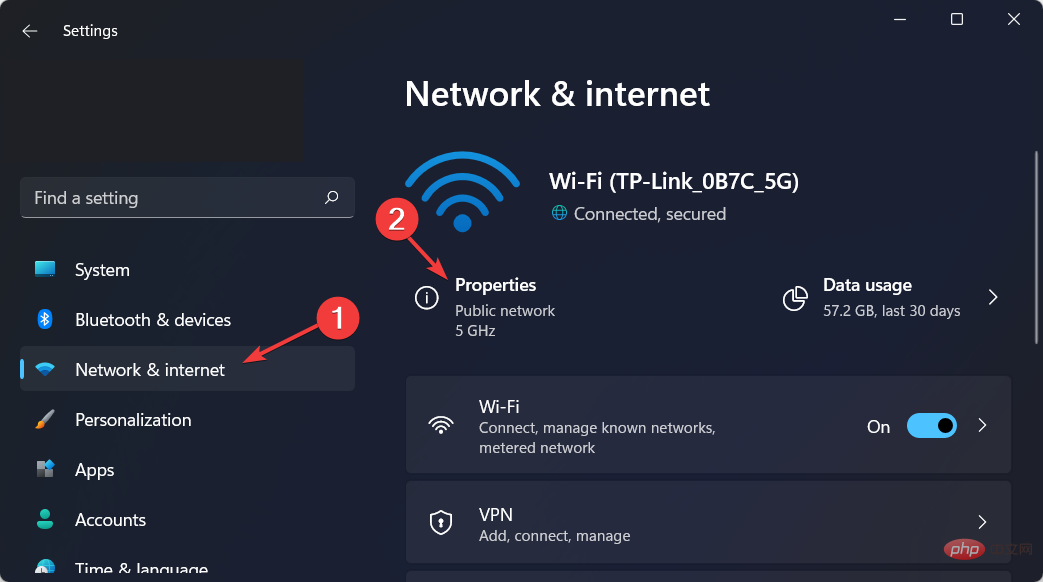
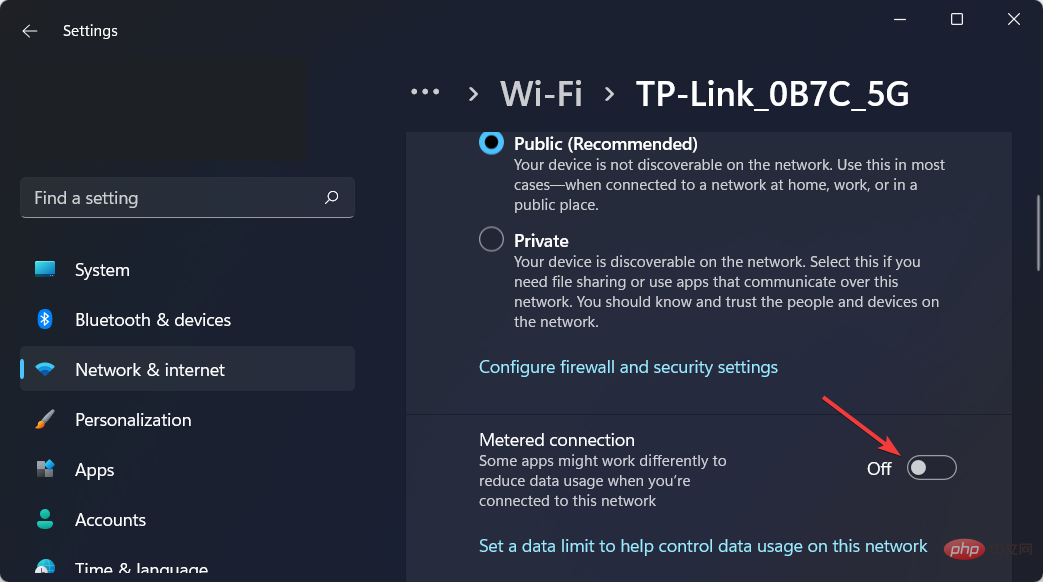
After you complete this, try installing the wireless display again to see if it works now.
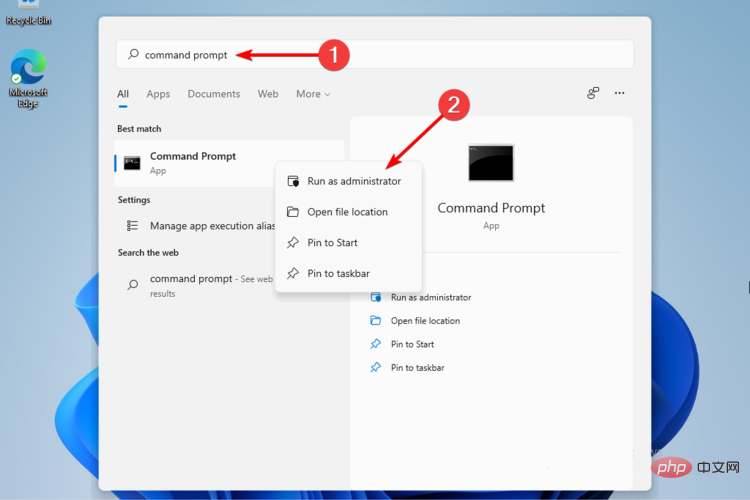
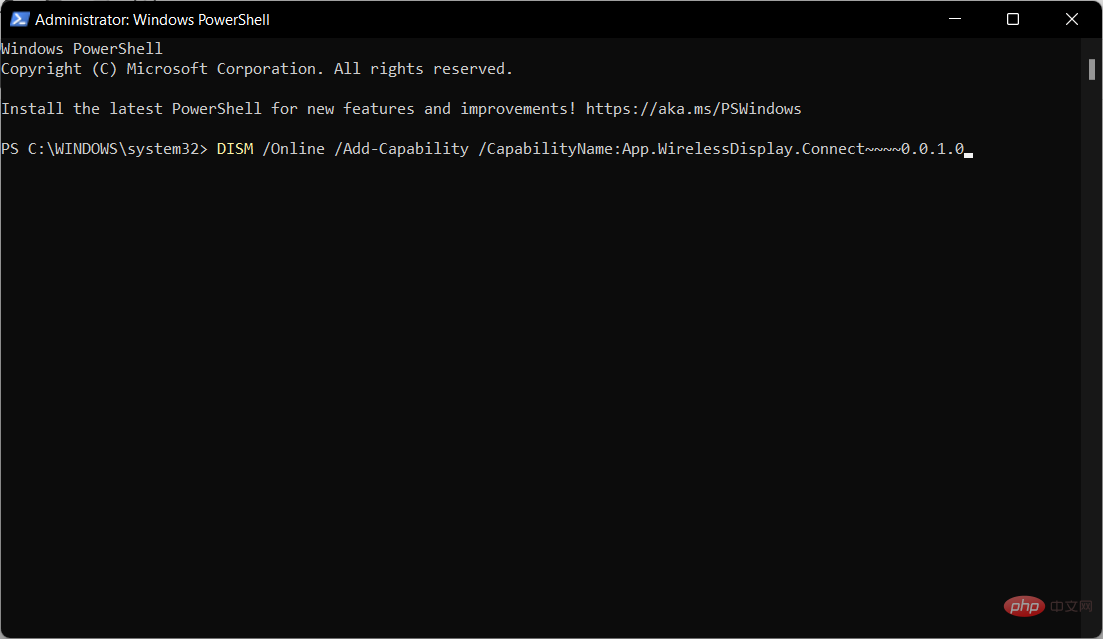
4. Using Command Prompt
- click the magnifying glass icon and type cmd in the search bar to right click on the top result and select Run as administrator.
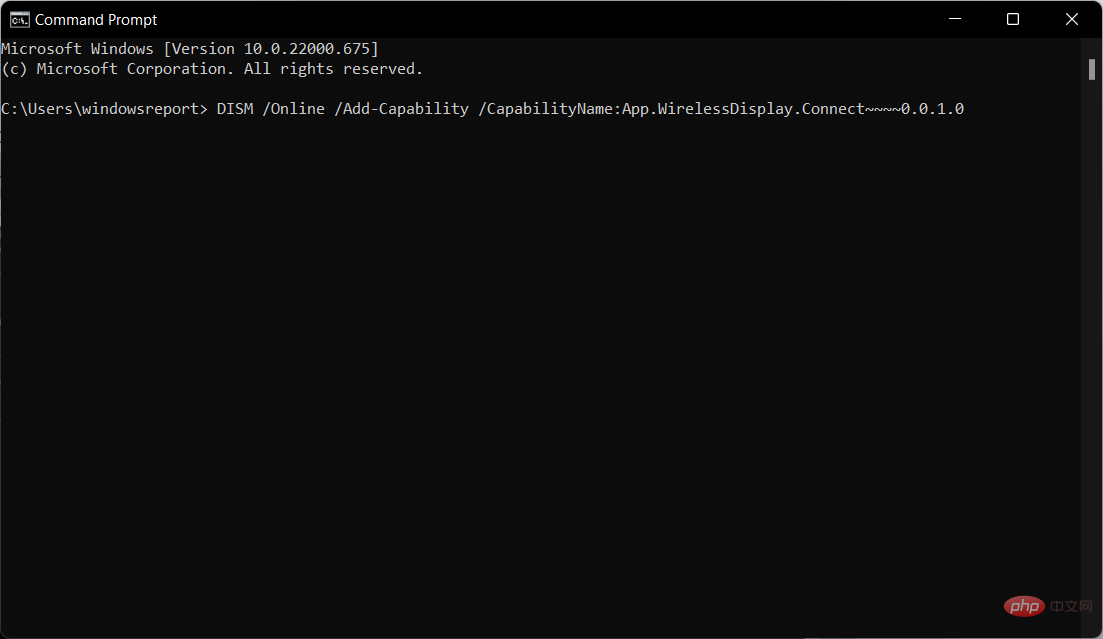
- In the pop-up window, type the following command and press Enter:
<strong>DISM /Online /Add-Capability /CapabilityName:App.WirelessDisplay.Connect~ ~~~0.0.1.0</strong>
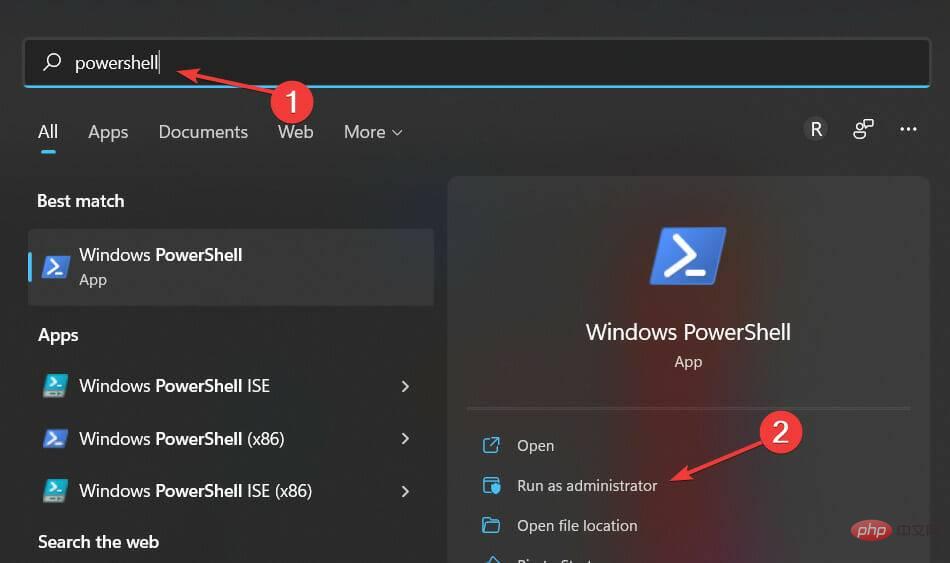
- Click the magnifying glass icon and enter PowerShell, then select Run as administrator on the right.
- In the pop-up window, type the following command the same as above and press Enter:
<strong>DISM /Online /Add-Capability /CapabilityName:App .WirelessDisplay.Connect~~~~0.0.1.0</strong>
So if your wireless display installation fails, these are the most valuable options. As you can see, they're not complicated, so you don't have to be an expert to complete them quickly.
For those interested in learning more about the design of the latest operating system version, we recommend checking out our post on the 15+ new features you should know about Windows 11.
Or, check out the best security and privacy features in Windows 11 and learn how this operating system version handles your data.
The above is the detailed content of Wireless display installation fails in Windows 11: 4 simple tips. For more information, please follow other related articles on the PHP Chinese website!

Hot AI Tools

Undresser.AI Undress
AI-powered app for creating realistic nude photos

AI Clothes Remover
Online AI tool for removing clothes from photos.

Undress AI Tool
Undress images for free

Clothoff.io
AI clothes remover

Video Face Swap
Swap faces in any video effortlessly with our completely free AI face swap tool!

Hot Article
Hot Tools

Notepad++7.3.1
Easy-to-use and free code editor

SublimeText3 Chinese version
Chinese version, very easy to use

Zend Studio 13.0.1
Powerful PHP integrated development environment

Dreamweaver CS6
Visual web development tools

SublimeText3 Mac version
God-level code editing software (SublimeText3)
Hot Topics


 What is the reason why PS keeps showing loading?
Apr 06, 2025 pm 06:39 PM
What is the reason why PS keeps showing loading?
Apr 06, 2025 pm 06:39 PM
PS "Loading" problems are caused by resource access or processing problems: hard disk reading speed is slow or bad: Use CrystalDiskInfo to check the hard disk health and replace the problematic hard disk. Insufficient memory: Upgrade memory to meet PS's needs for high-resolution images and complex layer processing. Graphics card drivers are outdated or corrupted: Update the drivers to optimize communication between the PS and the graphics card. File paths are too long or file names have special characters: use short paths and avoid special characters. PS's own problem: Reinstall or repair the PS installer.
 How to speed up the loading speed of PS?
Apr 06, 2025 pm 06:27 PM
How to speed up the loading speed of PS?
Apr 06, 2025 pm 06:27 PM
Solving the problem of slow Photoshop startup requires a multi-pronged approach, including: upgrading hardware (memory, solid-state drive, CPU); uninstalling outdated or incompatible plug-ins; cleaning up system garbage and excessive background programs regularly; closing irrelevant programs with caution; avoiding opening a large number of files during startup.
 How to solve the problem of loading when PS is always showing that it is loading?
Apr 06, 2025 pm 06:30 PM
How to solve the problem of loading when PS is always showing that it is loading?
Apr 06, 2025 pm 06:30 PM
PS card is "Loading"? Solutions include: checking the computer configuration (memory, hard disk, processor), cleaning hard disk fragmentation, updating the graphics card driver, adjusting PS settings, reinstalling PS, and developing good programming habits.
 Is slow PS loading related to computer configuration?
Apr 06, 2025 pm 06:24 PM
Is slow PS loading related to computer configuration?
Apr 06, 2025 pm 06:24 PM
The reason for slow PS loading is the combined impact of hardware (CPU, memory, hard disk, graphics card) and software (system, background program). Solutions include: upgrading hardware (especially replacing solid-state drives), optimizing software (cleaning up system garbage, updating drivers, checking PS settings), and processing PS files. Regular computer maintenance can also help improve PS running speed.
 Is PS slow loading related to other programs that are running?
Apr 06, 2025 pm 06:03 PM
Is PS slow loading related to other programs that are running?
Apr 06, 2025 pm 06:03 PM
The secrets to mastering Office software include: understanding different versions and platforms, correctly installing and configuring, proficient in using the software interface, in-depth understanding of feature operations, application collaboration and sharing functions, utilizing templates and styles, mastering advanced skills, and solving common problems. In addition, you need to choose a version that suits your needs, make good use of templates and styles, develop backup habits, and learn shortcut keys and advanced techniques to improve efficiency.
 How to solve the problem of loading when the PS opens the file?
Apr 06, 2025 pm 06:33 PM
How to solve the problem of loading when the PS opens the file?
Apr 06, 2025 pm 06:33 PM
"Loading" stuttering occurs when opening a file on PS. The reasons may include: too large or corrupted file, insufficient memory, slow hard disk speed, graphics card driver problems, PS version or plug-in conflicts. The solutions are: check file size and integrity, increase memory, upgrade hard disk, update graphics card driver, uninstall or disable suspicious plug-ins, and reinstall PS. This problem can be effectively solved by gradually checking and making good use of PS performance settings and developing good file management habits.
 Does mysql need the internet
Apr 08, 2025 pm 02:18 PM
Does mysql need the internet
Apr 08, 2025 pm 02:18 PM
MySQL can run without network connections for basic data storage and management. However, network connection is required for interaction with other systems, remote access, or using advanced features such as replication and clustering. Additionally, security measures (such as firewalls), performance optimization (choose the right network connection), and data backup are critical to connecting to the Internet.
 How to solve the problem of loading when PS is started?
Apr 06, 2025 pm 06:36 PM
How to solve the problem of loading when PS is started?
Apr 06, 2025 pm 06:36 PM
A PS stuck on "Loading" when booting can be caused by various reasons: Disable corrupt or conflicting plugins. Delete or rename a corrupted configuration file. Close unnecessary programs or upgrade memory to avoid insufficient memory. Upgrade to a solid-state drive to speed up hard drive reading. Reinstalling PS to repair corrupt system files or installation package issues. View error information during the startup process of error log analysis.