
 Operation and Maintenance
Linux Operation and Maintenance
What functions does the ssh service have - logging into remote hosts, sftp, and off-site backup of files?
Operation and Maintenance
Linux Operation and Maintenance
What functions does the ssh service have - logging into remote hosts, sftp, and off-site backup of files?
What functions does the ssh service have - logging into remote hosts, sftp, and off-site backup of files?

Today I will introduce to you several applications of ssh. Common applications include using ssh to connect to remote servers, using sftp to transfer files, and using ssh to perform off-site backups.
Connect to the remote host
Connect to the remote server This is our most commonly used function, connect to the remote server, and then manage the server .
If your client is windows, then you need to install terminal tools, such as xshell, Terminator, Tmux, etc., and then use these terminal tools to connect to the remote server. If the client is Linux, you can use the ssh command directly.
Commonly used command usage is given below
Connect to the remote host ssh [account@]IP [-p specified port]
Without logging in, directly send a command to the remote server to execute the ssh -f [account@]IP [-p specified port] command
The following demonstrates remote connection to the server
# ssh 121.196.12.64
The authenticity of host '121.196.12.64 (121.196.12.64)' can't be established.
ECDSA key fingerprint is SHA256:wx0RHE8fcCoad6YKw0Ex4NE+QjwRiTYxC2s2g/DqPUU.
ECDSA key fingerprint is MD5:43:2c:7a:12:24:1d:86:3a:b0:a0:b7:95:c2:cf:7b:ab.
Are you sure you want to continue connecting (yes/no)?
When you connect for the first time, you will be asked if you want to connect, enter yes here. After entering yes, you will be asked to enter a password
root@121.196.12.64's password:
Welcome to Alibaba Cloud Elastic Compute Service !
Activate the web console with: systemctl enable --now cockpit.socket
Last login: Thu Nov 19 16:25:42 2020 from 114.103.36.247
When you enter the password correctly, you will successfully connect to the remote server.
When the public key of the remote host is accepted, it will be saved in the file $HOME/.ssh/known_hosts. The next time you connect to this host, the system will recognize that its public key has been saved locally, skip the warning part, and directly prompt you to enter the password.
Each SSH user has its own known_hosts file. In addition, the system also has such a file, usually /etc/ssh/ssh_known_hosts, which saves some public keys of remote hosts that are trustworthy to all users.
If you want to exit the login, enter exit and wait to log in
# exit
logout
Connection to 121.196.12.64 closed.
Simulate ftp file transfer method: SFTP
Using SSH is used to control the remote host. If you just want to download resources from the remote server or upload local files to the server, then use sftp or scp. These two commands are also through the ssh port.
Login through sftp
# sftp root@121.196.12.64
root@121.196.12.64's password:
Connected to 121.196.12.64.
sftp> ?  <== 输入?可查看交互命令的帮助信息
There are many commands for the interactive mode of sftp. Here are some common interactive commands, viewed from the three categories.
Commands for the remote server: such as ls, pwd, mkdir, etc.
Commands for the local machine: lcd, lls, etc.
Commands for uploading and downloading: put (upload files), get (download files).
The upload and download operations are demonstrated below.
# 从远程服务器下载一个文件到本地
sftp> ls
1.txt        install.sh
sftp> get 1.txt
Fetching /root/1.txt to 1.txt
/root/1.txt                                                                         100%    6     0.0KB/s   00:00
sftp> lls
1.txt  install.sh  job1.php  job2.php  job3.php  learnshell  logrotate_learn.log  logrotate_learn.log.1.gz

# 上传本地文件到服务器上
sftp> put job1.php
Uploading job1.php to /root/job1.php
job1.php                                                                            100%   34     0.3KB/s   00:00
sftp> ls
1.txt        install.sh   job1.php
Off-site file transfer: SCP
The SCP command can be used for off-site backup. The simplest usage of SCP is as follows
# 上传文件
scp [-pr] [-l 速率] file [账号@]主机:目录名
# 下载文件
scp [-pr] [-l 速率] [账号@]主机:file 目录名
Options and parameters:
-p Keep file attributes
-r Recursive operation
-l Limit the rate, followed by a value; for example, 1024 means 1024k bytes/s
For the backup of important files, follow one principle "Never put all your eggs in one basket." In addition to local backup, we should also perform off-site backup. Frequently use the scp command plus the system's scheduled tasks to perform off-site backup, such as:
* 2 1 * * scp -rp root@101.*.*.185:/backup \
> /root/backup/scp_$(date +$Y%m%d)  1>/dev/null 2>&1
For more related technical articles, please visit the linux tutorial column!
The above is the detailed content of What functions does the ssh service have - logging into remote hosts, sftp, and off-site backup of files?. For more information, please follow other related articles on the PHP Chinese website!

Hot AI Tools

Undresser.AI Undress
AI-powered app for creating realistic nude photos

AI Clothes Remover
Online AI tool for removing clothes from photos.

Undress AI Tool
Undress images for free

Clothoff.io
AI clothes remover

Video Face Swap
Swap faces in any video effortlessly with our completely free AI face swap tool!

Hot Article
Hot Tools

Notepad++7.3.1
Easy-to-use and free code editor

SublimeText3 Chinese version
Chinese version, very easy to use

Zend Studio 13.0.1
Powerful PHP integrated development environment

Dreamweaver CS6
Visual web development tools

SublimeText3 Mac version
God-level code editing software (SublimeText3)
Hot Topics


![Telnet in Windows 11 Complete Tutorial [Installation/Enablement and Troubleshooting]](https://img.php.cn/upload/article/000/000/164/168476253791019.jpg?x-oss-process=image/resize,m_fill,h_207,w_330) Telnet in Windows 11 Complete Tutorial [Installation/Enablement and Troubleshooting]
May 22, 2023 pm 09:35 PM
Telnet in Windows 11 Complete Tutorial [Installation/Enablement and Troubleshooting]
May 22, 2023 pm 09:35 PM
<p>Telnet is the abbreviation of "Terminal Network". It is a protocol that users can use to connect one computer to a local computer. </p><p>Here, the local computer refers to the device that initiates the connection, and the computer connected to the local computer is called the remote computer. </p><p>Telnet runs on a client/server principal, and although it is outdated, it is still used by many people in 2022. Many people have already switched to Windows 11 operating system, which is the latest operating system offered by Microsoft. &
 How to SSH from iPad to Mac
Apr 14, 2023 pm 12:22 PM
How to SSH from iPad to Mac
Apr 14, 2023 pm 12:22 PM
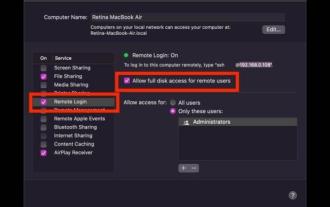
How to SSH from iPad to Mac This is a two-part walkthrough. First, you'll enable the SSH server on your Mac, and then you'll use the ssh client app to connect to it from your iPad. On Mac, start an SSH server You can enable an SSH server on your Mac by turning on a feature called Remote Login. Go to Apple Menu > System Preferences > Sharing > Enable "Remote Login" and check the "Allow remote users full access to disk" box Your Mac is now an SSH server, providing you with a shell to connect from your iPad. Notice
 Python server programming: Using Paramiko to implement SSH remote operation
Jun 18, 2023 pm 01:10 PM
Python server programming: Using Paramiko to implement SSH remote operation
Jun 18, 2023 pm 01:10 PM
With the development of cloud computing and the Internet of Things, remote operation of servers has become increasingly important. In Python, we can use the Paramiko module to easily implement SSH remote operations. In this article, we will introduce the basic usage of Paramiko and how to use Paramiko in Python to remotely manage servers. What is Paramiko Paramiko is a Python module for SSHv1 and SSHv2 that can be used to connect and control SSH clients
 OpenSSH on Windows: Installation, Configuration, and Usage Guide
Mar 08, 2024 am 09:31 AM
OpenSSH on Windows: Installation, Configuration, and Usage Guide
Mar 08, 2024 am 09:31 AM
For most Windows users, Remote Desktop Protocol (RDP) has always been the first choice for remote management because it provides a friendly graphical interface. However, for system administrators who require more granular control, SSH may better suit their needs. Through SSH, administrators can interact with remote devices through the command line, which can make management work more efficient. The advantage of SSH is its security and flexibility, making it easier for administrators to perform remote management and maintenance work, especially when dealing with a large number of devices or performing automated tasks. So while RDP excels in terms of user-friendliness, for system administrators, SSH is superior in terms of power and control. Previously, Windows users needed to borrow
 Linux SSH login mutual trust configuration
Feb 19, 2024 pm 07:48 PM
Linux SSH login mutual trust configuration
Feb 19, 2024 pm 07:48 PM
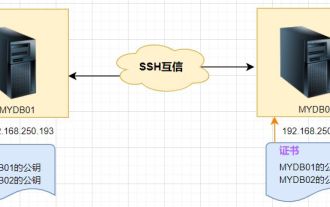
1. The purpose of ssh mutual trust 1. SSH mutual trust is required when building a cluster, which is conducive to convenient operation on another node. 2. When using scp remote copy operation, you need to enter the user name and password of the target server. At this time, you can configure SSH mutual trust between Linux servers, so that you can log in without a password when operating between multiple Linux servers. 2. The principle of ssh mutual trust configuration. In short, the server stores the certificate of the target host so that authentication can be completed automatically without entering a password. 3. SSH mutual trust configuration steps 1. Each node generates its own public key and private key pair. 2. Send your public key file to the other party. 3. Verify whether the mutual trust configuration is successful. 4. Configure ssh mutual trust here with MYDB01 and
 How to connect to Mysql database remotely using Python based on ssh
May 27, 2023 pm 04:07 PM
How to connect to Mysql database remotely using Python based on ssh
May 27, 2023 pm 04:07 PM
Background: If you need to access the Mysql database of a remote server, but for the security period of the Mysql database, the security measures are set to only allow local connections (that is, you need to log in to the server to use it), and other remote connections cannot be accessed directly, and The corresponding port has also been modified, so you need to connect to the database based on ssh. Connecting to the database in this way is the same as the interface in Navicat based on ssh connection. Navicat connects to the database installation support library. If you want to connect to Mysql, you first need to install pymysqlpipinstallpymysql to install the ssh-based library sshtunnelpipinstallsshtunnel#
 How to check SSH version in Linux
Feb 15, 2023 am 11:28 AM
How to check SSH version in Linux
Feb 15, 2023 am 11:28 AM
Checking method: 1. Use a text editor to open "/etc/ssh/sshd_config" and check the "Protocol" field. If "Protocol 2" is displayed, it means that the server only supports SSH2. If "Protocol 1" is displayed, it means that the server supports both SSH2 and SSH2. By. 2. Force ssh to use a specific SSH protocol and judge by checking the response of the SSH server. 3. Use the scanssh tool with the syntax "sudo scanssh -s ssh ip address".
 Install SSH on the Linux Debian11 server, create a new user and allow SSH remote login, and configure SSH secure login!
Mar 01, 2024 pm 07:16 PM
Install SSH on the Linux Debian11 server, create a new user and allow SSH remote login, and configure SSH secure login!
Mar 01, 2024 pm 07:16 PM
The steps to install SSH on your Debian11 server and create a new user to allow SSH remote login are as follows: Step 1: Install SSH In order to install the SSH server, you need to log in to your Debian11 server as the root user or a user with sudo privileges. Execute the following command in the terminal to install the SSH server: sudoaptupdatesudoaptinstallopenssh-server Step 2: Create a new user To create a new user, you can use the adduser command. Replace the following command with your desired username: sudoaddusernew_username You will be prompted to set the new user's password and other
