

3D button implemented in pure css3_html/css_WEB-ITnose

I have introduced many buttons implemented in pure CSS3 before. Today I want to bring you another 3D button implemented in pure CSS3. In the example, 3D buttons in five colors are given. The renderings are as follows:
Online preview Source code download
Implemented code.
html code:
<h1> <span class="font-effect-shadow-multiple" style="font-size: 50px; font-family: Luckiest Guy;"> CSS</span> <span class="font-effect-3d" style="font-size: 50px; font-family: Sonsie One;"> 3D</span> <span class="font-effect-shadow-multiple" style="font-size: 50px; font-family: Luckiest Guy;"> Buttons</span> </h1> <p> <a href="#" class="s3-btn s3-btn1">s3-btn1</a> </p> <p> <a href="#" class="s3-btn s3-btn2">s3-btn2</a> </p> <p> <a href="#" class="s3-btn s3-btn3">s3-btn3</a> </p> <p> <a href="#" class="s3-btn s3-btn4">s3-btn4</a> </p> <p> <a href="#" class="s3-btn s3-btn5">s3-btn5</a> </p>
css3 code:
body { font-family: 'Open Sans' , sans-serif; background-image: url(blurred-background-images-photos-0322125813.jpg); background-repeat: no-repeat; background-position: center center; background-size: cover; background-attachment: fixed; } h1 { text-align: center; } p { margin: 1em; padding: 1em; text-align: center; } .s3-btn1, .s3-btn2, .s3-btn3, .s3-btn4, .s3-btn5, a.s3-btn1, a.s3-btn2, a.s3-btn3, a.s3-btn4, a.s3-btn5 { outline: none; text-decoration: none !important; margin: 0 auto; padding: 1em 3em; border-radius: 5px; -webkit-transition: all 100ms linear; transition: all 100ms linear; touch-callout: none; -webkit-user-select: none; -moz-user-select: none; -ms-user-select: none; user-select: none; cursor: pointer; position: relative; text-align: center; } .s3-btn1 { color: #ffffff; background: -webkit-linear-gradient(top, #c03718 0%, #e44a27 100%); background: linear-gradient(to bottom, #c03718 0%, #e44a27 100%); border: 1px solid #a93115; box-shadow: 0px 4px 0px 0px #a93115, 0px 5px 12px 0px rgba(0, 0, 0, 0.6), inset 0px 0px 10px -5px #000000; } .s3-btn1:hover { background: -webkit-linear-gradient(top, #c03718 0%, #d73e1b 100%); background: linear-gradient(to bottom, #c03718 0%, #d73e1b 100%); } .s3-btn1:hover:active { border: none !important; top: 4px; box-shadow: 0px 2px 0px 0px #a93115, 0px 5px 12px 0px rgba(0, 0, 0, 0.6), inset 0px 0px 10px -5px #000000; } .s3-btn2 { color: #ffffff; background: -webkit-linear-gradient(top, #6fbdbf 0%, #92cdcf 100%); background: linear-gradient(to bottom, #6fbdbf 0%, #92cdcf 100%); border: 1px solid #5db5b8; box-shadow: 0px 4px 0px 0px #5db5b8, 0px 5px 12px 0px rgba(0, 0, 0, 0.6), inset 0px 0px 10px -5px #000000; } .s3-btn2:hover { background: -webkit-linear-gradient(top, #6fbdbf 0%, #80c5c7 100%); background: linear-gradient(to bottom, #6fbdbf 0%, #80c5c7 100%); } .s3-btn2:hover:active { border: none !important; top: 4px; box-shadow: 0px 2px 0px 0px #5db5b8, 0px 5px 12px 0px rgba(0, 0, 0, 0.6), inset 0px 0px 10px -5px #000000; } .s3-btn3 { color: #ffffff; background: -webkit-linear-gradient(top, #a8e427 0%, #baea54 100%); background: linear-gradient(to bottom, #a8e427 0%, #baea54 100%); border: 1px solid #9bd71a; box-shadow: 0px 4px 0px 0px #9bd71a, 0px 5px 12px 0px rgba(0, 0, 0, 0.6), inset 0px 0px 10px -5px #000000; } .s3-btn3:hover { background: -webkit-linear-gradient(top, #a8e427 0%, #b1e73d 100%); background: linear-gradient(to bottom, #a8e427 0%, #b1e73d 100%); } .s3-btn3:hover:active { border: none !important; top: 4px; box-shadow: 0px 2px 0px 0px #9bd71a, 0px 5px 12px 0px rgba(0, 0, 0, 0.6), inset 0px 0px 10px -5px #000000; } .s3-btn4 { color: #ffffff; background: -webkit-linear-gradient(top, #70df9e 0%, #9ae8ba 100%); background: linear-gradient(to bottom, #70df9e 0%, #9ae8ba 100%); border: 1px solid #5cda8f; box-shadow: 0px 4px 0px 0px #5cda8f, 0px 5px 12px 0px rgba(0, 0, 0, 0.6), inset 0px 0px 10px -5px #000000; } .s3-btn4:hover { background: -webkit-linear-gradient(top, #70df9e 0%, #85e3ac 100%); background: linear-gradient(to bottom, #70df9e 0%, #85e3ac 100%); } .s3-btn4:hover:active { border: none !important; top: 4px; box-shadow: 0px 2px 0px 0px #5cda8f, 0px 5px 12px 0px rgba(0, 0, 0, 0.6), inset 0px 0px 10px -5px #000000; } .s3-btn5 { color: #ffffff; background: -webkit-linear-gradient(top, #161616 0%, #2f2f2f 100%); background: linear-gradient(to bottom, #161616 0%, #2f2f2f 100%); border: 1px solid #090909; box-shadow: 0px 4px 0px 0px #090909, 0px 5px 12px 0px rgba(0, 0, 0, 0.6), inset 0px 0px 10px -5px #000000; } .s3-btn5:hover { background: -webkit-linear-gradient(top, #161616 0%, #222222 100%); background: linear-gradient(to bottom, #161616 0%, #222222 100%); } .s3-btn5:hover:active { border: none !important; top: 4px; box-shadow: 0px 2px 0px 0px #090909, 0px 5px 12px 0px rgba(0, 0, 0, 0.6), inset 0px 0px 10px -5px #000000; }

Hot AI Tools

Undresser.AI Undress
AI-powered app for creating realistic nude photos

AI Clothes Remover
Online AI tool for removing clothes from photos.

Undress AI Tool
Undress images for free

Clothoff.io
AI clothes remover

Video Face Swap
Swap faces in any video effortlessly with our completely free AI face swap tool!

Hot Article
Hot Tools

Notepad++7.3.1
Easy-to-use and free code editor

SublimeText3 Chinese version
Chinese version, very easy to use

Zend Studio 13.0.1
Powerful PHP integrated development environment

Dreamweaver CS6
Visual web development tools

SublimeText3 Mac version
God-level code editing software (SublimeText3)
Hot Topics


 5 Ways to Disable Delivery Optimization Service in Windows
May 17, 2023 am 09:31 AM
5 Ways to Disable Delivery Optimization Service in Windows
May 17, 2023 am 09:31 AM
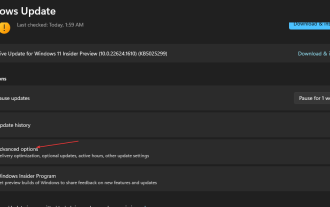
There are many reasons why you might want to disable the Delivery Optimization service on your Windows computer. However, our readers complained about not knowing the correct steps to follow. This guide discusses how to disable the Delivery Optimization service in a few steps. To learn more about services, you may want to check out our How to open services.msc guide for more information. What does Delivery Optimization Service do? Delivery Optimization Service is an HTTP downloader with cloud hosting solution. It allows Windows devices to download Windows updates, upgrades, applications and other large package files from alternative sources. Additionally, it helps reduce bandwidth consumption by allowing multiple devices in a deployment to download these packages. In addition, Windo
 Why is Gaussian Splatting so popular in autonomous driving that NeRF is starting to be abandoned?
Jan 17, 2024 pm 02:57 PM
Why is Gaussian Splatting so popular in autonomous driving that NeRF is starting to be abandoned?
Jan 17, 2024 pm 02:57 PM
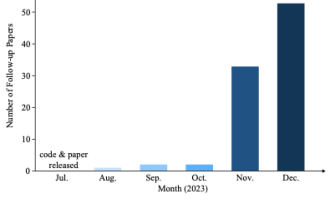
Written above & the author’s personal understanding Three-dimensional Gaussiansplatting (3DGS) is a transformative technology that has emerged in the fields of explicit radiation fields and computer graphics in recent years. This innovative method is characterized by the use of millions of 3D Gaussians, which is very different from the neural radiation field (NeRF) method, which mainly uses an implicit coordinate-based model to map spatial coordinates to pixel values. With its explicit scene representation and differentiable rendering algorithms, 3DGS not only guarantees real-time rendering capabilities, but also introduces an unprecedented level of control and scene editing. This positions 3DGS as a potential game-changer for next-generation 3D reconstruction and representation. To this end, we provide a systematic overview of the latest developments and concerns in the field of 3DGS for the first time.
 After rewriting:
How to Fix PS5 Controller Not Recognized on Windows 11
May 09, 2023 pm 10:16 PM
After rewriting:
How to Fix PS5 Controller Not Recognized on Windows 11
May 09, 2023 pm 10:16 PM
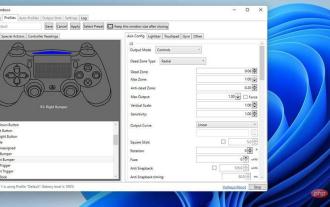
<h3>What should I know about connecting my PS5 controller? </h3><p>As good as the DualSense controller is, there have been reports of the controller not connecting or not being detected. The easiest way to solve this problem is to connect the controller to your PC using an appropriate USB cable. </p><p>Some games natively support DualSense. In these cases, you can simply plug in the controller. But this raises other questions, like what if you don't have a USB cable or don't want to use one
 Choose camera or lidar? A recent review on achieving robust 3D object detection
Jan 26, 2024 am 11:18 AM
Choose camera or lidar? A recent review on achieving robust 3D object detection
Jan 26, 2024 am 11:18 AM
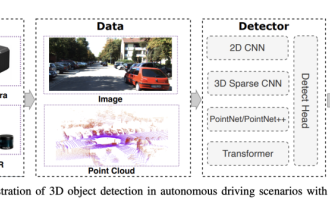
0.Written in front&& Personal understanding that autonomous driving systems rely on advanced perception, decision-making and control technologies, by using various sensors (such as cameras, lidar, radar, etc.) to perceive the surrounding environment, and using algorithms and models for real-time analysis and decision-making. This enables vehicles to recognize road signs, detect and track other vehicles, predict pedestrian behavior, etc., thereby safely operating and adapting to complex traffic environments. This technology is currently attracting widespread attention and is considered an important development area in the future of transportation. one. But what makes autonomous driving difficult is figuring out how to make the car understand what's going on around it. This requires that the three-dimensional object detection algorithm in the autonomous driving system can accurately perceive and describe objects in the surrounding environment, including their locations,
![Change the power button action on Windows 11 [5 Tips]](https://img.php.cn/upload/article/000/887/227/169600135086895.png?x-oss-process=image/resize,m_fill,h_207,w_330) Change the power button action on Windows 11 [5 Tips]
Sep 29, 2023 pm 11:29 PM
Change the power button action on Windows 11 [5 Tips]
Sep 29, 2023 pm 11:29 PM
The power button can do more than shut down your PC, although this is the default action for desktop users. If you want to change the power button action in Windows 11, it's easier than you think! Keep in mind that the physical power button is different from the button in the Start menu, and the changes below won't affect the operation of the latter. Additionally, you'll find slightly different power options depending on whether it's a desktop or laptop. Why should you change the power button action in Windows 11? If you put your computer to sleep more often than you shut it down, changing the way your hardware power button (that is, the physical power button on your PC) behaves will do the trick. The same idea applies to sleep mode or simply turning off the display. Change Windows 11
 CLIP-BEVFormer: Explicitly supervise the BEVFormer structure to improve long-tail detection performance
Mar 26, 2024 pm 12:41 PM
CLIP-BEVFormer: Explicitly supervise the BEVFormer structure to improve long-tail detection performance
Mar 26, 2024 pm 12:41 PM
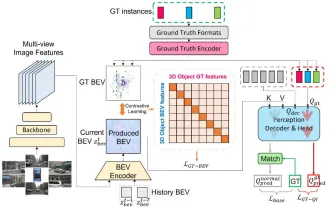
Written above & the author’s personal understanding: At present, in the entire autonomous driving system, the perception module plays a vital role. The autonomous vehicle driving on the road can only obtain accurate perception results through the perception module. The downstream regulation and control module in the autonomous driving system makes timely and correct judgments and behavioral decisions. Currently, cars with autonomous driving functions are usually equipped with a variety of data information sensors including surround-view camera sensors, lidar sensors, and millimeter-wave radar sensors to collect information in different modalities to achieve accurate perception tasks. The BEV perception algorithm based on pure vision is favored by the industry because of its low hardware cost and easy deployment, and its output results can be easily applied to various downstream tasks.
 How to reset your Xbox Series S or X controller
Jun 03, 2023 pm 08:19 PM
How to reset your Xbox Series S or X controller
Jun 03, 2023 pm 08:19 PM
The Xbox gaming console is a favorite among gamers. With the new SeriesX and SeriesS, gaming is almost a lifelike experience. The Xbox controller is your primary tool for experiencing gaming effects. Sometimes the controller connection gets cut off or some errors are encountered while trying to connect the controller to the main console. This may be due to various issues related to pairing. This can be overcome with a few simple steps. Reset your Xbox Series S or Xbox Series X controller Step 1: Press and hold the Xbox button on your controller for a few seconds to turn off the controller. Step 2: On the screen, go to Turn off controller and press button A to select that option. NOTE: If you keep pressing X
 How to use Vue to implement button countdown effects
Sep 21, 2023 pm 02:03 PM
How to use Vue to implement button countdown effects
Sep 21, 2023 pm 02:03 PM
How to use Vue to implement button countdown effects With the increasing popularity of web applications, we often need to use some dynamic effects to improve user experience when users interact with the page. Among them, the countdown effect of the button is a very common and practical effect. This article will introduce how to use the Vue framework to implement button countdown effects and give specific code examples. First, we need to create a Vue component that contains a button and countdown function. In Vue, a component is a reusable Vue instance, and a view will
