Summary of css margin properties and usage
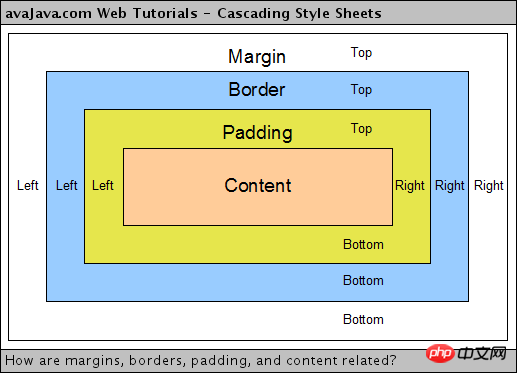
The white space surrounding the element's border is the margin. Setting margins creates additional "white space" outside the element. The simplest way to set margins is to use the margin attribute. The margin attribute accepts any length unit, which can be pixels, inches, millimeters or ems, percentage values or even negative values. Next, this article will talk about the properties and use of margins in detail, the overlap and superposition of margins, and the role of negative margins.
1. Introduction to the margin attribute of CSS
1.Detailed explanation of CSS The margin attribute uses

## The default value of margin is 0, So if a value is not declared for margin, no margin will appear. However, in practice, browsers already provide predetermined styles for many elements, and margins are no exception. For example, in browsers that support CSS, margins create "empty lines" above and below each paragraph element. Therefore, if no margin is declared for the p element, the browser may apply one on its own. Of course, as long as you specifically declare it, the default style will be overridden.
2. Detailed explanation of the use of css outer margin

If all four parameter values are provided, the four sides will be applied in the order of upper, right, lower, and left. If only one is provided, it will be used on all four sides. If two are provided, the first is used for up and down, the second for left and right. If three are provided, the first is used for top, the second for left and right, and the third for bottom. Non-Replaced inline elements can use this attribute to set outer patches on the left and right sides; to set outer patches on the top and bottom sides, the object must first be rendered as block level or inline block level. Extended margins are always transparent.
3. Margin Property Knowledge Collection Introduction to Important CSS Properties
2) Elements for which margin cannot be applied
3) Collapsing margins
4) Collapsing margins solution
## 2. The margins overlap or Overlay problem1.
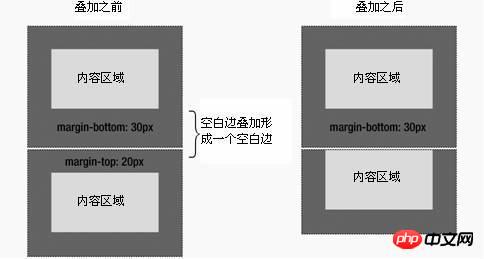
Introduction to the solution to the margin boundary overlay problem in CSS (picture and text) #Boundary overlay is a fairly simple concept. However, it can cause a lot of confusion when laying out web pages in practice. Simply put, when two vertical boundaries meet, they form a boundary. The height of this boundary is equal to the greater of the heights of the two superimposed boundaries.
2.
CSS margin overlap and prevention methodsBorder overlap refers to two or more The adjacent borders of two boxes (which may be adjacent or nested) (without any non-empty content, padding, or borders between them) overlap to form a single border.
The vertically adjacent boundaries of two or more block-level boxes will overlap. The resulting border width is the largest of adjacent border widths. If a negative boundary occurs, the negative boundary with the largest absolute value is subtracted from the largest positive boundary. If there are no positive boundaries, the negative boundary with the largest absolute value is subtracted from zero. Note: Adjacent boxes may not be generated by elements with parent-child or sibling relationships.
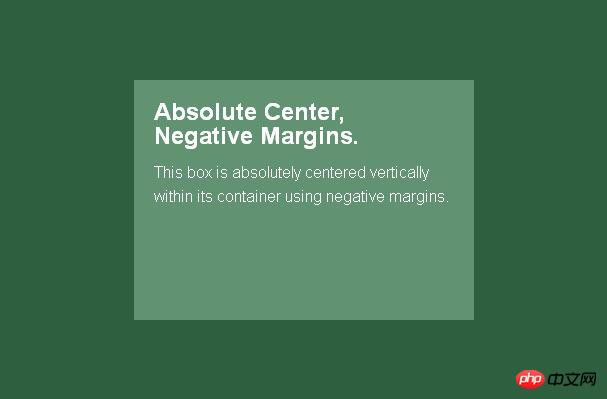
1. Briefly talk about the role of negative margin values We all use margin in CSS, but if margin is set to a negative number, then It may not be easy to handle. Negative margin values are not a hack. Negative margin values follow the document flow. If you use negative margin values to move an element upward, related elements will also be displaced accordingly. Negative margin values are well compatible with various browsers. . 2. Use negative margin values in CSS to adjust the center position This is perhaps the most commonly used centering method. If you know the size of each element, set a negative margin value equal to half the width and height (if you do not use the box-sizing: border-box style, you also need to add a padding value), and then match top: 50%; left: 50% ; style will center the block element. ##Related questions and answers about CSSmargin Front-end-Margin problem, that old man can help me explain it Front-end-CSS three-column equal-height layout question Margin negative compensation css - Why should negative margin values be designed like this? 1. CSS Centering: The Most Comprehensive Collection of CSS Centering Methods2. Centering: The Most Comprehensive Collection p Centering method summary3. css image centering: css image centering up, down, left, right (horizontally and vertically centered)
3. The effect of negative margin
##[Related recommendations]
The above is the detailed content of Summary of css margin properties and usage. For more information, please follow other related articles on the PHP Chinese website!

Hot AI Tools

Undresser.AI Undress
AI-powered app for creating realistic nude photos

AI Clothes Remover
Online AI tool for removing clothes from photos.

Undress AI Tool
Undress images for free

Clothoff.io
AI clothes remover

Video Face Swap
Swap faces in any video effortlessly with our completely free AI face swap tool!

Hot Article

Hot Tools

Notepad++7.3.1
Easy-to-use and free code editor

SublimeText3 Chinese version
Chinese version, very easy to use

Zend Studio 13.0.1
Powerful PHP integrated development environment

Dreamweaver CS6
Visual web development tools

SublimeText3 Mac version
God-level code editing software (SublimeText3)

Hot Topics
 How to use bootstrap in vue
Apr 07, 2025 pm 11:33 PM
Using Bootstrap in Vue.js is divided into five steps: Install Bootstrap. Import Bootstrap in main.js. Use the Bootstrap component directly in the template. Optional: Custom style. Optional: Use plug-ins.
 The Roles of HTML, CSS, and JavaScript: Core Responsibilities
Apr 08, 2025 pm 07:05 PM
HTML defines the web structure, CSS is responsible for style and layout, and JavaScript gives dynamic interaction. The three perform their duties in web development and jointly build a colorful website.
 Understanding HTML, CSS, and JavaScript: A Beginner's Guide
Apr 12, 2025 am 12:02 AM
WebdevelopmentreliesonHTML,CSS,andJavaScript:1)HTMLstructurescontent,2)CSSstylesit,and3)JavaScriptaddsinteractivity,formingthebasisofmodernwebexperiences.
 How to write split lines on bootstrap
Apr 07, 2025 pm 03:12 PM
There are two ways to create a Bootstrap split line: using the tag, which creates a horizontal split line. Use the CSS border property to create custom style split lines.
 How to insert pictures on bootstrap
Apr 07, 2025 pm 03:30 PM
There are several ways to insert images in Bootstrap: insert images directly, using the HTML img tag. With the Bootstrap image component, you can provide responsive images and more styles. Set the image size, use the img-fluid class to make the image adaptable. Set the border, using the img-bordered class. Set the rounded corners and use the img-rounded class. Set the shadow, use the shadow class. Resize and position the image, using CSS style. Using the background image, use the background-image CSS property.
 How to use bootstrap button
Apr 07, 2025 pm 03:09 PM
How to use the Bootstrap button? Introduce Bootstrap CSS to create button elements and add Bootstrap button class to add button text
 How to set up the framework for bootstrap
Apr 07, 2025 pm 03:27 PM
To set up the Bootstrap framework, you need to follow these steps: 1. Reference the Bootstrap file via CDN; 2. Download and host the file on your own server; 3. Include the Bootstrap file in HTML; 4. Compile Sass/Less as needed; 5. Import a custom file (optional). Once setup is complete, you can use Bootstrap's grid systems, components, and styles to create responsive websites and applications.
 How to resize bootstrap
Apr 07, 2025 pm 03:18 PM
To adjust the size of elements in Bootstrap, you can use the dimension class, which includes: adjusting width: .col-, .w-, .mw-adjust height: .h-, .min-h-, .max-h-


