

How to install Mint-UI in vue
Mint UI is a mobile component library based on Vue.js launched by the Ele.me front-end team. This article will introduce to you how to install and use Mint-UI in the vue project. Friends who need it can refer to it
1. Mint UI is a Vue.js-based mobile component library launched by the Ele.me front-end team. It has the following characteristics: Usage documentation:
http://mint-ui. github.io/#!/zh-cn
Mint UI contains rich CSS and JS components, which can meet daily mobile development needs. Through it, you can quickly build a page with a unified style and improve development efficiency.
True loading of components on demand. You can load only the declared components and their style files, without worrying about the file size being too large.
Taking into account the performance threshold of the mobile terminal, Mint UI uses CSS3 to handle various animations to avoid unnecessary redrawing and rearrangement of the browser, so that users can get a smooth experience. experience.
Relying on Vue.js’ efficient componentization solution, Mint UI is lightweight. Even if all are imported, the compressed file size is only ~30kb (JS CSS) gzip.
2. First create a vue project, refer to the previous article //www.jb51.net/article/131600.htm
3. Then install Mint UI :
npm i mint-ui --save
Four. Then you need to introduce Mint UI. There are two situations:
1. Introduce all components
If the project will use more of Mint UI Components, the easiest way is to import them all. At this time, it needs to be in the entry file main.js:
import Mint from 'mint-ui';
Vue.use(Mint);
import 'mint-ui/lib/style.css';
2. Introduce
on demand If you only need to use a certain component, you can only introduce this component. Mint UI can ensure that the code is When packaging, files unrelated to this component will not appear in the final code. For example, if you need to introduce the Button component, in main.js:
import Button from 'mint-ui/lib/button';
import 'mint-ui/lib/button/style.css';
Vue.component(Button.name, Button);
The above two introduction methods must separately introduce the corresponding CSS file. This is inconvenient, especially when you use the on-demand import method to introduce multiple components.
5. In order to avoid this problem, you can use the babel-plugin-component plug-in.
1. First of all, of course, install it:
npm i babel-plugin-component -D
2. Then configure it in .babelrc:
{
 "presets": [
 ["env", {
  "modules": false,
  "targets": {
  "browsers": ["> 1%", "last 2 versions", "not ie <= 8"]
  }
 }],
 "stage-2"
 ],
 "plugins": ["transform-runtime",["component",[
   {"libraryName":"mint-ui","style":true}
  ]]],
 "env": {
 "test": {
  "presets": ["env", "stage-2"],
  "plugins": ["istanbul"]
 }
 }
}3. In this way, the above two import methods can be simplified to :
//import Mint from 'mint-ui';
//Vue.use(Mint);
//import 'mint-ui/lib/style.css'; //不需要手动导入mint-ui样式
import Button from 'mint-ui/lib/button';
Vue.component(Button.name, Button);

import { Swipe, SwipeItem } from 'mint-ui'; //按需引入部分组件
Vue.component(Swipe.name, Swipe);
Vue.component(SwipeItem.name, SwipeItem);The previously installed plug-in will automatically import the corresponding CSS file!
6. Specific use of UI components - you can directly refer to the official documentation http://mint-ui.github.io/docs/
During the use process, I found that the Mint UI documentation is not very detailed. , many specific usages require additional Baidu...
1. First, look at the first introduction and usage of the official document:
When this kind of component is introduced, there is a line Vue.component ("corresponding component name"). When used, it is in the template part of the vue document, using the corresponding tag name and adding attributes. In fact, it is directly copying the official document. The code is enough, but relatively complex multi-attribute components require another Baidu.
Then let’s take a look at the code used in the project:
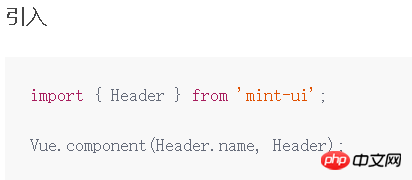
//在main.js里面添加--复制官方文档该组件对应的引入即可
import { Header } from 'mint-ui';
Vue.component(Header.name, Header);
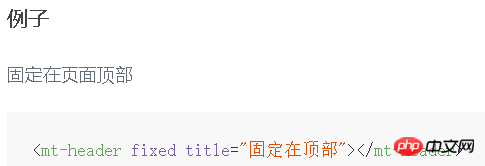
<template>
<mt-header title="修改客户资料">
<a @click="toBack" replace slot="left">
<a class="back-icon"></a>
</a>
<!--这个头部导航栏关键的是mt-header父标签,而该标签内的内容是根据需求写的哦-->
</mt-header>
</template> Component Rendering
2. Then look at the second introduction and usage of the official website document:
We can see when this component is introduced , there is no Vue.component ("corresponding component name"), and then look at the basic usage, it is as simple as this...
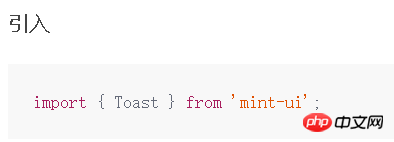
I refer to the first method and introduce it directly Toast component of the document, and then use it in script, an error will be reported at this time:
//提示框
import { Toast } from 'mint-ui';
created:function(){
 Toast("使用Toast"); //这里是为了测试才写在created里面,在平时用的时候,是根据自己需要放在对应的位置使用的
}
After searching on Baidu, it seems that many people have encountered this problem like me.. ....
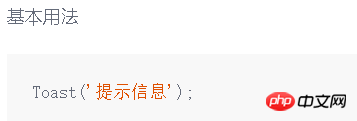
In fact, if we look at the usage statement of Toast, we can know that Toast is a method. Since it is a method, if it is used directly in js without being defined, an error will be reported, so when we introduce the component , set this method as a global variable:
//在main.js里面添加,这里需要将Toast方法设置为全局变量,否则就要在每个用到该方法的vue页面重新引入该组件....
import { Toast } from 'mint-ui';
window.Toast= Toast;After setting it, no more errors will be reported. Take a look at the component on the page again:
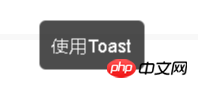
Component renderings
The above is what I compiled for everyone. I hope it will be helpful to everyone in the future.
Related articles:
Using JS to implement image changing clock (detailed tutorial)
Implementing DOM attribute binding in Angular4
Using JS to calculate the problem of buying 100 chickens
How to do it in Angular4 Implement HTML attribute binding
The above is the detailed content of How to install Mint-UI in vue. For more information, please follow other related articles on the PHP Chinese website!

Hot AI Tools

Undresser.AI Undress
AI-powered app for creating realistic nude photos

AI Clothes Remover
Online AI tool for removing clothes from photos.

Undress AI Tool
Undress images for free

Clothoff.io
AI clothes remover

Video Face Swap
Swap faces in any video effortlessly with our completely free AI face swap tool!

Hot Article
Hot Tools

Notepad++7.3.1
Easy-to-use and free code editor

SublimeText3 Chinese version
Chinese version, very easy to use

Zend Studio 13.0.1
Powerful PHP integrated development environment

Dreamweaver CS6
Visual web development tools

SublimeText3 Mac version
God-level code editing software (SublimeText3)
Hot Topics


 How to use bootstrap in vue
Apr 07, 2025 pm 11:33 PM
How to use bootstrap in vue
Apr 07, 2025 pm 11:33 PM
Using Bootstrap in Vue.js is divided into five steps: Install Bootstrap. Import Bootstrap in main.js. Use the Bootstrap component directly in the template. Optional: Custom style. Optional: Use plug-ins.
 How to add functions to buttons for vue
Apr 08, 2025 am 08:51 AM
How to add functions to buttons for vue
Apr 08, 2025 am 08:51 AM
You can add a function to the Vue button by binding the button in the HTML template to a method. Define the method and write function logic in the Vue instance.
 How to use watch in vue
Apr 07, 2025 pm 11:36 PM
How to use watch in vue
Apr 07, 2025 pm 11:36 PM
The watch option in Vue.js allows developers to listen for changes in specific data. When the data changes, watch triggers a callback function to perform update views or other tasks. Its configuration options include immediate, which specifies whether to execute a callback immediately, and deep, which specifies whether to recursively listen to changes to objects or arrays.
 What does vue multi-page development mean?
Apr 07, 2025 pm 11:57 PM
What does vue multi-page development mean?
Apr 07, 2025 pm 11:57 PM
Vue multi-page development is a way to build applications using the Vue.js framework, where the application is divided into separate pages: Code Maintenance: Splitting the application into multiple pages can make the code easier to manage and maintain. Modularity: Each page can be used as a separate module for easy reuse and replacement. Simple routing: Navigation between pages can be managed through simple routing configuration. SEO Optimization: Each page has its own URL, which helps SEO.
 How to reference js file with vue.js
Apr 07, 2025 pm 11:27 PM
How to reference js file with vue.js
Apr 07, 2025 pm 11:27 PM
There are three ways to refer to JS files in Vue.js: directly specify the path using the <script> tag;; dynamic import using the mounted() lifecycle hook; and importing through the Vuex state management library.
 How to return to previous page by vue
Apr 07, 2025 pm 11:30 PM
How to return to previous page by vue
Apr 07, 2025 pm 11:30 PM
Vue.js has four methods to return to the previous page: $router.go(-1)$router.back() uses <router-link to="/" component window.history.back(), and the method selection depends on the scene.
 How to use vue traversal
Apr 07, 2025 pm 11:48 PM
How to use vue traversal
Apr 07, 2025 pm 11:48 PM
There are three common methods for Vue.js to traverse arrays and objects: the v-for directive is used to traverse each element and render templates; the v-bind directive can be used with v-for to dynamically set attribute values for each element; and the .map method can convert array elements into new arrays.
 How to jump to the div of vue
Apr 08, 2025 am 09:18 AM
How to jump to the div of vue
Apr 08, 2025 am 09:18 AM
There are two ways to jump div elements in Vue: use Vue Router and add router-link component. Add the @click event listener and call this.$router.push() method to jump.
