
 Web Front-end
JS Tutorial
How to implement the login and registration function using node.js and other technologies?
Web Front-end
JS Tutorial
How to implement the login and registration function using node.js and other technologies?
How to implement the login and registration function using node.js and other technologies?
This article mainly introduces node.js express mySQL ejs bootstrop to implement the website login and registration function. It is very good and has reference value. Friends in need can refer to it
Comrades, after unremitting efforts, After checking various documents, I finally came up with a slightly decent node project. Of course, if you use it directly in the project, this demo is too simple. After all, a complete login registration has a lot of practical content. In this case, mySQL In the user list, for ease of understanding, only two fields, username and password, are set. For normal login and registration, there will definitely be more fields. But for those who are new to node, such as the author, I still learned a lot. Even nervously, I didn’t know what to write as follows. I must have made reference to many other teenagers’ blogs on the Internet. In the future, the login and registration demo will be based on the needs of the project. Improved,
The effect is as follows
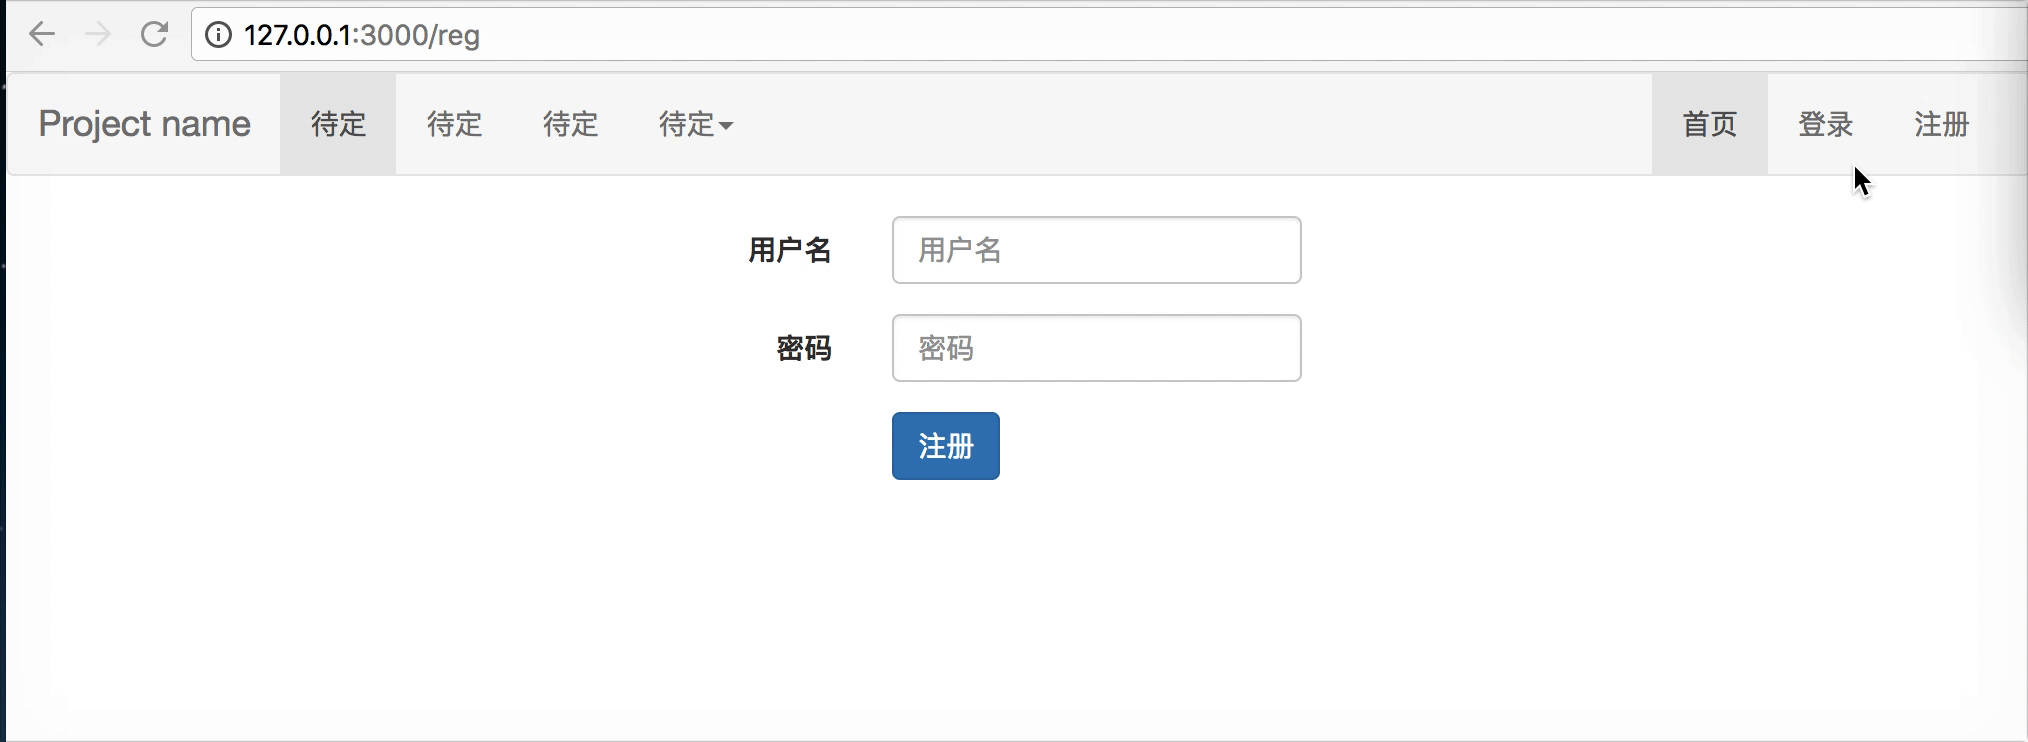
Effect.gif
Project structure
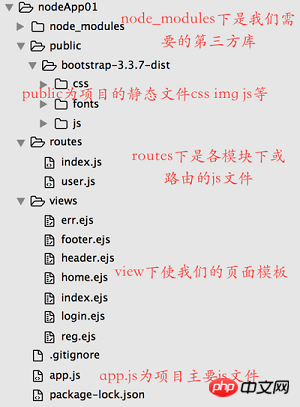
Main entrance app.js
app.js is the main entrance to the program. It is generally used to write the middleware and various settings we introduce.
var express = require('express');
// NodeJS中的Path对象,用于处理目录的对象,提高开发效率
var path = require('path');
// 用来定义网页logo的中间件
var favicon = require('serve-favicon');
// NodeJs中Express框架使用morgan中间件记录日志
// Express中的app.js文件已经默认引入了该中间件var logger = require('morgan');
// 使用app.use(logger('dev'));以将请求信息打印在控制台,便于开发调试,
// 但实际生产环境中,需要将日志记录在log文件里
var logger = require('morgan');
// 存储登录信息中间件
var cookieParser = require('cookie-parser');
// 解析请求体的中间件
var bodyParser = require('body-parser');
// 引入模块的js文件
var routes = require('./routes/index');
// var users = require('./routes/user');
// 引入session中间件
var session=require('express-session');
// 创建项目示例
var app = express();
// 引入我们需要的模板
app.set('views', path.join(__dirname, 'views'));
app.set('view engine', 'ejs');
// 用摩记录请求
app.use(logger('dev'));
app.use(bodyParser.json());
app.use(bodyParser.urlencoded({ extended: false }));
// 利用cookieParser中间件存取信息
app.use(cookieParser("Luck"));
// 利用session中间件存取信息
app.use(session({
  secret:'luck',
  resave:false,
  saveUninitialized:true
}));
// 静态化我们的public文件下的文件,使其可以直接引用
app.use(express.static(path.join(__dirname, 'public')));
app.use('/', routes);
// app.use('/users', users);
// 捕捉404状态
app.use(function(req, res, next) {
  var err = new Error('Not Found');
  err.status = 404;
  next(err);
});
module.exports = app;
app.listen(3000,'127.0.0.1')
routes下的index.js文件
index.js这里我用来处理页面的路由跳转
var express = require('express');
var router = express.Router();
// 为数据库链接的js文件,可查询数据库中的用户名和密码等信息
var usr=require('netRequest/dbConnect');
// 获取首页登录信息
router.get('/', function(req, res) {
  if(req.cookies.islogin){
    req.session.islogin=req.cookies.islogin;
  }
  if(req.session.islogin){
    res.locals.islogin=req.session.islogin;
  }
 res.render('index', { title: 'HOME',test:res.locals.islogin});
});
// 登录页处理
router.route('/login')
  // get请求渲染页面
  .get(function(req, res) {
    if(req.session.islogin){
      res.locals.islogin=req.session.islogin;
    }
    if(req.cookies.islogin){
      req.session.islogin=req.cookies.islogin;
    }
    res.render('login', { title: '用户登录' ,test:res.locals.islogin});
  })
  // post请求查询用户信息
  .post(function(req, res) {
    client=usr.connect();
    result=null;
    // 调用数据库方法
    usr.selectFun(client, req.body.username, function (result) {
      if(result[0]===undefined){
        res.send('没有该用户');
      }else{
        if(result[0].password==req.body.password){
          req.session.islogin=req.body.username;
          res.locals.islogin=req.session.islogin;
          res.cookie('islogin',res.locals.islogin,{maxAge:60000});
          res.redirect('/home');
        }else{
          res.redirect('/login');
        }
      }
    });
  });
// 退出登录页处理
router.get('/logout', function(req, res) {
  res.clearCookie('islogin');
  req.session.destroy();
  res.redirect('/');
});
// home页处理
router.get('/home', function(req, res) {
  if(req.session.islogin){
    res.locals.islogin=req.session.islogin;
  }
  if(req.cookies.islogin){
    req.session.islogin=req.cookies.islogin;
  }
  res.render('home', { title: 'Home', user: res.locals.islogin });
});
// 注册页处理
router.route('/reg')
  // get请求渲染页面
  .get(function(req,res){
    res.render('reg',{title:'注册'});
  })
  // post请求注册用户
  .post(function(req,res) {
    client = usr.connect();
    // 调用数据库方法
    usr.insertFun(client,req.body.username ,req.body.password2, function (err) {
       if(err) throw err;
       res.send('注册成功');
    });
  });
module.exports = router;
node_modules中netRequest/dbConnect.jsdbConnect.js
var mysql=require('mysql');
// 现在只是练习可以直接为数据库创建链接,
// 用户多时需要创建连接池
function connectServer(){
  var client=mysql.createConnection({
    host:'172.16.20.103',
    port:3308,
    database:'test',
    user:'JRJ_Win',
    password:'FT%^$fjYR56'
  })
  return client;
}
function selectFun(client,username,callback){
  client.query('select password from win.luck_user where username="'+username+'"',function(err,results,fields){
    if(err) throw err;
    callback(results);
  });
}
function insertFun(client , username , password,callback){
  client.query('insert into win.luck_user value(?,?)', [username, password], function(err,result){
    if( err ){
      console.log( "error:" + err.message);
      return err;
    }
     callback(err);
  });
}
exports.connect = connectServer;
exports.selectFun = selectFun;
exports.insertFun = insertFun;The rest is the page template
login.ejs
<%- include header %>
<p class="container">
  <form class="col-sm-offset-4 col-sm-4 form-horizontal" role="form" method="post">
    <fieldset>
      <% if(locals.islogin) { %>
          <h3>用户: <%= test %>  已经登陆。<br></h3>
          <a class="btn" href="/logout" rel="external nofollow" > 退出登录 </a>
         <% } else{ %>
            <p class="form-group">
              <label class="col-sm-3 control-label" for="username">用户名</label>
              <p class="col-sm-9">
                <input type="text" class="form-control" id="username" name="username" placeholder="用户名" required>
              </p>
            </p>
            <p class="form-group">
              <label class="col-sm-3 control-label" for="password">密码</label>
              <p class="col-sm-9">
                <input type="password" class="form-control" id="password" name="password" placeholder="密码" required>
              </p>
            </p>
            <p class="form-group">
              <p class="col-sm-offset-3 col-sm-9">
                <button type="submit" class="btn btn-primary">登录</button>
              </p>
            </p>
      <% } %>
    </fieldset>
  </form>
</p>
<%- include footer %>index.ejs
<%- include header %>
<p class="jumbotron text-center">
  <% if(locals.islogin){%>
    <h2>用户:<%= test %> </h2>已经登陆
    <% }else{%>
      <h2 class="text-center"><a href="/login" rel="external nofollow" rel="external nofollow" >请登录后查看</a></h2>
  <%}%>
</p>
<%- include footer %>reg .ejs
<%- include header %>
<p class="container">
  <form class=" col-sm-offset-4 col-sm-4 form-horizontal" role="form" method="post">
    <fieldset>
      <p class="form-group">
        <label class="col-sm-3 control-label" for="username">用户名</label>
        <p class="col-sm-9">
          <input type="text" class="form-control" id="username" name="username" placeholder="用户名" required>
        </p>
      </p>
      <p class="form-group">
        <label class="col-sm-3 control-label" for="password2">密码</label>
        <p class="col-sm-9">
          <input type="password" class="form-control" id="password2" name="password2" placeholder="密码" required>
        </p>
      </p>
      <p class="form-group">
        <p class="col-sm-offset-3 col-sm-9">
          <button type="submit" class="btn btn-primary">注册</button>
        </p>
      </p>
    </fieldset>
  </form>
</p>
<%- include footer %>header.ejs
<!DOCTYPE html>
<html>
<head>
  <meta charset="UTF-8"/>
  <title>Test</title>
  <link rel="stylesheet" href="/bootstrap-3.3.7-dist/css/bootstrap.min.css" rel="external nofollow" >
  <script src="https://cdn.bootcss.com/jquery/1.12.4/jquery.min.js"></script>
  <script type="text/javascript" src="/bootstrap-3.3.7-dist/js/bootstrap.min.js"></script>
</head>
<body>
<!--  <header>
    <h1><%= title %></h1>
  </header> -->
  <nav class="navbar navbar-default">
    <p class="container-fluid">
      <p class="navbar-header">
        <button type="button" class="navbar-toggle collapsed" data-toggle="collapse" data-target="#navbar" aria-expanded="false" aria-controls="navbar">
          <span class="sr-only">Toggle navigation</span>
          <span class="icon-bar"></span>
          <span class="icon-bar"></span>
          <span class="icon-bar"></span>
        </button>
        <a class="navbar-brand" href="#" rel="external nofollow" rel="external nofollow" rel="external nofollow" rel="external nofollow" rel="external nofollow" rel="external nofollow" rel="external nofollow" rel="external nofollow" rel="external nofollow" rel="external nofollow" >Project name</a>
      </p>
      <p id="navbar" class="navbar-collapse collapse">
        <ul class="nav navbar-nav">
          <li class="active"><a href="#" rel="external nofollow" rel="external nofollow" rel="external nofollow" rel="external nofollow" rel="external nofollow" rel="external nofollow" rel="external nofollow" rel="external nofollow" rel="external nofollow" rel="external nofollow" >待定</a></li>
          <li><a href="#" rel="external nofollow" rel="external nofollow" rel="external nofollow" rel="external nofollow" rel="external nofollow" rel="external nofollow" rel="external nofollow" rel="external nofollow" rel="external nofollow" rel="external nofollow" >待定</a></li>
          <li><a href="#" rel="external nofollow" rel="external nofollow" rel="external nofollow" rel="external nofollow" rel="external nofollow" rel="external nofollow" rel="external nofollow" rel="external nofollow" rel="external nofollow" rel="external nofollow" >待定</a></li>
          <li class="dropdown">
            <a href="#" rel="external nofollow" rel="external nofollow" rel="external nofollow" rel="external nofollow" rel="external nofollow" rel="external nofollow" rel="external nofollow" rel="external nofollow" rel="external nofollow" rel="external nofollow" class="dropdown-toggle" data-toggle="dropdown" role="button" aria-haspopup="true" aria-expanded="false">待定<span class="caret"></span></a>
            <ul class="dropdown-menu">
              <li><a href="#" rel="external nofollow" rel="external nofollow" rel="external nofollow" rel="external nofollow" rel="external nofollow" rel="external nofollow" rel="external nofollow" rel="external nofollow" rel="external nofollow" rel="external nofollow" >Action</a></li>
              <li><a href="#" rel="external nofollow" rel="external nofollow" rel="external nofollow" rel="external nofollow" rel="external nofollow" rel="external nofollow" rel="external nofollow" rel="external nofollow" rel="external nofollow" rel="external nofollow" >Another action</a></li>
              <li><a href="#" rel="external nofollow" rel="external nofollow" rel="external nofollow" rel="external nofollow" rel="external nofollow" rel="external nofollow" rel="external nofollow" rel="external nofollow" rel="external nofollow" rel="external nofollow" >Something else here</a></li>
              <li role="separator" class="pider"></li>
              <li class="dropdown-header">Nav header</li>
              <li><a href="#" rel="external nofollow" rel="external nofollow" rel="external nofollow" rel="external nofollow" rel="external nofollow" rel="external nofollow" rel="external nofollow" rel="external nofollow" rel="external nofollow" rel="external nofollow" >Separated link</a></li>
              <li><a href="#" rel="external nofollow" rel="external nofollow" rel="external nofollow" rel="external nofollow" rel="external nofollow" rel="external nofollow" rel="external nofollow" rel="external nofollow" rel="external nofollow" rel="external nofollow" >One more separated link</a></li>
            </ul>
          </li>
        </ul>
        <ul class="nav navbar-nav navbar-right">
          <li class="active"><a title="主页" href="/" rel="external nofollow" >首页<span class="sr-only">(current)</span></a></li>
          <li><a title="登陆" href="/login" rel="external nofollow" rel="external nofollow" >登录</a></li>
          <li><a title="注册" href="/reg" rel="external nofollow" >注册</a></li>
        </ul>
      </p>
    </nav>
<article>footer.ejs
</article>
</body>
</html>
The main code of the project is here. If you want to understand it, it will probably take a while.
The above is what I compiled for everyone. I hope it will be helpful to everyone in the future.
Related articles:
How to fix the header and first column in Vue
How to use the image annotation component in jquery.picsign
How to package the koa2 framework app through webpack? What should I do?
Detailed interpretation of Vue component development ideas
Detailed interpretation of how to use components and their functions in Vue.js?
The above is the detailed content of How to implement the login and registration function using node.js and other technologies?. For more information, please follow other related articles on the PHP Chinese website!

Hot AI Tools

Undresser.AI Undress
AI-powered app for creating realistic nude photos

AI Clothes Remover
Online AI tool for removing clothes from photos.

Undress AI Tool
Undress images for free

Clothoff.io
AI clothes remover

Video Face Swap
Swap faces in any video effortlessly with our completely free AI face swap tool!

Hot Article
Hot Tools

Notepad++7.3.1
Easy-to-use and free code editor

SublimeText3 Chinese version
Chinese version, very easy to use

Zend Studio 13.0.1
Powerful PHP integrated development environment

Dreamweaver CS6
Visual web development tools

SublimeText3 Mac version
God-level code editing software (SublimeText3)
Hot Topics


 How to get the bootstrap search bar
Apr 07, 2025 pm 03:33 PM
How to get the bootstrap search bar
Apr 07, 2025 pm 03:33 PM
How to use Bootstrap to get the value of the search bar: Determines the ID or name of the search bar. Use JavaScript to get DOM elements. Gets the value of the element. Perform the required actions.
 How to use bootstrap in vue
Apr 07, 2025 pm 11:33 PM
How to use bootstrap in vue
Apr 07, 2025 pm 11:33 PM
Using Bootstrap in Vue.js is divided into five steps: Install Bootstrap. Import Bootstrap in main.js. Use the Bootstrap component directly in the template. Optional: Custom style. Optional: Use plug-ins.
 How to do vertical centering of bootstrap
Apr 07, 2025 pm 03:21 PM
How to do vertical centering of bootstrap
Apr 07, 2025 pm 03:21 PM
Use Bootstrap to implement vertical centering: flexbox method: Use the d-flex, justify-content-center, and align-items-center classes to place elements in the flexbox container. align-items-center class method: For browsers that do not support flexbox, use the align-items-center class, provided that the parent element has a defined height.
 How to write split lines on bootstrap
Apr 07, 2025 pm 03:12 PM
How to write split lines on bootstrap
Apr 07, 2025 pm 03:12 PM
There are two ways to create a Bootstrap split line: using the tag, which creates a horizontal split line. Use the CSS border property to create custom style split lines.
 How to set up the framework for bootstrap
Apr 07, 2025 pm 03:27 PM
How to set up the framework for bootstrap
Apr 07, 2025 pm 03:27 PM
To set up the Bootstrap framework, you need to follow these steps: 1. Reference the Bootstrap file via CDN; 2. Download and host the file on your own server; 3. Include the Bootstrap file in HTML; 4. Compile Sass/Less as needed; 5. Import a custom file (optional). Once setup is complete, you can use Bootstrap's grid systems, components, and styles to create responsive websites and applications.
 How to insert pictures on bootstrap
Apr 07, 2025 pm 03:30 PM
How to insert pictures on bootstrap
Apr 07, 2025 pm 03:30 PM
There are several ways to insert images in Bootstrap: insert images directly, using the HTML img tag. With the Bootstrap image component, you can provide responsive images and more styles. Set the image size, use the img-fluid class to make the image adaptable. Set the border, using the img-bordered class. Set the rounded corners and use the img-rounded class. Set the shadow, use the shadow class. Resize and position the image, using CSS style. Using the background image, use the background-image CSS property.
 How to use bootstrap button
Apr 07, 2025 pm 03:09 PM
How to use bootstrap button
Apr 07, 2025 pm 03:09 PM
How to use the Bootstrap button? Introduce Bootstrap CSS to create button elements and add Bootstrap button class to add button text
 How to resize bootstrap
Apr 07, 2025 pm 03:18 PM
How to resize bootstrap
Apr 07, 2025 pm 03:18 PM
To adjust the size of elements in Bootstrap, you can use the dimension class, which includes: adjusting width: .col-, .w-, .mw-adjust height: .h-, .min-h-, .max-h-
