
 Web Front-end
JS Tutorial
What are the steps to input the ngForOf template to the component using content projection through Angular?
Web Front-end
JS Tutorial
What are the steps to input the ngForOf template to the component using content projection through Angular?
What are the steps to input the ngForOf template to the component using content projection through Angular?
This article mainly introduces the method of Angular using content projection to input the ngForOf template into the component. Now I share it with you and give it as a reference.
Now, we write a component puppiesListCmp to display a list of puppies:
//puppies-list.component.ts
@Component({
 selector: 'puppies-list',
 template: `
  <p *ngFor="let puppy of puppies">
   <span>{{puppy.name}}</span>
   <span>{{puppy.age}}</span>
   <span>{{puppy.color}}</span>
  </p>
`
})
export class puppiesListCmp{
 @Input() puppies: Puppy[];
}
interface Puppy {
 name: string,
 age: number,
 color: string
}Then use it like this:
//app.component.ts
@Component({
 selector: 'my-app',
 template: `
  <puppies-list [puppies]="puppies"></puppies-list>
`
})
export class App{
 puppies = [
  {
   name: "sam",
   age: 0.6,
   color: "yellow"
  },
  {
   name: "bingo",
   age: 1.5,
   color: "black"
  }
 ]
}The effect will be like this:

However, I hope that our puppiesListCmp component can meet different needs , for example, only the name and color of the puppy are displayed when the data remains unchanged, like this:

This is the focus of this article. We need to implement user-defined templates!
Now we don’t hard-code the component template, but let the user input from the outside!
First, our component template:
<p *ngFor="let puppy of puppies">
   <span>{{puppy.name}}</span>
   <span>{{puppy.age}}</span>
   <span>{{puppy.color}}</span>
</p>is equivalent to:
<ng-template ngFor let-puppy [ngForOf]="puppies">
   <p>
    <span>{{puppy.name}}</span>
    <span>{{puppy.age}}</span>
    <span>{{puppy.color}}</span>
   </p>
</ng-template>Then, use @ContentChild (about @ContentChild, you can view it here, FQ is required ) obtains the external (relative to the puppiesListCmp component) custom template and assigns it to ngForTemplate. In other words, this part:
<p>
  <span>{{puppy.name}}</span>
  <span>{{puppy.age}}</span>
  <span>{{puppy.color}}</span>
</p>is no longer hard-coded in the component as before, but is customized by the user in the parent component. Then use Angular's Content Projection to project it into the puppiesListCmp component. Like this:
//puppies-list.component.ts
import { Component, Input, ContentChild, TemplateRef } from '@angular/core';
import { NgForOfContext } from '@angular/common';
@Component({
 selector: 'puppies-list',
 template: `
<ng-template ngFor let-puppy [ngForOf]="puppies" [ngForTemplate]="tpl"></ng-template>
`
})
export class puppiesListCmp{
 @Input() puppies: Puppy[];
 @ContentChild(TemplateRef) tpl: TemplateRef<NgForOfContext<Puppy>>
}
interface Puppy {
 name: string,
 age: number,
 color: string
}This way our component is complete. Then we use it:
//app.component.ts
@Component({
 selector: 'my-app',
 template: `
<puppies-list [puppies]="puppies">
 <ng-template let-puppy>
  <p>
   <span>{{puppy.name}}</span>
   <span>{{puppy.age}}</span>
   <span>{{puppy.color}}</span>
  </p>
 </ng-template>
</puppies-list>
`
})The effect is still the same:

If we just To display the puppy’s name and color, just write it like this:
//app.component.ts
@Component({
 selector: 'my-app',
 template: `
<puppies-list [puppies]="puppies">
 <ng-template let-puppy>
  <p>
   <span>{{puppy.name}}</span>
   <span>{{puppy.color}}</span>
  </p>
 </ng-template>
</puppies-list>
`
})The effect is like this:

Such components are very flexible and can be customized to whatever effect you want, which realizes the reuse of components.
The above is what I compiled for everyone. I hope it will be helpful to everyone in the future.
Related articles:
Detailed explanation of Angularjs Promise examples
Detailed explanation of five methods of JS exporting Excel
JavaScript implements the method of writing files to local
The above is the detailed content of What are the steps to input the ngForOf template to the component using content projection through Angular?. For more information, please follow other related articles on the PHP Chinese website!

Hot AI Tools

Undresser.AI Undress
AI-powered app for creating realistic nude photos

AI Clothes Remover
Online AI tool for removing clothes from photos.

Undress AI Tool
Undress images for free

Clothoff.io
AI clothes remover

Video Face Swap
Swap faces in any video effortlessly with our completely free AI face swap tool!

Hot Article
Hot Tools

Notepad++7.3.1
Easy-to-use and free code editor

SublimeText3 Chinese version
Chinese version, very easy to use

Zend Studio 13.0.1
Powerful PHP integrated development environment

Dreamweaver CS6
Visual web development tools

SublimeText3 Mac version
God-level code editing software (SublimeText3)
Hot Topics


 How to enable Sensitive Content Warning on iPhone and learn about its features
Sep 22, 2023 pm 12:41 PM
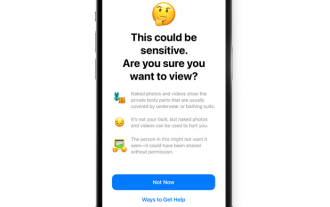
How to enable Sensitive Content Warning on iPhone and learn about its features
Sep 22, 2023 pm 12:41 PM
Especially over the past decade, mobile devices have become the primary way to share content with friends and family. The easy-to-access, easy-to-use interface and ability to capture images and videos in real time make it a great choice for creating and sharing content. However, it's easy for malicious users to abuse these tools to forward unwanted, sensitive content that may not be suitable for viewing and does not require your consent. To prevent this from happening, a new feature with "Sensitive Content Warning" was introduced in iOS17. Let's take a look at it and how to use it on your iPhone. What is the new Sensitive Content Warning and how does it work? As mentioned above, Sensitive Content Warning is a new privacy and security feature designed to help prevent users from viewing sensitive content, including iPhone
 How to change the Microsoft Edge browser to open with 360 navigation - How to change the opening with 360 navigation
Mar 04, 2024 pm 01:50 PM
How to change the Microsoft Edge browser to open with 360 navigation - How to change the opening with 360 navigation
Mar 04, 2024 pm 01:50 PM
How to change the page that opens the Microsoft Edge browser to 360 navigation? It is actually very simple, so now I will share with you the method of changing the page that opens the Microsoft Edge browser to 360 navigation. Friends in need can take a look. I hope Can help everyone. Open the Microsoft Edge browser. We see a page like the one below. Click the three-dot icon in the upper right corner. Click "Settings." Click "On startup" in the left column of the settings page. Click on the three points shown in the picture in the right column (do not click "Open New Tab"), then click Edit and change the URL to "0" (or other meaningless numbers). Then click "Save". Next, select "
 How to install Angular on Ubuntu 24.04
Mar 23, 2024 pm 12:20 PM
How to install Angular on Ubuntu 24.04
Mar 23, 2024 pm 12:20 PM
Angular.js is a freely accessible JavaScript platform for creating dynamic applications. It allows you to express various aspects of your application quickly and clearly by extending the syntax of HTML as a template language. Angular.js provides a range of tools to help you write, update and test your code. Additionally, it provides many features such as routing and form management. This guide will discuss how to install Angular on Ubuntu24. First, you need to install Node.js. Node.js is a JavaScript running environment based on the ChromeV8 engine that allows you to run JavaScript code on the server side. To be in Ub
 How to use PHP and Angular for front-end development
May 11, 2023 pm 04:04 PM
How to use PHP and Angular for front-end development
May 11, 2023 pm 04:04 PM
With the rapid development of the Internet, front-end development technology is also constantly improving and iterating. PHP and Angular are two technologies widely used in front-end development. PHP is a server-side scripting language that can handle tasks such as processing forms, generating dynamic pages, and managing access permissions. Angular is a JavaScript framework that can be used to develop single-page applications and build componentized web applications. This article will introduce how to use PHP and Angular for front-end development, and how to combine them
 An article exploring server-side rendering (SSR) in Angular
Dec 27, 2022 pm 07:24 PM
An article exploring server-side rendering (SSR) in Angular
Dec 27, 2022 pm 07:24 PM
Do you know Angular Universal? It can help the website provide better SEO support!
 A brief analysis of how to use monaco-editor in angular
Oct 17, 2022 pm 08:04 PM
A brief analysis of how to use monaco-editor in angular
Oct 17, 2022 pm 08:04 PM
How to use monaco-editor in angular? The following article records the use of monaco-editor in angular that was used in a recent business. I hope it will be helpful to everyone!
 A brief analysis of independent components in Angular and see how to use them
Jun 23, 2022 pm 03:49 PM
A brief analysis of independent components in Angular and see how to use them
Jun 23, 2022 pm 03:49 PM
This article will take you through the independent components in Angular, how to create an independent component in Angular, and how to import existing modules into the independent component. I hope it will be helpful to you!
 How to set up Cheat Engine in Chinese? Cheat Engine setting Chinese method
Mar 13, 2024 pm 04:49 PM
How to set up Cheat Engine in Chinese? Cheat Engine setting Chinese method
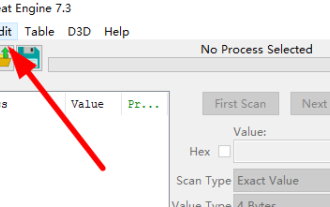
Mar 13, 2024 pm 04:49 PM
CheatEngine is a game editor that can edit and modify the game's memory. However, its default language is non-Chinese, which is inconvenient for many friends. So how to set Chinese in CheatEngine? Today, the editor will give you a detailed introduction to how to set up Chinese in CheatEngine. I hope it can help you. Setting method one: 1. Double-click to open the software and click "edit" in the upper left corner. 2. Then click “settings” in the option list below. 3. In the opened window interface, click "languages" in the left column
