

How to use routing guards in Angular routing
This article mainly introduces the detailed explanation of Angular routing route guard. The editor thinks it is quite good. Now I will share it with you and give it as a reference. Let’s follow the editor to take a look.
1. Route guard
Users are only allowed to enter or leave a route when they meet certain conditions.
Route guard scenario:
Only when the user logs in and has certain permissions, certain routes can be entered.
A wizard composed of multiple forms, such as a registration process. Users can navigate to the next route only if they fill in the required information in the components of the current route.
Remind the user when the user attempts to leave the current navigation without performing a save operation.
Angular provides some hooks to help control entering or leaving routes. These hooks are routing guards, and the above scenarios can be realized through these hooks.
CanActivate: Handles navigation to a route.
CanDeactivate: Handles departure from the current route.
Resolve: Get routing data before routing activation.
Some attributes are used when configuring routing, path, component, outlet, children, routing guards are also routing attributes.
2. CanActivate
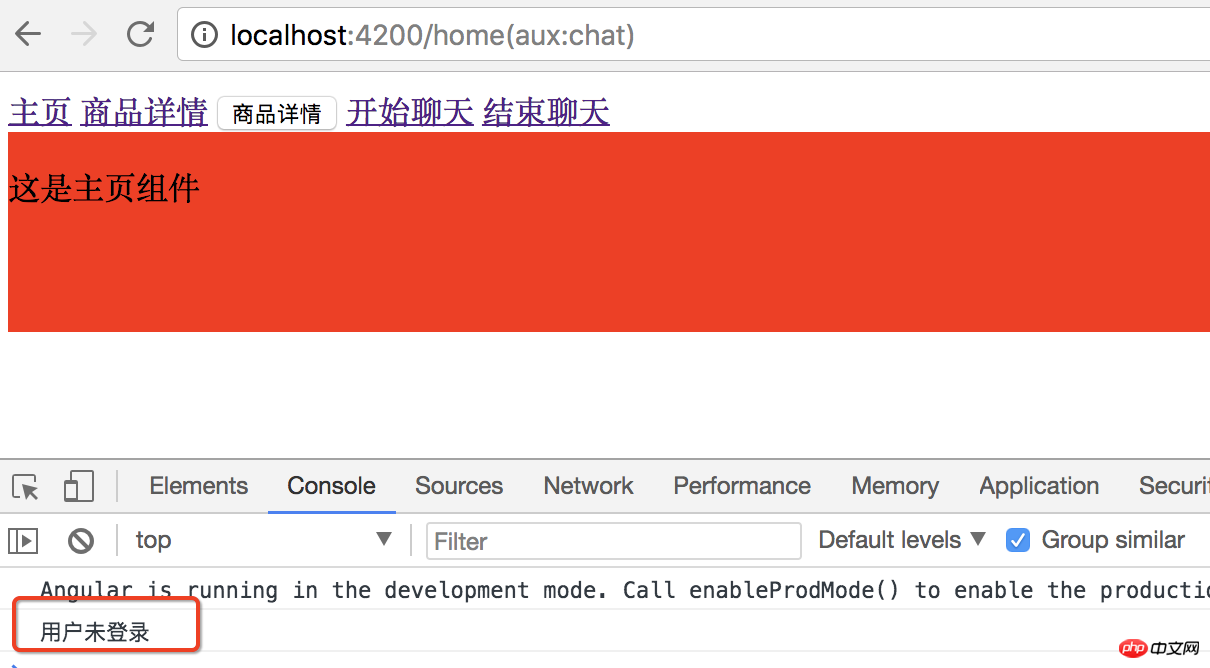
Example: Only allow logged-in users to enter product information routing.
Create a new guard directory. Create a new login.guard.ts in the directory.
The LoginGuard class implements the CanActivate interface and returns true or false. Angular determines whether the request passed or failed based on the return value.
import { CanActivate } from "@angular/router";
export class LoginGuard implements CanActivate{
  canActivate(){
    let loggedIn :boolean= Math.random()<0.5;
    if(!loggedIn){
      console.log("用户未登录");
    }
    return loggedIn;
  }
}Configure product routing. First add LoginGuard to providers and then specify the routing guard.
canActivate can specify multiple guards, and the value is an array.
const routes: Routes = [
 { path: '', redirectTo : 'home',pathMatch:'full' },
 { path: 'chat', component: ChatComponent, outlet: "aux"},//辅助路由
 { path: 'home', component: HomeComponent },
 { path: 'product/:id', component: ProductComponent, children:[
  { path: '', component : ProductDescComponent },
  { path: 'seller/:id', component : SellerInfoComponent }
 ] ,canActivate: [LoginGuard]},
 { path: '**', component: Code404Component }
];Effect: Click the Product details link console to remind the user that they are not logged in and cannot enter the product details route.
3. CanDeactivate
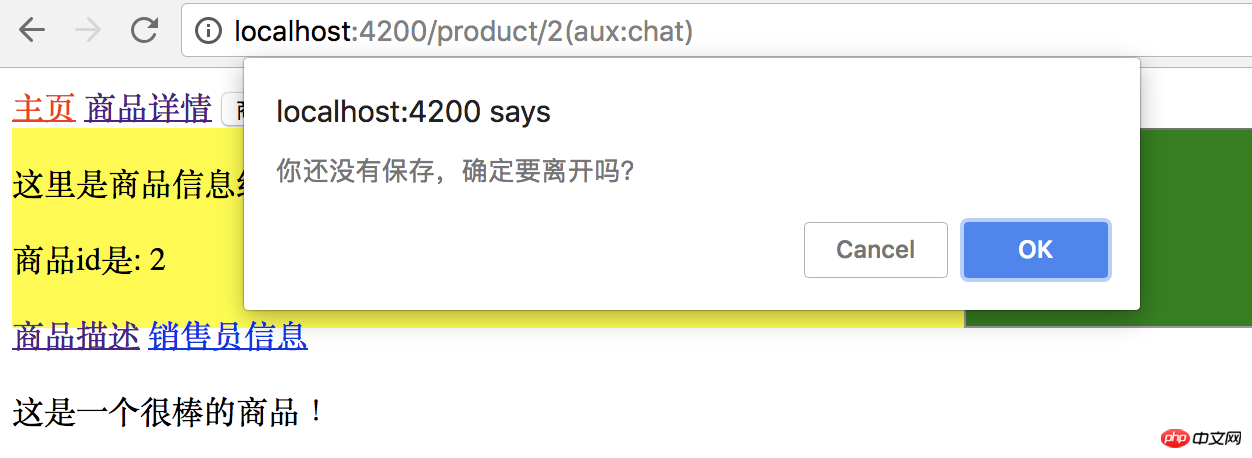
Route guard when leaving. Remind users to save before leaving.
Create a new unsave.guard.ts file in the guard directory.
The CanDeactivate interface has a generic type that specifies the type of the current component.
The first parameter of the CanDeactivate method is the component of the generic type specified by the interface. Based on the status of the component to be protected, or calling a method to determine whether the user can leave.
import { CanDeactivate } from "@angular/router";
import { ProductComponent } from "../product/product.component";
export class UnsaveGuard implements CanDeactivate<ProductComponent>{
  //第一个参数 范型类型的组件
  //根据当前要保护组件 的状态 判断当前用户是否能够离开
  canDeactivate(component: ProductComponent){
    return window.confirm('你还没有保存,确定要离开吗?');
  }
}To configure routing, add it to the provider first, and then configure the routing.
import { NgModule } from '@angular/core';
import { Routes, RouterModule } from '@angular/router';
import { HomeComponent } from './home/home.component';
import { ProductComponent } from './product/product.component';
import { Code404Component } from './code404/code404.component';
import { ProductDescComponent } from './product-desc/product-desc.component';
import { SellerInfoComponent } from './seller-info/seller-info.component';
import { ChatComponent } from './chat/chat.component';
import { LoginGuard } from './guard/login.guard';
import { UnsaveGuard } from './guard/unsave.guard';
const routes: Routes = [
 { path: '', redirectTo : 'home',pathMatch:'full' },
 { path: 'chat', component: ChatComponent, outlet: "aux"},//辅助路由
 { path: 'home', component: HomeComponent },
 { path: 'product/:id', component: ProductComponent, children:[
  { path: '', component : ProductDescComponent },
  { path: 'seller/:id', component : SellerInfoComponent }
 ] ,canActivate: [LoginGuard],
   canDeactivate: [UnsaveGuard]},
 { path: '**', component: Code404Component }
];
@NgModule({
 imports: [RouterModule.forRoot(routes)],
 exports: [RouterModule],
 providers: [LoginGuard,UnsaveGuard]
})
export class AppRoutingModule { }Effect:
Click ok to leave the current page, cancel to stay on the current page.
4. Resolve guard
There is a delay in returning http request data, resulting in the template not being displayed immediately.
Before the data is returned, all places on the template that need to use interpolation Expression to display the value of a controller are empty. The user experience is not good.
resolve Solution: Go to the server to read the data before entering the routing. After reading all the required data, enter the routing with the data and display the data immediately.
Example:
Before entering the product information routing, prepare the product information and then enter the routing. If you cannot get the information, or there is a problem getting the information, you will jump directly to the Error message page, or a prompt will pop up, and you will no longer enter the target route.
First declare the product information type in product.component.ts.
import { NgModule } from '@angular/core';
import { Routes, RouterModule } from '@angular/router';
import { HomeComponent } from './home/home.component';
import { ProductComponent } from './product/product.component';
import { Code404Component } from './code404/code404.component';
import { ProductDescComponent } from './product-desc/product-desc.component';
import { SellerInfoComponent } from './seller-info/seller-info.component';
import { ChatComponent } from './chat/chat.component';
import { LoginGuard } from './guard/login.guard';
import { UnsaveGuard } from './guard/unsave.guard';
const routes: Routes = [
 { path: '', redirectTo : 'home',pathMatch:'full' },
 { path: 'chat', component: ChatComponent, outlet: "aux"},//辅助路由
 { path: 'home', component: HomeComponent },
 { path: 'product/:id', component: ProductComponent, children:[
  { path: '', component : ProductDescComponent },
  { path: 'seller/:id', component : SellerInfoComponent }
 ] ,canActivate: [LoginGuard],
   canDeactivate: [UnsaveGuard]},
 { path: '**', component: Code404Component }
];
@NgModule({
 imports: [RouterModule.forRoot(routes)],
 exports: [RouterModule],
 providers: [LoginGuard,UnsaveGuard]
})
export class AppRoutingModule { }Create new product.resolve.ts in the guard directory. The ProductResolve class implements the Resolve interface.
Resolve must also declare a paradigm, which is the type of data to be parsed by resolve.
import { Resolve, ActivatedRouteSnapshot, RouterStateSnapshot, Router } from "@angular/router";
import { Injectable } from "@angular/core";
import { Observable } from "rxjs/Observable";
import { Product } from "../product/product.component";
@Injectable()
export class ProductResolve implements Resolve<Product>{
  constructor(private router: Router) {
  }
  resolve(route: ActivatedRouteSnapshot, state: RouterStateSnapshot): Observable<any> | Promise<any> | any {
    let productId: number = route.params["id"];
    if (productId == 2) { //正确id
      return new Product(1, "iPhone7");
    } else { //id不是1导航回首页
      this.router.navigate(["/home"]);
      return undefined;
    }
  }
}路由配置:Provider里声明,product路由里配置。
resolve是一个对象,对象里参数的名字就是想传入的参数的名字product,用ProductResolve来解析生成。
import { NgModule } from '@angular/core';
import { Routes, RouterModule } from '@angular/router';
import { HomeComponent } from './home/home.component';
import { ProductComponent } from './product/product.component';
import { Code404Component } from './code404/code404.component';
import { ProductDescComponent } from './product-desc/product-desc.component';
import { SellerInfoComponent } from './seller-info/seller-info.component';
import { ChatComponent } from './chat/chat.component';
import { LoginGuard } from './guard/login.guard';
import { UnsaveGuard } from './guard/unsave.guard';
import { ProductResolve } from './guard/product.resolve';
const routes: Routes = [
 { path: '', redirectTo : 'home',pathMatch:'full' },
 { path: 'chat', component: ChatComponent, outlet: "aux"},//辅助路由
 { path: 'home', component: HomeComponent },
 { path: 'product/:id', component: ProductComponent, children:[
  { path: '', component : ProductDescComponent },
  { path: 'seller/:id', component : SellerInfoComponent }
 ] ,
  // canActivate: [LoginGuard],
  // canDeactivate: [UnsaveGuard],
  resolve:{ //resolve是一个对象
   product : ProductResolve  //想传入product,product由ProductResolve生成
  }},
 { path: '**', component: Code404Component }
];
@NgModule({
 imports: [RouterModule.forRoot(routes)],
 exports: [RouterModule],
 providers: [LoginGuard,UnsaveGuard,ProductResolve]
})
export class AppRoutingModule { }修改一下product.component.ts 和模版,显示商品id和name。
import { Component, OnInit } from '@angular/core';
import { ActivatedRoute, Params } from '@angular/router';
@Component({
 selector: 'app-product',
 templateUrl: './product.component.html',
 styleUrls: ['./product.component.css']
})
export class ProductComponent implements OnInit {
 private productId: number;
 private productName: string;
 constructor(private routeInfo: ActivatedRoute) { }
 ngOnInit() {
  // this.routeInfo.params.subscribe((params: Params)=> this.productId=params["id"]);
  this.routeInfo.data.subscribe(
   (data:{product:Product})=>{
    this.productId=data.product.id;
    this.productName=data.product.name;
   }
  );
 }
}
export class Product{
 constructor(public id:number, public name:string){
 }
}<p class="product">
<p>
这里是商品信息组件
</p>
<p>
商品id是: {{productId}}
</p>
<p>
商品名称是: {{productName}}
</p>
<a [routerLink]="['./']">商品描述</a>
<a [routerLink]="['./seller',99]">销售员信息</a>
<router-outlet></router-outlet>
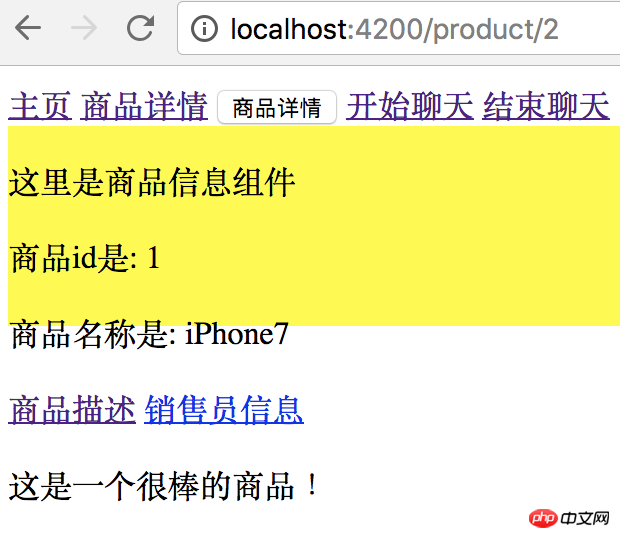
</p>效果:
点商品详情链接,传入商品ID为2,在resolve守卫中是正确id,会返回一条商品数据。
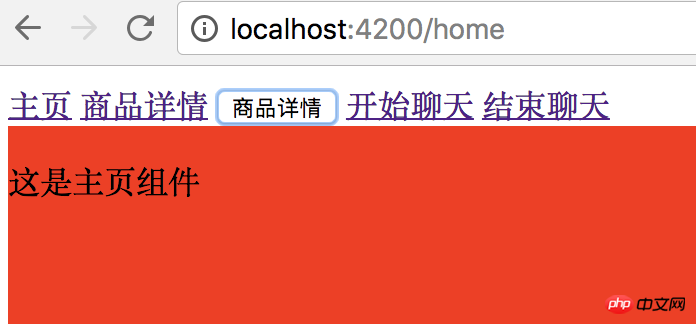
点商品详情按钮,传入商品ID是3,是错误id,会直接跳转到主页。
相信看了本文案例你已经掌握了方法,更多精彩请关注php中文网其它相关文章!
推荐阅读:
React怎样在react-router路由实现登陆验证控制
The above is the detailed content of How to use routing guards in Angular routing. For more information, please follow other related articles on the PHP Chinese website!

Hot AI Tools

Undresser.AI Undress
AI-powered app for creating realistic nude photos

AI Clothes Remover
Online AI tool for removing clothes from photos.

Undress AI Tool
Undress images for free

Clothoff.io
AI clothes remover

Video Face Swap
Swap faces in any video effortlessly with our completely free AI face swap tool!

Hot Article
Hot Tools

Notepad++7.3.1
Easy-to-use and free code editor

SublimeText3 Chinese version
Chinese version, very easy to use

Zend Studio 13.0.1
Powerful PHP integrated development environment

Dreamweaver CS6
Visual web development tools

SublimeText3 Mac version
God-level code editing software (SublimeText3)
Hot Topics


 How to install Angular on Ubuntu 24.04
Mar 23, 2024 pm 12:20 PM
How to install Angular on Ubuntu 24.04
Mar 23, 2024 pm 12:20 PM
Angular.js is a freely accessible JavaScript platform for creating dynamic applications. It allows you to express various aspects of your application quickly and clearly by extending the syntax of HTML as a template language. Angular.js provides a range of tools to help you write, update and test your code. Additionally, it provides many features such as routing and form management. This guide will discuss how to install Angular on Ubuntu24. First, you need to install Node.js. Node.js is a JavaScript running environment based on the ChromeV8 engine that allows you to run JavaScript code on the server side. To be in Ub
 How to implement API routing in the Slim framework
Aug 02, 2023 pm 05:13 PM
How to implement API routing in the Slim framework
Aug 02, 2023 pm 05:13 PM
How to implement API routing in the Slim framework Slim is a lightweight PHP micro-framework that provides a simple and flexible way to build web applications. One of the main features is the implementation of API routing, allowing us to map different requests to corresponding handlers. This article will introduce how to implement API routing in the Slim framework and provide some code examples. First, we need to install the Slim framework. The latest version of Slim can be installed through Composer. Open a terminal and
 Java Apache Camel: Building a flexible and efficient service-oriented architecture
Feb 19, 2024 pm 04:12 PM
Java Apache Camel: Building a flexible and efficient service-oriented architecture
Feb 19, 2024 pm 04:12 PM
Apache Camel is an Enterprise Service Bus (ESB)-based integration framework that can easily integrate disparate applications, services, and data sources to automate complex business processes. ApacheCamel uses route-based configuration to easily define and manage integration processes. Key features of ApacheCamel include: Flexibility: ApacheCamel can be easily integrated with a variety of applications, services, and data sources. It supports multiple protocols, including HTTP, JMS, SOAP, FTP, etc. Efficiency: ApacheCamel is very efficient, it can handle a large number of messages. It uses an asynchronous messaging mechanism, which improves performance. Expandable
 Angular components and their display properties: understanding non-block default values
Mar 15, 2024 pm 04:51 PM
Angular components and their display properties: understanding non-block default values
Mar 15, 2024 pm 04:51 PM
The default display behavior for components in the Angular framework is not for block-level elements. This design choice promotes encapsulation of component styles and encourages developers to consciously define how each component is displayed. By explicitly setting the CSS property display, the display of Angular components can be fully controlled to achieve the desired layout and responsiveness.
 Token-based authentication with Angular and Node
Sep 01, 2023 pm 02:01 PM
Token-based authentication with Angular and Node
Sep 01, 2023 pm 02:01 PM
Authentication is one of the most important parts of any web application. This tutorial discusses token-based authentication systems and how they differ from traditional login systems. By the end of this tutorial, you will see a fully working demo written in Angular and Node.js. Traditional Authentication Systems Before moving on to token-based authentication systems, let’s take a look at traditional authentication systems. The user provides their username and password in the login form and clicks Login. After making the request, authenticate the user on the backend by querying the database. If the request is valid, a session is created using the user information obtained from the database, and the session information is returned in the response header so that the session ID is stored in the browser. Provides access to applications subject to
 How to use routing to customize page switching animation effects in a Vue project?
Jul 21, 2023 pm 02:37 PM
How to use routing to customize page switching animation effects in a Vue project?
Jul 21, 2023 pm 02:37 PM
How to use routing to customize page switching animation effects in a Vue project? Introduction: In the Vue project, routing is one of the functions we often use. Switching between pages can be achieved through routing, providing a good user experience. In order to make page switching more vivid, we can achieve it by customizing animation effects. This article will introduce how to use routing to customize the page switching animation effect in the Vue project. Create a Vue project First, we need to create a Vue project. You can use VueCLI to quickly build
 Implementation method and experience summary of flexibly configuring routing rules in PHP
Oct 15, 2023 pm 03:43 PM
Implementation method and experience summary of flexibly configuring routing rules in PHP
Oct 15, 2023 pm 03:43 PM
Implementation method and experience summary of flexible configuration of routing rules in PHP Introduction: In Web development, routing rules are a very important part, which determines the corresponding relationship between URL and specific PHP scripts. In the traditional development method, we usually configure various URL rules in the routing file, and then map the URL to the corresponding script path. However, as the complexity of the project increases and business requirements change, it will become very cumbersome and inflexible if each URL needs to be configured manually. So, how to implement in PHP
 Use JavaScript functions to implement web page navigation and routing
Nov 04, 2023 am 09:46 AM
Use JavaScript functions to implement web page navigation and routing
Nov 04, 2023 am 09:46 AM
In modern web applications, implementing web page navigation and routing is a very important part. Using JavaScript functions to implement this function can make our web applications more flexible, scalable and user-friendly. This article will introduce how to use JavaScript functions to implement web page navigation and routing, and provide specific code examples. Implementing web page navigation For a web application, web page navigation is the most frequently operated part by users. When a user clicks on the page
