

Detailed explanation of optimization steps using vue-admin-template
This time I will bring you a detailed explanation of the optimization steps for using vue-admin-template. What are the precautions for using vue-admin-template optimization? The following is a practical case, let's take a look.
Preface
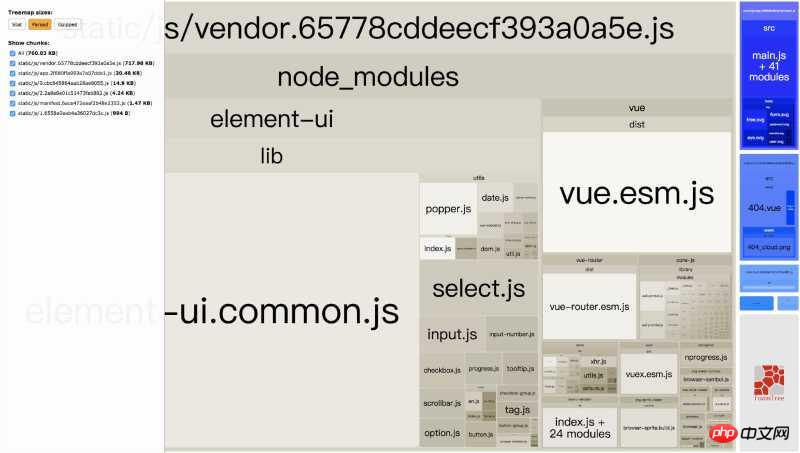
The company has several projects with backend management systems. In order to facilitate development, we chose the popular backend template in vue. Developed as a basic template. However, when I started using it, the author did not optimize this. When the project went online, I discovered that the packaged files were very large, with just one vendor having a volume of 770k (the picture below is the basic template, everything is No packaged file information is added):

can be analyzed through webpack-bundle-analyzer. The volume mainly comes from the Ele.me UI ( The volume is 500k), because the split components were not partially introduced, causing webpack to package the entire component library. The second is vue itself, which has a size of 80k.
# Therefore, it is urgent to optimize its packaging.
Optimization
The main purposes of optimization are:
Speed up resource loading and reduce user waiting time and home page white screen time to improve user experience.
Speed up packaging and don’t waste time waiting for packaging.
To solve the first problem, many people will think that resource files can be placed on CDN. Yes, this time we will solve the loading problem through CDN.
CDN - Improve loading speed
More mature frameworks/component libraries like vue and element ui generally have free, high-speed, The public cdn is for developers to use. Since most users are in China, the bootcdn library is used this time. The popular resources of this library are relatively complete, available in various versions, and the domestic access speed is very fast, which is simply good news for developers.
Introduce vue and Ele.me components into index.html.
<!DOCTYPE html>
<html>
 <head>
  <meta charset="utf-8">
  <meta name="viewport" content="width=device-width,initial-scale=1.0">
  <title>vue-admin-template</title>
  <!-- 同时也要引入对应版本的 css -->
  <link href="https://cdn.bootcss.com/element-ui/2.3.2/theme-chalk/index.css" rel="external nofollow" rel="stylesheet">
 </head>
 <body>
  <p id="app"></p>
  <!-- built files will be auto injected -->
  <!-- 先引入 Vue -->
  <script src="https://cdn.bootcss.com/vue/2.4.2/vue.min.js"></script>
  <!-- 引入组件库 -->
  <script src="https://cdn.bootcss.com/element-ui/2.3.2/index.js"></script>
  <script src="https://cdn.bootcss.com/element-ui/2.3.2/locale/zh-CN.min.js"></script>
 </body>
</html>
Because dependencies are introduced from outside, webpack needs to be informed of the source of dependencies when packaging.
Modifywebpack.base.conf.js:
module.exports = {
 ...
 externals: {
  vue: 'Vue',
  'element-ui':'ELEMENT'
 }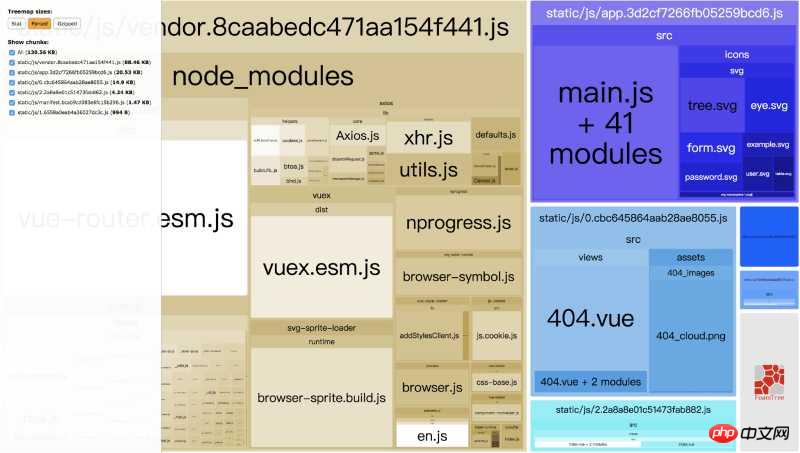
}Packaging it again can indeed greatly compress the packaging volume, from 700k to 130k:
But then there is a problem:
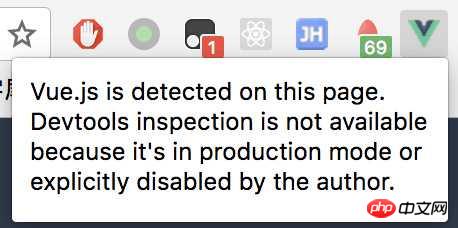
Obviously I am developing locally, but due to the introduction The online production version of the vue file is removed, so vue-dev-tools cannot be debugged.
Therefore, we need to adjust the webpack configuration again, webpack.base.conf.js, and the js injected by webpack is always at the end, so we need html-webpack-include-assets-plugin helps to inject app.js and then inject the corresponding component library:
const HtmlWebpackIncludeAssetsPlugin = require('html-webpack-include-assets-plugin')
const externals = {
 // 因为打包时,还没注入,所以这里要去掉。
 // 'element-ui':'ELEMENT'
}
// 生产环境中使用生产环境的 vue
// 开发环境继续使用本地 node_modules 中的 vue
if (process.env.NODE_ENV === 'production') {
 externals['vue'] = 'Vue'
 // 如发现打包时依旧将 element-ui 打包进入 vendor,可以在打包时将其加入外部依赖。
 externals['element-ui'] = 'ELEMENT'
}
// 生产环境默认注入 vue
// 开发环境中不注入
const defaultJS = process.env.NODE_ENV === 'production' ? [{ path: 'https://cdn.bootcss.com/vue/2.4.2/vue.min.js', type: 'js' }] : []
const plugins = [
 new HtmlWebpackIncludeAssetsPlugin({
   assets: defaultJS.concat([
    { path: 'https://cdn.bootcss.com/element-ui/2.3.2/index.js', type: 'js' },
    { path: 'https://cdn.bootcss.com/element-ui/2.3.2/locale/zh-CN.min.js', type: 'js' },
   ]),
   // 是否在 webpack 注入的 js 文件后新增?true 为 append, false 为 prepend。
   // 生产环境中,这些 js 应该先加载。
   append: process.env.NODE_ENV !== 'production',
   publicPath: '',
  })
]
module.exports = {
 ...
 externals,
 plugins,
 ...
}OK. At this time, both packaging and The final size can also be debugged using vue-dev-tool in development mode.
DLL - Improve packaging speed
# Front-ends that often package will find that many times, in order to fix certain bugs (such as promise in ie bug under Safari), and a new polyfill was introduced. However, after packaging, it was found that the hash value of the vendor has changed, and the entire vendor only added a new dependency of es6-promise, but it cost The price is that the previously packaged vendor needs to be discarded, and when the user revisits, they need to pull a brand new vendor again, which is a bit expensive.
At this time, using dllPlugin packaging has advantages. It can package some basic dependent modules together first. When officially packaging, these modules can be skipped and no longer packaged into the vendor repeatedly. This improves the packaging speed and also reduces the size of the vendor.
如,后台管理系统基础模块基本有以下几个:
axios: ajax 请求。
vuex: 全局状态管理。
js-cookie: 前端处理 cookie
vue-router: 路由管理。
这四个基础模块几乎是必须的,那么可以先提取出来。
step 1 打包基础模块
先在 build 文件夹下新建一个用于打包 dll 的配置文件 webpack.dll.conf.js:
const webpack = require('webpack');
const path = require('path');
const vueLoaderConfig = require('./vue-loader.conf')
const utils = require('./utils')
function resolve(dir) {
  return path.join(dirname, '..', dir)
}
const vendor = [
  // 'vue/dist/vue.runtime.esm.js', // 由于 vue 在生产环境中使用的是 cdn 引入,所以也无需提前打包进 dll
  // 'raven-js', // 前端监控,若无此需求,可以忽略。
  'es6-promise', // 修复 promise 中某些 bug。
  'vue-router',
  'js-cookie',
  'axios',
  'vuex',
];
const webpackConfig = {
  context: dirname,
  output: {
    path: path.join(dirname, '../static/js/'),
    filename: '[name].dll.js',
    library: '[name]_[hash]',
  },
  entry: {
    vendor
  },
  plugins: [
    new webpack.DllPlugin({
      context: dirname,
      path: path.join(dirname, '.', '[name]-manifest.json'),
      name: '[name]_[hash]',
    }),
    new webpack.optimize.UglifyJsPlugin({
      compress: {
       warnings: false
      },
      sourceMap: true,
      // parallel: true
    })
  ],
  module: {
    rules: [{
        test: /\.vue$/,
        loader: 'vue-loader',
        options: vueLoaderConfig
      },
      {
        test: /\.js$/,
        loader: 'babel-loader',
        include: [resolve('src'), resolve('test'), resolve('node_modules/webpack-dev-server/client')]
      },
      {
        test: /\.(png|jpe?g|gif|svg)(\?.*)?$/,
        loader: 'url-loader',
        options: {
          limit: 10000,
          name: utils.assetsPath('img/[name].[hash:7].[ext]')
        }
      },
      {
        test: /\.(mp4|webm|ogg|mp3|wav|flac|aac)(\?.*)?$/,
        loader: 'url-loader',
        options: {
          limit: 10000,
          name: utils.assetsPath('media/[name].[hash:7].[ext]')
        }
      },
      {
        test: /\.(woff2?|eot|ttf|otf)(\?.*)?$/,
        loader: 'url-loader',
        options: {
          limit: 10000,
          name: utils.assetsPath('fonts/[name].[hash:7].[ext]')
        }
      }
    ]
  }
};
module.exports = webpackConfig然后在 package.json 中加入一条命令:
{
  "scripts": {
    ...
    "build:dll": "webpack --config build/webpack.dll.conf.js",
    ...
  }
}执行 yarn build:dll 或者 npm run build:dll 即可完成打包 dll。执行完成后:
yarn build:dll
yarn run v1.5.1
$ webpack --config build/webpack.dll.conf.js
Hash: f6894dff019b2e0734af
Version: webpack 3.10.0
Time: 1295ms
     Asset   Size Chunks       Chunk Names
vendor.dll.js 62.6 kB    0 [emitted] vendor
  [8] dll vendor 12 bytes {0} [built]
  + 32 hidden modules
✨ Done in 1.89s.同时,可以在 build 目录下,找到各个模块对应关系文件 vendors-manifest.json 和 static/js 下的 vendor.dll.js。
step 2 页面中引入 vendor
打包后的 dll 文件需要手动在 index.html 引入:
<p id="app"></p>
<!-- built files will be auto injected -->
<script src="static/js/vendors.dll.js"></script>
step 3 告诉 webpack 使用 dllPlugin 进行打包
修改 build/webpack.prod.conf.js:
module.exports = {
  plugins: [
    ...
    new webpack.DllReferencePlugin({
      context: dirname,
      manifest: require('./vendor-manifest.json')
    }),
    ...
  ]
}再次打包:
$ yarn build:report
yarn run v1.5.1
$ npm_config_report=true node build/build.js
Hash: b4ff51852866ed865cfd
Version: webpack 3.10.0
Time: 6532ms
                       Asset    Size Chunks       Chunk Names
     static/js/manifest.42b9584a653aec2b9c5e.js   1.5 kB    5 [emitted] manifest
             static/img/404.a57b6f3.png  98.1 kB     [emitted]
        static/js/1.9e4133a25808e2101dd3.js    1 kB    1 [emitted]
        static/js/2.2a8a8e01c51473fab882.js  4.34 kB    2 [emitted]
      static/js/vendor.c7b076ef3341d4711402.js  39.4 kB    3 [emitted] vendor
       static/js/app.6d52c7a5bf1bacb5cc85.js  21.4 kB    4 [emitted] app
        static/js/0.cbc645864aab28ae8055.js  15.3 kB    0 [emitted]
static/css/app.1b30f8eba210e245a5f96d7bf0d6fb6c.css   7.6 kB    4 [emitted] app
                    favicon.ico  67.6 kB     [emitted]
                     index.html 986 bytes     [emitted]
              static/js/vendor.dll.js  62.6 kB     [emitted]
 Build complete.
 Tip: built files are meant to be served over an HTTP server.
 Opening index.html over file:// won't work.
发现 vendor 现在只有 40k 的体积,减少了一半的体积,而且打包速度也快了 2s,而相对于最开始的基础模板,打包速度快了 12s,这是很让人欣慰。
相信看了本文案例你已经掌握了方法,更多精彩请关注php中文网其它相关文章!
推荐阅读:
如何使用v-model与promise两种方式实现vue弹窗组件
怎样使用Vue+Jwt+SpringBoot+Ldap完成登录认证
The above is the detailed content of Detailed explanation of optimization steps using vue-admin-template. For more information, please follow other related articles on the PHP Chinese website!

Hot AI Tools

Undresser.AI Undress
AI-powered app for creating realistic nude photos

AI Clothes Remover
Online AI tool for removing clothes from photos.

Undress AI Tool
Undress images for free

Clothoff.io
AI clothes remover

Video Face Swap
Swap faces in any video effortlessly with our completely free AI face swap tool!

Hot Article
Hot Tools

Notepad++7.3.1
Easy-to-use and free code editor

SublimeText3 Chinese version
Chinese version, very easy to use

Zend Studio 13.0.1
Powerful PHP integrated development environment

Dreamweaver CS6
Visual web development tools

SublimeText3 Mac version
God-level code editing software (SublimeText3)
Hot Topics


 How to make Google Maps the default map in iPhone
Apr 17, 2024 pm 07:34 PM
How to make Google Maps the default map in iPhone
Apr 17, 2024 pm 07:34 PM
The default map on the iPhone is Maps, Apple's proprietary geolocation provider. Although the map is getting better, it doesn't work well outside the United States. It has nothing to offer compared to Google Maps. In this article, we discuss the feasible steps to use Google Maps to become the default map on your iPhone. How to Make Google Maps the Default Map in iPhone Setting Google Maps as the default map app on your phone is easier than you think. Follow the steps below – Prerequisite steps – You must have Gmail installed on your phone. Step 1 – Open the AppStore. Step 2 – Search for “Gmail”. Step 3 – Click next to Gmail app
 Steps to upgrade to the latest version of WeChat (Easily master the upgrade method to the latest version of WeChat)
Jun 01, 2024 pm 10:24 PM
Steps to upgrade to the latest version of WeChat (Easily master the upgrade method to the latest version of WeChat)
Jun 01, 2024 pm 10:24 PM
WeChat is one of the social media platforms in China that continuously launches new versions to provide a better user experience. Upgrading WeChat to the latest version is very important to keep in touch with family and colleagues, to stay in touch with friends, and to keep abreast of the latest developments. 1. Understand the features and improvements of the latest version. It is very important to understand the features and improvements of the latest version before upgrading WeChat. For performance improvements and bug fixes, you can learn about the various new features brought by the new version by checking the update notes on the WeChat official website or app store. 2. Check the current WeChat version We need to check the WeChat version currently installed on the mobile phone before upgrading WeChat. Click to open the WeChat application "Me" and then select the menu "About" where you can see the current WeChat version number. 3. Open the app
 This Apple ID is not yet in use in the iTunes Store: Fix
Jun 10, 2024 pm 05:42 PM
This Apple ID is not yet in use in the iTunes Store: Fix
Jun 10, 2024 pm 05:42 PM
When logging into iTunesStore using AppleID, this error saying "This AppleID has not been used in iTunesStore" may be thrown on the screen. There are no error messages to worry about, you can fix them by following these solution sets. Fix 1 – Change Shipping Address The main reason why this prompt appears in iTunes Store is that you don’t have the correct address in your AppleID profile. Step 1 – First, open iPhone Settings on your iPhone. Step 2 – AppleID should be on top of all other settings. So, open it. Step 3 – Once there, open the “Payment & Shipping” option. Step 4 – Verify your access using Face ID. step
 Shazam app not working in iPhone: Fix
Jun 08, 2024 pm 12:36 PM
Shazam app not working in iPhone: Fix
Jun 08, 2024 pm 12:36 PM
Having issues with the Shazam app on iPhone? Shazam helps you find songs by listening to them. However, if Shazam isn't working properly or doesn't recognize the song, you'll have to troubleshoot it manually. Repairing the Shazam app won't take long. So, without wasting any more time, follow the steps below to resolve issues with Shazam app. Fix 1 – Disable Bold Text Feature Bold text on iPhone may be the reason why Shazam is not working properly. Step 1 – You can only do this from your iPhone settings. So, open it. Step 2 – Next, open the “Display & Brightness” settings there. Step 3 – If you find that “Bold Text” is enabled
 Detailed explanation of the steps to obtain Win11 system administrator permissions
Mar 08, 2024 pm 09:09 PM
Detailed explanation of the steps to obtain Win11 system administrator permissions
Mar 08, 2024 pm 09:09 PM
Windows 11, as the latest operating system launched by Microsoft, is deeply loved by users. In the process of using Windows 11, sometimes we need to obtain system administrator rights in order to perform some operations that require permissions. Next, we will introduce in detail the steps to obtain system administrator rights in Windows 11. The first step is to click "Start Menu". You can see the Windows icon in the lower left corner. Click the icon to open the "Start Menu". In the second step, find and click "
 iPhone screenshots not working: How to fix it
May 03, 2024 pm 09:16 PM
iPhone screenshots not working: How to fix it
May 03, 2024 pm 09:16 PM
Screenshot feature not working on your iPhone? Taking a screenshot is very easy as you just need to hold down the Volume Up button and the Power button at the same time to grab your phone screen. However, there are other ways to capture frames on the device. Fix 1 – Using Assistive Touch Take a screenshot using the Assistive Touch feature. Step 1 – Go to your phone settings. Step 2 – Next, tap to open Accessibility settings. Step 3 – Open Touch settings. Step 4 – Next, open the Assistive Touch settings. Step 5 – Turn on Assistive Touch on your phone. Step 6 – Open “Customize Top Menu” to access it. Step 7 – Now you just need to link any of these functions to your screen capture. So click on the first
 Clock app missing in iPhone: How to fix it
May 03, 2024 pm 09:19 PM
Clock app missing in iPhone: How to fix it
May 03, 2024 pm 09:19 PM
Is the clock app missing from your phone? The date and time will still appear on your iPhone's status bar. However, without the Clock app, you won’t be able to use world clock, stopwatch, alarm clock, and many other features. Therefore, fixing missing clock app should be at the top of your to-do list. These solutions can help you resolve this issue. Fix 1 – Place the Clock App If you mistakenly removed the Clock app from your home screen, you can put the Clock app back in its place. Step 1 – Unlock your iPhone and start swiping to the left until you reach the App Library page. Step 2 – Next, search for “clock” in the search box. Step 3 – When you see “Clock” below in the search results, press and hold it and
 Safari zoom issue on iPhone: Here's the fix
Apr 20, 2024 am 08:08 AM
Safari zoom issue on iPhone: Here's the fix
Apr 20, 2024 am 08:08 AM
If you don't have control over the zoom level in Safari, getting things done can be tricky. So if Safari looks zoomed out, that might be a problem for you. Here are a few ways you can fix this minor zoom issue in Safari. 1. Cursor magnification: Select "Display" > "Cursor magnification" in the Safari menu bar. This will make the cursor more visible on the screen, making it easier to control. 2. Move the mouse: This may sound simple, but sometimes just moving the mouse to another location on the screen may automatically return it to normal size. 3. Use Keyboard Shortcuts Fix 1 – Reset Zoom Level You can control the zoom level directly from the Safari browser. Step 1 – When you are in Safari
