

How to use Vue three-layer nested routing
This time I will show you how to use Vue three-layer nested routing, and what are the precautions when using Vue three-layer nested routing. The following is a practical case, let's take a look.
Vue nested routing:
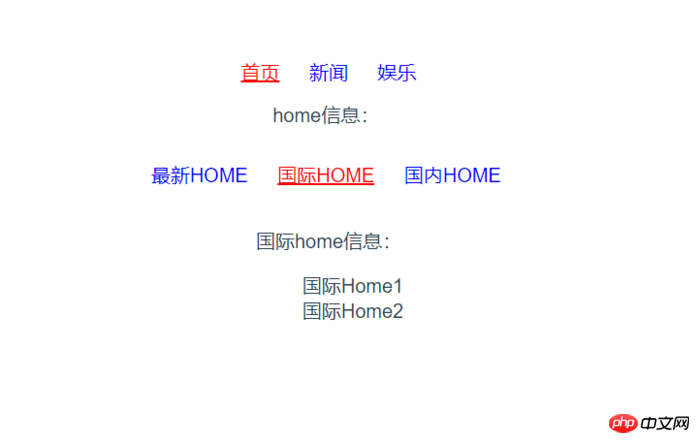
Achieve the effect (the routing is nested at three levels, click on the first-level tab to display the second-level tab effect, click on the second-level tab to switch the corresponding content, Content not in the tab area will not be rendered repeatedly when switching):
Demo access path: http://IP:port/#/routers/
1. Create the case folder page/routers/
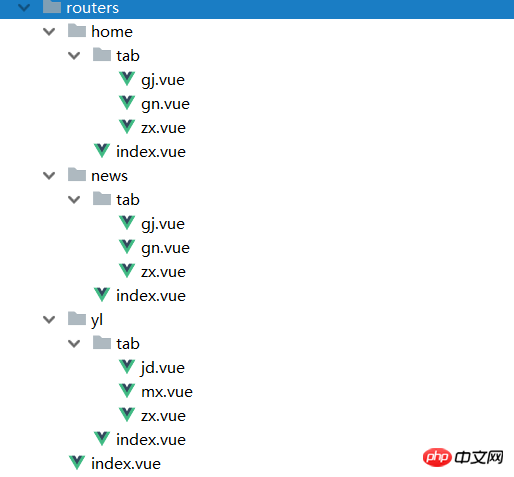
1 routers/index.vue
<template>
<p>
<router-link :to="{name: 'rindex_rhome'}" class="rlink" :class="{active:selected == 1}" @click.native="tabck(1)">首页</router-link>
<router-link :to="{name: 'rindex_rnews'}" class="rlink" class="{active:selected == 2}" @click.native="tabck(2)">新闻</router-link>
<router-link :to="{name: 'rindex_ryl'}" class="rlink" class="{active:selected == 3}" @click.native="tabck(3)">娱乐</router-link>
<!-- 二级子路由页面 -->
<router-view />
</p>
</template>
<script>
export default {
data(){
return {
selected: 1
}
},
methods: {
tabck(index){
this.selected = index; //设置tab选中项
}
}
}
</script>
<style>
.rlink {
padding: 5px;
margin: 5px;
margin-bottom: 10px;
display: inline-block;
text-decoration: none;
color: blue;
}
.rlink.active {
color: red;
text-decoration: underline;
}
</style>1-1- 1 routers/home/index.vue
<template>
<p>
HOME页面信息:<br/>
<router-link :to="{name: 'rindex_rhome_Rhomezx'}" class="rlink" :class="{active:selected == 1}" @click.native="tabck(1)">最新HOME</router-link>
<router-link :to="{name: 'rindex_rhome_Rhomegj'}" class="rlink" :class="{active:selected == 2}" @click.native="tabck(2)">国际HOME</router-link>
<router-link :to="{name: 'rindex_rhome_Rhomegn'}" class="rlink" :class="{active:selected == 3}" @click.native="tabck(3)">国内HOME</router-link>
<!-- 子路由(三层) -->
<router-view />
</p>
</template>
<script>
export default {
data(){
return {
selected: 1
}
},
methods: {
tabck(index) {
this.selected = index; //设置选中tab
}
}
}
</script>
<style>
</style>1-1-2 routers/home/tab/gj.vue、gn.vue、zx.vue
gj.vue:
<template>
 <p>
    国际HOME信息:<br/>
     <ul >
       <li v-for="(result, index) in list" :key="index">{{result.name}}{{index}}</li>
     </ul>
 </p>
</template>
<script>
 export default {
  data(){
   return {
     list: [
      {name:'国际HOME'},
      {name:'国际HOME'},
      {name:'国际HOME'}
     ]
   }
  }
 }
</script>gn.vue:
<template>
 <p>
    国内HOME信息:<br/>
     <ul >
       <li v-for="(result, index) in list" :key="index">{{result.name}}{{index}}</li>
     </ul>
 </p>
</template>
<script>
 export default {
  data(){
   return {
     list: [
      {name:'国内HOME'},
      {name:'国内HOME'}
     ]
   }
  }
 }
</script>zx.vue:
<template>
 <p>
    最新HOME信息:<br/>
     <ul >
       <li v-for="(result, index) in list" :key="index">{{result.name}}{{index}}</li>
     </ul>
 </p>
</template>
<script>
 export default {
  data(){
   return {
     list: [
      {name:'最新HOME'}
     ]
   }
  }
 }
</script>1-2 routers/news/index.vue
<template>
 <p>
    新闻页面信息:<br/>
    <router-link class="rlink" :class="{active:selected == 1}" @cllick.native="tabck(1)">最新新闻</router-link>
    <router-link class="rlink" :class="{active:selected == 2}" @cllick.native="tabck(2)">国际新闻</router-link>
    <router-link class="rlink" :class="{active:selected == 3}" @cllick.native="tabck(3)">国内新闻</router-link>
  <!-- 子路由 -->
  <router-view/>
 </p>
</template>
<script>
 export default {
  data () {
   return {
     selected: 1
   }
  },
  methods: {
   tabck(index){
    this.selected = index; //切换tab,设置选中项
   }
  }
 }
</script>1-2-1 routers/ news/tab/gj.vue、gn.vue、zx.vue
gj.vue:
<template>
 <p>
    国际新闻信息:<br/>
     <ul >
       <li v-for="(result, index) in list" :key="index">{{result.name}}{{index}}</li>
     </ul>
 </p>
</template>
<script>
 export default {
  data(){
   return {
     list: [
      {name:'国际新闻信息'},
      {name:'国际新闻信息'},
      {name:'国际新闻信息'},
      {name:'国际新闻信息'},
      {name:'国际新闻信息'}
     ]
   }
  }
 }
</script>gn.vue:
<template>
 <p>
    国内新闻信息:<br/>
     <ul >
       <li v-for="(result, index) in list" :key="index">{{result.name}}{{index}}</li>
     </ul>
 </p>
</template>
<script>
 export default {
  data(){
   return {
     list: [
      {name:'国内新闻信息'},
      {name:'国内新闻信息'}
     ]
   }
  }
 }
</script>zx.vue:
<template>
 <p>
    最新新闻信息:<br/>
     <ul >
       <li v-for="(result, index) in list" :key="index">{{result.name}}{{index}}</li>
     </ul>
 </p>
</template>
<script>
 export default {
  data(){
   return {
     list: [
      {name:'最新新闻信息'},
      {name:'最新新闻信息'}
     ]
   }
  }
 }
</script>1-3-1 routers/yl/index.vue
<template>
 <p>
    娱乐页面信息:<br/>
    <router-link class="rlink" :class="{active:selected == 1}" @click.native="tabck(1)">最新娱乐</router-link>
    <router-link class="rlink" :class="{active:selected == 2}" @click.native="tabck(2)">明星娱乐</router-link>
    <router-link class="rlink" :class="{active:selected == 3}" @click.native="tabck(3)">焦点娱乐</router-link>

    <!-- 子路由-->
    <router-view/>
 </p>
 <script>
  export default {
   data(){
    return {
     selected: 1
    }
   },
   methods: {
    tabck(index){
     this.selected = index; //设置tab选中项
    }
   }
  }
 </script>
</template>1-3-2 routers/yl/tab/jd.vue、mx.vue、zx.vue
jd.vue:
<template>
 <p>
    焦点娱乐信息:<br/>
     <ul >
       <li v-for="(result, index) in list" :key="index">{{result.name}}{{index}}</li>
     </ul>
 </p>
</template>
<script>
 export default {
  data(){
   return {
     list: [
      {name:'焦点娱乐信息'},
      {name:'焦点娱乐信息'}
     ]
   }
  }
 }
</script>mx.vue:
<template>
 <p>
    明星娱乐信息:<br/>
     <ul >
       <li v-for="(result, index) in list" :key="index">{{result.name}}{{index}}</li>
     </ul>
 </p>
</template>
<script>
 export default {
  data(){
   return {
     list: [
      {name:'明星娱乐信息'},
      {name:'明星娱乐信息'}
     ]
   }
  }
 }
</script>zx.vue:
<template>
 <p>
    最新娱乐信息:<br/>
     <ul >
       <li v-for="(result, index) in list" :key="index">{{result.name}}{{index}}</li>
     </ul>
 </p>
</template>
<script>
 export default {
  data(){
   return {
     list: [
      {name:'最新娱乐信息'},
      {name:'最新娱乐信息'}
     ]
   }
  }
 }
</script>2. Routing configuration rules (router/index.js)
....
 省略导入路由、使用路由代码...
....
// 嵌套路由的使用:第一层
import Rindex from '../page/routers/index'
// 嵌套路由的使用:第二层
import Rhome from '../page/routers/home/index'
// 嵌套路由的使用:第三层
import Rhomezx from '../page/routers/home/tab/zx'
import Rhomegj from '../page/routers/home/tab/gj'
import Rhomegn from '../page/routers/home/tab/gn'
import Rnews from '../page/routers/news/index'
import Rnewszx from '../page/routers/news/tab/zx'
import Rnewsgj from '../page/routers/news/tab/gj'
import Rnewsgn from '../page/routers/news/tab/gn'
import Ryl from '../page/routers/yl/index'
import Rylzx from '../page/routers/yl/tab/zx'
import Rylmx from '../page/routers/yl/tab/mx'
import Ryljd from '../page/routers/yl/tab/jd'
// 路由规则配置:
export default new Router({
 routes : [
  {
   name: 'rindex',
   path: '/routers',
   component: Rindex,
   redirect: {name: 'rindex_rhome'}, // 跳转到下一级第一个
   children: [
     {
       name: 'rindex_rhome',
       path: 'rindex_rhome', //如果这里不使用 "/rhome" 则表示是归属于上级路由(上级luyou/子path),如果使用 "/rhome" 则表示根路径下访问
       component: Rhome,
       redirect: {name: 'rindex_rhome_Rhomezx'}, //跳转到下级第一层
       children: [
        {
         name: 'rindex_rhome_Rhomezx',
         path: 'rindex_rhome_Rhomezx',
         component: Rhomezx
        },
        {
         name: 'rindex_rhome_Rhomegj',
         path: 'rindex_rhome_Rhomegj',
         component: Rhomegj
        },
        {
         name: 'rindex_rhome_Rhomegn',
         path: 'rindex_rhome_Rhomegn',
         component: Rhomegn
        }
      ]
     },
     {
      name: 'rindex_rnews',
      path: 'rindex_rnews',
      component: Rnews,
      redirect: {name: 'rindex_rnews_Rnewszx'},
      children: [
       {
         name: 'rindex_rnews_Rnewszx',
         path: 'rindex_rnews_Rnewszx',
         component: Rnewszx
       },
       {
         name: 'rindex_rnews_Rnewsgj',
         path: 'rindex_rnews_Rnewsgj',
         component: Rnewsgj
       },
       {
         name: 'rindex_rnews_Rnewsgn',
         path: 'rindex_rnews_Rnewsgn',
         component: Rnewsgn
       }
      ]
    },
    {
      name: 'rindex_ryl',
      path: 'rindex_ryl',
      component: Ryl,
      redirect: {name: 'rindex_ryl_rylzx'},
      chidren:[
        {
          name: 'rindex_ryl_rylzx',
          path: 'rindex_ryl_rylzx',
          component: Rylzx
        },
        {
          name: 'rindex_ryl_rylmx',
          path: 'rindex_ryl_rylmx',
          component: Rylmx
        },
        {
          name: 'rindex_ryl_ryljd',
          path: 'rindex_ryl_ryljd',
          component: Ryljd
        }
      ]
    }
   ]
  }
 ]
});I believe you have mastered the method after reading the case in this article. For more exciting information, please pay attention to other related articles on the php Chinese website!
Recommended reading:
Summary of how to use data-* attributes in H5
How to load jquery in a JS file. js
The above is the detailed content of How to use Vue three-layer nested routing. For more information, please follow other related articles on the PHP Chinese website!

Hot AI Tools

Undresser.AI Undress
AI-powered app for creating realistic nude photos

AI Clothes Remover
Online AI tool for removing clothes from photos.

Undress AI Tool
Undress images for free

Clothoff.io
AI clothes remover

Video Face Swap
Swap faces in any video effortlessly with our completely free AI face swap tool!

Hot Article
Hot Tools

Notepad++7.3.1
Easy-to-use and free code editor

SublimeText3 Chinese version
Chinese version, very easy to use

Zend Studio 13.0.1
Powerful PHP integrated development environment

Dreamweaver CS6
Visual web development tools

SublimeText3 Mac version
God-level code editing software (SublimeText3)
Hot Topics


 Can generic functions in Go be nested within each other?
Apr 16, 2024 pm 12:09 PM
Can generic functions in Go be nested within each other?
Apr 16, 2024 pm 12:09 PM
Nested Generic Functions Generic functions in Go 1.18 allow the creation of functions that apply to multiple types, and nested generic functions can create reusable code hierarchies: Generic functions can be nested within each other, creating a nested code reuse structure. By composing filters and mapping functions into a pipeline, you can create reusable type-safe pipelines. Nested generic functions provide a powerful tool for creating reusable, type-safe code, making your code more efficient and maintainable.
 How to implement API routing in the Slim framework
Aug 02, 2023 pm 05:13 PM
How to implement API routing in the Slim framework
Aug 02, 2023 pm 05:13 PM
How to implement API routing in the Slim framework Slim is a lightweight PHP micro-framework that provides a simple and flexible way to build web applications. One of the main features is the implementation of API routing, allowing us to map different requests to corresponding handlers. This article will introduce how to implement API routing in the Slim framework and provide some code examples. First, we need to install the Slim framework. The latest version of Slim can be installed through Composer. Open a terminal and
 How to use Vue form processing to implement recursive nesting of forms
Aug 11, 2023 pm 04:57 PM
How to use Vue form processing to implement recursive nesting of forms
Aug 11, 2023 pm 04:57 PM
How to use Vue form processing to implement recursive nesting of forms Introduction: As the complexity of front-end data processing and form processing continues to increase, we need a flexible way to handle complex forms. As a popular JavaScript framework, Vue provides us with many powerful tools and features to handle recursive nesting of forms. This article will introduce how to use Vue to handle such complex forms, and attach code examples. 1. Recursive nesting of forms In some scenarios, we may need to deal with recursive nesting.
 Java Apache Camel: Building a flexible and efficient service-oriented architecture
Feb 19, 2024 pm 04:12 PM
Java Apache Camel: Building a flexible and efficient service-oriented architecture
Feb 19, 2024 pm 04:12 PM
Apache Camel is an Enterprise Service Bus (ESB)-based integration framework that can easily integrate disparate applications, services, and data sources to automate complex business processes. ApacheCamel uses route-based configuration to easily define and manage integration processes. Key features of ApacheCamel include: Flexibility: ApacheCamel can be easily integrated with a variety of applications, services, and data sources. It supports multiple protocols, including HTTP, JMS, SOAP, FTP, etc. Efficiency: ApacheCamel is very efficient, it can handle a large number of messages. It uses an asynchronous messaging mechanism, which improves performance. Expandable
 How to use routing in ThinkPHP6
Jun 20, 2023 pm 07:54 PM
How to use routing in ThinkPHP6
Jun 20, 2023 pm 07:54 PM
ThinkPHP6 is a powerful PHP framework with convenient routing functions that can easily implement URL routing configuration; at the same time, ThinkPHP6 also supports a variety of routing modes, such as GET, POST, PUT, DELETE, etc. This article will introduce how to use ThinkPHP6 for routing configuration. 1. ThinkPHP6 routing mode GET method: The GET method is a method used to obtain data and is often used for page display. In ThinkPHP6, you can use the following
 How to use routing to customize page switching animation effects in a Vue project?
Jul 21, 2023 pm 02:37 PM
How to use routing to customize page switching animation effects in a Vue project?
Jul 21, 2023 pm 02:37 PM
How to use routing to customize page switching animation effects in a Vue project? Introduction: In the Vue project, routing is one of the functions we often use. Switching between pages can be achieved through routing, providing a good user experience. In order to make page switching more vivid, we can achieve it by customizing animation effects. This article will introduce how to use routing to customize the page switching animation effect in the Vue project. Create a Vue project First, we need to create a Vue project. You can use VueCLI to quickly build
 How to create nested tables in HTML?
Sep 09, 2023 pm 10:05 PM
How to create nested tables in HTML?
Sep 09, 2023 pm 10:05 PM
Tables are a fundamental and crucial aspect of web development and are used to present information in an orderly and clear format. However, there may be situations where more complex data needs to be presented, requiring the use of nested tables. Nested tables are tables located within other table cells. In this article, we'll walk you through the process of building nested tables in HTML, with meticulously detailed explanations complete with illustrations to help you understand the concepts more effectively. Whether you are a newbie or an experienced web designer, this article will provide you with the knowledge and expertise you need to become proficient in creating nested tables using HTML. Before we start exploring making nested tables, it's necessary to understand the basic makeup of HTML tables. HTML tables are implemented through the <table> element.
 How to use routing to implement page jump in Vue?
Jul 21, 2023 am 08:33 AM
How to use routing to implement page jump in Vue?
Jul 21, 2023 am 08:33 AM
How to use routing to implement page jump in Vue? With the continuous development of front-end development technology, Vue.js has become one of the most popular front-end frameworks. In Vue development, page jump is an essential part. Vue provides VueRouter to manage application routing, and seamless switching between pages can be achieved through routing. This article will introduce how to use routing to implement page jumps in Vue, with code examples. First, install the vue-router plugin in the Vue project.
