
 Web Front-end
JS Tutorial
Detailed explanation of the steps to implement JWT user authentication with Node.js+Koa
Web Front-end
JS Tutorial
Detailed explanation of the steps to implement JWT user authentication with Node.js+Koa
Detailed explanation of the steps to implement JWT user authentication with Node.js+Koa
This time I will bring you a detailed explanation of the steps to implement JWT user authentication in Node.js Koa. What are the precautions for implementing JWT user authentication in Node.js Koa. The following is a practical case, let’s take a look.
1. Prerequisite knowledge
Token-based authentication
Koajs Chinese Documentation
Koa Framework Tutorial
2. Environment
Microsoft Visual Studio 2017 Integrated Development Environment
Node .js v8.9.4JavascriptRunning environment
##3. Start working and improve step by step
1. Create a basic static resource server and infrastructure The following is the basic code to implement a static server and a handler when token verification is abnormal. Below we will gradually add registration, login, and information functions under this basic code.const path = require('path'); // 用于处理目录路径
const Koa = require('koa'); // web开发框架
const serve = require('koa-static'); // 静态资源处理
const route = require('koa-route'); // 路由中间件
const jwt = require('jsonwebtoken'); // 用于签发、解析`token`
const jwtKoa = require('koa-jwt'); // 用于路由权限控制
const koaBody = require('koa-body'); // 用于查询字符串解析到`ctx.request.query`
const app = new Koa();
const website = {
scheme: 'http',
host: 'localhost',
port: 1337,
join: function () {
return `${this.scheme}://${this.host}:${this.port}`
}
}
/* jwt密钥 */
const secret = 'secret';
/* 当token验证异常时候的处理,如token过期、token错误 */
app.use((ctx, next) => {
return next().catch((err) => {
if (err.status === 401) {
ctx.status = 401;
ctx.body = {
ok: false,
msg: err.originalError ? err.originalError.message : err.message
}
} else {
throw err;
}
});
});
/* 查询字符串解析到`ctx.request.query` */
app.use(koaBody());
/* 路由权限控制 */
// 待办事项……
/* POST /api/register 注册 */
// 待办事项……
/* GET /api/login 登录 */
// 待办事项……
/* GET /api/info 信息 */
// 待办事项……
/* 静态资源处理 */
app.use(serve(path.join(dirname, 'static')));
/* 监听服务器端口 */
app.listen(website.port, () => {
console.log(`${website.join()} 服务器已经启动!`);
});Login interface, other resources do not require authentication, and the information interface requires authentication.
/* 路由权限控制 */
app.use(jwtKoa({ secret: secret }).unless({
 // 设置login、register接口,可以不需要认证访问
 path: [
 /^\/api\/login/,
 /^\/api\/register/,
 /^((?!\/api).)*$/ // 设置除了私有接口外的其它资源,可以不需要认证访问
 ]
}));/* POST /api/register 注册 */
app.use(route.post('/api/register', async (ctx, next) => {
const body = ctx.request.body;
/*
* body = {
* user : '御焱',
* password : '123456'
* }
*/
// 判断 body.user 和 body.password 格式是否正确
// 待办事项……
// 判断用户是否已经注册
// 待办事项……
// 保存到新用户到数据库中
// 待办事项……
// 是否注册成功
let 是否注册成功 = true;
if (是否注册成功) {
// 返回一个注册成功的JOSN数据给前端
return ctx.body = {
ok: true,
msg: '注册成功',
token: getToken({ user: body.user, password: body.password })
}
} else {
// 返回一个注册失败的JOSN数据给前端
return ctx.body = {
ok: false,
msg: '注册失败'
}
}
}));
/* 获取一个期限为4小时的token */
function getToken(payload = {}) {
return jwt.sign(payload, secret, { expiresIn: '4h' });
}
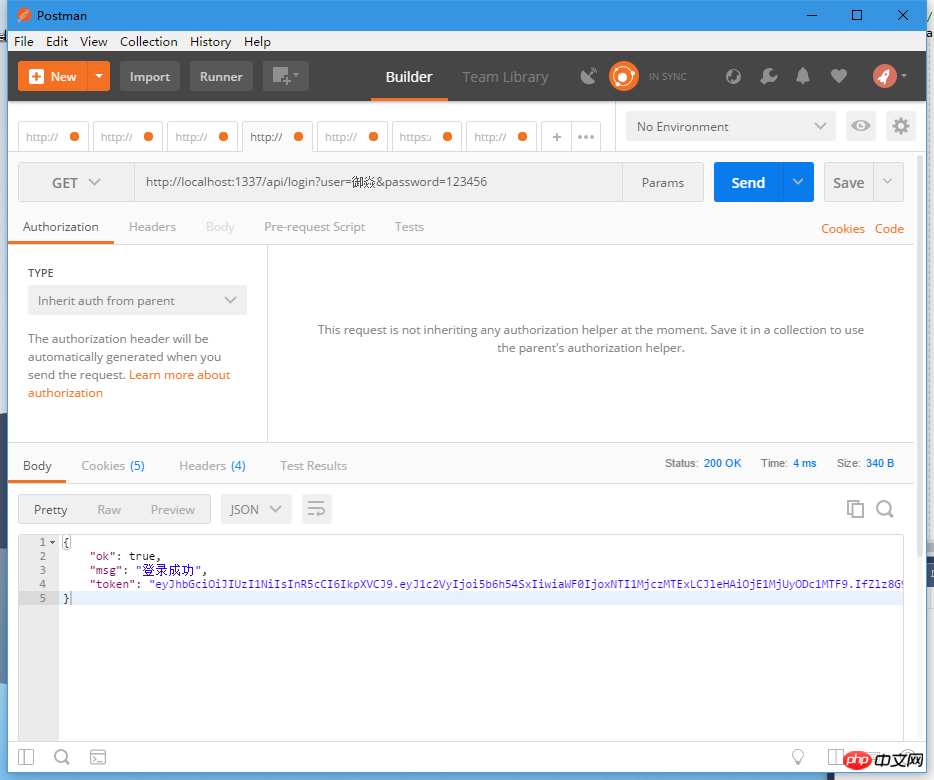
/* GET /api/login 登录 */
app.use(route.get('/api/login', async (ctx, next) => {
 const query = ctx.request.query;
 /*
 * query = {
 * user : '御焱',
 * password : '123456'
 * }
 */
 // 判断 query.user 和 query.password 格式是否正确
 // 待办事项……
 // 判断是否已经注册
 // 待办事项……

 // 判断姓名、学号是否正确
 // 待办事项……

 return ctx.body = {
 ok: true,
 msg: '登录成功',
 token: getToken({ user: query.user, password: query.password })
 }
}));
/* GET /api/info 信息 */
app.use(route.get('/api/info', async (ctx, next) => {
 // 前端访问时会附带token在请求头
 payload = getJWTPayload(ctx.headers.authorization)
 /*
 * payload = {
 * user : "御焱",
 * iat : 1524042454,
 * exp : 1524056854
 * }
 */
 // 根据 payload.user 查询该用户在数据库中的信息
 // 待办事项……
 const info = {
 name: '御焱',
 age: 10,
 sex: '男'
 }
 let 获取信息成功 = true;
 if (获取信息成功) {
 return ctx.body = {
  ok: true,
  msg: '获取信息成功',
  data: info
 }
 } else {
 return ctx.body = {
  ok: false,
  msg: '获取信息失败'
 }
 }
}));
/* 通过token获取JWT的payload部分 */
function getJWTPayload(token) {
 // 验证并解析JWT
 return jwt.verify(token.split(' ')[1], secret);
}
https://segmentfault.com/a/1190000014727547
I believe you have mastered the method after reading the case in this article. For more exciting information, please pay attention to php Chinese Other related articles online! Recommended reading:Vue three-layer nested routing experience
Vue.js calculation and listener properties Detailed instructions for use
The above is the detailed content of Detailed explanation of the steps to implement JWT user authentication with Node.js+Koa. For more information, please follow other related articles on the PHP Chinese website!

Hot AI Tools

Undresser.AI Undress
AI-powered app for creating realistic nude photos

AI Clothes Remover
Online AI tool for removing clothes from photos.

Undress AI Tool
Undress images for free

Clothoff.io
AI clothes remover

Video Face Swap
Swap faces in any video effortlessly with our completely free AI face swap tool!

Hot Article
Hot Tools

Notepad++7.3.1
Easy-to-use and free code editor

SublimeText3 Chinese version
Chinese version, very easy to use

Zend Studio 13.0.1
Powerful PHP integrated development environment

Dreamweaver CS6
Visual web development tools

SublimeText3 Mac version
God-level code editing software (SublimeText3)
Hot Topics


 How to make Google Maps the default map in iPhone
Apr 17, 2024 pm 07:34 PM
How to make Google Maps the default map in iPhone
Apr 17, 2024 pm 07:34 PM
The default map on the iPhone is Maps, Apple's proprietary geolocation provider. Although the map is getting better, it doesn't work well outside the United States. It has nothing to offer compared to Google Maps. In this article, we discuss the feasible steps to use Google Maps to become the default map on your iPhone. How to Make Google Maps the Default Map in iPhone Setting Google Maps as the default map app on your phone is easier than you think. Follow the steps below – Prerequisite steps – You must have Gmail installed on your phone. Step 1 – Open the AppStore. Step 2 – Search for “Gmail”. Step 3 – Click next to Gmail app
 Steps to upgrade to the latest version of WeChat (Easily master the upgrade method to the latest version of WeChat)
Jun 01, 2024 pm 10:24 PM
Steps to upgrade to the latest version of WeChat (Easily master the upgrade method to the latest version of WeChat)
Jun 01, 2024 pm 10:24 PM
WeChat is one of the social media platforms in China that continuously launches new versions to provide a better user experience. Upgrading WeChat to the latest version is very important to keep in touch with family and colleagues, to stay in touch with friends, and to keep abreast of the latest developments. 1. Understand the features and improvements of the latest version. It is very important to understand the features and improvements of the latest version before upgrading WeChat. For performance improvements and bug fixes, you can learn about the various new features brought by the new version by checking the update notes on the WeChat official website or app store. 2. Check the current WeChat version We need to check the WeChat version currently installed on the mobile phone before upgrading WeChat. Click to open the WeChat application "Me" and then select the menu "About" where you can see the current WeChat version number. 3. Open the app
 This Apple ID is not yet in use in the iTunes Store: Fix
Jun 10, 2024 pm 05:42 PM
This Apple ID is not yet in use in the iTunes Store: Fix
Jun 10, 2024 pm 05:42 PM
When logging into iTunesStore using AppleID, this error saying "This AppleID has not been used in iTunesStore" may be thrown on the screen. There are no error messages to worry about, you can fix them by following these solution sets. Fix 1 – Change Shipping Address The main reason why this prompt appears in iTunes Store is that you don’t have the correct address in your AppleID profile. Step 1 – First, open iPhone Settings on your iPhone. Step 2 – AppleID should be on top of all other settings. So, open it. Step 3 – Once there, open the “Payment & Shipping” option. Step 4 – Verify your access using Face ID. step
 Shazam app not working in iPhone: Fix
Jun 08, 2024 pm 12:36 PM
Shazam app not working in iPhone: Fix
Jun 08, 2024 pm 12:36 PM
Having issues with the Shazam app on iPhone? Shazam helps you find songs by listening to them. However, if Shazam isn't working properly or doesn't recognize the song, you'll have to troubleshoot it manually. Repairing the Shazam app won't take long. So, without wasting any more time, follow the steps below to resolve issues with Shazam app. Fix 1 – Disable Bold Text Feature Bold text on iPhone may be the reason why Shazam is not working properly. Step 1 – You can only do this from your iPhone settings. So, open it. Step 2 – Next, open the “Display & Brightness” settings there. Step 3 – If you find that “Bold Text” is enabled
 Detailed explanation of the steps to obtain Win11 system administrator permissions
Mar 08, 2024 pm 09:09 PM
Detailed explanation of the steps to obtain Win11 system administrator permissions
Mar 08, 2024 pm 09:09 PM
Windows 11, as the latest operating system launched by Microsoft, is deeply loved by users. In the process of using Windows 11, sometimes we need to obtain system administrator rights in order to perform some operations that require permissions. Next, we will introduce in detail the steps to obtain system administrator rights in Windows 11. The first step is to click "Start Menu". You can see the Windows icon in the lower left corner. Click the icon to open the "Start Menu". In the second step, find and click "
 iPhone screenshots not working: How to fix it
May 03, 2024 pm 09:16 PM
iPhone screenshots not working: How to fix it
May 03, 2024 pm 09:16 PM
Screenshot feature not working on your iPhone? Taking a screenshot is very easy as you just need to hold down the Volume Up button and the Power button at the same time to grab your phone screen. However, there are other ways to capture frames on the device. Fix 1 – Using Assistive Touch Take a screenshot using the Assistive Touch feature. Step 1 – Go to your phone settings. Step 2 – Next, tap to open Accessibility settings. Step 3 – Open Touch settings. Step 4 – Next, open the Assistive Touch settings. Step 5 – Turn on Assistive Touch on your phone. Step 6 – Open “Customize Top Menu” to access it. Step 7 – Now you just need to link any of these functions to your screen capture. So click on the first
 Clock app missing in iPhone: How to fix it
May 03, 2024 pm 09:19 PM
Clock app missing in iPhone: How to fix it
May 03, 2024 pm 09:19 PM
Is the clock app missing from your phone? The date and time will still appear on your iPhone's status bar. However, without the Clock app, you won’t be able to use world clock, stopwatch, alarm clock, and many other features. Therefore, fixing missing clock app should be at the top of your to-do list. These solutions can help you resolve this issue. Fix 1 – Place the Clock App If you mistakenly removed the Clock app from your home screen, you can put the Clock app back in its place. Step 1 – Unlock your iPhone and start swiping to the left until you reach the App Library page. Step 2 – Next, search for “clock” in the search box. Step 3 – When you see “Clock” below in the search results, press and hold it and
 Safari zoom issue on iPhone: Here's the fix
Apr 20, 2024 am 08:08 AM
Safari zoom issue on iPhone: Here's the fix
Apr 20, 2024 am 08:08 AM
If you don't have control over the zoom level in Safari, getting things done can be tricky. So if Safari looks zoomed out, that might be a problem for you. Here are a few ways you can fix this minor zoom issue in Safari. 1. Cursor magnification: Select "Display" > "Cursor magnification" in the Safari menu bar. This will make the cursor more visible on the screen, making it easier to control. 2. Move the mouse: This may sound simple, but sometimes just moving the mouse to another location on the screen may automatically return it to normal size. 3. Use Keyboard Shortcuts Fix 1 – Reset Zoom Level You can control the zoom level directly from the Safari browser. Step 1 – When you are in Safari
