

How to use this in React components
This time I will show you how to use this in React components. What are the precautions when using this in React components. Here are practical cases, let’s take a look.
What is this of the React component?
By writing a simple component and rendering it, print out the custom function and the this:
import React from 'react';
const STR = '被调用,this指向:';
class App extends React.Component{
constructor(){
super()
}
//测试函数
handler() {
console.log(`handler ${STR}`,this);
}
render(){
console.log(`render ${STR}`,this);
return(
<p>
<h1>hello World</h1>
<label htmlFor = 'btn'>单击打印函数handler中this的指向</label>
<input id = "btn" type="button" value = '单击' onClick = {this.handler}/>
</p>
)
}
}
export default AppThe result is as shown in the figure:
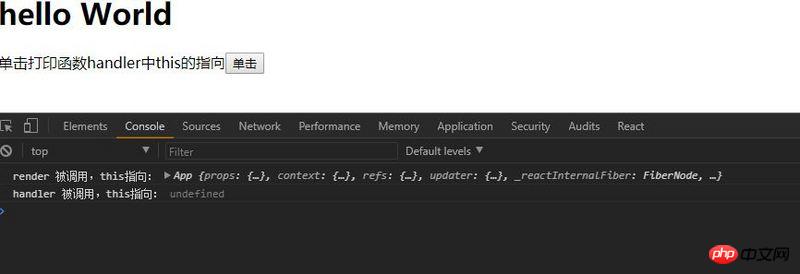
As you can see, this in the render function points to the component instance, and this in the handler() function is undefined, why is this?
This in JavaScript function
We all know that this in JavaScript function is not defined when the function is declared, but when the function is called (that is, run)
var student = {
  func: function() {
    console.log(this);
  };
};
student.func();
var studentFunc = student.func;
studentFunc();defined when running this code, you can see that student.func() prints the student object, because this points to the student object at this time; and studentFunc() prints window, because it is called by window at this time , this points to window.
This code vividly verifies that this in the JavaScript function is not defined when the function is declared, but when the function is running;
Similarly, React components also follow JavaScript This feature means that different 'callers' of component methods will lead to differences in this (the "caller" here refers to the current object when the function is executed)
Different "callers" will cause this is different
Test: print this in the lifecycle function and custom function that come with the component, and use this.handler() in the render() method respectively , window.handler(), onCilck={this.handler} These three methods call handler():
/App.jsx
//测试函数
handler() {
console.log(`handler ${STR}`,this);
}
render(){
console.log(`render ${STR}`,this);
this.handler();
window.handler = this.handler;
window.handler();
return(
<p>
<h1>hello World</h1>
<label htmlFor = 'btn'>单击打印函数handler中this的指向</label>
<input id = "btn" type="button" value = '单击' onClick = {this.handler}/>
</p>
)
}
}
export default App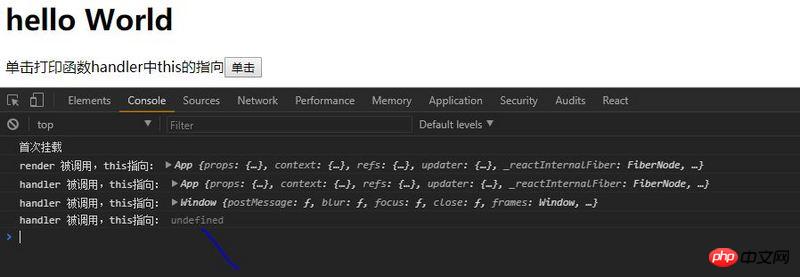
Yes See: this -> component instance App object in
render; this.handler() -> component instance in
render App object;
render in window.handler() -> window object;
- ##onClick ={this .handler} -> undefined
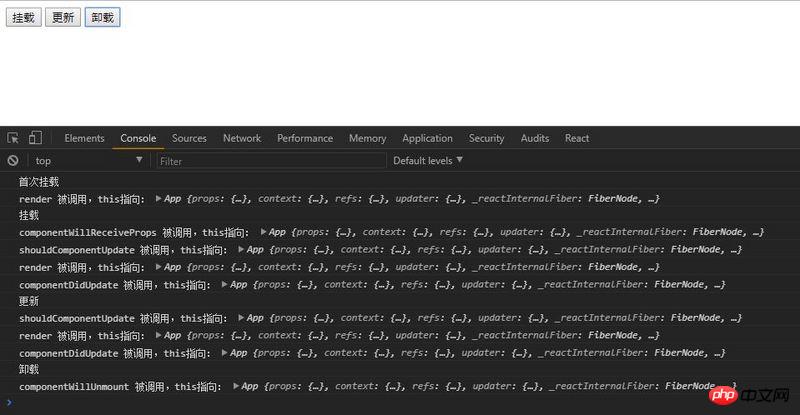
Use Three buttons trigger the loading, updating and uninstalling process of components: /index.htmlimport React from 'react' import {render,unmountComponentAtNode} from 'react-dom' import App from './App.jsx' const root=document.getElementById('root') console.log("首次挂载"); let instance = render(<App />,root); window.renderComponent = () => { console.log("挂载"); instance = render(<App />,root); } window.setState = () => { console.log("更新"); instance.setState({foo: 'bar'}); } window.unmountComponentAtNode = () => { console.log('卸载'); unmountComponentAtNode(root); }Copy after login
Run the program, click "Mount" in turn, and bind onClick={this.handler} The results of "Click" button, "Update" and "Uninstall" buttons are as follows:<!DOCTYPE html> <html> <head> <title>react-this</title> </head> <body> <button onclick="window.renderComponent()">挂载</button> <button onclick="window.setState()">更新</button> <button onclick="window.unmountComponentAtNode()">卸载</button> <p id="root"> <!-- app --> </p> </body> </html>Copy after login
Automatic binding and manual binding
- React.createClass has a built-in magic that can automatically bind the method used so that its this points to The instantiation object of the component, but other JavaScript classes do not have this feature;
- So the React team decided not to implement automatic binding in the React component class and give the freedom of context conversion to For developers;
- So we usually bind the this point of the method in the
constructor :
import React from 'react';
const STR = '被调用,this指向:';
class App extends React.Component{
constructor(){
super();
this.handler = this.handler.bind(this);
}
//测试函数
handler() {
console.log(`handler ${STR}`,this);
}
render(){
console.log(`render ${STR}`,this);
this.handler();
window.handler = this.handler;
window.handler();
return(
<p>
<h1>hello World</h1>
<label htmlFor = 'btn'>单击打印函数handler中this的指向</label>
<input id = "btn" type="button" value = '单击' onClick = {this.handler}/>
</p>
)
}
}
export default App将this.handler()绑定为组件实例后,this.handler()中的this就指向组将实例,即onClick={this.handler}打印出来的为组件实例;
总结:
React组件生命周期函数中的this指向组件实例;
自定义组件方法的this会因调用者不同而不同;
为了在组件的自定义方法中获取组件实例,需要手动绑定this到组将实例。
相信看了本文案例你已经掌握了方法,更多精彩请关注php中文网其它相关文章!
推荐阅读:
The above is the detailed content of How to use this in React components. For more information, please follow other related articles on the PHP Chinese website!

Hot AI Tools

Undresser.AI Undress
AI-powered app for creating realistic nude photos

AI Clothes Remover
Online AI tool for removing clothes from photos.

Undress AI Tool
Undress images for free

Clothoff.io
AI clothes remover

Video Face Swap
Swap faces in any video effortlessly with our completely free AI face swap tool!

Hot Article
Hot Tools

Notepad++7.3.1
Easy-to-use and free code editor

SublimeText3 Chinese version
Chinese version, very easy to use

Zend Studio 13.0.1
Powerful PHP integrated development environment

Dreamweaver CS6
Visual web development tools

SublimeText3 Mac version
God-level code editing software (SublimeText3)
Hot Topics


 Guide to React front-end and back-end separation: How to achieve decoupling and independent deployment of front-end and back-end
Sep 28, 2023 am 10:48 AM
Guide to React front-end and back-end separation: How to achieve decoupling and independent deployment of front-end and back-end
Sep 28, 2023 am 10:48 AM
React front-end and back-end separation guide: How to achieve front-end and back-end decoupling and independent deployment, specific code examples are required In today's web development environment, front-end and back-end separation has become a trend. By separating front-end and back-end code, development work can be made more flexible, efficient, and facilitate team collaboration. This article will introduce how to use React to achieve front-end and back-end separation, thereby achieving the goals of decoupling and independent deployment. First, we need to understand what front-end and back-end separation is. In the traditional web development model, the front-end and back-end are coupled
 How to build a reliable messaging app with React and RabbitMQ
Sep 28, 2023 pm 08:24 PM
How to build a reliable messaging app with React and RabbitMQ
Sep 28, 2023 pm 08:24 PM
How to build a reliable messaging application with React and RabbitMQ Introduction: Modern applications need to support reliable messaging to achieve features such as real-time updates and data synchronization. React is a popular JavaScript library for building user interfaces, while RabbitMQ is a reliable messaging middleware. This article will introduce how to combine React and RabbitMQ to build a reliable messaging application, and provide specific code examples. RabbitMQ overview:
 React Router User Guide: How to implement front-end routing control
Sep 29, 2023 pm 05:45 PM
React Router User Guide: How to implement front-end routing control
Sep 29, 2023 pm 05:45 PM
ReactRouter User Guide: How to Implement Front-End Routing Control With the popularity of single-page applications, front-end routing has become an important part that cannot be ignored. As the most popular routing library in the React ecosystem, ReactRouter provides rich functions and easy-to-use APIs, making the implementation of front-end routing very simple and flexible. This article will introduce how to use ReactRouter and provide some specific code examples. To install ReactRouter first, we need
 PHP, Vue and React: How to choose the most suitable front-end framework?
Mar 15, 2024 pm 05:48 PM
PHP, Vue and React: How to choose the most suitable front-end framework?
Mar 15, 2024 pm 05:48 PM
PHP, Vue and React: How to choose the most suitable front-end framework? With the continuous development of Internet technology, front-end frameworks play a vital role in Web development. PHP, Vue and React are three representative front-end frameworks, each with its own unique characteristics and advantages. When choosing which front-end framework to use, developers need to make an informed decision based on project needs, team skills, and personal preferences. This article will compare the characteristics and uses of the three front-end frameworks PHP, Vue and React.
 Integration of Java framework and front-end React framework
Jun 01, 2024 pm 03:16 PM
Integration of Java framework and front-end React framework
Jun 01, 2024 pm 03:16 PM
Integration of Java framework and React framework: Steps: Set up the back-end Java framework. Create project structure. Configure build tools. Create React applications. Write REST API endpoints. Configure the communication mechanism. Practical case (SpringBoot+React): Java code: Define RESTfulAPI controller. React code: Get and display the data returned by the API.
 How to use React to develop a responsive backend management system
Sep 28, 2023 pm 04:55 PM
How to use React to develop a responsive backend management system
Sep 28, 2023 pm 04:55 PM
How to use React to develop a responsive backend management system. With the rapid development of the Internet, more and more companies and organizations need an efficient, flexible, and easy-to-manage backend management system to handle daily operations. As one of the most popular JavaScript libraries currently, React provides a concise, efficient and maintainable way to build user interfaces. This article will introduce how to use React to develop a responsive backend management system and give specific code examples. Create a React project first
 Vue.js vs. React: Project-Specific Considerations
Apr 09, 2025 am 12:01 AM
Vue.js vs. React: Project-Specific Considerations
Apr 09, 2025 am 12:01 AM
Vue.js is suitable for small and medium-sized projects and fast iterations, while React is suitable for large and complex applications. 1) Vue.js is easy to use and is suitable for situations where the team is insufficient or the project scale is small. 2) React has a richer ecosystem and is suitable for projects with high performance and complex functional needs.
 What closures does react have?
Oct 27, 2023 pm 03:11 PM
What closures does react have?
Oct 27, 2023 pm 03:11 PM
React has closures such as event handling functions, useEffect and useCallback, higher-order components, etc. Detailed introduction: 1. Event handling function closure: In React, when we define an event handling function in a component, the function will form a closure and can access the status and properties within the component scope. In this way, the state and properties of the component can be used in the event processing function to implement interactive logic; 2. Closures in useEffect and useCallback, etc.
