
 Web Front-end
JS Tutorial
Grunt's detailed explanation of static file compression and version control packaging
Web Front-end
JS Tutorial
Grunt's detailed explanation of static file compression and version control packaging
Grunt's detailed explanation of static file compression and version control packaging

This article mainly brings you an example of Grunt's compression and version control packaging of static files. The editor thinks it is quite good, so I will share it with you now and give it as a reference for everyone. Let’s follow the editor to take a look, I hope it can help everyone.
Let’s talk about the general steps before talking about it: Install nodejs -> Install grunt globally -> Project creation package.json -> Project installation grunt and grunt plug-in -> Configure Gruntfile.js -> Run task
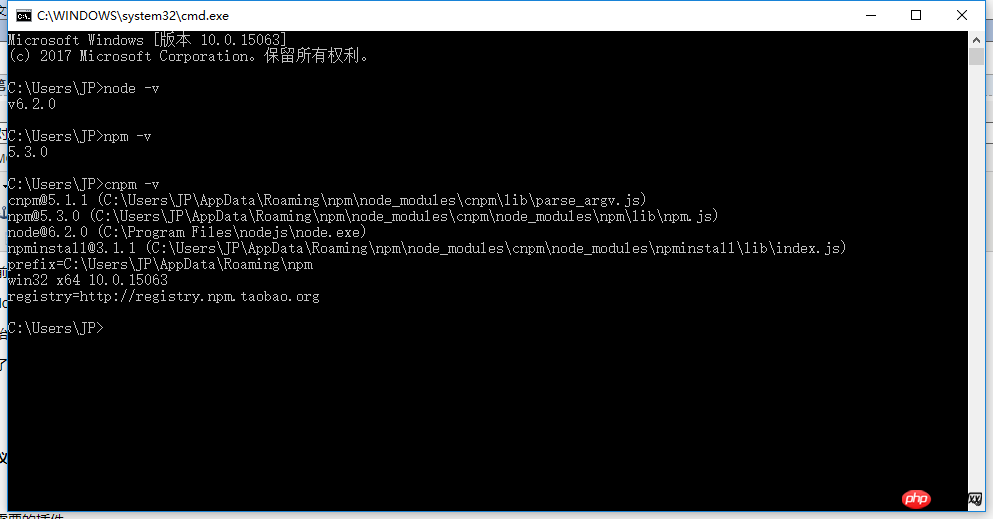
1. Install Node
We need to install Nodejs before we start, if there is no portal installed
After installation, check whether the installation is successful. Normally the prompt is like this
It is recommended that npm be replaced with Taobao’s cnpm , the speed is awesome.
Installation command:
npm install cnpm -g -registry=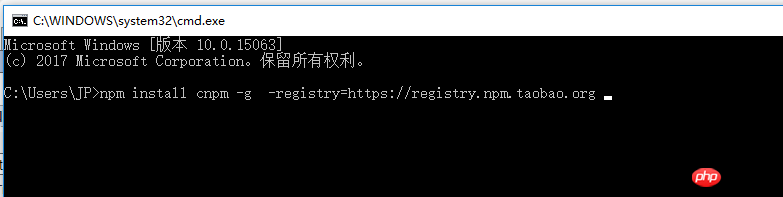 https://registry.npm.taobao.org
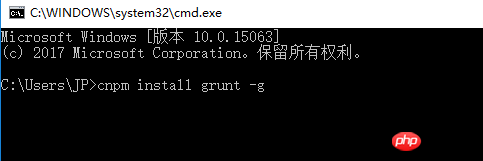
2. Install global Grunt
Installation command:
cnpm install grunt -g
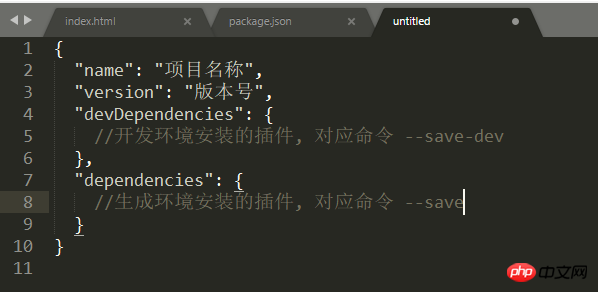
3.Project creation package.json
Create package in the project root directory .json file, the file content is as follows
4. Project installation grunt and grunt plug-in
The plug-ins we need
| Plug-in name | Description | Github address |
| grunt-contrib-clean | Clear files and folders | https://github.com/gruntjs/grunt-contrib-clean |
| grunt-contrib-copy | Copy files and folders | https://github.com/gruntjs/grunt-contrib-copy |
| grunt-contrib-concat | Connect and merge files (not used) | https://github.com/gruntjs/grunt-contrib-concat |
| grunt-contrib-cssmin | (CSS file) compression | https://github.com/gruntjs/grunt-contrib-cssmin |
| grunt-contrib-uglify | (JS file) compression | https://github.com/gruntjs/grunt-contrib-uglify |
| grunt-filerev | File content hash (MD5) (version number control) | https://github.com/yeoman/grunt-filerev |
| grunt-usemin | File reference modification | https://github.com/yeoman/grunt-usemin |
| load-grunt-tasks | oad-grunt-tasks | https://github.com/sindresorhus/load-grunt-tasks |
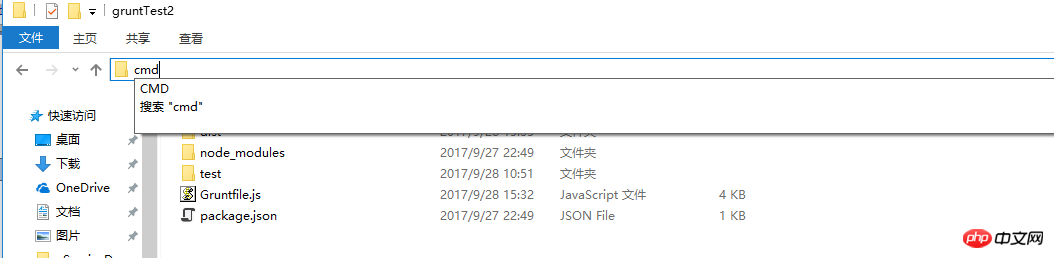
We open our project folder, enter cmd in the path bar and press Enter
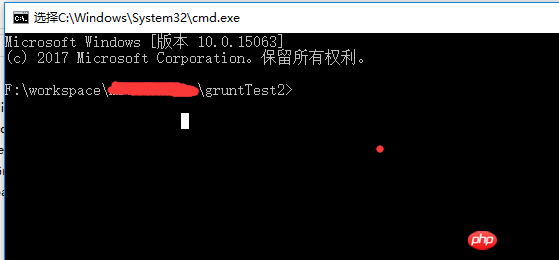
The interface after pressing Enter
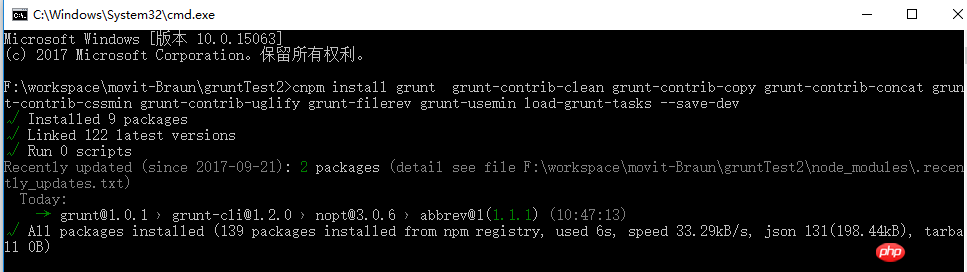
After opening the command line window, we enter the installation command:
cnpm install grunt grunt-contrib-clean grunt-contrib-copy grunt-contrib-concat grunt-contrib-cssmin grunt- contrib-uglify grunt-filerev grunt-usemin load-grunt-tasks --save-dev
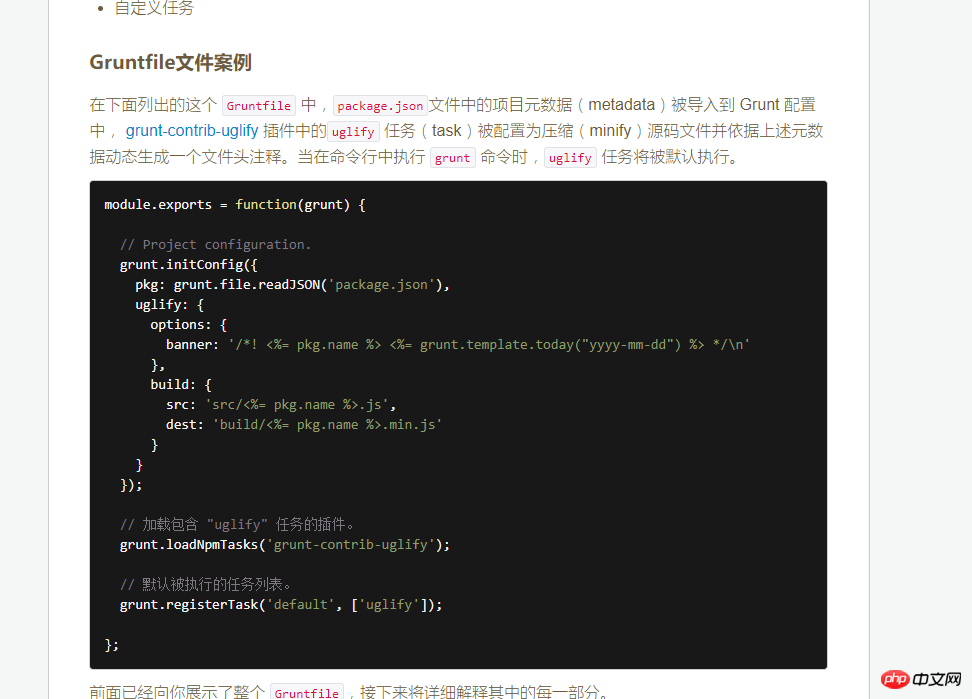
.Configuration Gruntfile.js (This is the point, the point, the point. Say important things three times.)
I will post my configuration first, and I will explain it slowly latermodule.exports = function (grunt) {
require('load-grunt-tasks')(grunt);
var path = {
  src : 'test',
  dest : 'dist',
 }
grunt.initConfig({
path : path,
clean : {//清空生产文件夹
beforebuild : {
files : [{
src : ['<%= path.dest %>/']
}
]
}
},
filerev : {//对css和js文件重命名
build : {
files : [{
src : ['<%= path.dest %>/**',
'!<%= path.dest %>/page/*.html',//html文件不加版本号
'!<%= path.dest %>/**/*.{png,jpg,jpeg}']//图片 不需要加版本号
}
]
}
},
useminPrepare : {//声明concat、cssmin、uglify
build : {
files : [{
src : '<%= path.src %>/page/*.html'
}
],
}
},
usemin : {//修改html中的css和js引用
html : {
files : [{
src : '<%= path.dest %>/page/*.html'
}
]
}
},
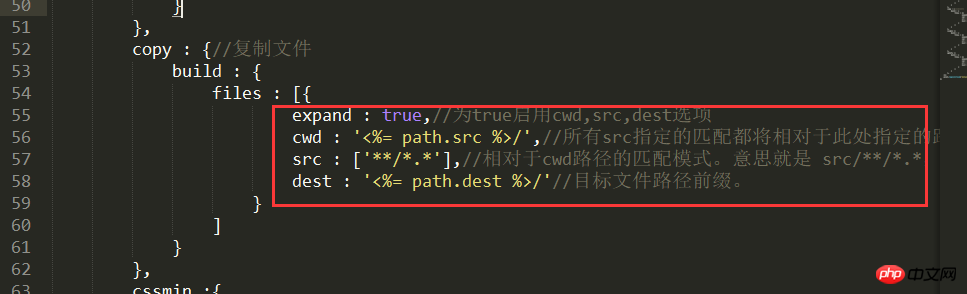
copy : {//复制文件
build : {
files : [{
expand : true,//为true启用cwd,src,dest选项
cwd : '<%= path.src %>/',//所有src指定的匹配都将相对于此处指定的路径(但不包括此路径)
src : ['**/*.*'],//相对于cwd路径的匹配模式。意思就是 src/**/*.*,匹配src下面所有文件
dest : '<%= path.dest %>/'//目标文件路径前缀。
}
]
}
},
cssmin :{
build : {
files : [{
expand : true,//为true启用cwd,src,dest选项
cwd : '<%= path.src %>/',//所有src指定的匹配都将相对于此处指定的路径(但不包括此路径)
src : ['css/*.css'],//相对于cwd路径的匹配模式。意思就是 src/**/*.css,匹配src下面所有css文件
dest : '<%= path.dest %>/'//目标文件路径前缀。
}
]
}
},
uglify :{
build : {
files : [{
expand : true,//为true启用cwd,src,dest选项
cwd : '<%= path.src %>/',//所有src指定的匹配都将相对于此处指定的路径(但不包括此路径)
src : ['js/*.js'],//相对于cwd路径的匹配模式。意思就是 src/**/*.js,匹配src下面所有js文件
dest : '<%= path.dest %>/'//目标文件路径前缀。
}
]
}
},
});
grunt.registerTask('default', ['clean:beforebuild', 'copy', 'cssmin', 'uglify','filerev', 'usemin']);
};
task name, can be viewed in the corresponding github
grunt.loadNpmTasks('grunt-contrib-uglify'); As you can see from the literal meaning, load a plug-in that can provide "uglify" tasks.
grunt.registerTask('default', ['uglify']); Register an alias task. This alias task corresponds to a task list
Step one: We need to repackage, then we need to copy the files, so we need the grunt-contrib-copy plug-in.
Before copying, we must first determine the source file and target file. The source files here are placed in the test folder, and the target files are placed in the dist folder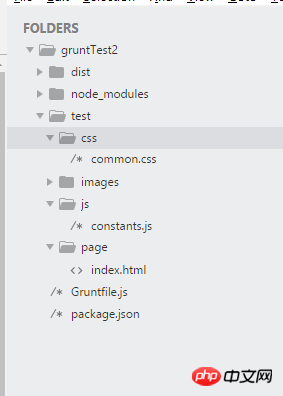
var path = {
src : 'test',
dest : 'dist',
}
copy : {//复制文件
build : {
files : [{
expand : true,//为true启用cwd,src,dest选项
cwd : '<%= path.src %>/',//所有src指定的匹配都将相对于此处指定的路径(但不包括此路径)
src : ['**/*.*'],//相对于cwd路径的匹配模式。意思就是 src/**/*.*,匹配src下面所有文件
dest : '<%= path.dest %>/'//目标文件路径前缀。
}
]
}
},cssmin :{
build : {
files : [{
expand : true,//为true启用cwd,src,dest选项
cwd : '<%= path.src %>/',//所有src指定的匹配都将相对于此处指定的路径(但不包括此路径)
src : ['css/*.css'],//相对于cwd路径的匹配模式。意思就是 src/**/*.css,匹配src下面所有文件
dest : '<%= path.dest %>/'//目标文件路径前缀。
}
]
}
},uglify :{
build : {
files : [{
expand : true,//为true启用cwd,src,dest选项
cwd : '<%= path.src %>/',//所有src指定的匹配都将相对于此处指定的路径(但不包括此路径)
src : ['js/*.js'],//相对于cwd路径的匹配模式。意思就是 src/**/*.js,匹配src下面所有文件
dest : '<%= path.dest %>/'//目标文件路径前缀。
}
]
}
},filerev : {//对css和js文件重命名
build : {
files : [{
src : ['<%= path.dest %>/**',
'!<%= path.dest %>/page/*.html',//html文件不加版本号
'!<%= path.dest %>/**/*.{png,jpg,jpeg}']//图片 不需要加版本号
}
]
}
},You need to use the grunt-usemin plug-in to modify the file reference. The task corresponding to the plug-in is called usemin
usemin : {//修改html中的css和js引用
html : {
files : [{
src : '<%= path.dest %>/page/*.html'
}
]
}
},usemin : {//修改html中的css和js引用
html : {
files : [{
src : '<%= path.dest %>/page/*.html'
}
]
},
css :{
files : [{
src : '<%= path.dest %>/css/*.css'
}
]
}
},clean : {//清空生产文件夹
beforebuild : {
files : [{
src : ['<%= path.dest %>/']
}
]
}
},grunt.registerTask('default', ['clean:beforebuild', 'copy', 'cssmin', 'uglify','filerev', 'usemin']);
可以看到,我们这里只是注册了任务,并没有应用插件。我们添加插件是听过 load-grunt-tasks 插件完成的
require('load-grunt-tasks')(grunt);
这里指令相当于我们一个个写
grunt.loadNpmTasks('xxx');
Gruntfile.js 配置完了之后我们执行grunt命令就可以在目标文件夹中得到我们所需要的文件
这里补充说明几点:
Gruntfile.js 配置完了之后我们执行grunt命令就可以在目标文件夹中得到我们所需要的文件
这里补充说明几点:
这种写法是动态构建文件对象
这种写法是文件数组格式
相关推荐:
The above is the detailed content of Grunt's detailed explanation of static file compression and version control packaging. For more information, please follow other related articles on the PHP Chinese website!

Hot AI Tools

Undresser.AI Undress
AI-powered app for creating realistic nude photos

AI Clothes Remover
Online AI tool for removing clothes from photos.

Undress AI Tool
Undress images for free

Clothoff.io
AI clothes remover

Video Face Swap
Swap faces in any video effortlessly with our completely free AI face swap tool!

Hot Article
Hot Tools

Notepad++7.3.1
Easy-to-use and free code editor

SublimeText3 Chinese version
Chinese version, very easy to use

Zend Studio 13.0.1
Powerful PHP integrated development environment

Dreamweaver CS6
Visual web development tools

SublimeText3 Mac version
God-level code editing software (SublimeText3)
Hot Topics


 How to recover expired WeChat files? Can expired WeChat files be recovered?
Feb 22, 2024 pm 02:46 PM
How to recover expired WeChat files? Can expired WeChat files be recovered?
Feb 22, 2024 pm 02:46 PM
Open WeChat, select Settings in Me, select General and then select Storage Space, select Management in Storage Space, select the conversation in which you want to restore files and select the exclamation mark icon. Tutorial Applicable Model: iPhone13 System: iOS15.3 Version: WeChat 8.0.24 Analysis 1 First open WeChat and click the Settings option on the My page. 2 Then find and click General Options on the settings page. 3Then click Storage Space on the general page. 4 Next, click Manage on the storage space page. 5Finally, select the conversation in which you want to recover files and click the exclamation mark icon on the right. Supplement: WeChat files generally expire in a few days. If the file received by WeChat has not been clicked, the WeChat system will clear it after 72 hours. If the WeChat file has been viewed,
 Photos cannot open this file because the format is not supported or the file is corrupted
Feb 22, 2024 am 09:49 AM
Photos cannot open this file because the format is not supported or the file is corrupted
Feb 22, 2024 am 09:49 AM
In Windows, the Photos app is a convenient way to view and manage photos and videos. Through this application, users can easily access their multimedia files without installing additional software. However, sometimes users may encounter some problems, such as encountering a "This file cannot be opened because the format is not supported" error message when using the Photos app, or file corruption when trying to open photos or videos. This situation can be confusing and inconvenient for users, requiring some investigation and fixes to resolve the issues. Users see the following error when they try to open photos or videos on the Photos app. Sorry, Photos cannot open this file because the format is not currently supported, or the file
 Can Tmp format files be deleted?
Feb 24, 2024 pm 04:33 PM
Can Tmp format files be deleted?
Feb 24, 2024 pm 04:33 PM
Tmp format files are a temporary file format usually generated by a computer system or program during execution. The purpose of these files is to store temporary data to help the program run properly or improve performance. Once the program execution is completed or the computer is restarted, these tmp files are often no longer necessary. Therefore, for Tmp format files, they are essentially deletable. Moreover, deleting these tmp files can free up hard disk space and ensure the normal operation of the computer. However, before deleting Tmp format files, we need to
 What to do if the 0x80004005 error code appears. The editor will teach you how to solve the 0x80004005 error code.
Mar 21, 2024 pm 09:17 PM
What to do if the 0x80004005 error code appears. The editor will teach you how to solve the 0x80004005 error code.
Mar 21, 2024 pm 09:17 PM
When deleting or decompressing a folder on your computer, sometimes a prompt dialog box "Error 0x80004005: Unspecified Error" will pop up. How should you solve this situation? There are actually many reasons why the error code 0x80004005 is prompted, but most of them are caused by viruses. We can re-register the dll to solve the problem. Below, the editor will explain to you the experience of handling the 0x80004005 error code. Some users are prompted with error code 0X80004005 when using their computers. The 0x80004005 error is mainly caused by the computer not correctly registering certain dynamic link library files, or by a firewall that does not allow HTTPS connections between the computer and the Internet. So how about
 Different uses of slashes and backslashes in file paths
Feb 26, 2024 pm 04:36 PM
Different uses of slashes and backslashes in file paths
Feb 26, 2024 pm 04:36 PM
A file path is a string used by the operating system to identify and locate a file or folder. In file paths, there are two common symbols separating paths, namely forward slash (/) and backslash (). These two symbols have different uses and meanings in different operating systems. The forward slash (/) is a commonly used path separator in Unix and Linux systems. On these systems, file paths start from the root directory (/) and are separated by forward slashes between each directory. For example, the path /home/user/Docume
 How to transfer files from Quark Cloud Disk to Baidu Cloud Disk?
Mar 14, 2024 pm 02:07 PM
How to transfer files from Quark Cloud Disk to Baidu Cloud Disk?
Mar 14, 2024 pm 02:07 PM
Quark Netdisk and Baidu Netdisk are currently the most commonly used Netdisk software for storing files. If you want to save the files in Quark Netdisk to Baidu Netdisk, how do you do it? In this issue, the editor has compiled the tutorial steps for transferring files from Quark Network Disk computer to Baidu Network Disk. Let’s take a look at how to operate it. How to save Quark network disk files to Baidu network disk? To transfer files from Quark Network Disk to Baidu Network Disk, you first need to download the required files from Quark Network Disk, then select the target folder in the Baidu Network Disk client and open it. Then, drag and drop the files downloaded from Quark Cloud Disk into the folder opened by the Baidu Cloud Disk client, or use the upload function to add the files to Baidu Cloud Disk. Make sure to check whether the file was successfully transferred in Baidu Cloud Disk after the upload is completed. That's it
 What is hiberfil.sys file? Can hiberfil.sys be deleted?
Mar 15, 2024 am 09:49 AM
What is hiberfil.sys file? Can hiberfil.sys be deleted?
Mar 15, 2024 am 09:49 AM
Recently, many netizens have asked the editor, what is the file hiberfil.sys? Can hiberfil.sys take up a lot of C drive space and be deleted? The editor can tell you that the hiberfil.sys file can be deleted. Let’s take a look at the details below. hiberfil.sys is a hidden file in the Windows system and also a system hibernation file. It is usually stored in the root directory of the C drive, and its size is equivalent to the size of the system's installed memory. This file is used when the computer is hibernated and contains the memory data of the current system so that it can be quickly restored to the previous state during recovery. Since its size is equal to the memory capacity, it may take up a larger amount of hard drive space. hiber
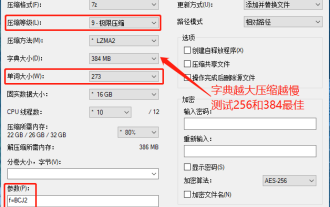 7-zip maximum compression rate setting, how to compress 7zip to the minimum
Jun 18, 2024 pm 06:12 PM
7-zip maximum compression rate setting, how to compress 7zip to the minimum
Jun 18, 2024 pm 06:12 PM
I found that the compressed package downloaded from a download website will be larger than the original compressed package after decompression. The difference is tens of Kb for a small one and several dozen Mb for a large one. If it is uploaded to a cloud disk or paid space, it does not matter if the file is small. , if there are many files, the storage cost will be greatly increased. I studied it specifically and can learn from it if necessary. Compression level: 9-Extreme compression Dictionary size: 256 or 384, the more compressed the dictionary, the slower it is. The compression rate difference is larger before 256MB, and there is no difference in compression rate after 384MB. Word size: maximum 273 Parameters: f=BCJ2, test and add parameter compression rate will be higher
