
 Web Front-end
JS Tutorial
Angular combines with zTree to asynchronously load node data instance sharing
Web Front-end
JS Tutorial
Angular combines with zTree to asynchronously load node data instance sharing
Angular combines with zTree to asynchronously load node data instance sharing

This article mainly shares with you the difficulties and methods of asynchronously loading node data using Angular combined with zTree. Friends who have needs in this regard can refer to it. I hope it can help everyone.
1 Prerequisite preparation
1.1 Create a new angular4 project

1.2 Go to zTree official website to download zTree
zTree official website: Click to go to
Version used by Sanshao: Click to go to

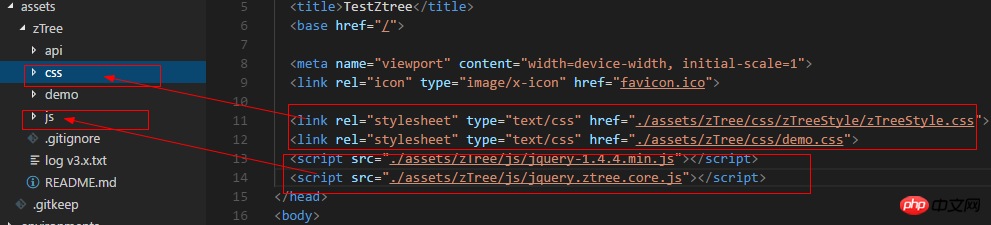
<!doctype html>
<html lang="en">
<head>
 <meta charset="utf-8">
 <title>TestZtree</title>
 <base href="/" rel="external nofollow" >

 <meta name="viewport" content="width=device-width, initial-scale=1">
 <link rel="icon" type="image/x-icon" href="favicon.ico" rel="external nofollow" >

 <link rel="stylesheet" type="text/css" href="./assets/zTree/css/zTreeStyle/zTreeStyle.css" rel="external nofollow" >
 <link rel="stylesheet" type="text/css" href="./assets/zTree/css/demo.css" rel="external nofollow" >
 <script src="./assets/zTree/js/jquery-1.4.4.min.js"></script>
 <script src="./assets/zTree/js/jquery.ztree.core.js"></script>
</head>
<body>
 <app-root></app-root>
</body>
</html>
declare var $ : any;
##
import { Component, OnInit } from '@angular/core';
declare var $ : any;
@Component({
selector: 'app-root',
templateUrl: './app.component.html',
styleUrls: ['./app.component.scss']
})
export class AppComponent implements OnInit {
// setting = {
// view: {
// showLine: true,
// showIcon: true,
// fontCss: this.getFont
// },
// data: {
// simpleData: {
// enable: true,
// idKey: 'id',
// pIdKey: 'pId'
// }
// },
// callback: {
// onClick: this.onCzTreeOnClick
// }
// };
// zNodes = [
// {id: 1, pId: 0, name: '1 一级标题', open: true, iconOpen:"assets/zTree/css/zTreeStyle/img/diy/1_open.png", iconClose:"assets/zTree/css/zTreeStyle/img/diy/1_close.png"},
// {id: 11, pId: 1, name: '1.1 二级标题', open: true, font:{'background-color':'skyblue', 'color':'white'}},
// {id: 111, pId: 11, name: '1.1.1 三级标题 -> 博客园', url: 'http://www.cnblogs.com/NeverCtrl-C/'},
// {id: 112, pId: 11, name: '1.1.2 三级标题 -> 单击', click: "alert('你单击了')"},
// {id: 12, pId: 1, name: '1.2 二级标题'},
// {id: 2, pId: 0, name: '2 一级标题'}
// ]
// getFont(treeId, node) {
// return node.font ? node.font : {};
// }
// onCzTreeOnClick(event, treeId, treeNode, clickFlag) {
// alert(treeNode.name);
// }
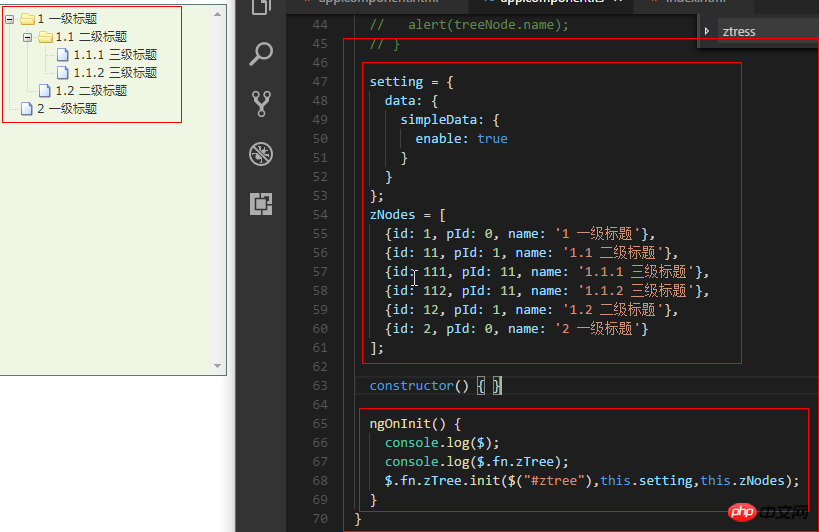
setting = {
data: {
simpleData: {
enable: true
}
}
};
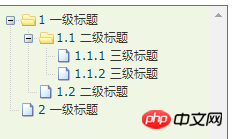
zNodes = [
{id: 1, pId: 0, name: '1 一级标题'},
{id: 11, pId: 1, name: '1.1 二级标题'},
{id: 111, pId: 11, name: '1.1.1 三级标题'},
{id: 112, pId: 11, name: '1.1.2 三级标题'},
{id: 12, pId: 1, name: '1.2 二级标题'},
{id: 2, pId: 0, name: '2 一级标题'}
];
constructor() { }
ngOnInit() {
console.log($);
console.log($.fn.zTree);
$.fn.zTree.init($("#ztree"),this.setting,this.zNodes);
}
}View Code
2.4 In component HTML Write code in
<ul class="ztree"><ul></ul>
2.5 Effect display
 3 zTree basic functions
3.1 Not displayed Connecting lines
3.1.1 Official documentation
Does not display connecting lines between titles
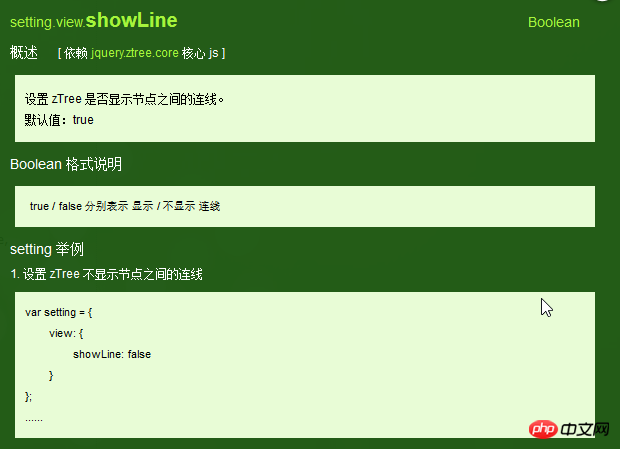 3.1.2 Programming steps
Just specify the value of showLine attribute as false in the basic configuration object
 setting = {
 data: {
 simpleData: {
 enable: true
 }
 },
 view: {
 showLine: false
 }
};3.2 Do not display the node icon
3.2.1 Official document
Remove the icon in front of the node
#3.2.2 Programming steps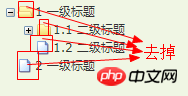
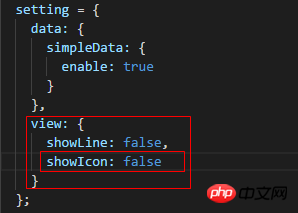
##
setting = {
 data: {
 simpleData: {
 enable: true
 }
 },
 view: {
 showLine: false,
 showIcon: false
 }
 };
3.3 Custom node icon
3.3.1 Official document
Change the icon of the node
3.3.2 Programming steps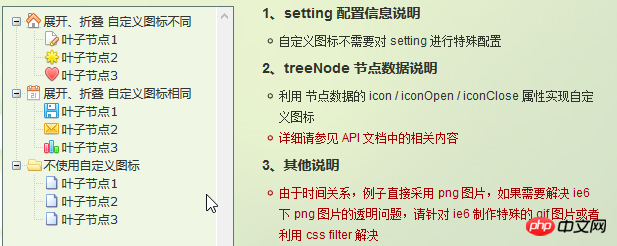 Set icon/iconOpen for treeNode node data /iconClose attribute
 3.4.1 Official document
Change the style of node font
3.4.2 Programming steps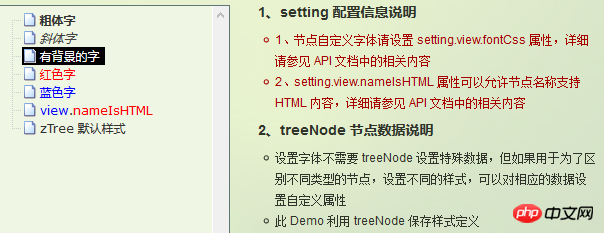 Just set the font attribute for the treeNode node data. The value of the font attribute is an object, and the content of the object is the same as the style data

##3.5 Hyperlink
3.5.1 Official document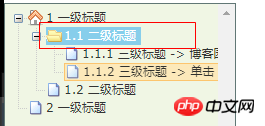
3.5.2 Programming steps
Set the url and click attributes for the treeNode node data
_self -> Open in the original window

 zNodes = [
 {id: 1, pId: 0, name: '1 一级标题', open: true, iconOpen:"assets/zTree/css/zTreeStyle/img/diy/1_open.png", iconClose:"assets/zTree/css/zTreeStyle/img/diy/1_close.png"},
 {id: 11, pId: 1, name: '1.1 二级标题', open: true, font:{'background-color':'skyblue', 'color':'white'}},
 {id: 111, pId: 11, name: '1.1.1 三级标题 -> 博客园1', url: 'http://www.cnblogs.com/NeverCtrl-C/', target: '_blank'},
 {id: 113, pId: 11, name: '1.1.1 三级标题 -> 博客园2', url: 'http://www.cnblogs.com/NeverCtrl-C/', target: '_self'},
 {id: 112, pId: 11, name: '1.1.2 三级标题 -> 单击', click: "alert('你单击了')"},
 {id: 12, pId: 1, name: '1.2 二级标题'},
 {id: 2, pId: 0, name: '2 一级标题'}
]View Code
3.6.1 Official document
The corresponding method is triggered when the node title is clicked
Tips 01: You can use this usage in angular Implement route jump
3.6.2 编程步骤
设置基本配置对象的onClick属性
技巧01:onClick属性值是一个方法的引用,我们需要自己编写这个方法
 setting = {
 view: {
 showLine: true,
 showIcon: true,
 fontCss: this.getFont
 },
 data: {
 simpleData: {
 enable: true,
 idKey: 'id',
 pIdKey: 'pId'
 }
 },
 callback: {
 onClick: this.onCzTreeOnClick
 }
};View Code
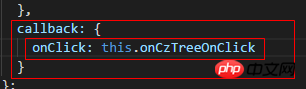
编写onClick触发方法

 onCzTreeOnClick(event, treeId, treeNode, clickFlag) {
 alert(treeNode.name);
}View Code
3.6.3 代码汇总
import { Component, OnInit } from '@angular/core';
declare var $ : any;
@Component({
selector: 'app-root',
templateUrl: './app.component.html',
styleUrls: ['./app.component.scss']
})
export class AppComponent implements OnInit {
setting = {
view: {
showLine: true,
showIcon: true,
fontCss: this.getFont
},
data: {
simpleData: {
enable: true,
idKey: 'id',
pIdKey: 'pId'
}
},
callback: {
onClick: this.onCzTreeOnClick
},
// async: {
// enable: true,
// url:"http://localhost:3000/data",
// type: "get",
// // autoParam:["id", "name=n", "level=lv"],
// // otherParam:{"otherParam":"zTreeAsyncTest"},
// dataFilter: this.filter
// }
};
zNodes = [
{id: 1, pId: 0, name: '1 一级标题', open: true, iconOpen:"assets/zTree/css/zTreeStyle/img/diy/1_open.png", iconClose:"assets/zTree/css/zTreeStyle/img/diy/1_close.png"},
{id: 11, pId: 1, name: '1.1 二级标题', open: true, font:{'background-color':'skyblue', 'color':'white'}},
{id: 111, pId: 11, name: '1.1.1 三级标题 -> 博客园1', url: 'http://www.cnblogs.com/NeverCtrl-C/', target: '_blank'},
{id: 113, pId: 11, name: '1.1.1 三级标题 -> 博客园2', url: 'http://www.cnblogs.com/NeverCtrl-C/', target: '_self'},
{id: 112, pId: 11, name: '1.1.2 三级标题 -> 单击', click: "alert('你单击了')"},
{id: 12, pId: 1, name: '1.2 二级标题'},
{id: 2, pId: 0, name: '2 一级标题'}
]
getFont(treeId, node) {
return node.font ? node.font : {};
}
// filter(treeId, parentNode,responseData) {
// console.log(responseData);
// if (responseData) {
// for(var i =0; i < responseData.length; i++) {
// responseData[i].name += "动态节点数据" + responseData[i].id;
// }
// }
// return responseData;
// }
onCzTreeOnClick(event, treeId, treeNode, clickFlag) {
alert(treeNode.name);
}
constructor() { }
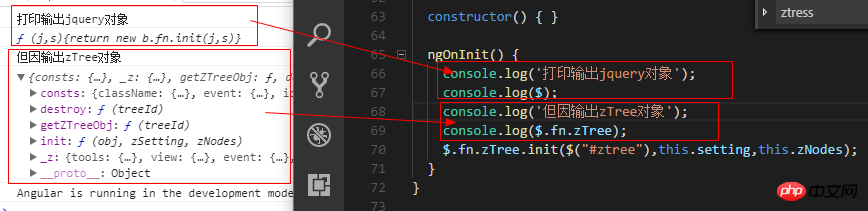
ngOnInit() {
console.log('打印输出jquery对象');
console.log($);
console.log('但因输出zTree对象');
console.log($.fn.zTree);
$.fn.zTree.init($("#ztree"),this.setting,this.zNodes);
// $.fn.zTree.init($("#ztree"),this.setting);
}
}View Code
3.7 异步加载节点数据
3.7.1 官方文档
节点的数据是从后台进行获取的
3.7.2 编程步骤
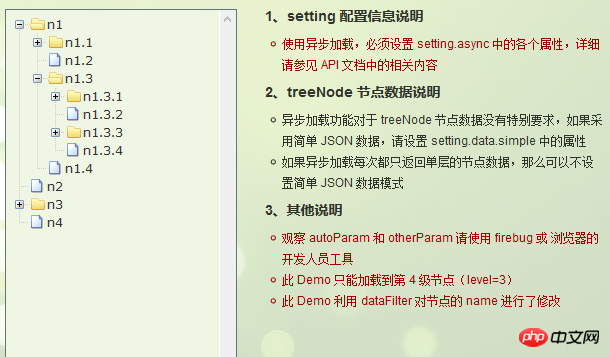
技巧01:异步加载节点数据时init方法不用传递第三个参数

> 准备一个后台用于返回JSON格式的数据
技巧01:返回的JSON数据是一个列表,格式为
[
 {
 "id": 1,
 "pId": 0,
 "name": "1 one"
 },
 {
 "id": 2,
 "pId": 0,
 "name": "2 two"
 }
]技巧02:三少偷懒,是利用json-server模拟的后台数据,哈哈;json-server
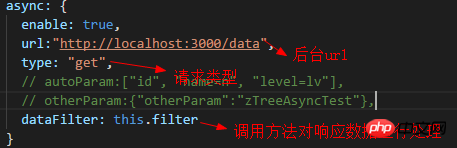
> 设置基本配置对象的async属性
 setting = {
 view: {
 showLine: true,
 showIcon: true,
 fontCss: this.getFont
 },
 data: {
 simpleData: {
 enable: true,
 idKey: 'id',
 pIdKey: 'pId'
 }
 },
 callback: {
 onClick: this.onCzTreeOnClick
 },
 async: {
 enable: true,
 url:"http://localhost:3000/data",
 type: "get",
 // autoParam:["id", "name=n", "level=lv"],
 // otherParam:{"otherParam":"zTreeAsyncTest"},
 dataFilter: this.filter
 }
};View Code
> 编写响应数据处理方法
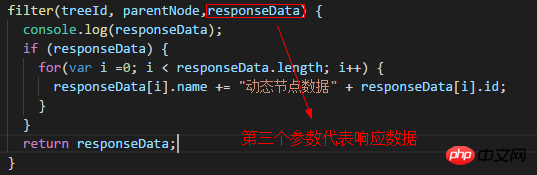
 filter(treeId, parentNode,responseData) {
 console.log(responseData);
 if (responseData) {
 for(var i =0; i < responseData.length; i++) {
 responseData[i].name += "动态节点数据" + responseData[i].id;
 }
 }
 return responseData;
}View Code
3.7.3 代码总汇
{
 "data":
 [
 {
 "id": 1,
 "pId": 0,
 "name": "1 one"
 },
 {
 "id": 11,
 "pId": 1,
 "name": "1.1 oneToOne"
 },
 {
 "id": 12,
 "pId": 1,
 "name": "1.2 oneToTwo"
 },
 {
 "id": 2,
 "pId": 0,
 "name": "2 two"
 }
 ]
}模拟后台响应数据
<ul class="ztree"><ul></ul>
HTML
import { Component, OnInit } from '@angular/core';
declare var $ : any;

@Component({
 selector: 'app-root',
 templateUrl: './app.component.html',
 styleUrls: ['./app.component.scss']
})
export class AppComponent implements OnInit {

 setting = {
 view: {
 showLine: true,
 showIcon: true,
 fontCss: this.getFont
 },
 data: {
 simpleData: {
 enable: true,
 idKey: 'id',
 pIdKey: 'pId'
 }
 },
 callback: {
 onClick: this.onCzTreeOnClick
 },
 async: {
 enable: true,
 url:"http://localhost:3000/data",
 type: "get",
 // autoParam:["id", "name=n", "level=lv"],
 // otherParam:{"otherParam":"zTreeAsyncTest"},
 dataFilter: this.filter
 }
 };

 // zNodes = [
 // {id: 1, pId: 0, name: '1 一级标题', open: true, iconOpen:"assets/zTree/css/zTreeStyle/img/diy/1_open.png", iconClose:"assets/zTree/css/zTreeStyle/img/diy/1_close.png"},
 // {id: 11, pId: 1, name: '1.1 二级标题', open: true, font:{'background-color':'skyblue', 'color':'white'}},
 // {id: 111, pId: 11, name: '1.1.1 三级标题 -> 博客园1', url: 'http://www.cnblogs.com/NeverCtrl-C/', target: '_blank'},
 // {id: 113, pId: 11, name: '1.1.1 三级标题 -> 博客园2', url: 'http://www.cnblogs.com/NeverCtrl-C/', target: '_self'},
 // {id: 112, pId: 11, name: '1.1.2 三级标题 -> 单击', click: "alert('你单击了')"},
 // {id: 12, pId: 1, name: '1.2 二级标题'},
 // {id: 2, pId: 0, name: '2 一级标题'}
 // ]

 getFont(treeId, node) {
 return node.font ? node.font : {};
 }

 filter(treeId, parentNode,responseData) {
 console.log(responseData);
 if (responseData) {
 for(var i =0; i < responseData.length; i++) {
 responseData[i].name += "动态节点数据" + responseData[i].id;
 }
 }
 return responseData;
 }

 onCzTreeOnClick(event, treeId, treeNode, clickFlag) {
 alert(treeNode.name);
 }

 constructor() { }

 ngOnInit() {
 console.log('打印输出jquery对象');
 console.log($);
 console.log('但因输出zTree对象');
 console.log($.fn.zTree);
 // $.fn.zTree.init($("#ztree"),this.setting,this.zNodes);
 $.fn.zTree.init($("#ztree"),this.setting);
 }
}TS
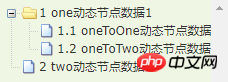
3.7.4 效果展示
相关推荐:
The above is the detailed content of Angular combines with zTree to asynchronously load node data instance sharing. For more information, please follow other related articles on the PHP Chinese website!

Hot AI Tools

Undresser.AI Undress
AI-powered app for creating realistic nude photos

AI Clothes Remover
Online AI tool for removing clothes from photos.

Undress AI Tool
Undress images for free

Clothoff.io
AI clothes remover

Video Face Swap
Swap faces in any video effortlessly with our completely free AI face swap tool!

Hot Article
Hot Tools

Notepad++7.3.1
Easy-to-use and free code editor

SublimeText3 Chinese version
Chinese version, very easy to use

Zend Studio 13.0.1
Powerful PHP integrated development environment

Dreamweaver CS6
Visual web development tools

SublimeText3 Mac version
God-level code editing software (SublimeText3)
Hot Topics


![Error loading plugin in Illustrator [Fixed]](https://img.php.cn/upload/article/000/465/014/170831522770626.jpg?x-oss-process=image/resize,m_fill,h_207,w_330) Error loading plugin in Illustrator [Fixed]
Feb 19, 2024 pm 12:00 PM
Error loading plugin in Illustrator [Fixed]
Feb 19, 2024 pm 12:00 PM
When launching Adobe Illustrator, does a message about an error loading the plug-in pop up? Some Illustrator users have encountered this error when opening the application. The message is followed by a list of problematic plugins. This error message indicates that there is a problem with the installed plug-in, but it may also be caused by other reasons such as a damaged Visual C++ DLL file or a damaged preference file. If you encounter this error, we will guide you in this article to fix the problem, so continue reading below. Error loading plug-in in Illustrator If you receive an "Error loading plug-in" error message when trying to launch Adobe Illustrator, you can use the following: As an administrator
 How to install Angular on Ubuntu 24.04
Mar 23, 2024 pm 12:20 PM
How to install Angular on Ubuntu 24.04
Mar 23, 2024 pm 12:20 PM
Angular.js is a freely accessible JavaScript platform for creating dynamic applications. It allows you to express various aspects of your application quickly and clearly by extending the syntax of HTML as a template language. Angular.js provides a range of tools to help you write, update and test your code. Additionally, it provides many features such as routing and form management. This guide will discuss how to install Angular on Ubuntu24. First, you need to install Node.js. Node.js is a JavaScript running environment based on the ChromeV8 engine that allows you to run JavaScript code on the server side. To be in Ub
 Stremio subtitles not working; error loading subtitles
Feb 24, 2024 am 09:50 AM
Stremio subtitles not working; error loading subtitles
Feb 24, 2024 am 09:50 AM
Subtitles not working on Stremio on your Windows PC? Some Stremio users reported that subtitles were not displayed in the videos. Many users reported encountering an error message that said "Error loading subtitles." Here is the full error message that appears with this error: An error occurred while loading subtitles Failed to load subtitles: This could be a problem with the plugin you are using or your network. As the error message says, it could be your internet connection that is causing the error. So please check your network connection and make sure your internet is working properly. Apart from this, there could be other reasons behind this error, including conflicting subtitles add-on, unsupported subtitles for specific video content, and outdated Stremio app. like
 Detailed explanation of angular learning state manager NgRx
May 25, 2022 am 11:01 AM
Detailed explanation of angular learning state manager NgRx
May 25, 2022 am 11:01 AM
This article will give you an in-depth understanding of Angular's state manager NgRx and introduce how to use NgRx. I hope it will be helpful to you!
 An article exploring server-side rendering (SSR) in Angular
Dec 27, 2022 pm 07:24 PM
An article exploring server-side rendering (SSR) in Angular
Dec 27, 2022 pm 07:24 PM
Do you know Angular Universal? It can help the website provide better SEO support!
 How to use PHP and Angular for front-end development
May 11, 2023 pm 04:04 PM
How to use PHP and Angular for front-end development
May 11, 2023 pm 04:04 PM
With the rapid development of the Internet, front-end development technology is also constantly improving and iterating. PHP and Angular are two technologies widely used in front-end development. PHP is a server-side scripting language that can handle tasks such as processing forms, generating dynamic pages, and managing access permissions. Angular is a JavaScript framework that can be used to develop single-page applications and build componentized web applications. This article will introduce how to use PHP and Angular for front-end development, and how to combine them
 A brief analysis of how to use monaco-editor in angular
Oct 17, 2022 pm 08:04 PM
A brief analysis of how to use monaco-editor in angular
Oct 17, 2022 pm 08:04 PM
How to use monaco-editor in angular? The following article records the use of monaco-editor in angular that was used in a recent business. I hope it will be helpful to everyone!
 PHP implements infinite scroll loading
Jun 22, 2023 am 08:30 AM
PHP implements infinite scroll loading
Jun 22, 2023 am 08:30 AM
With the development of the Internet, more and more web pages need to support scrolling loading, and infinite scrolling loading is one of them. It allows the page to continuously load new content, allowing users to browse the web more smoothly. In this article, we will introduce how to implement infinite scroll loading using PHP. 1. What is infinite scroll loading? Infinite scroll loading is a method of loading web content based on scroll bars. Its principle is that when the user scrolls to the bottom of the page, background data is asynchronously retrieved through AJAX to continuously load new content. This kind of loading method
