

How to use canvas to implement image mosaic

This article mainly introduces the relevant information about the sample code for implementing image mosaic on canvas. The content is quite good. I will share it with you now and give it as a reference.
1. API used for native canvas implementation
1) getContext(contextID) ---Returns an environment for drawing on the canvas
Canvas.getContext('2d') // 返回一个 CanvasRenderingContext2D 对象,使用它可以绘制到 Canvas 元素中
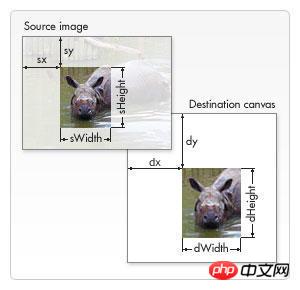
2) drawImage
drawImage(imgObj, x, y)  // 按原图大小绘制, x、y为图片在画布中的位置坐标
drawImage(imgObj, x, y, width, height) // 按指定宽高绘制
drawImage(imgObj, sourceX, sourceY, sourceWidth, sourceHeight, destX, destY, destWidth, destHeight) // 从原来图片上某一个位置开始(sourceX,sourceY),指定长宽进行剪切(sourceWidth,sourceHeight),然后将剪切的内容放到位置为(destX,destY),宽度为(destWidth),高度为(destHeight)的位置上
3) getImageData(x, y, width, height) ---Get the image information of the rectangular area
ctx.getImageData(0, 0, 10, 10) // 获取左上角坐标为(0, 0),宽高为区域内的图像信息
// 返回ImageData: { width: 10, height: 10, data: Uint8ClampedArray[400] }4) beginPath() --- Start a path, or reset the current path 5) rect(x, y, width, height) --- Draw a rectangle
6) lineWidth --- Set or return The width of the current line
7) fillStyle ---Sets or returns the color, gradient or pattern used to fill the painting
ctx.fillStyle = color|gradient|pattern
8) strokeStyle ---Sets or returns the color used for strokes , gradient or mode
9) globalAlpha --- Set or return the current transparency value of the drawing
10) fill() --- Fill the current image (path). The default color is black
[Note]If the path is not closed, the fill() method will add a line from the end point of the path to the start point to close the path and then fill it. the path.
11) stroke() --- will actually draw the path defined by the moveTo() and lineTo() methods. The default color is black
12) toDataURL(type, encoderOptions) ---Export pictures, type is the picture type, encoderOptions picture quality, [0, 1]
Canvas.toDataURL("image/png", 1)2. fabric.js
Library that simplifies canvas writing and provides the missing object model for canvas
What fabric.js can do
1) Create and fill graphics on canvas (including pictures, text, regular graphics and complex paths to form graphics)
2) Fill graphics with gradient colors
3) Combine graphics (including combinations) Graphics, graphic text, pictures, etc.)
4) Set graphic animation set for user interaction
5) Generate JSON, SVG data, etc.
3. Use fabric.js to implement To the API
1) Declare canvas
let canvas =new fabric.Canvas('canvas') {
   width: 200,
   height: 200
}Insert picture
let imgInstance = new fabric.Image(imgElement,{
  left: 0,
  top: 0,
  width: 100,
  height: 100,
  angle: 0
}3) Set the background image setBackgroundImage
canvas.setBackgroundImage(imgInstance)
4) renderAll() redraw
5) on() user interaction
canvas.on('mouse:down', function(options) {
   console.log(options.e.clientX, options.e.clientY)
})

// 监听事件
/*
   mouse:down :鼠标按下时
   mouse:move :鼠标移动时
   mouse:up :鼠标抬起时
   after:render :画布重绘后
   object:selected:对象被选中
   object:moving:对象移动
   object:rotating:对象被旋转
   object:added:对象被加入
   object:removed对象被移除
*/6) getPointer()
7) setWidth(), setHeight() set the width and height of canvas
8) Draw a rectangle
let rect = new fabric.Rect({
 left: 0,
 top: 0,
 width: 100,
 height: 100
})add(obj) Add graphics
canvas.add(rect)
10) remove(obj) Remove graphics
11) set() Set object content
12) toDataURL(obj)
4. Native canvas implementation code
<template>
<p class="container">
<p class="operations">
<ul>
<li @click="mosaic">马赛克</li>
<li @click="addText">添加文字</li>
<li @click="tailor">裁剪</li>
<li @click="rotate">旋转</li>
<li @click="exportImg">导出图片</li>
</ul>
</p>
<canvas ref="imgContent" class="img-wrap">
你的浏览器太low
</canvas>
</div>
</template>
<script>
export default {
data () {
return {
context: '',
canvas: '',
isMasic: false,
isText: false,
isTailor: false,
isTranslate: false,
squareEdgeLength: 20,
angle: 0,
img: ''
}
},
mounted () {
this.initData()
},
methods: {
initData () {
let imgContent = this.$refs.imgContent
this.canvas = imgContent
this.context = imgContent.getContext('2d')
let Img = new Image()
this.image = Img
Img.crossOrigin = "Anonymous"
Img.src = 'http://oia85104s.bkt.clouddn.com/PictureUnlock_193139.pictureunlock.jpg'
this.canvas.setAttribute('width', Img.width)
this.canvas.setAttribute('height', Img.height)
let self = this
Img.onload = () => {
let beginX, beginY, endX, endY
self.context.drawImage(Img, 0, 0)
self.context.save()
self.canvas.addEventListener('mousedown', e => {
beginX = e.offsetX
beginY = e.offsetY
self.canvas.addEventListener('mouseup', e => {
endX = e.offsetX
endY = e.offsetY
if (self.isMasic) {
self.makeGrid(beginX, beginY, endX - beginX, endY - beginY)
return
}
if (self.isTailor) {
self.context.drawImage(Img, beginX, beginY, endX - beginX, endY - beginY, 0, 0, endX - beginX, endY - beginY)
return
}
})
})
}
},
drawRect (x, y, width, height, fillStyle, lineWidth, strokeStyle, globalAlpha) {
this.context.beginPath()
this.context.rect(x, y, width, height)
this.context.lineWidth = lineWidth
this.context.strokeStyle = strokeStyle
fillStyle && (this.context.fillStyle = fillStyle)
globalAlpha && (this.context.globalAlpha = globalAlpha)
this.context.fill()
this.context.stroke()
},
// 打马赛克
mosaic () {
let self = this
this.resetClickStatus()
this.isMasic = true
},
makeGrid (beginX, beginY, rectWidth, rectHight) {
const row = Math.round(rectWidth / this.squareEdgeLength) + 1
const column = Math.round(rectHight / this.squareEdgeLength) + 1
for (let i = 0; i < row * column; i++) {
let x = (i % row) * this.squareEdgeLength + beginX
let y = parseInt(i / row) * this.squareEdgeLength + beginY
this.setColor(x, y)
}
},
setColor (x, y) {
const imgData = this.context.getImageData(x, y, this.squareEdgeLength, this.squareEdgeLength).data
let r = 0, g = 0, b = 0
console.log(this.context.getImageData(x, y, this.squareEdgeLength, this.squareEdgeLength), JSON.stringify(imgData))
for (let i = 0; i < imgData.length; i += 4) {
r += imgData[i]
g += imgData[i + 1]
b += imgData[i + 2]
}
r = Math.round(r / (imgData.length / 4))
g = Math.round(g / (imgData.length / 4))
b = Math.round(b / (imgData.length / 4))
this.drawRect(x, y, this.squareEdgeLength, this.squareEdgeLength, `rgb(${r}, ${g}, ${b})`, 2, `rgb(${r}, ${g}, ${b})`)
},
// 添加文字
addText () {
this.resetClickStatus()
this.isText = true
console.log('添加文字')
},
// 裁剪
tailor () {
this.resetClickStatus()
this.isTailor = true
console.log('裁剪')
} ,
// 旋转
rotate () {
// if (this.angle === 360) {
// this.angle = 90
// } else {
// this.angle += 90
// }
// if ([90, 270].includes(this.angle)) {
// this.canvas.setAttribute('width', this.image.height)
// this.canvas.setAttribute('height', this.image.width)
// } else {
// this.canvas.setAttribute('width', this.image.width)
// this.canvas.setAttribute('height', this.image.height)
// }
const x = this.image.width / 2
const y = this.image.height / 2
this.context.clearRect(0,0, this.canvas.width, this.canvas.height) // 清理画布内容
this.context.translate(x, y)
this.context.rotate(90 * Math.PI / 180)
this.context.translate(-x, -y)
this.context.drawImage(this.image, 0, 0)
},
resetClickStatus () {
this.isMasic = false
this.isText = false
this.isTailor = false
this.isTranslate = false
},
exportImg () {
this.resetClickStatus()
const exportUrl = this.canvas.toDataURL("image/jpeg")
let a = document.createElement('a')
a.setAttribute('download', '')
a.href = exportUrl
document.body.appendChild(a)
a.click()
}
}
}
</script>
<style scoped lang="less">
.operations {
width: 1200px;
margin: 0 auto;
ul {
display: flex;
align-items: center;
margin-bottom: 30px;
li {
list-style: none;
margin-right: 20px;
cursor: pointer;
}
}
}
.img-wrap {
display: block;
margin: 0 auto;
}
</style>The above is the entire content of this article, I hope it will be helpful to everyone's learning, For more related content, please pay attention to the PHP Chinese website!
The above is the detailed content of How to use canvas to implement image mosaic. For more information, please follow other related articles on the PHP Chinese website!

Hot AI Tools

Undresser.AI Undress
AI-powered app for creating realistic nude photos

AI Clothes Remover
Online AI tool for removing clothes from photos.

Undress AI Tool
Undress images for free

Clothoff.io
AI clothes remover

Video Face Swap
Swap faces in any video effortlessly with our completely free AI face swap tool!

Hot Article
Hot Tools

Notepad++7.3.1
Easy-to-use and free code editor

SublimeText3 Chinese version
Chinese version, very easy to use

Zend Studio 13.0.1
Powerful PHP integrated development environment

Dreamweaver CS6
Visual web development tools

SublimeText3 Mac version
God-level code editing software (SublimeText3)
Hot Topics


 How to remove mosaics on Meitu Xiuxiu How to remove mosaics on Meitu Xiuxiu
Mar 12, 2024 pm 02:16 PM
How to remove mosaics on Meitu Xiuxiu How to remove mosaics on Meitu Xiuxiu
Mar 12, 2024 pm 02:16 PM
How to remove mosaics on Meitu Xiuxiu? Meitu Xiuxiu is a treasure trove of photo retouching software. The software provides users with a large number of high-definition materials and photo retouching recipes that are updated daily. Here, users can experience the latest and most fashionable photo retouching methods. In Meitu, no matter what part of the photo you are dissatisfied with, we can easily help you fix it. However, some novice users are not very clear about some operations of the software and do not know how to remove mosaics. For this reason, the editor has compiled the method of removing mosaics from Meitu Xiuxiu and brings it to everyone. Let’s take a look. How to remove mosaics on Meitu Xiu Xiu 1. Enter the home page of Meitu Xiu Xiu, select the option of beautify pictures and click to open; 2. Flip the page and select a picture you want to remove mosaics to open, and enter the edit picture page; 3.
 How to remove mosaic How to remove mosaic
Feb 22, 2024 pm 03:22 PM
How to remove mosaic How to remove mosaic
Feb 22, 2024 pm 03:22 PM
Use the imitation stamp to pick up the color of the picture and then apply it. Tutorial Applicable Model: Lenovo AIO520C System: Windows 10 Professional Edition: Photoshop 2020 Analysis 1 First enter PhotoShop and open the mosaic picture. 2In the toolbar on the left, find and click Clone Stamp. 3 Then press and hold the Alt key on the keyboard. 4. Move the mouse to pick the color in the picture. 5Then release the Alt key on the keyboard. 6Finally, use the mouse to smear on the mosaic area to eliminate the mosaic. Supplement: What is the principle of mosaic removal? 1. If you want to remove mosaic from a picture, it is equivalent to painting on a canvas with an outline. Although the color aspect is easier to handle, it is still very difficult to complete. because
 How to unlock mosaic
Nov 08, 2023 pm 04:36 PM
How to unlock mosaic
Nov 08, 2023 pm 04:36 PM
Mosaic unlocking refers to removing or modifying mosaics in images or videos to restore the blocked or modified content. If the mosaic exists due to technical reasons, it can be removed or modified through technical means, but it is necessary to comply with relevant laws, regulations and ethics, and it is not recommended to try.
 How to remove mosaics on MeituXiuXiu? Tutorial on how to remove mosaics and restore original pictures for Meitu Xiuxiu!
Mar 15, 2024 pm 10:37 PM
How to remove mosaics on MeituXiuXiu? Tutorial on how to remove mosaics and restore original pictures for Meitu Xiuxiu!
Mar 15, 2024 pm 10:37 PM
1. How to remove mosaics on Meitu Xiuxiu? Tutorial on how to remove mosaics and restore original pictures for Meitu Xiuxiu! 1. Open the MeituXiuXiu app and click on Picture Beautification on the homepage. 2. Select a picture in the photo album of your phone. 3. Click the Mosaic function in the bottom menu. 4. After selection, options will appear, click on the eraser option. 5. Apply to the mosaic area in the image to erase part of the mosaic and restore the original image.
 What are the canvas arrow plug-ins?
Aug 21, 2023 pm 02:14 PM
What are the canvas arrow plug-ins?
Aug 21, 2023 pm 02:14 PM
The canvas arrow plug-ins include: 1. Fabric.js, which has a simple and easy-to-use API and can create custom arrow effects; 2. Konva.js, which provides the function of drawing arrows and can create various arrow styles; 3. Pixi.js , which provides rich graphics processing functions and can achieve various arrow effects; 4. Two.js, which can easily create and control arrow styles and animations; 5. Arrow.js, which can create various arrow effects; 6. Rough .js, you can create hand-drawn arrows, etc.
 What are the details of the canvas clock?
Aug 21, 2023 pm 05:07 PM
What are the details of the canvas clock?
Aug 21, 2023 pm 05:07 PM
The details of the canvas clock include clock appearance, tick marks, digital clock, hour, minute and second hands, center point, animation effects, other styles, etc. Detailed introduction: 1. Clock appearance, you can use Canvas to draw a circular dial as the appearance of the clock, and you can set the size, color, border and other styles of the dial; 2. Scale lines, draw scale lines on the dial to represent hours or minutes. Position; 3. Digital clock, you can draw a digital clock on the dial to indicate the current hour and minute; 4. Hour hand, minute hand, second hand, etc.
 Learn the canvas framework and explain the commonly used canvas framework in detail
Jan 17, 2024 am 11:03 AM
Learn the canvas framework and explain the commonly used canvas framework in detail
Jan 17, 2024 am 11:03 AM
Explore the Canvas framework: To understand what are the commonly used Canvas frameworks, specific code examples are required. Introduction: Canvas is a drawing API provided in HTML5, through which we can achieve rich graphics and animation effects. In order to improve the efficiency and convenience of drawing, many developers have developed different Canvas frameworks. This article will introduce some commonly used Canvas frameworks and provide specific code examples to help readers gain a deeper understanding of how to use these frameworks. 1. EaselJS framework Ea
 uniapp implements how to use canvas to draw charts and animation effects
Oct 18, 2023 am 10:42 AM
uniapp implements how to use canvas to draw charts and animation effects
Oct 18, 2023 am 10:42 AM
How to use canvas to draw charts and animation effects in uniapp requires specific code examples 1. Introduction With the popularity of mobile devices, more and more applications need to display various charts and animation effects on the mobile terminal. As a cross-platform development framework based on Vue.js, uniapp provides the ability to use canvas to draw charts and animation effects. This article will introduce how uniapp uses canvas to achieve chart and animation effects, and give specific code examples. 2. canvas
