

Photoshop设计制作出一串逼真的金色麦穗

真实的麦穗中麦粒都是不同摸样的,不过差别不是很大。我们绘制的时候只需要绘制2到3颗不同的麦粒,其它的就可以通过复制及调整大小得到,这样我们可以省去很多繁琐的操作。
最终效果
1、麦穗大致有以下几部分构成:中间的杆子及麦粒,分解图如下。
<图1>
2、我们先来制作中间的杆子部分,新建一个1024 * 768像素的文档,新建一个组,在组里新建一个图层,用钢笔勾出杆子前截部分的选区,填充橙黄色:#FFCF68,如下图。
<图2>
3、新建一个图层,按Ctrl + Alt + G 创建剪贴蒙版,然后在当前图层下面新建一个图层,用钢笔勾出底部的暗部选区,羽化1个像素后填充暗橙色:#DF943D,如下图。
<图3>
4、新建一个图层,用钢笔勾出顶部的暗部选区,羽化2个像素后填充暗橙色:#AE4704,如下图。
<图4>
5、新建一个图层,用钢笔勾顶部边缘的反光选区,羽化1个像素后填充橙黄色:#DF943D,如下图。
<图5>
6、在组的最上面新建一个图层,用钢笔勾出第二节麦秆选区,填充橙黄色:#FAD16E,如下图。
<图6>
7、同上的方法新建简体蒙版后给顶部、中间、边缘部分加上暗部,过程如图7,8。
<图7> 
<图8>
8、现在来制作麦粒部分,我们只需要制作两颗不同的麦粒,其它的可以直接复制。先来制作第一颗,要完成的效果如下图。
<图9>
9、新建一个组,用钢笔勾出麦粒的轮廓,转为选区后给组添加图层蒙版,如下图。可以暂时隐藏其它图层,这样便于观察。
<图10>
10、在组里新建一个图层,填充橙黄色:#E49943作为底色,如下图。
<图11>
11、新建一个图层,用钢笔勾出顶部的高光选区,羽化5个像素后填充黄色:#FFE576,如下图。
<图12>
12、新建一个图层,用钢笔勾出顶部的暗部选区,羽化2个像素后填充橙黄色:#E6A046,如下图。
<图13>
13、新建一个图层,用钢笔勾出顶部边缘的反光选区,羽化1个像素后填充淡黄色:#FED169,如下图。
<图14>
14、新建一个图层,用钢笔勾出底部的暗部选区,羽化6个像素后填充暗橙色:#C66021,如下图。
<图15>
15、新建一个图层,用钢笔勾出中间高光部分的选区,羽化3个像素后填充淡黄色:#FEE67F,如下图。
<图16>
16、新建一个图层,用钢笔勾出中间高亮部分的选区,羽化1个像素后填充稍亮的淡黄色:#FEF9B4,如下图。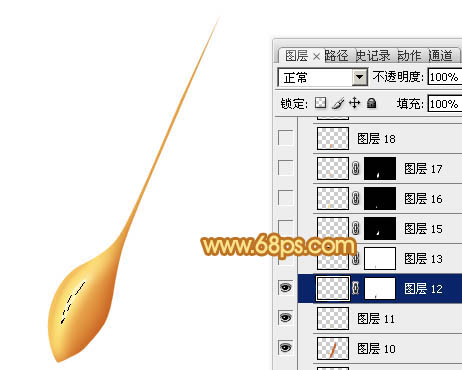
<图17>
17、把高亮图层复制一层,增加亮度,边缘部分可以添加图层蒙版,用黑色画笔涂抹一下。
<图18>
18、新建一个图层,用钢笔勾出中间顶部的高光选区,羽化2个像素后填充橙黄色:#FEE6A5,如图19。取消选区后用钢笔勾出图20所示的选区,然后添加图层蒙版,效果如图20。
<图19> 
<图20>
19、新建一个图层,用钢笔勾出下图所示的选区,把前景颜色设置为橙黄色:#FED76D,用画笔把选区底部涂上高光,如下图。
<图21>
20、新建一个图层,同上的方法制作下图所示的高光。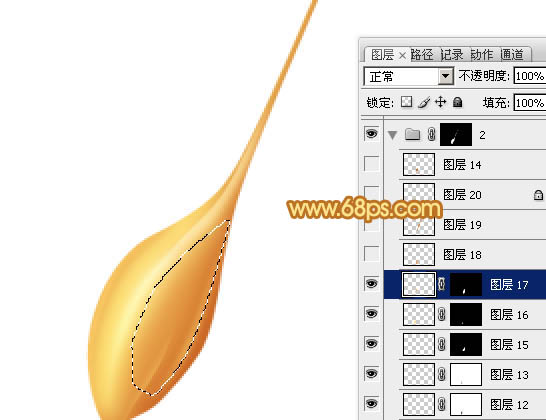
<图22>
21、新建一个图层,同上的方法制作底部的反光选区,如下图。
<图23> 
<图24>
22、微调一下细节,麦粒部分基本完成,如下图。
<图25>
23、同上的方法新建一个组,制作第二颗麦粒,效果如下图。
<图26>
24、然后复制制作的麦粒,底部的麦粒可以调暗一点,过程如图27 - 29。
<图27> 
<图28> 
<图29>
最后把整体稍微锐化一下,完成最终效果。

Hot AI Tools

Undresser.AI Undress
AI-powered app for creating realistic nude photos

AI Clothes Remover
Online AI tool for removing clothes from photos.

Undress AI Tool
Undress images for free

Clothoff.io
AI clothes remover

Video Face Swap
Swap faces in any video effortlessly with our completely free AI face swap tool!

Hot Article
Hot Tools

Notepad++7.3.1
Easy-to-use and free code editor

SublimeText3 Chinese version
Chinese version, very easy to use

Zend Studio 13.0.1
Powerful PHP integrated development environment

Dreamweaver CS6
Visual web development tools

SublimeText3 Mac version
God-level code editing software (SublimeText3)
Hot Topics


 What are the common questions about exporting PDF on PS
Apr 06, 2025 pm 04:51 PM
What are the common questions about exporting PDF on PS
Apr 06, 2025 pm 04:51 PM
Frequently Asked Questions and Solutions when Exporting PS as PDF: Font Embedding Problems: Check the "Font" option, select "Embed" or convert the font into a curve (path). Color deviation problem: convert the file into CMYK mode and adjust the color; directly exporting it with RGB requires psychological preparation for preview and color deviation. Resolution and file size issues: Choose resolution according to actual conditions, or use the compression option to optimize file size. Special effects issue: Merge (flatten) layers before exporting, or weigh the pros and cons.
 How to set password protection for export PDF on PS
Apr 06, 2025 pm 04:45 PM
How to set password protection for export PDF on PS
Apr 06, 2025 pm 04:45 PM
Export password-protected PDF in Photoshop: Open the image file. Click "File"> "Export"> "Export as PDF". Set the "Security" option and enter the same password twice. Click "Export" to generate a PDF file.
 What is the reason why PS keeps showing loading?
Apr 06, 2025 pm 06:39 PM
What is the reason why PS keeps showing loading?
Apr 06, 2025 pm 06:39 PM
PS "Loading" problems are caused by resource access or processing problems: hard disk reading speed is slow or bad: Use CrystalDiskInfo to check the hard disk health and replace the problematic hard disk. Insufficient memory: Upgrade memory to meet PS's needs for high-resolution images and complex layer processing. Graphics card drivers are outdated or corrupted: Update the drivers to optimize communication between the PS and the graphics card. File paths are too long or file names have special characters: use short paths and avoid special characters. PS's own problem: Reinstall or repair the PS installer.
 How to speed up the loading speed of PS?
Apr 06, 2025 pm 06:27 PM
How to speed up the loading speed of PS?
Apr 06, 2025 pm 06:27 PM
Solving the problem of slow Photoshop startup requires a multi-pronged approach, including: upgrading hardware (memory, solid-state drive, CPU); uninstalling outdated or incompatible plug-ins; cleaning up system garbage and excessive background programs regularly; closing irrelevant programs with caution; avoiding opening a large number of files during startup.
 How to solve the problem of loading when PS is always showing that it is loading?
Apr 06, 2025 pm 06:30 PM
How to solve the problem of loading when PS is always showing that it is loading?
Apr 06, 2025 pm 06:30 PM
PS card is "Loading"? Solutions include: checking the computer configuration (memory, hard disk, processor), cleaning hard disk fragmentation, updating the graphics card driver, adjusting PS settings, reinstalling PS, and developing good programming habits.
 How to use PS Pen Tool
Apr 06, 2025 pm 10:15 PM
How to use PS Pen Tool
Apr 06, 2025 pm 10:15 PM
The Pen Tool is a tool that creates precise paths and shapes, and is used by: Select the Pen Tool (P). Sets Path, Fill, Stroke, and Shape options. Click Create anchor point, drag the curve to release the Create anchor point. Press Ctrl/Cmd Alt/Opt to delete the anchor point, drag and move the anchor point, and click Adjust curve. Click the first anchor to close the path to create a shape, and double-click the last anchor to create an open path.
 Photoshop for Professionals: Advanced Editing & Workflow Techniques
Apr 05, 2025 am 12:15 AM
Photoshop for Professionals: Advanced Editing & Workflow Techniques
Apr 05, 2025 am 12:15 AM
Photoshop's advanced editing skills include frequency separation and HDR synthesis, and optimized workflows can be automated. 1) Frequency separation technology separates the texture and color details of images. 2) HDR synthesis enhances the dynamic range of images. 3) Automate workflows to improve efficiency and ensure consistency.
 Photoshop's Value: Weighing the Cost Against Its Features
Apr 11, 2025 am 12:02 AM
Photoshop's Value: Weighing the Cost Against Its Features
Apr 11, 2025 am 12:02 AM
Photoshop is worth the investment because it provides powerful features and a wide range of application scenarios. 1) Core functions include image editing, layer management, special effects production and color adjustment. 2) Suitable for professional designers and photographers, but amateurs may consider alternatives such as GIMP. 3) Subscribe to AdobeCreativeCloud can be used as needed to avoid high one-time spending.
