

Operation process returned in oppoR15

php editor Xigua brings the operation process returned in oppo R15. When using oppo R15, you often need to perform return operations. Being familiar with the correct return method can improve the user experience. With a few simple steps, you can easily implement the return function, allowing you to operate your phone more conveniently. Next, let us learn about the return operation process in oppo R15.
1. Use navigation gestures to return
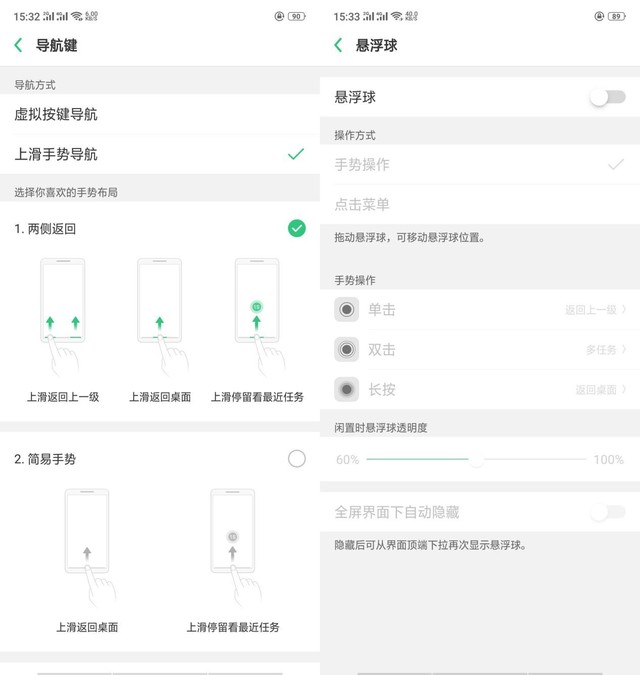
We can use oppo’s full-screen interaction method. The navigation gestures of oppo r15 include: swipe up from both sides of the screen to return, swipe up from the middle to return to the desktop, and swipe up in the middle and pause for 1 second to open the multitasking interface.
2. Return to virtual navigation keys
We can also turn off navigation gestures and turn on virtual navigation keys in the navigation key settings. In this way, 3 permanent virtual navigation keys will appear. Click the small dot in the middle to return to the desktop.

The above is the detailed content of Operation process returned in oppoR15. For more information, please follow other related articles on the PHP Chinese website!

Hot AI Tools

Undresser.AI Undress
AI-powered app for creating realistic nude photos

AI Clothes Remover
Online AI tool for removing clothes from photos.

Undress AI Tool
Undress images for free

Clothoff.io
AI clothes remover

Video Face Swap
Swap faces in any video effortlessly with our completely free AI face swap tool!

Hot Article
Hot Tools

Notepad++7.3.1
Easy-to-use and free code editor

SublimeText3 Chinese version
Chinese version, very easy to use

Zend Studio 13.0.1
Powerful PHP integrated development environment

Dreamweaver CS6
Visual web development tools

SublimeText3 Mac version
God-level code editing software (SublimeText3)
Hot Topics


 How to shut down keyboard shortcuts in Windows 10
Jul 12, 2023 pm 02:09 PM
How to shut down keyboard shortcuts in Windows 10
Jul 12, 2023 pm 02:09 PM
In daily work and life, shutting down the computer is a common operation, but many friends don’t know that the keyboard can also be shut down quickly. So what is the shortcut key for shutting down the win10 keyboard? Next, the editor will tell you how to shut down the win10 shortcut keyboard. Share it with everyone. Win10 shutdown shortcut keyboard: 1. First, we can press "alt+F4" on the keyboard to bring up the shutdown interface. 2. Then press the Enter key to shut down. 3. We can also press and hold the power button to shut down. However, long pressing the power button is a forced shutdown and can easily cause damage to the hard disk. Just press and hold it for less than 2 seconds to automatically shut down. 4. Press and hold "win+x" on the keyboard and then press "u&q" twice
 Windows 7 disabling microphone operation process
Jul 16, 2023 pm 09:53 PM
Windows 7 disabling microphone operation process
Jul 16, 2023 pm 09:53 PM
Microphone is one of the commonly used functions of computers. Some Windows 7 customers want to completely block the sound of their office computers. So how should they disable the microphone? The operation steps are very simple. You first click on the sound icon, then right-click to select the recording device, then switch to the recording menu bar in the open window, select the microphone, and right-click to disable it. If you want to enable it again in the future, the same method is used. Just right click to enable it. How to disable the microphone in Windows 7: 1. First, right-click the sound icon in the taskbar in the lower right corner of the computer desktop and select "Recording Device" in the menu; 2. Then in the pop-up sound characteristics prompt box, switch to the "Recording" menu bar. Then right-click and select "Disable"; 3. In this way, it will not affect the sound card.
 How to record the internal sound of the computer in win10? The operation process of recording the internal sound of the computer in win10
Jul 10, 2023 am 08:02 AM
How to record the internal sound of the computer in win10? The operation process of recording the internal sound of the computer in win10
Jul 10, 2023 am 08:02 AM
Sometimes we have the need for audio. If we want to record the sound inside the computer, how do we do it? Taking win10 as an example, first click the sound icon to open the sound control panel, then switch to the recording menu bar, then right-click to select the device that indicates that it is prohibited to use, then right-click to open the stereo mix, then open its properties dialog box, and switch Go to the level menu bar and adjust the volume. You need to use a radio to record the internal sound of the computer. How to record the internal sound of the computer in win10: 1. On the Windows 10 desktop, right-click the volume icon in the lower right corner of the mouse and select the "Sound" menu item in the pop-up menu; 2. Then the sound setting dialog box will pop up. Click "Record" above
 Operation process returned in oppoR15
Mar 25, 2024 pm 03:00 PM
Operation process returned in oppoR15
Mar 25, 2024 pm 03:00 PM
1. Using navigation gestures to return, we can use oppo’s full-screen interaction method. The navigation gestures of oppor15 include: swipe up from both sides of the screen to return, swipe up from the middle to return to the desktop, and swipe up in the middle and pause for 1 second to open the multitasking interface. 2. Return to virtual navigation keys. We can also turn off navigation gestures and turn on virtual navigation keys in the navigation key settings. In this way, 3 permanent virtual navigation keys will appear. Click the small dot in the middle to return to the desktop.
 What are the basic operating procedures of Word?
Mar 20, 2024 am 09:07 AM
What are the basic operating procedures of Word?
Mar 20, 2024 am 09:07 AM
We always use word at work, but word is really powerful and has many operation steps. When we first come into contact with word, we always forget how to operate it. Don’t worry, today the editor will bring you A complete guide to the basic operating procedures of Word. First, open a new Word document and enter the content that needs to be edited. If you need to make adjustments, you can do so again after you've finished editing. 2. After our document is ready, you can directly choose Save As to save the document on the disk you need, or you can directly change the default save path, so that it will be directly stored in the place you selected in the future. At this time, you need to execute the Tools/Options command. , switch to the file location option in the options dialog box, select the document path,
 Win10 system backup file operation process
Mar 28, 2024 am 10:00 AM
Win10 system backup file operation process
Mar 28, 2024 am 10:00 AM
1. Win10 system comes with the [Local Backup] function. Right-click the Win icon in the lower left corner of the desktop to pop up the menu, click [Control Panel], as shown in the picture, set the viewing mode to [Small Icons], and then click [Storage Space] ]; As shown in the figure: 2. Enter the following interface, click [Create New Pool and Storage Space], browse the status of each disk on the computer, select one as the drive used to create a storage pool, and then click [Create Pool]; such as As shown in the picture: specify the drive name and drive letter, select a layout, and finally specify the storage space size, click [Create Storage Space], complete these operations, and wait for the computer to automatically back up. This process is time-consuming! So that’s it. If you don’t know, you can do it according to the content in the article.
 How to change the default storage location in Windows 7? How to change the default storage location in Windows 7?
Jul 19, 2023 am 09:17 AM
How to change the default storage location in Windows 7? How to change the default storage location in Windows 7?
Jul 19, 2023 am 09:17 AM
In the Windows 7 operating system, when users download files, they will be stored in a location by default. If you want to change the default storage location, what should you do? You first click the menu bar, find the folder name named after your personal account, right-click the mouse to open the properties dialog box, then switch to the location menu bar, click the move button, select the storage location you want to set in the opened channel, and then Save the settings and make the changes. How to change the default storage location in Windows 7: 1. First click the Start button on the lower left, and then find the personal folder named after the personal account, as shown in the figure below. 2. Then look for the name of the "Free Downloads" folder, right-click and select it and search for "Properties" in the drop-down list. 3. Then click on the top
 The operation process of making black point transition in edius
Mar 27, 2024 pm 10:21 PM
The operation process of making black point transition in edius
Mar 27, 2024 pm 10:21 PM
1. First, click on the small triangle in front of the video material that requires black point transition, which is the mixer setting area. 2. Then click [MIX] next to it to activate it. At this time, you can see an extra blue line under the video material on the timeline. 3. Click on the blue line to add key frames. You can choose to add several key frames as needed. 4. If you need the video to slowly darken from a certain place to the end, add a key frame at the place where it starts to darken, and then pull the ending frame below to achieve a black transition.
