

How to completely uninstall Valorant from Windows 11

If you have problems trying to uninstall Valorant, this article will help. Here, we will guide you on how to completely uninstall this game on Windows 11. Please make sure there are no games or Riot clients running in the background during the uninstall process to ensure Valorant can be completely uninstalled. In addition, after completing the uninstallation, you also need to ensure that all residual files related to Valorant are deleted.
How to completely uninstall Valorant from Windows 11
Use the following steps to completely remove or uninstall Valorant in Windows 11 from your Windows PC:
let us start.
1]Close Valorant completely
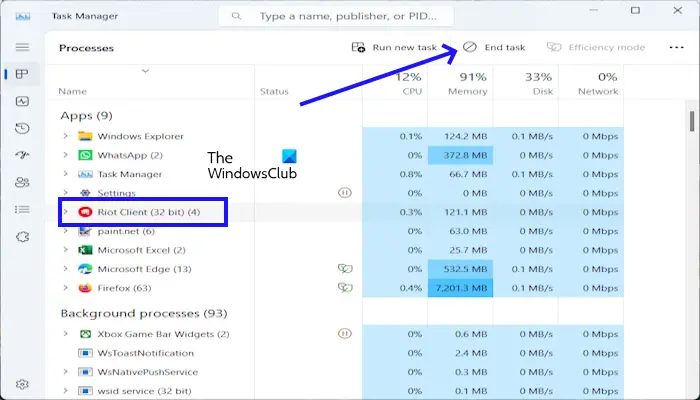
Before uninstalling Valorant, make sure to close Valorant, Vanguard and Riot clients. You can do this through Task Manager. Make sure to check if these programs are running, then close them cleanly by right-clicking on them and selecting "End Task."
You can also close Valorant via the system tray. Just click on the system tray, right-click on the Riot client, and select Exit. If another option appears like Vanguard or Valorant, right-click on it and select Exit.
2]Uninstall Valorant game
The next step is to remove or uninstall the Valorant game using Windows Settings, Control Panel, or Command Prompt.
By using Windows settings:
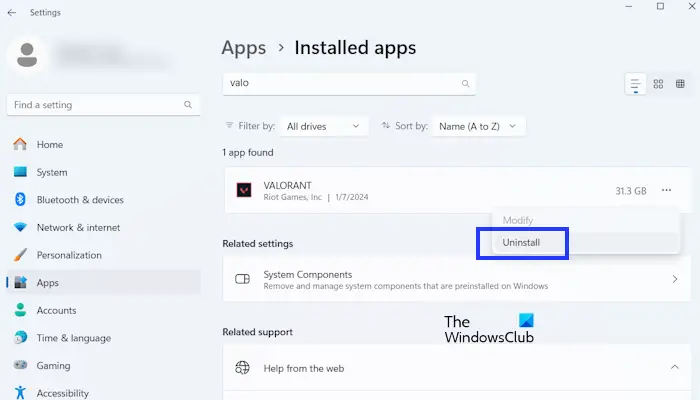
- Go to your Windows settings.
- Click on the application installed application.
- Scroll down and look for VALORANT.
- Click on the three dots to uninstall Valorant.
- Now, click "".
By using the control panel:
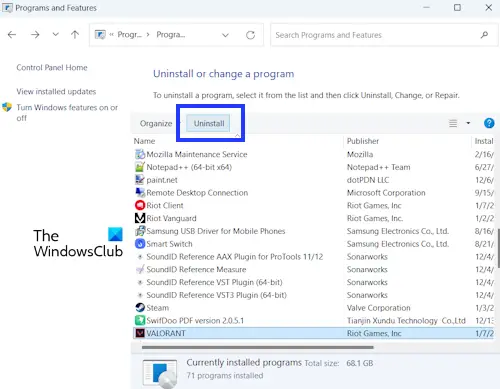
- Open the control panel.
- Click to uninstall the program.
- Now, scroll down and look for Valorant.
- Click to uninstall.
Use Command Prompt
You can also uninstall Valorant using the command prompt. If you are unable to uninstall Valorant through the Settings app, you can use this method. The following instructions will guide you in doing this:
- Type command prompt in the Windows search box.
- Right-click on the command prompt and select Run as administrator.
Type the following commands one by one and press Enter after each command:
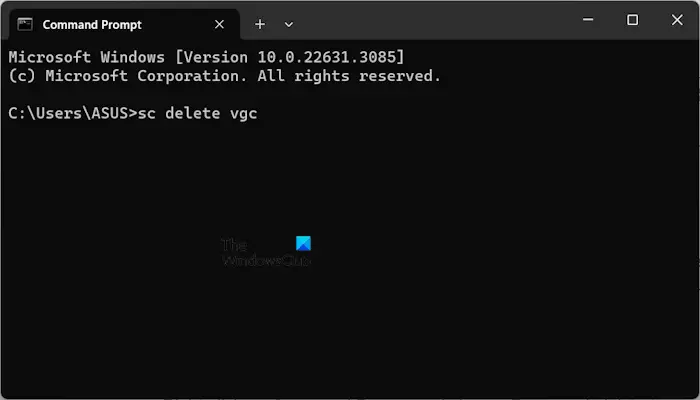
SC删除vgc
SC删除VGK
Exit CMD and restart your computer.
3]Delete remaining files
The Valorant Games folder contains all the files and data needed to run the game. This data includes executable files, game data, user settings, etc. Open File Explorer and follow the instructions.
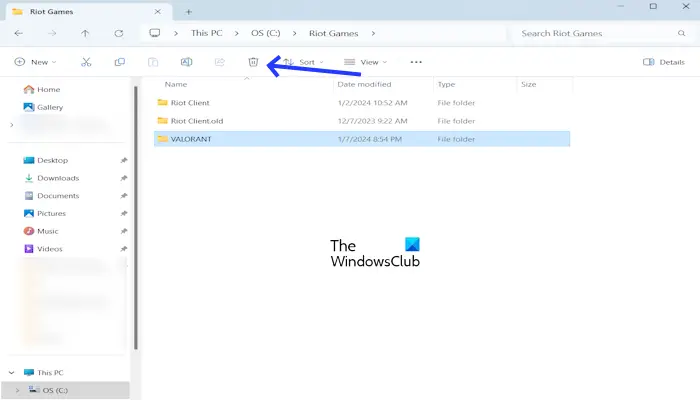
First, open your C drive. There you will see the Riot Games folder. Open the Riot Games folder and delete the VALORANT folder.
4] Delete all keys related to the Valorant game in the registry
Now, delete all keys related to the Valorant game in the registry. This method is a bit technical compared to the previous method. Before proceeding, make sure to create a system restore point as this will help you restore your system if something goes wrong. We also recommend that you back up your registry before proceeding. Please note that if you restore this specific recovery point, all keys associated with Valorant will also be restored.
Please follow these steps carefully, as any incorrect modifications to the Registry Editor may make your system unstable.
Open the run command box (Windows R key). Type regdit and press Enter. Click Yes at the UAC prompt. This will open the Registry Editor.
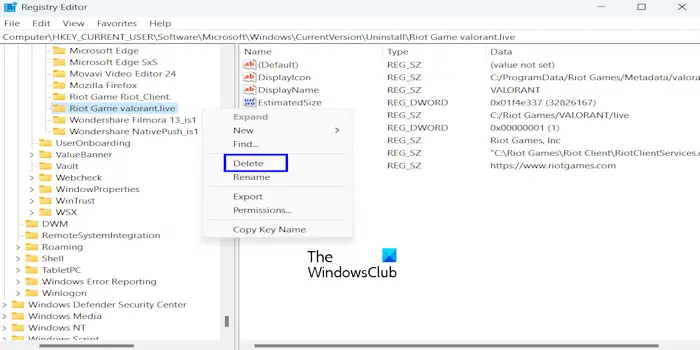
Now, navigate to the following path. The easiest way to get to the following paths is to copy and paste them into the address bar of Registry Editor. After that, press Enter key.
ComputerHKEY_CURRENT_USERSoftwareMicrosoftWindowsCurrentVersionUninstallRiot游戏Valiorant.live
Right-click the Valorant LIVE folder and select Delete.
I hope this helps.
Why can’t I uninstall Riot?
Before uninstalling Riot Client, you need to uninstall all Riot games; otherwise, you will receive the error message "Unable to Uninstall Riot Client". After uninstalling all Riot games, you can uninstall the Riot client. The Riot Games folder contains all files and data required to run Riot Games. Additionally, you must delete the remaining files.
How to uninstall Riot Games from Windows 11?
Uninstalling Riot Games is easy. First, exit the game completely and close the Riot client completely. You can use Task Manager to do the same thing. Once this is done, you can uninstall the game(s) from Control Panel or Windows 11 Settings.
Read next: VALORANT Connection Error VAN 135, 68, 81 on Windows PC.
The above is the detailed content of How to completely uninstall Valorant from Windows 11. For more information, please follow other related articles on the PHP Chinese website!

Hot AI Tools

Undresser.AI Undress
AI-powered app for creating realistic nude photos

AI Clothes Remover
Online AI tool for removing clothes from photos.

Undress AI Tool
Undress images for free

Clothoff.io
AI clothes remover

Video Face Swap
Swap faces in any video effortlessly with our completely free AI face swap tool!

Hot Article
Hot Tools

Notepad++7.3.1
Easy-to-use and free code editor

SublimeText3 Chinese version
Chinese version, very easy to use

Zend Studio 13.0.1
Powerful PHP integrated development environment

Dreamweaver CS6
Visual web development tools

SublimeText3 Mac version
God-level code editing software (SublimeText3)
Hot Topics
 1657
1657
 14
1415
52
1309
25
1257
29
1229
24
14
1415
52
1309
25
1257
29
1229
24

 Can I install mysql on Windows 7
Apr 08, 2025 pm 03:21 PM
Can I install mysql on Windows 7
Apr 08, 2025 pm 03:21 PM
Yes, MySQL can be installed on Windows 7, and although Microsoft has stopped supporting Windows 7, MySQL is still compatible with it. However, the following points should be noted during the installation process: Download the MySQL installer for Windows. Select the appropriate version of MySQL (community or enterprise). Select the appropriate installation directory and character set during the installation process. Set the root user password and keep it properly. Connect to the database for testing. Note the compatibility and security issues on Windows 7, and it is recommended to upgrade to a supported operating system.
 How to solve mysql cannot connect to local host
Apr 08, 2025 pm 02:24 PM
How to solve mysql cannot connect to local host
Apr 08, 2025 pm 02:24 PM
The MySQL connection may be due to the following reasons: MySQL service is not started, the firewall intercepts the connection, the port number is incorrect, the user name or password is incorrect, the listening address in my.cnf is improperly configured, etc. The troubleshooting steps include: 1. Check whether the MySQL service is running; 2. Adjust the firewall settings to allow MySQL to listen to port 3306; 3. Confirm that the port number is consistent with the actual port number; 4. Check whether the user name and password are correct; 5. Make sure the bind-address settings in my.cnf are correct.
 MySQL can't be installed after downloading
Apr 08, 2025 am 11:24 AM
MySQL can't be installed after downloading
Apr 08, 2025 am 11:24 AM
The main reasons for MySQL installation failure are: 1. Permission issues, you need to run as an administrator or use the sudo command; 2. Dependencies are missing, and you need to install relevant development packages; 3. Port conflicts, you need to close the program that occupies port 3306 or modify the configuration file; 4. The installation package is corrupt, you need to download and verify the integrity; 5. The environment variable is incorrectly configured, and the environment variables must be correctly configured according to the operating system. Solve these problems and carefully check each step to successfully install MySQL.
 Unable to access mysql from terminal
Apr 08, 2025 pm 04:57 PM
Unable to access mysql from terminal
Apr 08, 2025 pm 04:57 PM
Unable to access MySQL from the terminal may be due to: MySQL service not running; connection command error; insufficient permissions; firewall blocks connection; MySQL configuration file error.
 How to copy and paste mysql
Apr 08, 2025 pm 07:18 PM
How to copy and paste mysql
Apr 08, 2025 pm 07:18 PM
Copy and paste in MySQL includes the following steps: select the data, copy with Ctrl C (Windows) or Cmd C (Mac); right-click at the target location, select Paste or use Ctrl V (Windows) or Cmd V (Mac); the copied data is inserted into the target location, or replace existing data (depending on whether the data already exists at the target location).
 Solutions to the errors reported by MySQL on a specific system version
Apr 08, 2025 am 11:54 AM
Solutions to the errors reported by MySQL on a specific system version
Apr 08, 2025 am 11:54 AM
The solution to MySQL installation error is: 1. Carefully check the system environment to ensure that the MySQL dependency library requirements are met. Different operating systems and version requirements are different; 2. Carefully read the error message and take corresponding measures according to prompts (such as missing library files or insufficient permissions), such as installing dependencies or using sudo commands; 3. If necessary, try to install the source code and carefully check the compilation log, but this requires a certain amount of Linux knowledge and experience. The key to ultimately solving the problem is to carefully check the system environment and error information, and refer to the official documents.
 Can mysql run on Windows
Apr 08, 2025 pm 01:54 PM
Can mysql run on Windows
Apr 08, 2025 pm 01:54 PM
Running MySQL on Windows is feasible, but challenges such as port conflicts, permission issues, and environment variable settings need to be considered. Installation issues can be solved by customizing configuration files, adjusting user permissions, and setting environment variables correctly. Additionally, the appropriate storage engine should be selected, tweaked configuration files, and SSDs should be used to optimize performance.
 Can vs code run in Windows 8
Apr 15, 2025 pm 07:24 PM
Can vs code run in Windows 8
Apr 15, 2025 pm 07:24 PM
VS Code can run on Windows 8, but the experience may not be great. First make sure the system has been updated to the latest patch, then download the VS Code installation package that matches the system architecture and install it as prompted. After installation, be aware that some extensions may be incompatible with Windows 8 and need to look for alternative extensions or use newer Windows systems in a virtual machine. Install the necessary extensions to check whether they work properly. Although VS Code is feasible on Windows 8, it is recommended to upgrade to a newer Windows system for a better development experience and security.
