How to create an unattended installation of Windows 11
You've decided you want to install Windows 11, but your device doesn't meet the strict system requirements, and you don't want to spend time in front of your computer clicking through dialog pages.
There is a better way. You can sit back and relax during the installation process without being prompted for information. That’s the beauty of creating an unattended installation of Windows 11, and we’ll show you how.
What are the benefits of unattended installation?
- Allows you to automate tasks and complete the process faster than manual installation.
- It can be run on multiple computers using the same installer file.
- Useful for large deployments where you want to standardize the configuration of computers on the network.
- Ability to customize installation based on needs and preferences.
- There is no user intervention, so there are no user password prompts or account login requests.
How to install Windows 11 unattended?
1. What is required for unattended installation?
1. Hardware Requirements Check
- Have at least 4 GB of RAM and 64 GB of free disk space on your computer.
- A USB flash drive or external hard drive with at least 8 GB of free space formatted as NTFS or FAT32.
2. Internet connection requirements
Unattended installation does not require an Internet connection because you will be installing Windows offline.
This will prevent the system from forcing you to use a Microsoft account or checking that your device meets the system requirements.
3. Notes on language settings
If you install Windows 11 in a language other than English, this language is likely not supported.
You must complete the installation in an available language before changing the language setting to your preferred option.
4. Product Key Notes
Because each copy of Windows 11 has its own unique product key, you will use a universal volume license key for an unattended installation .
This unique product key allows you to install the same product on multiple computers. You can find the Universal Volume License Key for the Windows version on the official Microsoft page.
5. Notes on 32-bit vs. 64-bit versions
Since there is no 32-bit version of Windows 11, the only option is to choose 64-bit. However, you can still run 64-bit programs on 32-bit by adjusting certain settings.
Finally, you need to back up any important files, as anything can go wrong with any installation.
2. Create a bootable USB drive
- In this step, we will use the Ventoy tool.
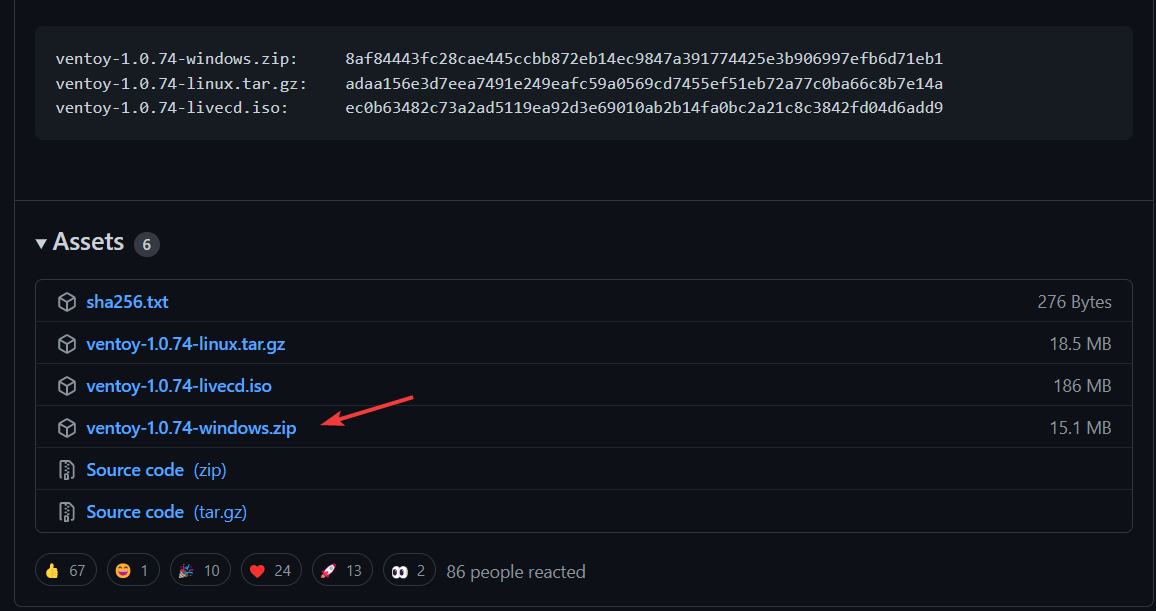
- Head to Ventoy’s GitHub repository and download the Windows zip file.

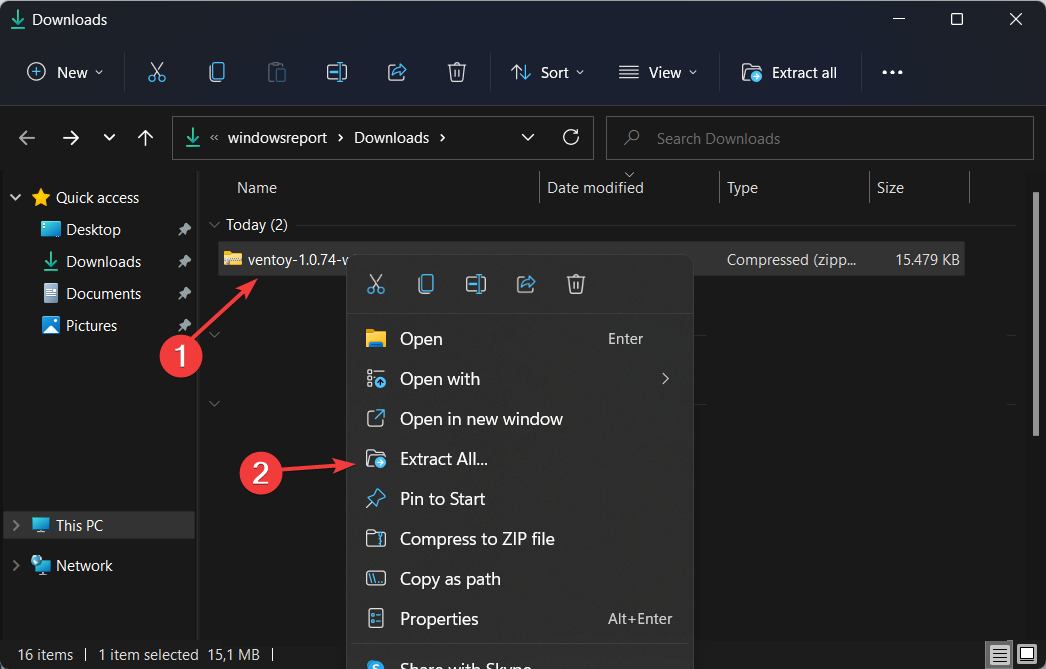
- Once downloaded, right-click on it to extract the folder at your current location.

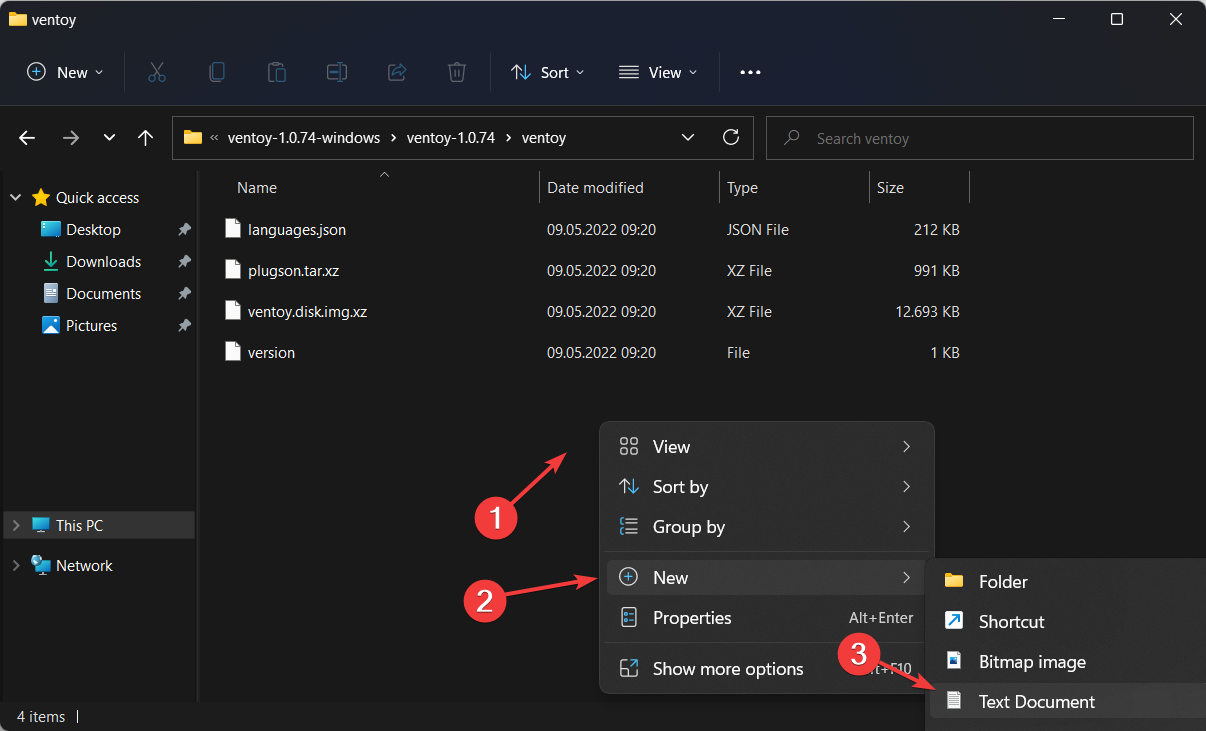
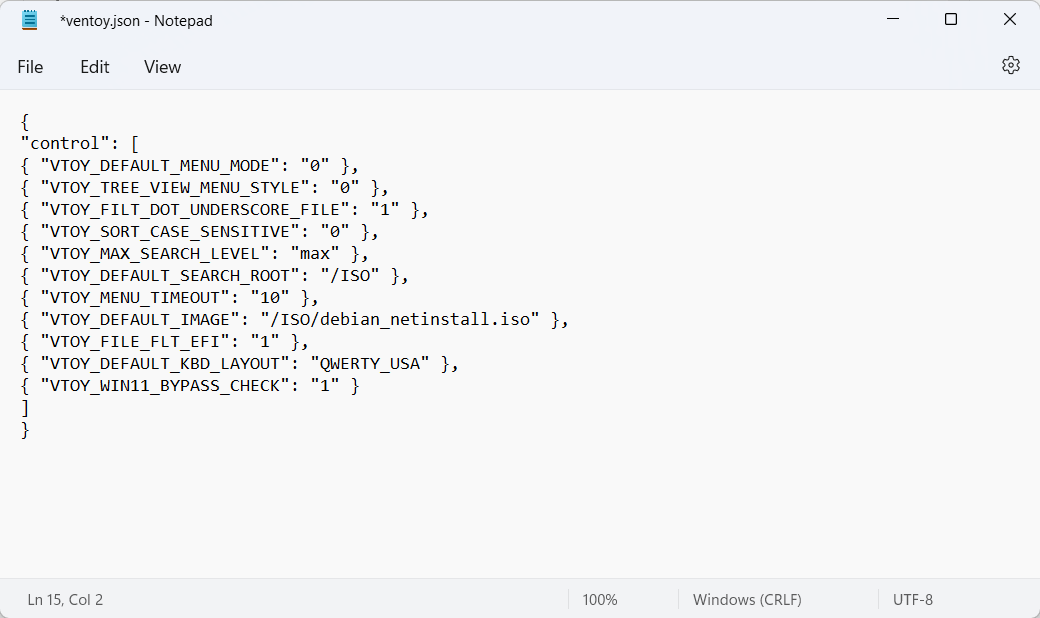
- Next, open the extracted folder and click on the subdirectory named Ventoy. Right-click anywhere on the window to create a new text file named ventoy.json. Copy and paste the following text into it and save the file:
<strong>{ "control": [ { "VTOY_DEFAULT_MENU_MODE": "0" }, { "VTOY_TREE_VIEW_MENU_STYLE": "0" }, { "VTOY_FILT_DOT_UNDERSCORE_FILE": "1 " }, { "VTOY_SORT_CASE_SENSITIVE": "0" }, { "VTOY_MAX_SEARCH_LEVEL": "max" }, { "VTOY_DEFAULT_SEARCH_ROOT": "/ISO" }, { "VTOY_MENU_TIMEOUT": "10" }, { "VTOY_DEFAULT_IMAGE": " /ISO/debian_netinstall.iso" }, { "VTOY_FILE_FLT_EFI": "1" }, { "VTOY_DEFAULT_KBD_LAYOUT": "QWERTY_USA" }, { "VTOY_WIN11_BYPASS_CHECK": "1" } ] }</strong>
- By setting the last parameter to 1, the computer will be able to avoid certain registry checks. For example, Ventoy Secure Boot for Windows 11.

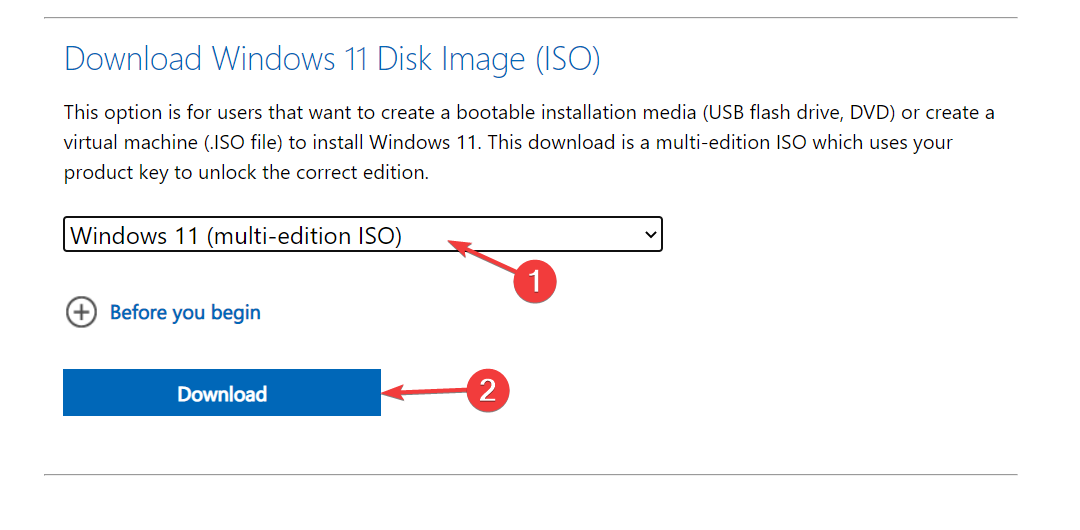
- Now head to the Microsoft page to download the Windows 11 disk image ISO.

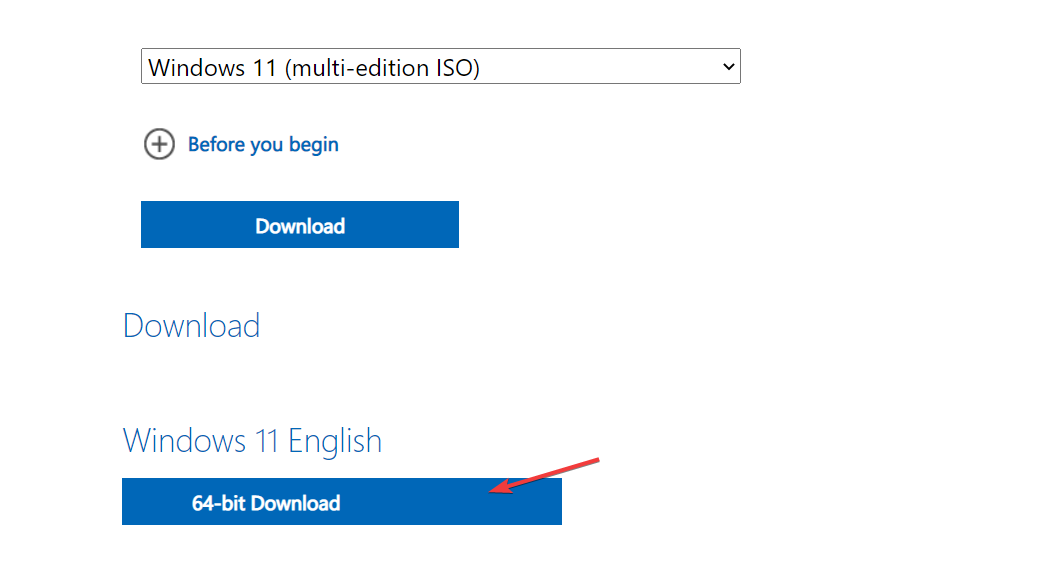
- Select the operating system version and language and click the 64-bit Download button.

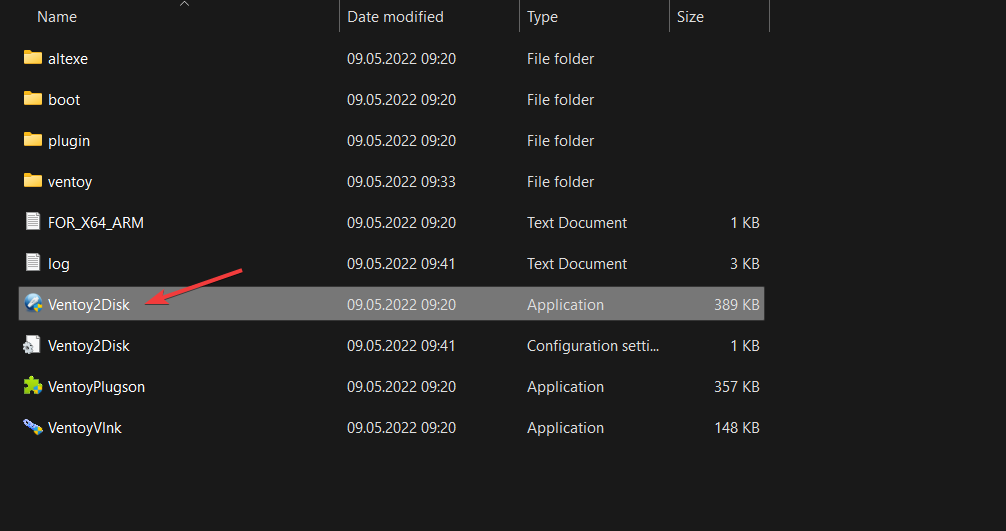
- Next, return to the extracted Ventoy folder and double-click the Ventoy2Disk file. Then insert the USB drive to format it.

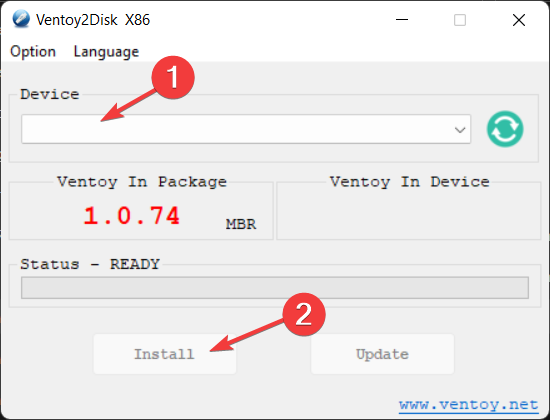
- You will be prompted with a new window where you can select the USB plugged in and select Install.

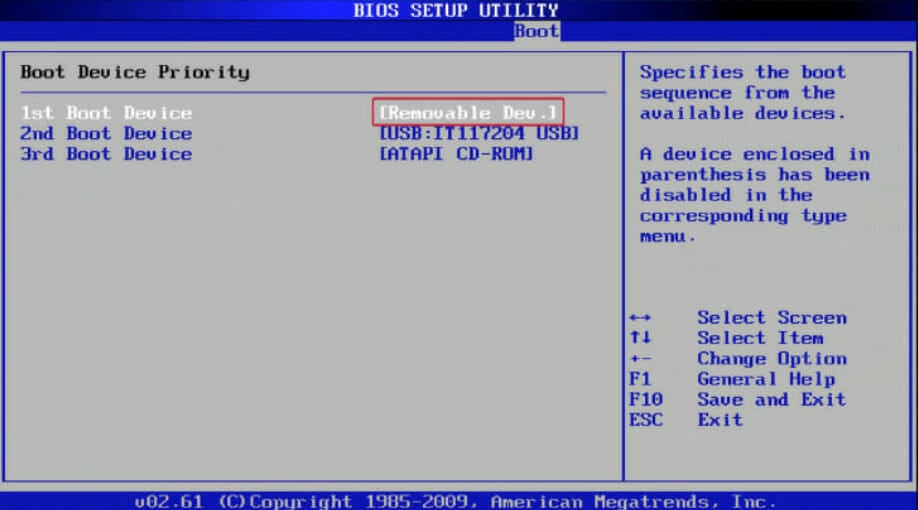
- Now, copy the Windows 11 ISO on the Ventoy drive and reboot the computer to enter the BIOS. Change the boot order so that USB has boot priority and continue with the installation process.

3. Configure the answer file
1. Understand the Windows answer file structure
The answer file is a text file that contains the manual steps of Windows Setup. Answers to questions asked during Windows installation.
These questions include where Windows is installed, what components should be installed on the computer, and whether those components should include any specific drivers when installed.
2. Generate unattended files using ADK tools
- Navigate to your browser and download the Windows Assessment and Deployment Kit.
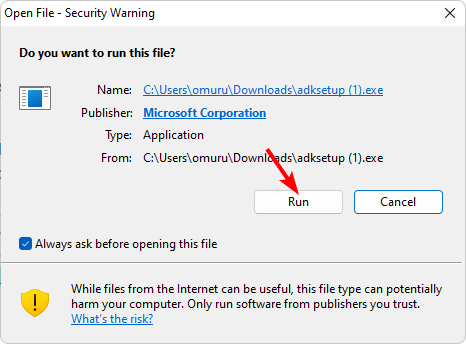
- Launch the installation file and click Run.

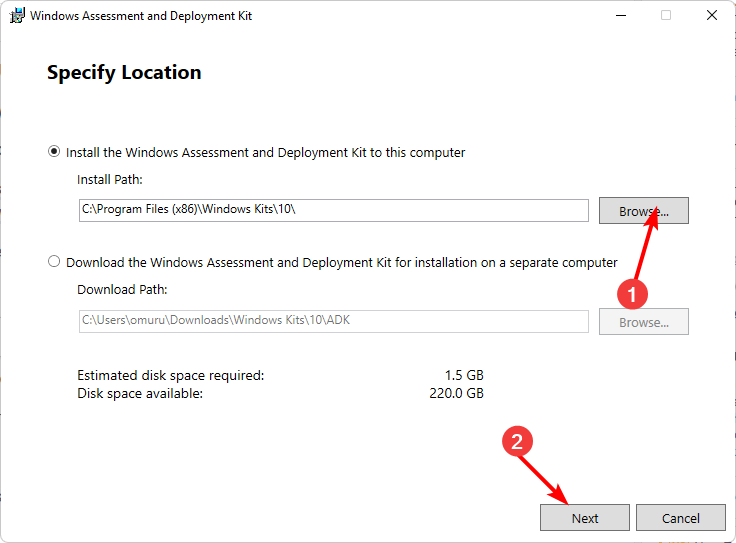
- Select the installation location by clicking "Browse" and then click "Next".

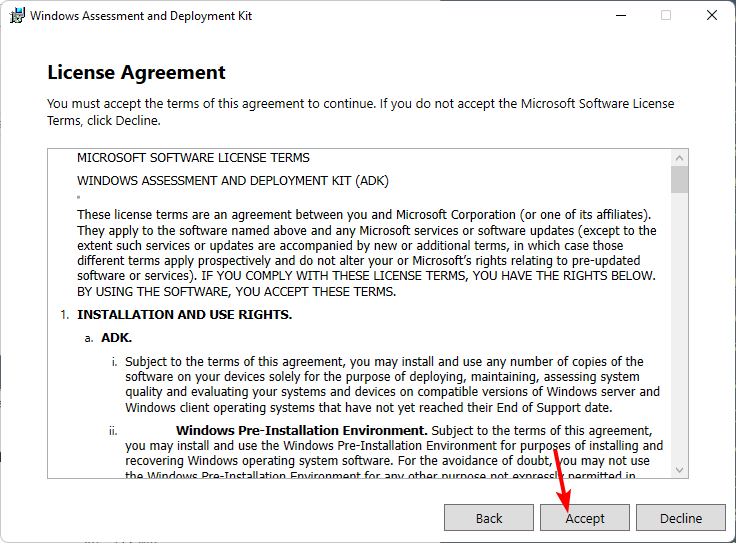
- Click Next and accept the terms and agreement, then click Next.

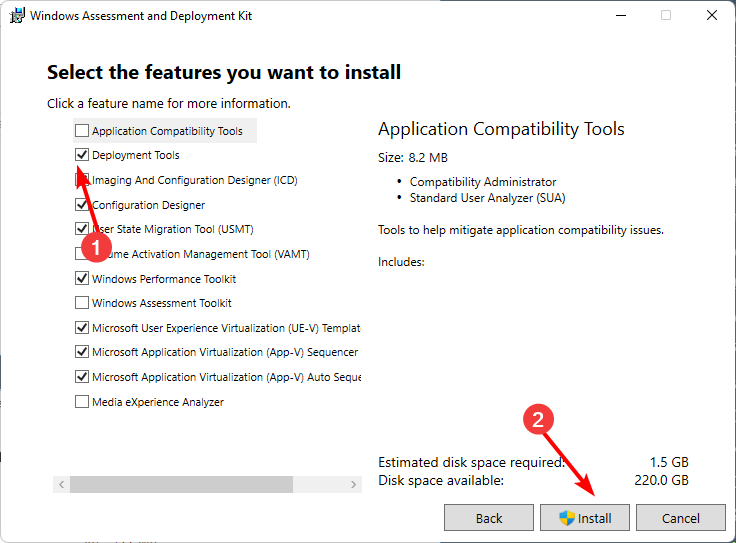
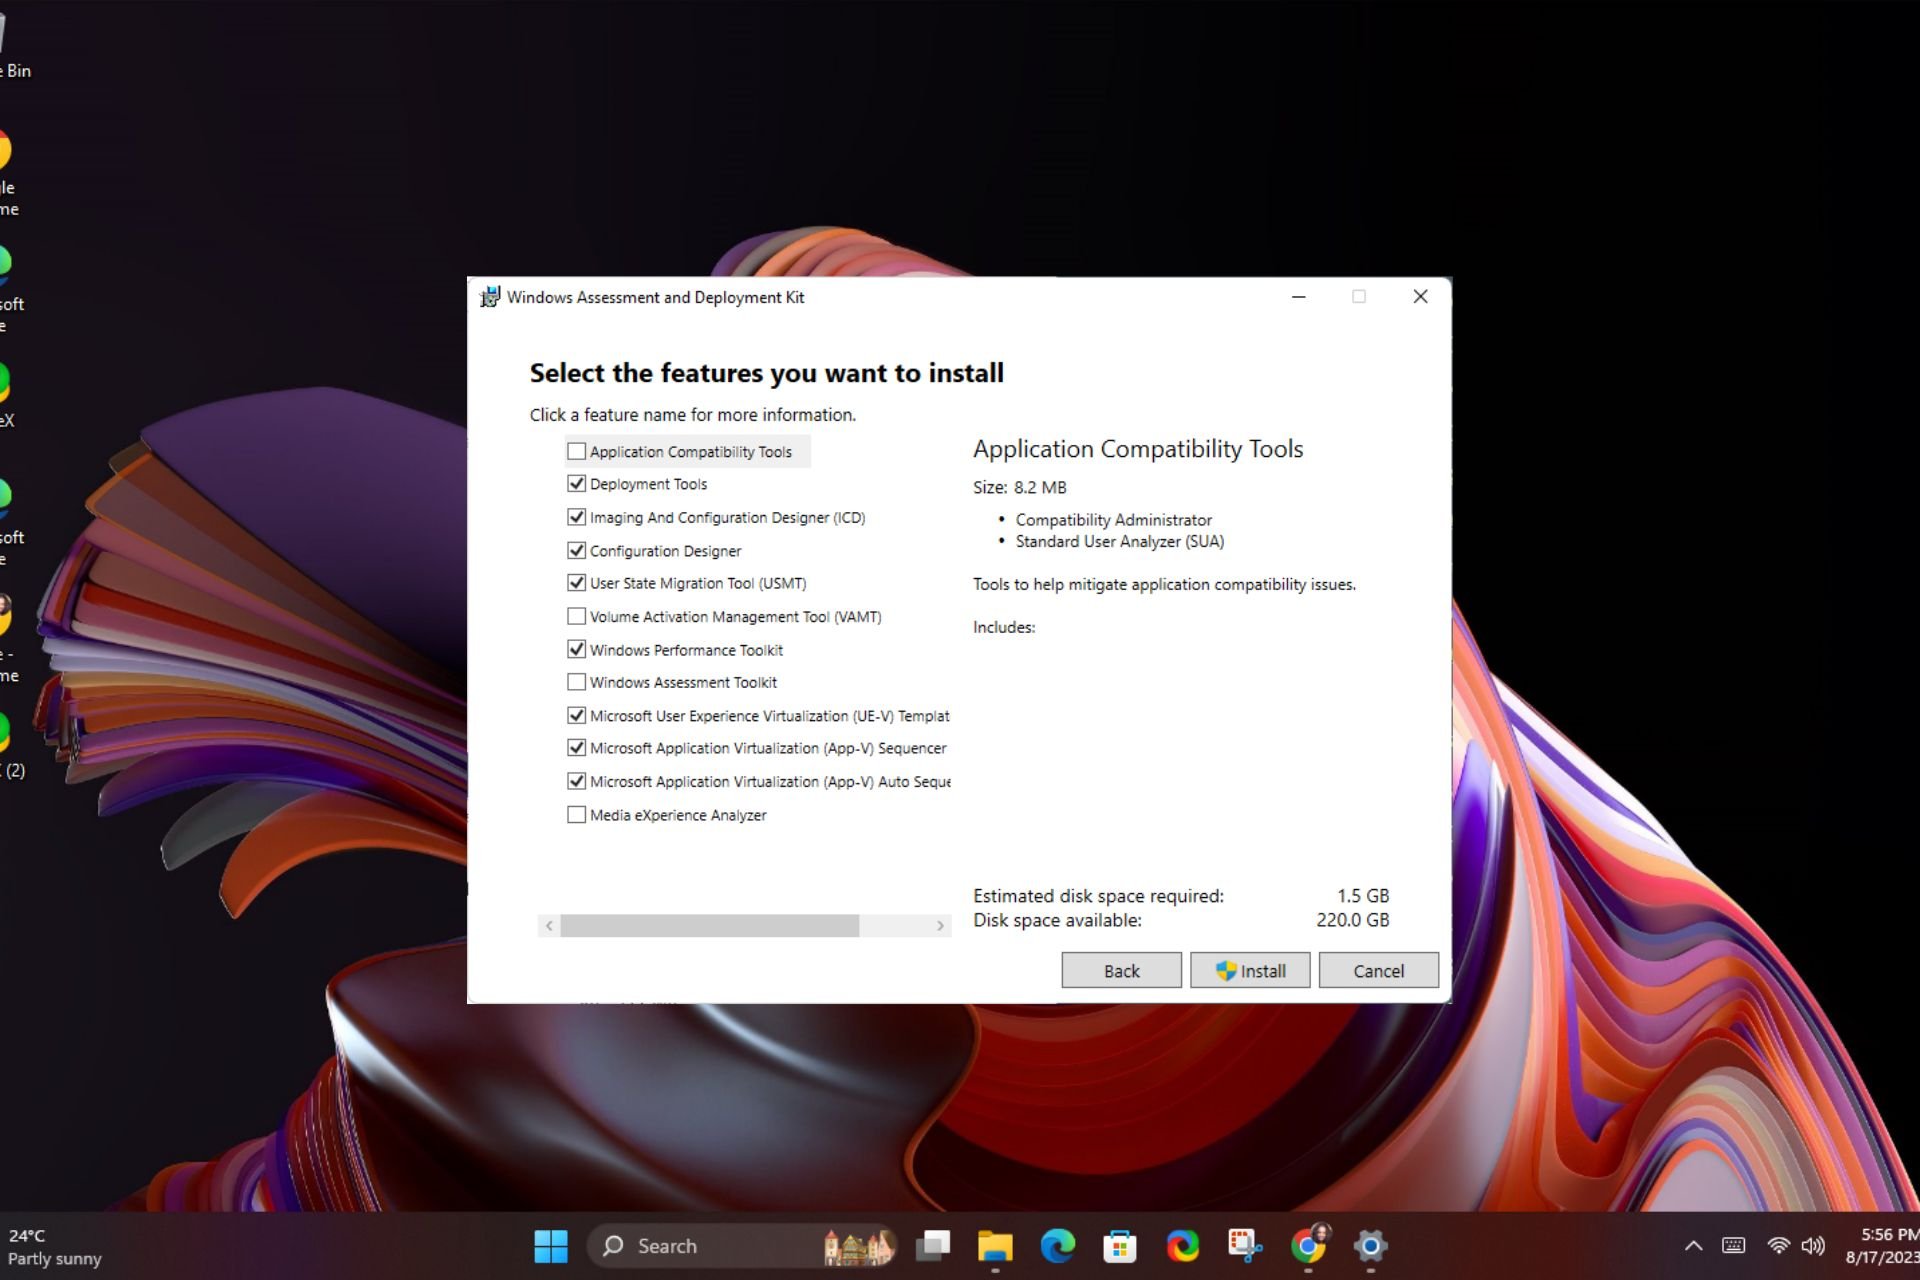
- Check the Deployment Tools box and click Install.

- Click on your Search icon and open the Windows system image.
- Select"File>System Image".
- In "Choose Windows Image", select the ISO file you downloaded in 2 above when creating the bootable USB drive.
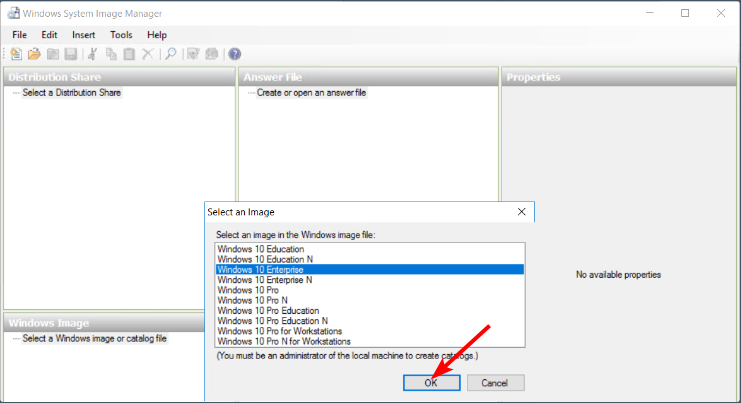
- Select your version of Windows and click OK.

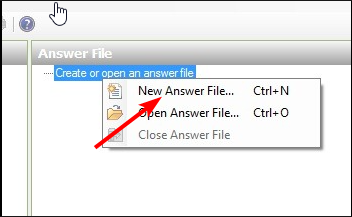
- Next, click Create or Open Answer File > New Answer File.

- Expand Component. This will list the various stages of customization, which you can drag to the right to set up the configuration stage. You can check out more information on how to adjust these settings on Microsoft's official page.
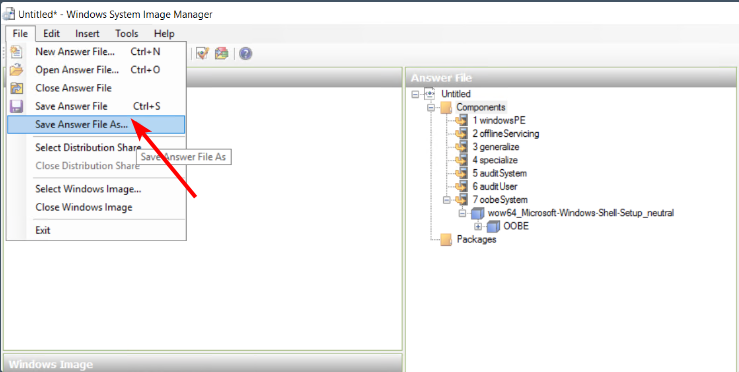
- Finally, after you have added all the components, click File > Save Answer File and make sure it is saved in XML format on the bootable drive created in 2 above, then eject it.

- Shut down your PC and insert the bootable drive, Windows 11 should install automatically.
Since this is a fairly lengthy affair, we encourage you to choose the Windows Answer File Generator to speed up the process and minimize errors.
Considering how long Windows 11 takes to download, this is a very popular solution that doesn't take much time. And with the help of some automated tools, installation time should be significantly reduced.
It's worth trying this method, especially if you have multiple computers that you want to upgrade to Windows 11 at the same time.
The above is the detailed content of How to create an unattended installation of Windows 11. For more information, please follow other related articles on the PHP Chinese website!

Hot AI Tools

Undresser.AI Undress
AI-powered app for creating realistic nude photos

AI Clothes Remover
Online AI tool for removing clothes from photos.

Undress AI Tool
Undress images for free

Clothoff.io
AI clothes remover

Video Face Swap
Swap faces in any video effortlessly with our completely free AI face swap tool!

Hot Article

Hot Tools

Notepad++7.3.1
Easy-to-use and free code editor

SublimeText3 Chinese version
Chinese version, very easy to use

Zend Studio 13.0.1
Powerful PHP integrated development environment

Dreamweaver CS6
Visual web development tools

SublimeText3 Mac version
God-level code editing software (SublimeText3)

Hot Topics
 Can I install mysql on Windows 7
Apr 08, 2025 pm 03:21 PM
Yes, MySQL can be installed on Windows 7, and although Microsoft has stopped supporting Windows 7, MySQL is still compatible with it. However, the following points should be noted during the installation process: Download the MySQL installer for Windows. Select the appropriate version of MySQL (community or enterprise). Select the appropriate installation directory and character set during the installation process. Set the root user password and keep it properly. Connect to the database for testing. Note the compatibility and security issues on Windows 7, and it is recommended to upgrade to a supported operating system.
 How to solve mysql cannot connect to local host
Apr 08, 2025 pm 02:24 PM
The MySQL connection may be due to the following reasons: MySQL service is not started, the firewall intercepts the connection, the port number is incorrect, the user name or password is incorrect, the listening address in my.cnf is improperly configured, etc. The troubleshooting steps include: 1. Check whether the MySQL service is running; 2. Adjust the firewall settings to allow MySQL to listen to port 3306; 3. Confirm that the port number is consistent with the actual port number; 4. Check whether the user name and password are correct; 5. Make sure the bind-address settings in my.cnf are correct.
 Solutions to the errors reported by MySQL on a specific system version
Apr 08, 2025 am 11:54 AM
The solution to MySQL installation error is: 1. Carefully check the system environment to ensure that the MySQL dependency library requirements are met. Different operating systems and version requirements are different; 2. Carefully read the error message and take corresponding measures according to prompts (such as missing library files or insufficient permissions), such as installing dependencies or using sudo commands; 3. If necessary, try to install the source code and carefully check the compilation log, but this requires a certain amount of Linux knowledge and experience. The key to ultimately solving the problem is to carefully check the system environment and error information, and refer to the official documents.
 MySQL can't be installed after downloading
Apr 08, 2025 am 11:24 AM
The main reasons for MySQL installation failure are: 1. Permission issues, you need to run as an administrator or use the sudo command; 2. Dependencies are missing, and you need to install relevant development packages; 3. Port conflicts, you need to close the program that occupies port 3306 or modify the configuration file; 4. The installation package is corrupt, you need to download and verify the integrity; 5. The environment variable is incorrectly configured, and the environment variables must be correctly configured according to the operating system. Solve these problems and carefully check each step to successfully install MySQL.
 Unable to access mysql from terminal
Apr 08, 2025 pm 04:57 PM
Unable to access MySQL from the terminal may be due to: MySQL service not running; connection command error; insufficient permissions; firewall blocks connection; MySQL configuration file error.
 How to copy and paste mysql
Apr 08, 2025 pm 07:18 PM
Copy and paste in MySQL includes the following steps: select the data, copy with Ctrl C (Windows) or Cmd C (Mac); right-click at the target location, select Paste or use Ctrl V (Windows) or Cmd V (Mac); the copied data is inserted into the target location, or replace existing data (depending on whether the data already exists at the target location).
 How to pull the vertical reference line of PS
Apr 06, 2025 pm 08:18 PM
Pull vertical guides in Photoshop: Enable ruler view (View > ruler). Hover the mouse over the vertical edge of the ruler, and then the cursor becomes a vertical line with double arrows and hold and drag the mouse to pull out the reference line. Click Delete by dragging the guide, or hovering it into a cross.
 MySQL download prompts disk write errors how to deal with
Apr 08, 2025 am 11:51 AM
MySQL download prompts a disk write error. The solution is as follows: 1. Check whether the disk space is insufficient, clean up the space or replace a larger disk; 2. Use disk detection tools (such as chkdsk or fsck) to check and fix disk errors, and replace the hard disk if necessary; 3. Check the target directory permissions to ensure that the user account has write permissions; 4. Change the download tool or network environment, and use the download manager to restore interrupted download; 5. Temporarily close the anti-virus software or firewall, and re-enable it after the download is completed. By systematically troubleshooting these aspects, the problem can be solved.


