
 Operation and Maintenance
Safety
How to set up a high-availability Apache (HTTP) cluster on RHEL 9/8
Operation and Maintenance
Safety
How to set up a high-availability Apache (HTTP) cluster on RHEL 9/8
How to set up a high-availability Apache (HTTP) cluster on RHEL 9/8


Pacemaker is a high-availability cluster software suitable for Linux-like operating systems. Pacemaker is known as the "cluster resource manager" and provides maximum availability of cluster resources by failover of resources between cluster nodes. Pacemaker uses Corosync for heartbeats and internal communications between cluster components. Corosync is also responsible for voting (Quorum) in the cluster.
Prerequisites
Before we begin, make sure you have the following:
- Two RHEL 9/8 servers
- Red Hat Subscription or locally configured repository
- Access to both servers via SSH
- root or sudo permissions
- Internet connection
Lab details:
- Server 1: node1.example.com (192.168.1.6)
- Server 2: node2.exaple.com (192.168. 1.7)
- VIP: 192.168.1.81
- Shared Disk:
/dev/sdb(2GB)
Without further ado, let’s Learn more about these steps.
1. Update the /etc/hosts file
Add the following entries in the /etc/hosts file on both nodes:
192.168.1.6node1.example.com192.168.1.7node2.example.com
2 , Install the high-availability package Pacemaker
Pacemaker and other necessary software packages cannot be obtained in the default package repository of RHEL 9/8. Therefore, we must enable a highly available warehouse. Run the following subscription manager commands on both nodes.
For RHEL 9 server:
$ sudo subscription-manager repos --enable=rhel-9-for-x86_64-highavailability-rpms
For RHEL 8 server:
$ sudo subscription-manager repos --enable=rhel-8-for-x86_64-highavailability-rpms
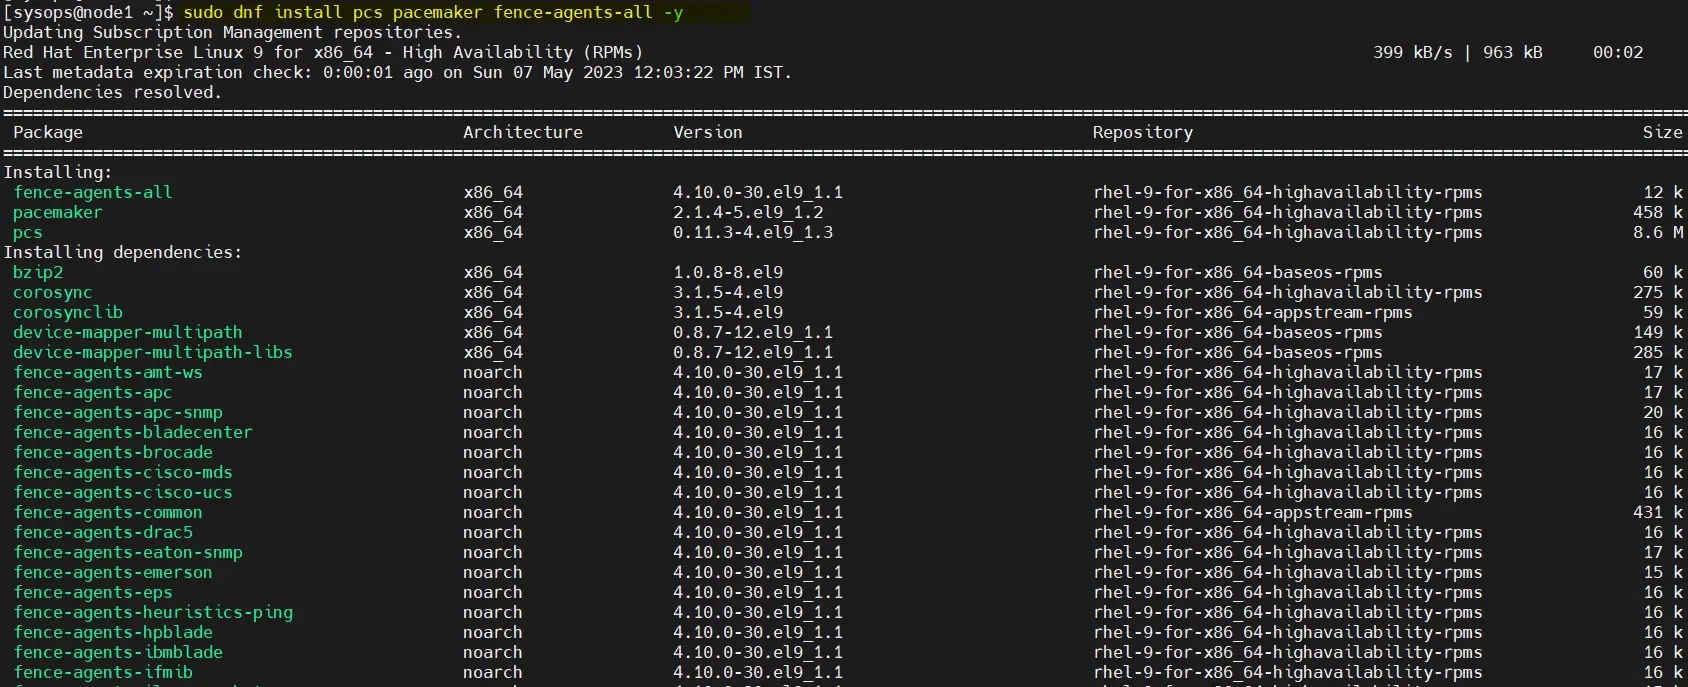
After enabling the repository, run the command to install the pacemaker package on both nodes :
$ sudo dnf install pcs pacemaker fence-agents-all -y
How to set up a high-availability Apache (HTTP) cluster on RHEL 9/8
3. Allow high-availability ports in the firewall
To allow high availability ports in the firewall, run the following command on each node:
$ sudo firewall-cmd --permanent --add-service=high-availability$ sudo firewall-cmd --reload
4. Set a password for the hacluster user and start the pcsd service
On both servers Set a password for the hacluster user and run the following echo command:
$ echo "<Enter-Password>" | sudo passwd --stdin hacluster
Execute the following command to start and enable the cluster service on both servers:
$ sudo systemctl start pcsd.service$ sudo systemctl enable pcsd.service
5. Create a high-availability cluster
Use the pcs command to authenticate both nodes and run the following command from any node. In my case, I'm running it on node1:
$ sudo pcs host auth node1.example.com node2.example.com
authenticated using the hacluster user.

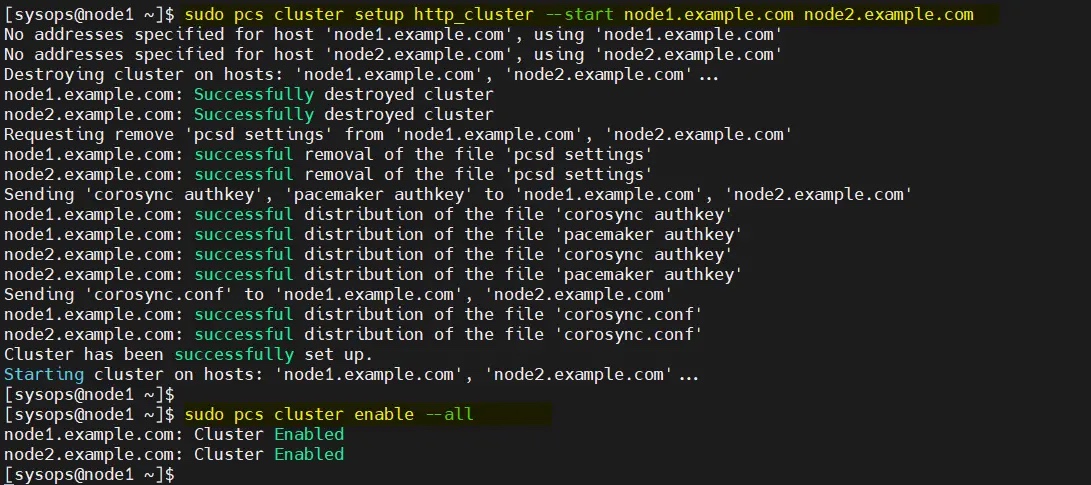
Use the following pcs cluster setup command to add two nodes to the cluster. The cluster name I use here is http_cluster . Run the command only on node1:
$ sudo pcs cluster setup http_cluster --start node1.example.com node2.example.com$ sudo pcs cluster enable --all
The output of these two commands is as follows:
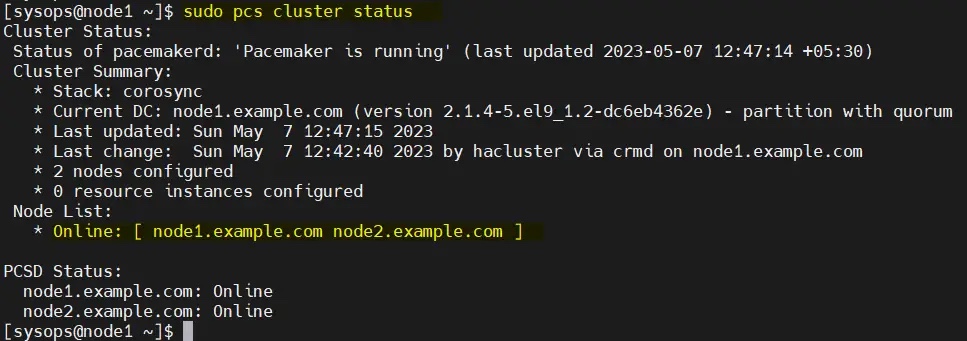
从任何节点验证初始集群状态:
$ sudo pcs cluster status
注意:在我们的实验室中,我们没有任何防护设备,因此我们将其禁用。但在生产环境中,强烈建议配置防护。
$ sudo pcs property set stonith-enabled=false$ sudo pcs property set no-quorum-policy=ignore
6、为集群配置共享卷
在服务器上,挂载了一个大小为 2GB 的共享磁盘(/dev/sdb)。因此,我们将其配置为 LVM 卷并将其格式化为 XFS 文件系统。
在开始创建 LVM 卷之前,编辑两个节点上的 /etc/lvm/lvm.conf 文件。
将参数 #system_id_source = "none" 更改为 system_id_source = "uname":
$ sudo sed -i 's/# system_id_source = "none"/ system_id_source = "uname"/g' /etc/lvm/lvm.conf
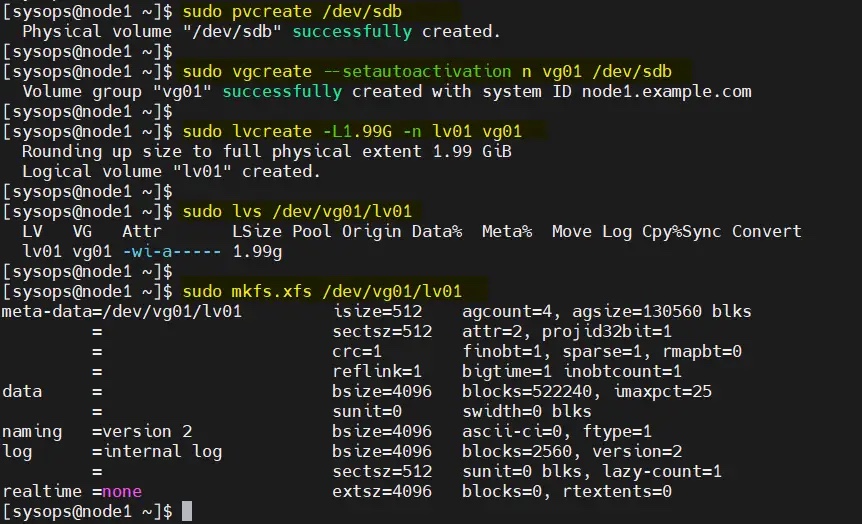
在 node1 上依次执行以下一组命令创建 LVM 卷:
$ sudo pvcreate /dev/sdb$ sudo vgcreate --setautoactivation n vg01 /dev/sdb$ sudo lvcreate -L1.99G -n lv01 vg01$ sudo lvs /dev/vg01/lv01$ sudo mkfs.xfs /dev/vg01/lv01
将共享设备添加到集群第二个节点(node2.example.com)上的 LVM 设备文件中,仅在 node2 上运行以下命令:
[sysops@node2 ~]$ sudo lvmdevices --adddev /dev/sdb
7、安装和配置 Apache Web 服务器(httpd)
在两台服务器上安装 Apache web 服务器(httpd),运行以下 dnf 命令:
$ sudo dnf install -y httpd wget
并允许防火墙中的 Apache 端口,在两台服务器上运行以下 firewall-cmd 命令:
$ sudo firewall-cmd --permanent --zone=public --add-service=http$ sudo firewall-cmd --permanent --zone=public --add-service=https$ sudo firewall-cmd --reload
在两个节点上创建 status.conf 文件,以便 Apache 资源代理获取 Apache 的状态:
$ sudo bash -c 'cat <<-END > /etc/httpd/conf.d/status.conf<Location /server-status>SetHandler server-statusRequire local</Location>END'$
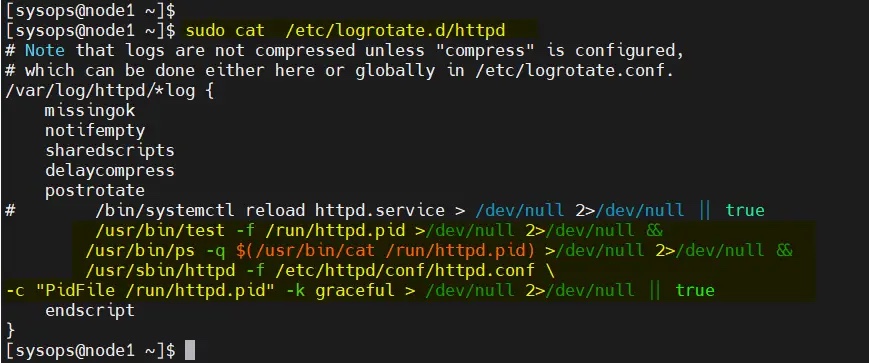
修改两个节点上的 /etc/logrotate.d/httpd:
替换下面的行
/bin/systemctl reload httpd.service > /dev/null 2>/dev/null || true
为
/usr/bin/test -f /run/httpd.pid >/dev/null 2>/dev/null &&/usr/bin/ps -q $(/usr/bin/cat /run/httpd.pid) >/dev/null 2>/dev/null &&/usr/sbin/httpd -f /etc/httpd/conf/httpd.conf \-c "PidFile /run/httpd.pid" -k graceful > /dev/null 2>/dev/null || true
保存并退出文件。
8、为 Apache 创建一个示例网页
仅在 node1 上执行以下命令:
$ sudo lvchange -ay vg01/lv01$ sudo mount /dev/vg01/lv01 /var/www/$ sudo mkdir /var/www/html$ sudo mkdir /var/www/cgi-bin$ sudo mkdir /var/www/error$ sudo bash -c ' cat <<-END >/var/www/html/index.html<html><body>High Availability Apache Cluster - Test Page </body></html>END'$$ sudo umount /var/www
注意:如果启用了 SElinux,则在两台服务器上运行以下命令:
$ sudo restorecon -R /var/www
9、创建集群资源和资源组
为集群定义资源组和集群资源。在我的例子中,我们使用 webgroup 作为资源组。
-
web_lvm是共享 LVM 卷的资源名称(/dev/vg01/lv01) -
web_fs是将挂载在/var/www上的文件系统资源的名称 -
VirtualIP是网卡enp0s3的 VIP(IPadd2)资源 -
Website是 Apache 配置文件的资源。
从任何节点执行以下命令集。
$ sudo pcs resource create web_lvm ocf:heartbeat:LVM-activate vgname=vg01 vg_access_mode=system_id --group webgroup$ sudo pcs resource create web_fs Filesystem device="/dev/vg01/lv01" directory="/var/www" fstype="xfs" --group webgroup$ sudo pcs resource create VirtualIP IPaddr2 ip=192.168.1.81 cidr_netmask=24 nic=enp0s3 --group webgroup$ sudo pcs resource create Website apache configfile="/etc/httpd/conf/httpd.conf" statusurl="http://127.0.0.1/server-status" --group webgroup

现在验证集群资源状态,运行:
$ sudo pcs status
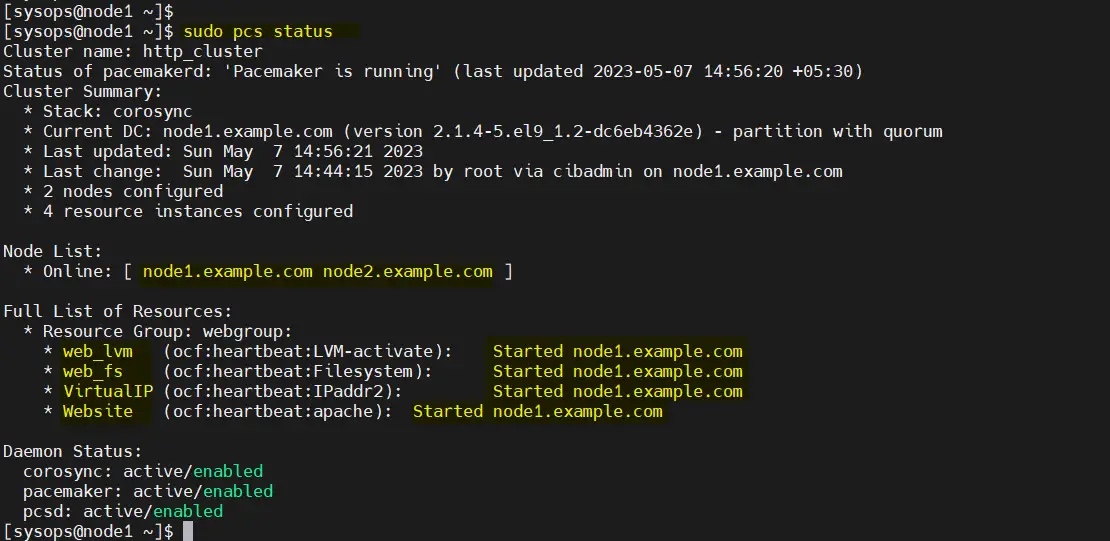
很好,上面的输出显示所有资源都在 node1 上启动。
10、测试 Apache 集群
尝试使用 VIP(192.168.1.81)访问网页。
使用 curl 命令或网络浏览器访问网页:
$ curl http://192.168.1.81

或者
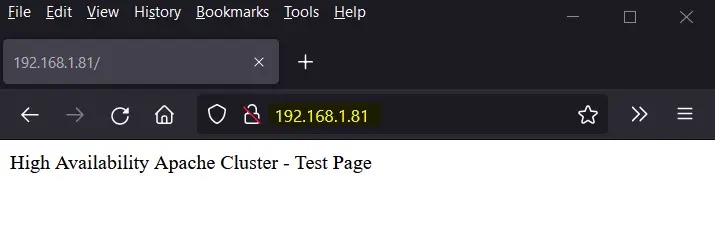
完美!以上输出确认我们能够访问我们高可用 Apache 集群的网页。
让我们尝试将集群资源从 node1 移动到 node2,运行:
$ sudo pcs node standby node1.example.com$ sudo pcs status

完美,以上输出确认集群资源已从 node1 迁移到 node2。
要从备用节点(node1.example.com)中删除节点,运行以下命令:
$ sudo pcs node unstandby node1.example.com

The above is the detailed content of How to set up a high-availability Apache (HTTP) cluster on RHEL 9/8. For more information, please follow other related articles on the PHP Chinese website!

Hot AI Tools

Undresser.AI Undress
AI-powered app for creating realistic nude photos

AI Clothes Remover
Online AI tool for removing clothes from photos.

Undress AI Tool
Undress images for free

Clothoff.io
AI clothes remover

Video Face Swap
Swap faces in any video effortlessly with our completely free AI face swap tool!

Hot Article
Hot Tools

Notepad++7.3.1
Easy-to-use and free code editor

SublimeText3 Chinese version
Chinese version, very easy to use

Zend Studio 13.0.1
Powerful PHP integrated development environment

Dreamweaver CS6
Visual web development tools

SublimeText3 Mac version
God-level code editing software (SublimeText3)
Hot Topics


 How to set the cgi directory in apache
Apr 13, 2025 pm 01:18 PM
How to set the cgi directory in apache
Apr 13, 2025 pm 01:18 PM
To set up a CGI directory in Apache, you need to perform the following steps: Create a CGI directory such as "cgi-bin", and grant Apache write permissions. Add the "ScriptAlias" directive block in the Apache configuration file to map the CGI directory to the "/cgi-bin" URL. Restart Apache.
 What to do if the apache80 port is occupied
Apr 13, 2025 pm 01:24 PM
What to do if the apache80 port is occupied
Apr 13, 2025 pm 01:24 PM
When the Apache 80 port is occupied, the solution is as follows: find out the process that occupies the port and close it. Check the firewall settings to make sure Apache is not blocked. If the above method does not work, please reconfigure Apache to use a different port. Restart the Apache service.
 How to connect to the database of apache
Apr 13, 2025 pm 01:03 PM
How to connect to the database of apache
Apr 13, 2025 pm 01:03 PM
Apache connects to a database requires the following steps: Install the database driver. Configure the web.xml file to create a connection pool. Create a JDBC data source and specify the connection settings. Use the JDBC API to access the database from Java code, including getting connections, creating statements, binding parameters, executing queries or updates, and processing results.
 How to start apache
Apr 13, 2025 pm 01:06 PM
How to start apache
Apr 13, 2025 pm 01:06 PM
The steps to start Apache are as follows: Install Apache (command: sudo apt-get install apache2 or download it from the official website) Start Apache (Linux: sudo systemctl start apache2; Windows: Right-click the "Apache2.4" service and select "Start") Check whether it has been started (Linux: sudo systemctl status apache2; Windows: Check the status of the "Apache2.4" service in the service manager) Enable boot automatically (optional, Linux: sudo systemctl
 How to view your apache version
Apr 13, 2025 pm 01:15 PM
How to view your apache version
Apr 13, 2025 pm 01:15 PM
There are 3 ways to view the version on the Apache server: via the command line (apachectl -v or apache2ctl -v), check the server status page (http://<server IP or domain name>/server-status), or view the Apache configuration file (ServerVersion: Apache/<version number>).
 How to delete more than server names of apache
Apr 13, 2025 pm 01:09 PM
How to delete more than server names of apache
Apr 13, 2025 pm 01:09 PM
To delete an extra ServerName directive from Apache, you can take the following steps: Identify and delete the extra ServerName directive. Restart Apache to make the changes take effect. Check the configuration file to verify changes. Test the server to make sure the problem is resolved.
 How to configure zend for apache
Apr 13, 2025 pm 12:57 PM
How to configure zend for apache
Apr 13, 2025 pm 12:57 PM
How to configure Zend in Apache? The steps to configure Zend Framework in an Apache Web Server are as follows: Install Zend Framework and extract it into the Web Server directory. Create a .htaccess file. Create the Zend application directory and add the index.php file. Configure the Zend application (application.ini). Restart the Apache Web server.
 How to view the apache version
Apr 13, 2025 pm 01:00 PM
How to view the apache version
Apr 13, 2025 pm 01:00 PM
How to view the Apache version? Start the Apache server: Use sudo service apache2 start to start the server. View version number: Use one of the following methods to view version: Command line: Run the apache2 -v command. Server Status Page: Access the default port of the Apache server (usually 80) in a web browser, and the version information is displayed at the bottom of the page.
