What is the implementation principle of Vue3 slot Slot?
Vue’s official definition of slot
Vue implements a set of content distribution APIs. The design of this API is inspired by the Web Components specification draft and will <slot></slot> Elements serve as outlets for hosting distributed content.
What is Slot
So what exactly is Slot? Slot is actually a function that accepts the slot content passed by the parent component, then generates a VNode and returns it.
We generally use <slot></slot> This pair of tags accepts the content passed by the parent component. Then the final compilation of this pair of tags is a function that creates a VNode. , we can call it the function that creates the slot VNode.
// <slot></slot>标签被vue3编译之后的内容
export function render(_ctx, _cache, $props, $setup, $data, $options) {
  return _renderSlot(_ctx.$slots, "default")
}We can clearly see that the <slot></slot> tag becomes a function called _renderSlot after it is compiled by Vue3.
How to use slots
To use slots, parent-child components must exist.
Assume that the parent component has the following content:
<todo-button>
  Add todo
</todo-button>
We use a todo-button child component in the parent component and pass Add todo's slot content.
todo-button sub-component template content
<button class="btn-primary">
  <slot></slot>
</button>
When the component is rendered, <slot></slot> will be replaced with "Add todo" .
Review the principle of component rendering
So what is the underlying principle? Before understanding the underlying principles of slots, we also need to review the operating principles of Vue3 components.
The core of the component is that it can produce a bunch of VNode. For Vue, the core of a component is its rendering function. The essence of mounting a component is to execute the rendering function and obtain the VNode to be rendered. As for data/props/computed, these are all used to provide data for the rendering function to generate VNode. The most important thing about the source service is the VNode finally produced by the component, because this is the content that needs to be rendered.
The initialization principle of the slot
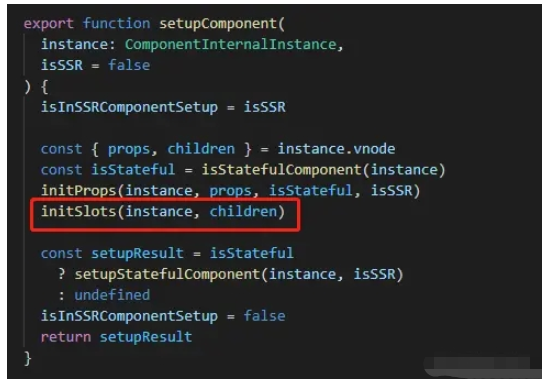
When Vue3 encounters a VNode type of component, it will enter the component rendering process. The process of component rendering is to first create a component instance, and then initialize the component instance. When initializing the component instance, Slot-related content will be processed.
In the runtime-core\src\component.ts of the source code

Initialize the related content of the component Slot in the function initSlots
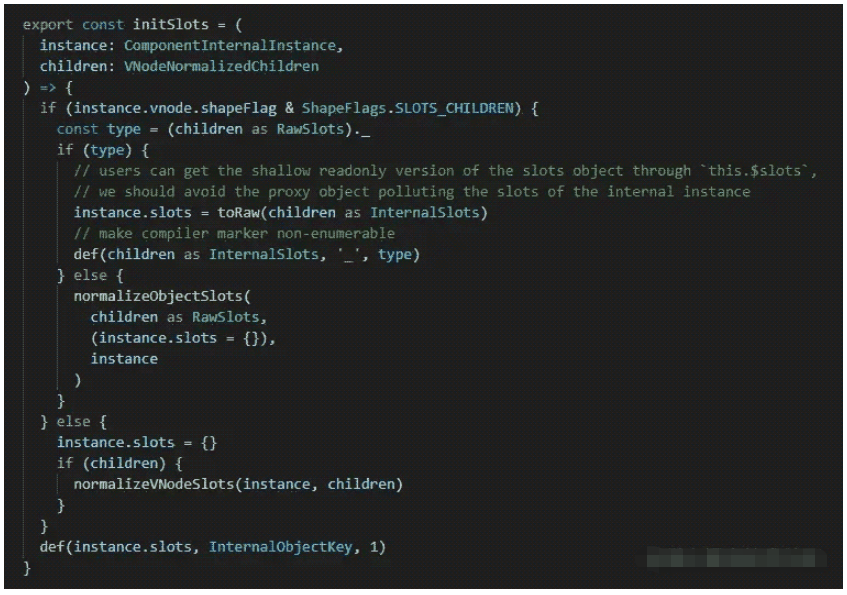
So what does the initSlots function look like and what does it do?
runtime-core\src\componentSlots.ts

First of all, we need to determine whether the component is a Slot component. Then how to determine whether the component is a Slot component? ? We first need to go back and take a look at the compiled code of the parent component above:
export function render(_ctx, _cache, $props, $setup, $data, $options) {
  const _component_todo_button = _resolveComponent("todo-button")
  return (_openBlock(), _createBlock(_component_todo_button, null, {
    default: _withCtx(() => [
      _createTextVNode(" Add todo ")
    ], undefined, true),
    _: 1 /* STABLE */
  }))
}We can see that the children content of the Slot component is an Object type, which is the following code:
{
    default: _withCtx(() => [
      _createTextVNode(" Add todo ")
    ], undefined, true),
    _: 1 /* STABLE */
}Then When the VNode of this component is created, it will be judged whether its children are of type Object. If it is of type Object, then a Slot component tag will be attached to the shapeFlag of the VNode of the component.
If it is compiled through a template, it is the standard slot children, which has the _ attribute and can be placed directly on the component instance. slots Attributes.
If it is a slot object written by the user himself, then there is no _ attribute, so it needs to be normalized, go to normalizeObjectSlots.
If the user's behavior does not follow the specifications, then follow the normalizeVNodeSlots process.
Analyze the contents of the slot
Let’s first look at the compiled code of the subcomponent:
export function render(_ctx, _cache, $props, $setup, $data, $options) {
  return (_openBlock(), _createElementBlock("button", { class: "btn-primary" }, [
    _renderSlot(_ctx.$slots, "default")
  ]))
}We also talked about it above<slot>< ;/slot>After the tag is compiled by vue3, it becomes a function called _renderSlot.

renderSlotThe function accepts five parameters, the first is the slot function object slots on the instance, the second is the name of the slot, that is, rendering the slot content to the specified location, the third is the props received by the slot scope, the fourth is the default content rendering function of the slot, and the fifth Not sure what it means yet.
Scope Slot Principle
Scope slot is a way for a child component to pass parameters to a parent component, allowing the slot content to access data only in the child component.
Subcomponent template
<slot username="coboy"></slot>
Compiled code
export function render(_ctx, _cache, $props, $setup, $data, $options) {
  return _renderSlot(_ctx.$slots, "default", { username: "coboy" })
}Parent component template
<todo-button>
    <template v-slot:default="slotProps">
        {{ slotProps.username }}
    </template>
</todo-button>Compiled code
export function render(_ctx, _cache, $props, $setup, $data, $options) {
  const _component_todo_button = _resolveComponent("todo-button")
  return (_openBlock(), _createBlock(_component_todo_button, null, {
    default: _withCtx((slotProps) => [
      _createTextVNode(_toDisplayString(slotProps.username), 1 /* TEXT */)
    ]),
    _: 1 /* STABLE */
  }))
}As mentioned above Through the renderSlot function, it can be simply summarized into the following code
export function renderSlots(slots, name, props) {
  const slot = slots[name]
  if (slot) {
    if (typeof slot === 'function') {
      return createVNode(Fragment, {}, slot(props))
    }
  }
}slots is the slot content uploaded by the component instance, which is actually this content
{
    default: _withCtx((slotProps) => [
      _createTextVNode(_toDisplayString(slotProps.username), 1 /* TEXT */)
    ]),
    _: 1 /* STABLE */
}name is default , then what slots[name] gets is the following function
_withCtx((slotProps) => [
      _createTextVNode(_toDisplayString(slotProps.username), 1 /* TEXT */)
])slot(props) is obviously slot({ username: "coboy" }), which transfers the data in the child component to the parent component The contents of the slot are in.
具名插槽原理
有时我们需要多个插槽。例如对于一个带有如下模板的 <base-layout> 组件:
<div class="container">
  <header>
    <!-- 我们希望把页头放这里 -->
  </header>
  <main>
    <!-- 我们希望把主要内容放这里 -->
  </main>
  <footer>
    <!-- 我们希望把页脚放这里 -->
  </footer>
</div>对于这样的情况,<slot> 元素有一个特殊的 attribute:name。通过它可以为不同的插槽分配独立的 ID,也就能够以此来决定内容应该渲染到什么地方:
<!--子组件-->
<div class="container">
  <header>
    <slot name="header"></slot>
  </header>
  <main>
    <slot></slot>
  </main>
  <footer>
    <slot name="footer"></slot>
  </footer>
</div>一个不带 name 的 <slot> 出口会带有隐含的名字“default”。
在向具名插槽提供内容的时候,我们可以在一个 <template> 元素上使用 v-slot 指令,并以 v-slot 的参数的形式提供其名称:
<!--父组件-->
<base-layout>
  <template v-slot:header>
    <h2 id="header">header</h2>
  </template>
  <template v-slot:default>
    <p>default</p>
  </template>
  <template v-slot:footer>
    <p>footer</p>
  </template>
</base-layout>父组件编译之后的内容:
export function render(_ctx, _cache, $props, $setup, $data, $options) {
  const _component_base_layout = _resolveComponent("base-layout")
  return (_openBlock(), _createBlock(_component_base_layout, null, {
    header: _withCtx(() => [
      _createElementVNode("h2", null, "header")
    ]),
    default: _withCtx(() => [
      _createElementVNode("p", null, "default")
    ]),
    footer: _withCtx(() => [
      _createElementVNode("p", null, "footer")
    ]),
    _: 1 /* STABLE */
  }))
}子组件编译之后的内容:
export function render(_ctx, _cache, $props, $setup, $data, $options) {
  return (_openBlock(), _createElementBlock("div", { class: "container" }, [
    _createElementVNode("header", null, [
      _renderSlot(_ctx.$slots, "header")
    ]),
    _createElementVNode("main", null, [
      _renderSlot(_ctx.$slots, "default")
    ]),
    _createElementVNode("footer", null, [
      _renderSlot(_ctx.$slots, "footer")
    ])
  ]))
}通过子组件编译之后的内容我们可以看到这三个Slot渲染函数
_renderSlot(_ctx.$slots, "header")
_renderSlot(_ctx.$slots, "default")
_renderSlot(_ctx.$slots, "footer")
然后我们再回顾一下renderSlot渲染函数
// renderSlots的简化
export function renderSlots(slots, name, props) {
  const slot = slots[name]
  if (slot) {
    if (typeof slot === 'function') {
      return createVNode(Fragment, {}, slot(props))
    }
  }
}这个时候我们就可以很清楚的知道所谓具名函数是通过renderSlots渲染函数的第二参数去定位要渲染的父组件提供的插槽内容。父组件的插槽内容编译之后变成了一个Object的数据类型。
{
    header: _withCtx(() => [
      _createElementVNode("h2", null, "header")
    ]),
    default: _withCtx(() => [
      _createElementVNode("p", null, "default")
    ]),
    footer: _withCtx(() => [
      _createElementVNode("p", null, "footer")
    ]),
    _: 1 /* STABLE */
}默认内容插槽的原理
我们可能希望这个 <button> 内绝大多数情况下都渲染“Submit”文本。为了将“Submit”作为备用内容,我们可以将它放在 <slot> 标签内
<button type="submit">
  <slot>Submit</slot>
</button>
现在当我们在一个父级组件中使用 <submit-button> 并且不提供任何插槽内容时:
<submit-button></submit-button>
备用内容“Submit”将会被渲染:
<button type="submit">
  Submit
</button>
但是如果我们提供内容:
<submit-button>
  Save
</submit-button>
则这个提供的内容将会被渲染从而取代备用内容:
<button type="submit">
  Save
</button>
这其中的原理是什么呢?我们先来看看上面默认内容插槽编译之后的代码
export function render(_ctx, _cache, $props, $setup, $data, $options) {
  return (_openBlock(), _createElementBlock("button", { type: "submit" }, [
    _renderSlot(_ctx.$slots, "default", {}, () => [
      _createTextVNode("Submit")
    ])
  ]))
}我们可以看到插槽函数的内容是这样的
_renderSlot(_ctx.$slots, "default", {}, () => [
    _createTextVNode("Submit")
])我们再回顾看一下renderSlot函数
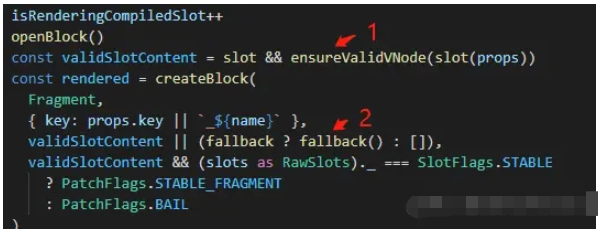
renderSlot函数接受五个参数,第四个是插槽的默认内容渲染函数。

再通过renderSlot函数的源码我们可以看到,
第一步,先获取父组件提供的内容插槽的内容,
在第二个步骤中,若父组件已提供插槽内容,则使用该插槽内容,否则执行默认的内容渲染函数以获取默认内容。
The above is the detailed content of What is the implementation principle of Vue3 slot Slot?. For more information, please follow other related articles on the PHP Chinese website!

Hot AI Tools

Undresser.AI Undress
AI-powered app for creating realistic nude photos

AI Clothes Remover
Online AI tool for removing clothes from photos.

Undress AI Tool
Undress images for free

Clothoff.io
AI clothes remover

Video Face Swap
Swap faces in any video effortlessly with our completely free AI face swap tool!

Hot Article

Hot Tools

Notepad++7.3.1
Easy-to-use and free code editor

SublimeText3 Chinese version
Chinese version, very easy to use

Zend Studio 13.0.1
Powerful PHP integrated development environment

Dreamweaver CS6
Visual web development tools

SublimeText3 Mac version
God-level code editing software (SublimeText3)

Hot Topics
 How to use tinymce in vue3 project
May 19, 2023 pm 08:40 PM
tinymce is a fully functional rich text editor plug-in, but introducing tinymce into vue is not as smooth as other Vue rich text plug-ins. tinymce itself is not suitable for Vue, and @tinymce/tinymce-vue needs to be introduced, and It is a foreign rich text plug-in and has not passed the Chinese version. You need to download the translation package from its official website (you may need to bypass the firewall). 1. Install related dependencies npminstalltinymce-Snpminstall@tinymce/tinymce-vue-S2. Download the Chinese package 3. Introduce the skin and Chinese package. Create a new tinymce folder in the project public folder and download the
 vue3+vite: How to solve the error when using require to dynamically import images in src
May 21, 2023 pm 03:16 PM
vue3+vite:src uses require to dynamically import images and error reports and solutions. vue3+vite dynamically imports multiple images. If vue3 is using typescript development, require will introduce image errors. requireisnotdefined cannot be used like vue2 such as imgUrl:require(' .../assets/test.png') is imported because typescript does not support require, so import is used. Here is how to solve it: use awaitimport
 How to refresh partial content of the page in Vue3
May 26, 2023 pm 05:31 PM
To achieve partial refresh of the page, we only need to implement the re-rendering of the local component (dom). In Vue, the easiest way to achieve this effect is to use the v-if directive. In Vue2, in addition to using the v-if instruction to re-render the local dom, we can also create a new blank component. When we need to refresh the local page, jump to this blank component page, and then jump back in the beforeRouteEnter guard in the blank component. original page. As shown in the figure below, how to click the refresh button in Vue3.X to reload the DOM within the red box and display the corresponding loading status. Since the guard in the component in the scriptsetup syntax in Vue3.X only has o
 How Vue3 parses markdown and implements code highlighting
May 20, 2023 pm 04:16 PM
Vue implements the blog front-end and needs to implement markdown parsing. If there is code, it needs to implement code highlighting. There are many markdown parsing libraries for Vue, such as markdown-it, vue-markdown-loader, marked, vue-markdown, etc. These libraries are all very similar. Marked is used here, and highlight.js is used as the code highlighting library. The specific implementation steps are as follows: 1. Install dependent libraries. Open the command window under the vue project and enter the following command npminstallmarked-save//marked to convert markdown into htmlnpmins
 How to use vue3+ts+axios+pinia to achieve senseless refresh
May 25, 2023 pm 03:37 PM
vue3+ts+axios+pinia realizes senseless refresh 1. First download aiXos and pinianpmipinia in the project--savenpminstallaxios--save2. Encapsulate axios request-----Download js-cookienpmiJS-cookie-s//Introduce aixosimporttype{AxiosRequestConfig ,AxiosResponse}from"axios";importaxiosfrom'axios';import{ElMess
 How to use Vue3 reusable components
May 20, 2023 pm 07:25 PM
Preface Whether it is vue or react, when we encounter multiple repeated codes, we will think about how to reuse these codes instead of filling a file with a bunch of redundant codes. In fact, both vue and react can achieve reuse by extracting components, but if you encounter some small code fragments and you don’t want to extract another file, in comparison, react can be used in the same Declare the corresponding widget in the file, or implement it through renderfunction, such as: constDemo:FC=({msg})=>{returndemomsgis{msg}}constApp:FC=()=>{return(
 How to select an avatar and crop it in Vue3
May 29, 2023 am 10:22 AM
The final effect is to install the VueCropper component yarnaddvue-cropper@next. The above installation value is for Vue3. If it is Vue2 or you want to use other methods to reference, please visit its official npm address: official tutorial. It is also very simple to reference and use it in a component. You only need to introduce the corresponding component and its style file. I do not reference it globally here, but only introduce import{userInfoByRequest}from'../js/api' in my component file. import{VueCropper}from'vue-cropper&
 How to use defineCustomElement to define components in Vue3
May 28, 2023 am 11:29 AM
Using Vue to build custom elements WebComponents is a collective name for a set of web native APIs that allow developers to create reusable custom elements (customelements). The main benefit of custom elements is that they can be used with any framework, even without one. They are ideal when you are targeting end users who may be using a different front-end technology stack, or when you want to decouple the final application from the implementation details of the components it uses. Vue and WebComponents are complementary technologies, and Vue provides excellent support for using and creating custom elements. You can integrate custom elements into existing Vue applications, or use Vue to build


