

How to use vue3 table component

Basic Table
Before developing the table component first, first think about what kind of API to use. Because the author uses element in production work, the styles of the first few components are similar to element, but This time I don’t plan to use the element style. I plan to change it and display it directly:
We hope users will use it like this:
<script setup>
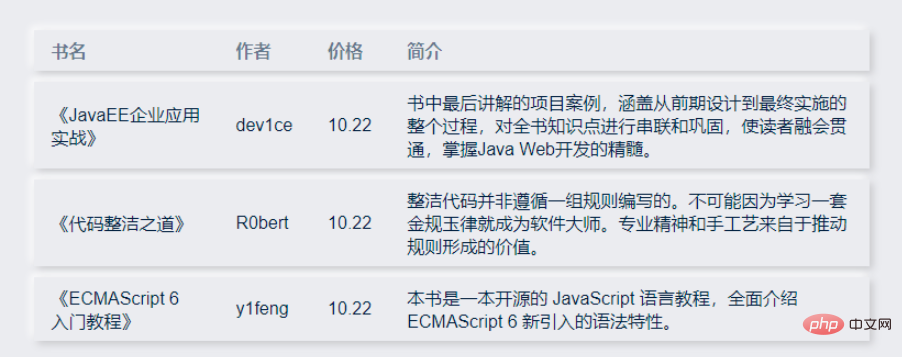
const dataList = [
{
id: 1,
name: '《JavaEE企业应用实战》',
author: 'dev1ce',
price: '10.22',
desc: '书中最后讲解的项目案例,涵盖从前期设计到最终实施的整个过程,对全书知识点进行串联和巩固,使读者融会贯通,掌握Java Web开发的精髓。'
},
{
id: 2,
name: '《代码整洁之道》',
author: 'R0bert',
price: '10.22',
desc: '整洁代码并非遵循一组规则编写的。不可能因为学习一套金规玉律就成为软件大师。专业精神和手工艺来自于推动规则形成的价值。'
},
{
id: 3,
name: '《ECMAScript 6 入门教程》',
author: 'y1feng',
price: '10.22',
desc: '本书是一本开源的 JavaScript 语言教程,全面介绍 ECMAScript 6 新引入的语法特性。'
},
]
const columnsList = [
{
title: '书名',
key: 'name'
},
{
title: '作者',
key: 'author'
},
{
title: '价格',
key: 'price'
},
{
title: '简介',
key: 'desc'
}
]
</script>
<template>
<sanorin-table :columns="columnsList" :data="dataList"/>
</template>Write the following code according to this
<script setup>
import { ref, computed } from 'vue'
import { useProp, useNeumorphism } from '../mixin/neumorphism'
const props = defineProps({
...useProp,
...{
data: { // dataList
type: Array,
default: () => [],
},
columns: { // columnsList
type: Array,
default: () => [],
},
}
})
const { baseStyleObject } = useNeumorphism(props)
let styleObject = computed(() => ({
// '--font-size': `${props.size-26}px`, '--line-height': `${props.size-20}px`, '--limit-size': `${props.size-28}px`
}))
</script>
<template>
<div :>
<table >
<thead>
<tr class="neumorphism">
<!-- 表头循环 -->
<th v-for="col in columns" :key="col.key">{{col.title}}</th>
</tr>
</thead>
<tbody>
<!-- 表体循环 -->
<tr class="neumorphism" v-for="row in data" :key="row.id">
<td v-for="col in columns" :key="col.key">
<span>
{{row[col.key]}}
</span>
</td>
</tr>
</tbody>
</table>
</div>
</template>
<script>
export default {
name: 'sanorin-table',
}
</script>
<style scoped>
@import "../../style/index.css";
@import "../../style/neumorphism.css";
table {
width: 100%;
/* border-collapse: collapse; */
empty-cells: show;
border-collapse:separate;
border-spacing:0px 10px;
}
table td,
table th {
color: var(--text-color);
padding: 8px 16px 8px 16px;
text-align: left;
}
table th {
color: var(--text-back-color) !important;
font-weight: 600;
white-space: nowrap;
}
table tr{
margin-top: 20px;
}
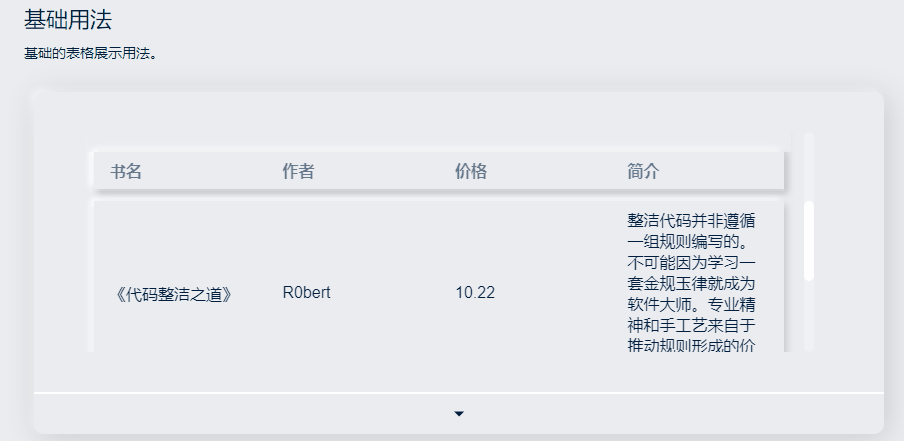
</style>The final one comes out The effect is:
# Then after realizing this, we start to do the following, starting with fixing the header.
Fixed header
The first method will be used here. If it cannot meet the needs in the future, it will be changed to the later method.
The effects and codes are as follows:
<script setup>
import { ref, computed } from 'vue'
import { useProp, useNeumorphism } from '../mixin/neumorphism'
const props = defineProps({
...useProp,
...{
data: { // dataList
type: Array,
default: () => [],
},
columns: { // columnsList
type: Array,
default: () => [],
},
}
})
const { baseStyleObject } = useNeumorphism(props)
let styleObject = computed(() => ({
}))
</script>
<template>
<div class="san-table scrollbar" :>
<table>
<thead>
<tr class="neumorphism">
<!-- 表头循环 -->
<th v-for="col in columns" :key="col.key">{{col.title}}</th>
</tr>
</thead>
<tbody>
<!-- 表体循环 -->
<tr class="neumorphism" v-for="row in data" :key="row.id">
<td v-for="col in columns" :key="col.key">
<span>
{{row[col.key]}}
</span>
</td>
</tr>
</tbody>
</table>
</div>
</template>
<script>
export default {
name: 'sanorin-table',
}
</script>
<style scoped>
@import "../../style/index.css";
@import "../../style/neumorphism.css";
.san-table{
padding: 0px 20px 20px 20px;
height: 200px;
position: relative;
width: 700px;
overflow: auto;
}
table {
width: 100%;
table-layout: fixed;
empty-cells: show;
border-collapse:separate;
border-spacing:0px 10px;
}
thead {
position: sticky;
top: 10px;
}
thead:before{
position: absolute;
content: '';
width: calc(100% + var(--shadow-blur) * 2);
transform: translate(calc(var(--shadow-blur) * -1) , -10px);
height: 20px;
background-color: var(--main-color);
z-index: -1;
}
table td,
table th {
color: var(--text-color);
padding: 8px 16px 8px 16px;
text-align: left;
}
table th {
color: var(--text-back-color) !important;
font-weight: 600;
white-space: nowrap;
}
</style>Height/Fluid Height
You can set a height for Table. (height)
When the amount of data changes dynamically, you can set a maximum height for Table. (maxHeight) Specifies the maximum height for the Table by setting the max-height property. At this time, if the required height of the table is greater than the maximum height, a scroll bar will be displayed.
As long as the height or maxHeight attribute is defined in the sanorin-table element, a table with a fixed header can be implemented without additional code.
The code is as follows:
<script setup>
import { ref, computed, reactive } from 'vue'
import { useProp, useNeumorphism } from '../mixin/neumorphism'
const props = defineProps({
...useProp,
...{
data: { // dataList
type: Array,
default: () => [],
},
columns: { // columnsList
type: Array,
default: () => [],
},
height: {
type: Number,
},
maxHeight: {
type: Number,
}
}
})
// 高度设置
let tableHeightStyleObj = computed(() => {
let styleObj = ((e) => {
if (e.maxHeight) return { maxHeight: e.maxHeight + 'px' }
if (e.height) return { height: e.height + 'px' }
return {}
})({...props})
return styleObj
})
const { baseStyleObject } = useNeumorphism(props)
let styleObject = computed(() => ({
...tableHeightStyleObj.value
}))
</script>
<template>
<div class="san-table scrollbar" :>
<table>
<colgroup>
<col v-for="(col, index) in columns" :key="index">
</colgroup>
<thead>
<tr class="neumorphism">
<th v-for="col in columns" :key="col.key"> {{col.title}} </th>
</tr>
</thead>
<tbody>
<tr class="neumorphism" v-for="row in data" :key="row.id">
<td v-for="col in columns" :key="col.key"> {{row[col.key]}} </td>
</tr>
</tbody>
</table>
</div>
</template>
<script>
export default {
name: 'sanorin-table',
}
</script>
<style scoped>
@import "../../style/index.css";
@import "../../style/neumorphism.css";
.san-table{
padding: 0px 20px 20px 20px;
position: relative;
width: 700px;
overflow: auto;
}
table {
width: 100%;
table-layout: fixed;
empty-cells: show;
border-collapse:separate;
border-spacing:0px 10px;
}
thead {
position: sticky;
top: 10px;
}
thead:before{
position: absolute;
content: '';
width: calc(100% + var(--shadow-blur) * 2);
transform: translate(calc(var(--shadow-blur) * -1) , -10px);
height: 20px;
background-color: var(--main-color);
z-index: -1;
}
table td,
table th {
color: var(--text-color);
padding: 8px 16px 8px 16px;
text-align: left;
}
table th {
color: var(--text-back-color) !important;
font-weight: 600;
white-space: nowrap;
}
</style>Custom column width
Next, add width control, hoping to add width to the array object passed in columns, the example is as follows:
const columnsList = [
  {
    title: '书名',
    key: 'name',
    width: 100,
  },
  {
    title: '作者',
    key: 'author',
    width: 100,
  },
  {
    title: '价格',
    key: 'price',
    width: 100,
  },
  {
    title: '简介',
    key: 'desc',
    minWidth: 350,
  }
]Hope to achieve the following effects
1. The column containing width has a fixed width and does not change with the browser width.
2. The column containing minWidth will automatically fill the remaining width of the table when it is greater than the set value. If it is less than the set value, When setting the value, fix the width
3. Columns that do not include width and minWidth will automatically fill the remaining width of the table
According to our needs, we need to control the width display of each column individually, and when the browser width changes Recalculate and re-render columns on the fly.
First define a method to calculate the required width of each column under the current situation, and then bind it to the required dom. Then, every time the table changes/the browser width changes, the width of the Table can be changed in real time.
  const initColumns = () => {
    // 计算每一列在当前情况下所要的宽度
  }
  watch(() => props.columns, () => { initColumns() });
  onMounted(() => {
    nextTick(() => {
      initColumns();
      on(window, 'resize', throttle(() => initColumns(), 400));
    });
  });
onBeforeUnmount(() => off(window, 'resize', () => initColumns()));All codes:
<script setup>
import { ref, computed, watch, onMounted, onBeforeUnmount, nextTick } from 'vue'
import { on, off } from '../../utils/listener'
import { throttle } from "../../utils/debounce&throttle"
import { useProp, useNeumorphism } from '../mixin/neumorphism'
const table = ref() // 与html中ref=""对应,定位dom元素
const props = defineProps({
...useProp,
...{
data: { // dataList
type: Array,
default: () => [],
},
columns: { // columnsList
type: Array,
default: () => [],
},
height: { // height
type: Number,
},
maxHeight: { // 流体高度
type: Number,
},
minUnsetWidth: { // 未设置宽度时最小宽度
type: Number,
default: 80
}
}
})
// 高度设置
let tableHeightStyleObj = computed(() => {
let styleObj = ((e) => {
if (e.maxHeight) return { maxHeight: e.maxHeight + 'px' }
if (e.height) return { height: e.height + 'px' }
return {}
})({...props})
return styleObj
})
// 列宽设置
let col = ref([])
const { columns, minUnsetWidth } = props
const _min_column_width = minUnsetWidth // 未设置宽度时最小宽度
const initColumns = () => {
col.value = (() => {
let _total_width = table.value.offsetWidth // 表格dom元素总宽度
let _needed_minWidth = columns.reduce((t, v) => { // 需要的最小宽度
t += v.width || v.minWidth || _min_column_width
return t
}, 0)
// 需要的最小宽度比总宽度大,则取minWidth即可
if (_needed_minWidth >= _total_width) return columns.reduce((t, v) => {
let n = v.width || v.minWidth || _min_column_width
t = [...t, n]
return t
}, [])
// 需要的最小宽度比总宽度大,则要把minWidth加权,权重为(未分配的宽度 / minWidth之和)
let _unassigned_width = columns.reduce((t, v) => {
t += v.minWidth || 0
return t
}, 0)
let _assigned_width = _needed_minWidth - _unassigned_width
let _width_power = (_total_width - _assigned_width) / _unassigned_width
return columns.reduce((t, v) => {
let n = v.width || (v.minWidth ? (_width_power * v.minWidth).toFixed(2) : _min_column_width)
t = [...t, n]
return t
}, [])
})()
}
watch(() => props.columns, () => { initColumns() })
const throttleInitColumns = () => throttle(() => initColumns(), 400)
onMounted(() => {
nextTick(() => {
initColumns()
on(window, 'resize', throttleInitColumns)
})
})
onBeforeUnmount(() => off(window, 'resize', throttleInitColumns))
const { baseStyleObject } = useNeumorphism(props)
let styleObject = computed(() => ({
...tableHeightStyleObj.value
}))
</script>
<template>
<div class="san-table scrollbar" :>
<table ref="table">
<colgroup>
<col v-for="(item, index) in col" :key="index" :width="`${item}px`">
</colgroup>
<thead>
<tr class="neumorphism">
<th v-for="col in columns" :key="col.key"> {{col.title}} </th>
</tr>
</thead>
<tbody>
<tr class="neumorphism" v-for="row in data" :key="row.id">
<td v-for="col in columns" :key="col.key"> {{row[col.key]}} </td>
</tr>
</tbody>
</table>
</div>
</template>
<script>
export default {
name: 'sanorin-table',
}
</script>
<style scoped>
@import "../../style/index.css";
@import "../../style/neumorphism.css";
.san-table{
padding: 0px 20px 20px 20px;
position: relative;
overflow: auto;
}
table {
width: 100%;
table-layout: fixed;
empty-cells: show;
border-collapse:separate;
border-spacing:0px 10px;
}
thead {
position: sticky;
top: 10px;
}
thead:before{
position: absolute;
content: '';
width: calc(100% + var(--shadow-blur) * 2);
transform: translate(calc(var(--shadow-blur) * -1) , -10px);
height: 20px;
background-color: var(--main-color);
z-index: -1;
}
table td,
table th {
color: var(--text-color);
padding: 8px 16px 8px 16px;
text-align: left;
word-break:break-all;
}
table th {
color: var(--text-back-color) !important;
font-weight: 600;
white-space: nowrap;
}
</style>The two js used, anti-shake throttling and registration monitoring are also put down here
/* 防抖节流函数 */
let timeout = null // 创建一个标记用来存放定时器的返回值
let count = 0;
export function debounce(fn, wait = 1000, immediate = false) {
  return function () {
    const args = arguments;
    if (immediate) {
      if (count == 0) {
        fn.apply(this, arguments)
        count++;
      } else {
        if (timeout) {
          clearTimeout(timeout) // 每当用户输入的时候把前一个 setTimeout clear 掉
        }
        timeout = setTimeout(() => {
          fn.apply(this, arguments)
        }, wait)
      }
    } else {
      if (timeout) {
        clearTimeout(timeout) // 每当用户输入的时候把前一个 setTimeout clear 掉
      }
      timeout = setTimeout(() => {
        fn.apply(this, arguments)
      }, wait)
    }
  }()
}
let canRun = true;
let count1 = 0;
export function throttle(fn, wait = 1000, immediate = true) {
  return function () {
    if (immediate) {
      if (count1 == 0) {
        fn.apply(this, arguments);
        count1++;
      } else {
        if (canRun) {
          canRun = false
          setTimeout(function () {
            fn.apply(this, arguments)
            canRun = true
          }, wait);
        }
      }
    } else {
      if (!canRun) return
      canRun = false
      setTimeout(function () {
        fn.apply(this, arguments)
        canRun = true
      }, wait);
    }
  }()
}/**
* 绑定事件 on(element, event, handler)
*/
export const on = (element, event, handler) => {
if (document.addEventListener) {
if (element && event && handler) {
element.addEventListener(event, handler, false)
}
}
}
/**
* 解绑事件 off(element, event, handler)
*/
export const off = (element, event, handler) => {
if (document.removeEventListener) {
if (element && event) {
element.removeEventListener(event, handler, false)
}
}
}The above is the detailed content of How to use vue3 table component. For more information, please follow other related articles on the PHP Chinese website!

Hot AI Tools

Undresser.AI Undress
AI-powered app for creating realistic nude photos

AI Clothes Remover
Online AI tool for removing clothes from photos.

Undress AI Tool
Undress images for free

Clothoff.io
AI clothes remover

Video Face Swap
Swap faces in any video effortlessly with our completely free AI face swap tool!

Hot Article
Hot Tools

Notepad++7.3.1
Easy-to-use and free code editor

SublimeText3 Chinese version
Chinese version, very easy to use

Zend Studio 13.0.1
Powerful PHP integrated development environment

Dreamweaver CS6
Visual web development tools

SublimeText3 Mac version
God-level code editing software (SublimeText3)
Hot Topics


 How to use tinymce in vue3 project
May 19, 2023 pm 08:40 PM
How to use tinymce in vue3 project
May 19, 2023 pm 08:40 PM
tinymce is a fully functional rich text editor plug-in, but introducing tinymce into vue is not as smooth as other Vue rich text plug-ins. tinymce itself is not suitable for Vue, and @tinymce/tinymce-vue needs to be introduced, and It is a foreign rich text plug-in and has not passed the Chinese version. You need to download the translation package from its official website (you may need to bypass the firewall). 1. Install related dependencies npminstalltinymce-Snpminstall@tinymce/tinymce-vue-S2. Download the Chinese package 3. Introduce the skin and Chinese package. Create a new tinymce folder in the project public folder and download the
 vue3+vite: How to solve the error when using require to dynamically import images in src
May 21, 2023 pm 03:16 PM
vue3+vite: How to solve the error when using require to dynamically import images in src
May 21, 2023 pm 03:16 PM
vue3+vite:src uses require to dynamically import images and error reports and solutions. vue3+vite dynamically imports multiple images. If vue3 is using typescript development, require will introduce image errors. requireisnotdefined cannot be used like vue2 such as imgUrl:require(' .../assets/test.png') is imported because typescript does not support require, so import is used. Here is how to solve it: use awaitimport
 How to refresh partial content of the page in Vue3
May 26, 2023 pm 05:31 PM
How to refresh partial content of the page in Vue3
May 26, 2023 pm 05:31 PM
To achieve partial refresh of the page, we only need to implement the re-rendering of the local component (dom). In Vue, the easiest way to achieve this effect is to use the v-if directive. In Vue2, in addition to using the v-if instruction to re-render the local dom, we can also create a new blank component. When we need to refresh the local page, jump to this blank component page, and then jump back in the beforeRouteEnter guard in the blank component. original page. As shown in the figure below, how to click the refresh button in Vue3.X to reload the DOM within the red box and display the corresponding loading status. Since the guard in the component in the scriptsetup syntax in Vue3.X only has o
 How Vue3 parses markdown and implements code highlighting
May 20, 2023 pm 04:16 PM
How Vue3 parses markdown and implements code highlighting
May 20, 2023 pm 04:16 PM
Vue implements the blog front-end and needs to implement markdown parsing. If there is code, it needs to implement code highlighting. There are many markdown parsing libraries for Vue, such as markdown-it, vue-markdown-loader, marked, vue-markdown, etc. These libraries are all very similar. Marked is used here, and highlight.js is used as the code highlighting library. The specific implementation steps are as follows: 1. Install dependent libraries. Open the command window under the vue project and enter the following command npminstallmarked-save//marked to convert markdown into htmlnpmins
 How to use vue3+ts+axios+pinia to achieve senseless refresh
May 25, 2023 pm 03:37 PM
How to use vue3+ts+axios+pinia to achieve senseless refresh
May 25, 2023 pm 03:37 PM
vue3+ts+axios+pinia realizes senseless refresh 1. First download aiXos and pinianpmipinia in the project--savenpminstallaxios--save2. Encapsulate axios request-----Download js-cookienpmiJS-cookie-s//Introduce aixosimporttype{AxiosRequestConfig ,AxiosResponse}from"axios";importaxiosfrom'axios';import{ElMess
 How to use Vue3 reusable components
May 20, 2023 pm 07:25 PM
How to use Vue3 reusable components
May 20, 2023 pm 07:25 PM
Preface Whether it is vue or react, when we encounter multiple repeated codes, we will think about how to reuse these codes instead of filling a file with a bunch of redundant codes. In fact, both vue and react can achieve reuse by extracting components, but if you encounter some small code fragments and you don’t want to extract another file, in comparison, react can be used in the same Declare the corresponding widget in the file, or implement it through renderfunction, such as: constDemo:FC=({msg})=>{returndemomsgis{msg}}constApp:FC=()=>{return(
 How to select an avatar and crop it in Vue3
May 29, 2023 am 10:22 AM
How to select an avatar and crop it in Vue3
May 29, 2023 am 10:22 AM
The final effect is to install the VueCropper component yarnaddvue-cropper@next. The above installation value is for Vue3. If it is Vue2 or you want to use other methods to reference, please visit its official npm address: official tutorial. It is also very simple to reference and use it in a component. You only need to introduce the corresponding component and its style file. I do not reference it globally here, but only introduce import{userInfoByRequest}from'../js/api' in my component file. import{VueCropper}from'vue-cropper&
 How to solve the problem that after the vue3 project is packaged and published to the server, the access page displays blank
May 17, 2023 am 08:19 AM
How to solve the problem that after the vue3 project is packaged and published to the server, the access page displays blank
May 17, 2023 am 08:19 AM
After the vue3 project is packaged and published to the server, the access page displays blank 1. The publicPath in the vue.config.js file is processed as follows: const{defineConfig}=require('@vue/cli-service') module.exports=defineConfig({publicPath :process.env.NODE_ENV==='production'?'./':'/&
