

Enable Secure Boot in Windows 11 User Mode: 3 Tips

Secure Boot is a security feature integrated into most current hardware and UEFI firmware that provides a secure environment for booting any Windows system.
This utility prevents malware from hijacking the device during the boot process. This feature works like a security door, which can be tricky when you enable Secure Boot for Windows 11 in user mode.
If your system uses an old boot framework and Secure Boot is not enabled, the Secure Boot state is not supported. Even if your motherboard includes a secure boot option.
Let’s look at some possible solutions. This solution perfectly solves the problem of Secure Boot not supported on all devices including HP, Dell and Lenovo laptops or ASRock and Gygabyte motherboards.
Is it safe to enable Secure Boot on Windows 11?
Secure Boot is a feature activated on the latest PC models. This is a UEFI platform feature that replaces the traditional PC BIOS.
Enabling Secure Boot increases your computer's security and protects it from virus attacks. It only protects your computer and has no negative impact on performance.
Secure Boot ensures that your desktop or laptop only opens trusted software, firmware, and applications. Therefore, it is very safe to enable Secure Boot on your Windows 11 PC.
How to enable Secure Boot on Windows 11 in user mode?
Secure Boot requires Windows 8.0 or later, making it ideal for Windows 11 and easier to enable. This supports WinPE 4 and above, so you can use the Windows Media Creation tool to install Windows 11.
Secure boot can be enabled when the system is in user mode on MSI motherboards.
First, before trying to continue with other steps to power it in user mode, check if your PC supports secure boot without entering the BIOS. This should help you if there is a requirement issue.
After verifying its reliability, you can enable Secure Boot for Windows 11 in user mode from the BIOS.
After trying to enable Secure Boot via an MSI motherboard, an error message usually appears.
The system is in setup mode! Secure Boot can be enabled when the system is in user mode. Repeat the operation after registering the Platform Key.
So, let’s see how simple it is to solve this problem.
When you receive this error, go to the BIOS screen to register the platform key and repeat booting in Secure Boot.
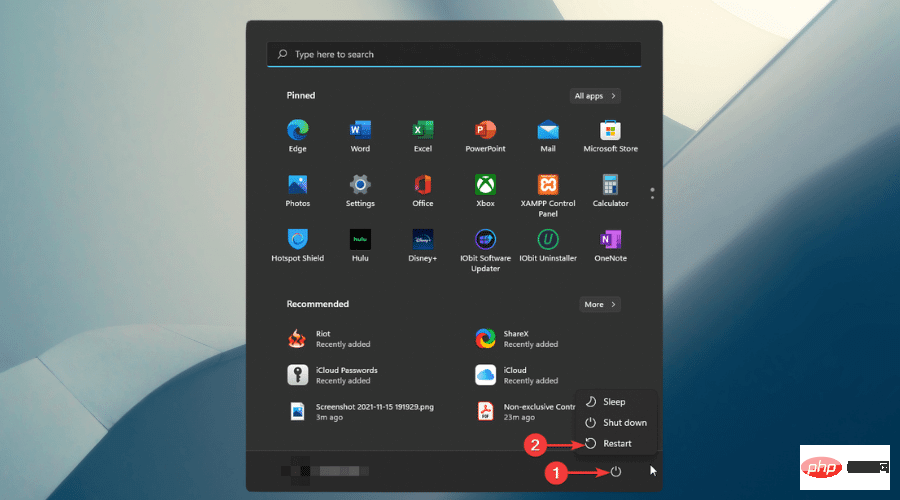
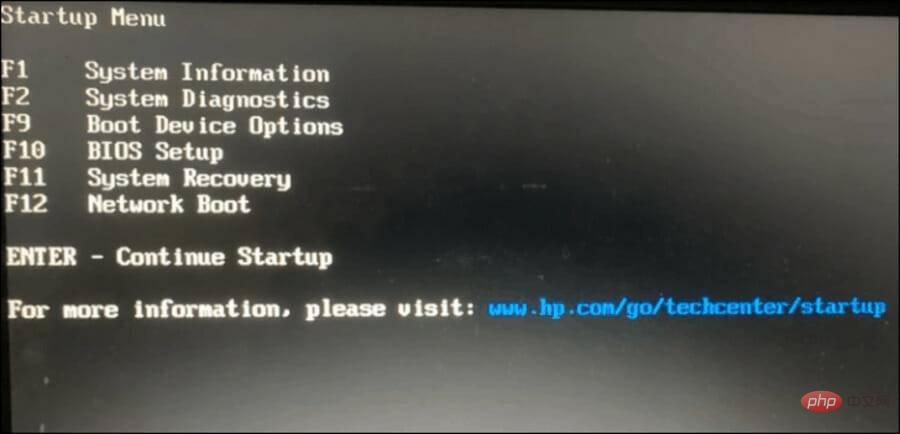
1. Check UEFI Firmware Settings
- Click the Start button, go to the Power icon and hold down the Shift button on your keyboard , and select Restart.

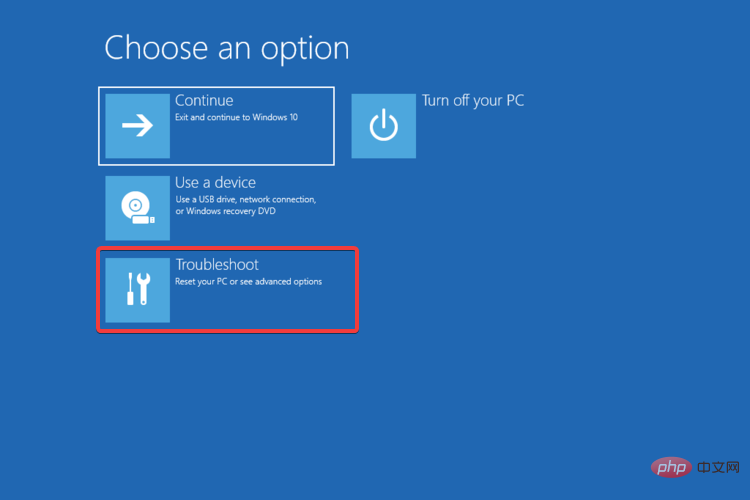
- Select Troubleshoot from the Advanced Startup window.
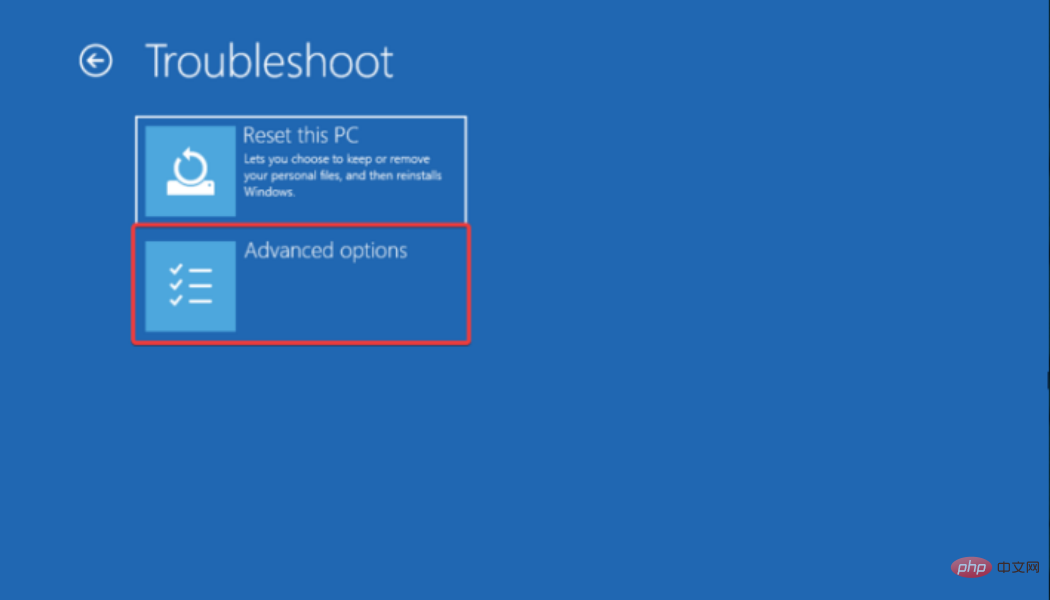
- Click Advanced Options.
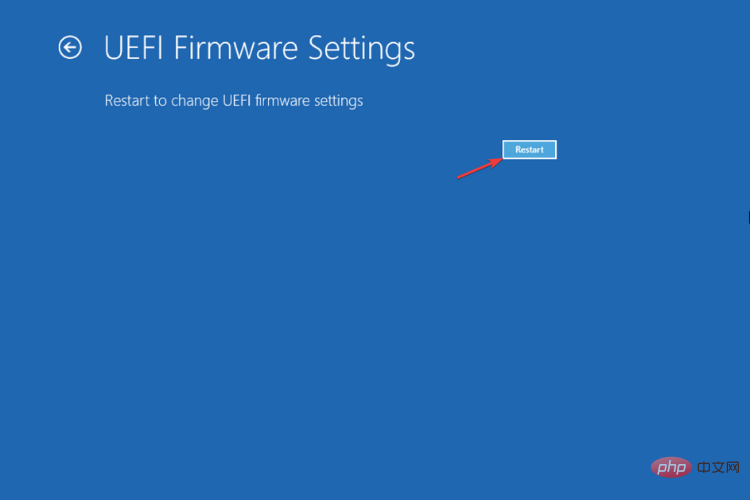
- SelectUEFI Firmware Settings.
- Click the Restart button to restart your PC and open BIOS setup.

Through firmware updates, many manufacturers update their devices’ UEFI support and system settings menu options.
Also, it is important to install the latest updates from the manufacturer on your Windows 11 PC for good overall performance.
After the PC restarts, proceed to the next solution to change the BIOS settings.
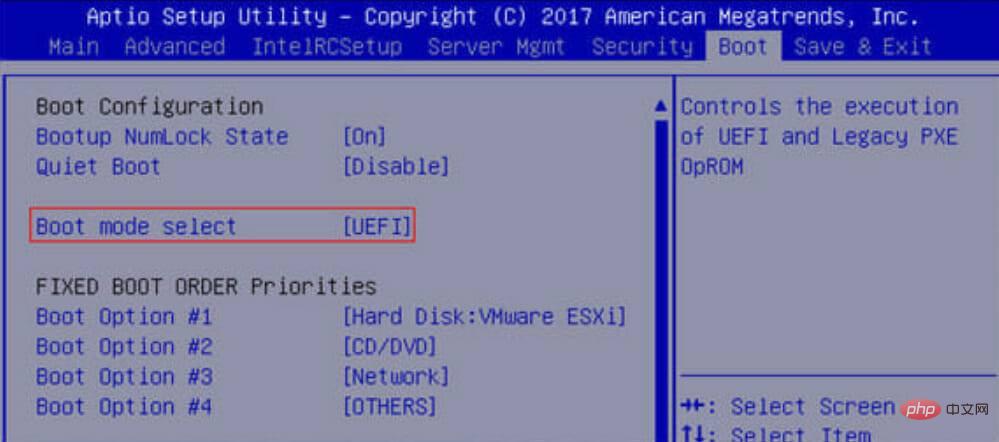
2. Change Legacy BIOS to UEFI Custom
- Enter BIOS Setup using the corresponding keys on the screen.
- Look for the Secure Boot option. In most cases it will be under the Startup or Security tab, but the location will vary depending on your PC. <strong></strong> Change BIOS
- from Legacy to UEFI. <strong></strong>Enable Secure Boot
- (UEFI) in user mode. <strong></strong>Press the Save & Exit
- corespondent key on the screen and you're done. <strong></strong> It is very important to change the boot mode of your PC from Legacy BIOS (also known as CSM mode) to UEFI BIOS.
 Enable
 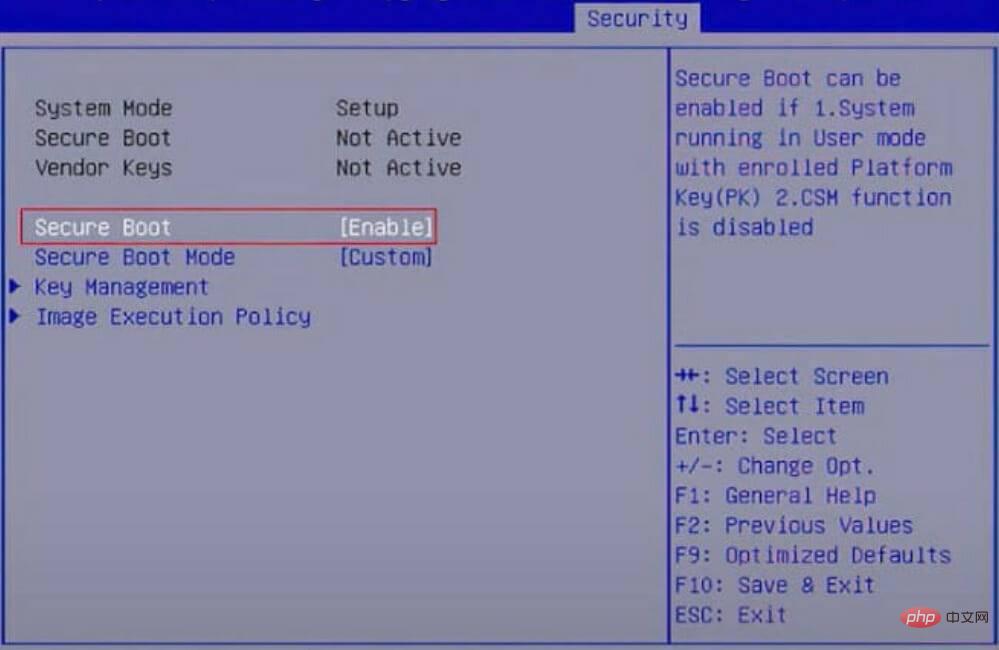 Press the
 After changing the settings, restart your computer. This will re-enable Secure Boot on your PC and the supported values should appear in System Information.
Secure Boot is now enabled on your computer. Use PC Health Check to determine if your PC meets Windows 11 system requirements for an upgrade or clean installation.
3. Convert your partition to GPT (if supported)
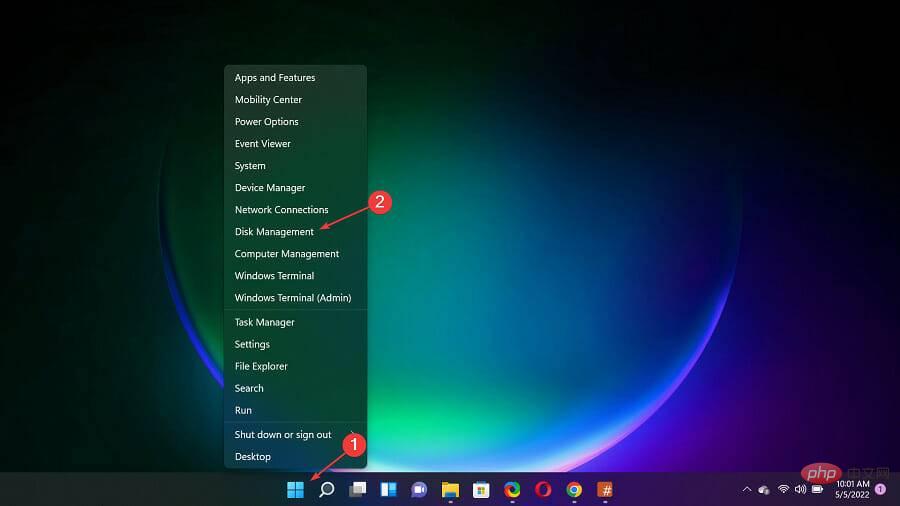
Notes Windows 11 only boots on GPT partitioned systems, so you will need to change the partition from MBR to GPT if it has not already booted. This is an advanced program, so we recommend that you create a backup of all your data before starting. Right-click the- Start
- button and select Disk Management. <strong></strong>Now, right-click on your drive and select Properties
- . <strong></strong>Next, click the Volumes tab and view the partition style. If it says everything is fine with GPT, you can end it here. If it says MBR instead, continue using this solution to change it.
-
Close the window, click the Search
- icon, type cmd, and select Run as administrator. <strong></strong>Type the following command and press Enter to run it:
- mbr2gpt.exe /convert /allowfullos
<strong></strong>Conversion process completed Finally, follow the instructions above to check the partition style in Disk Management, which should now read the GUID Partition Table (GPT). - Why do some software enforce TPM and Secure Boot?
 Now, right-click on your drive and select
 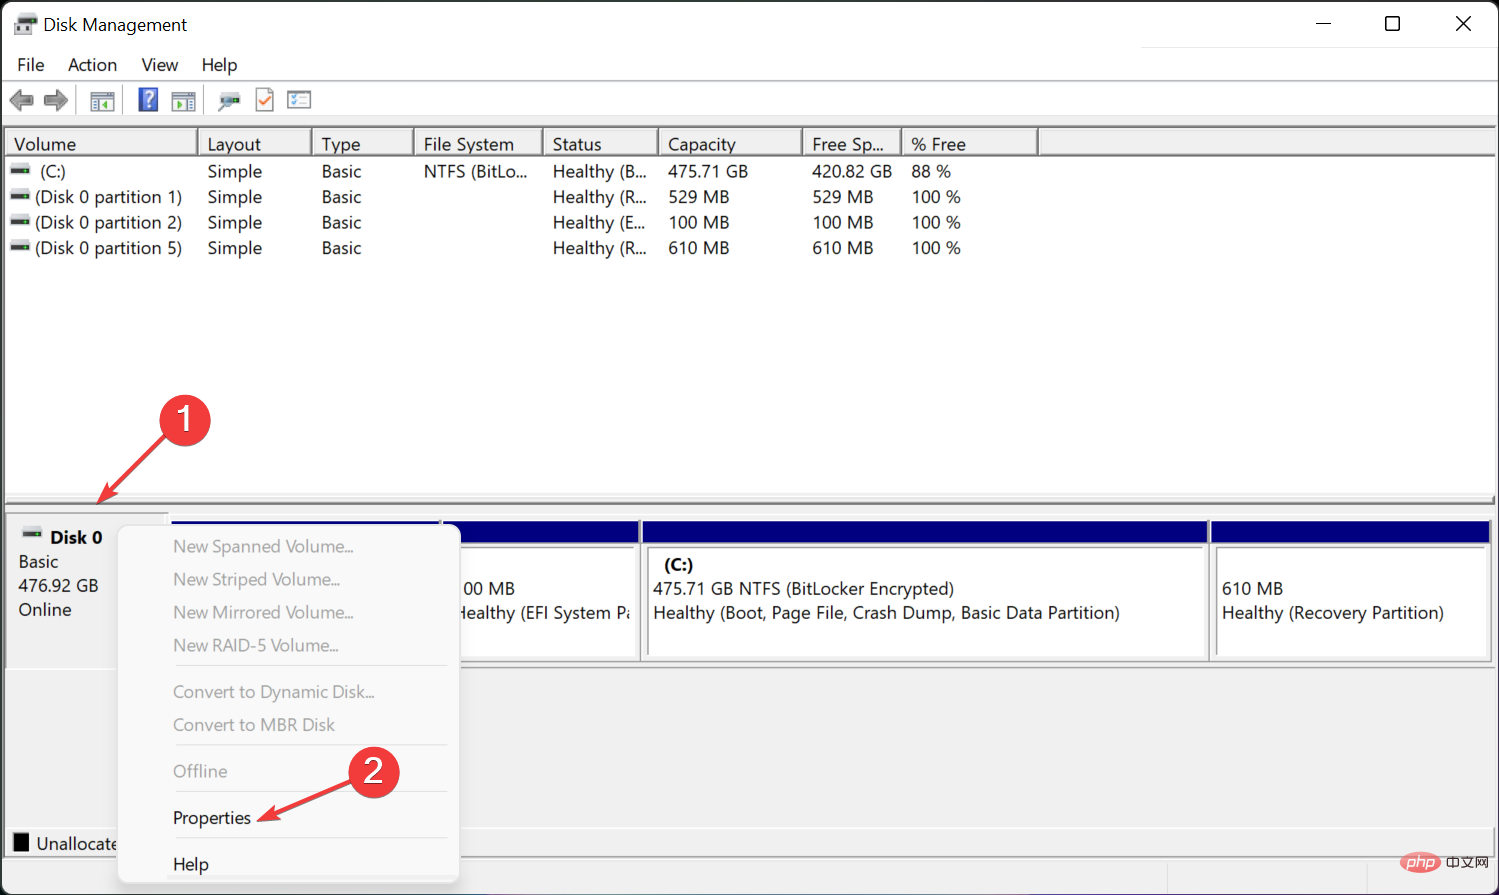 Next, click the Volumes tab and view the partition style. If it says everything is fine with GPT, you can end it here. If it says MBR instead, continue using this solution to change it.
 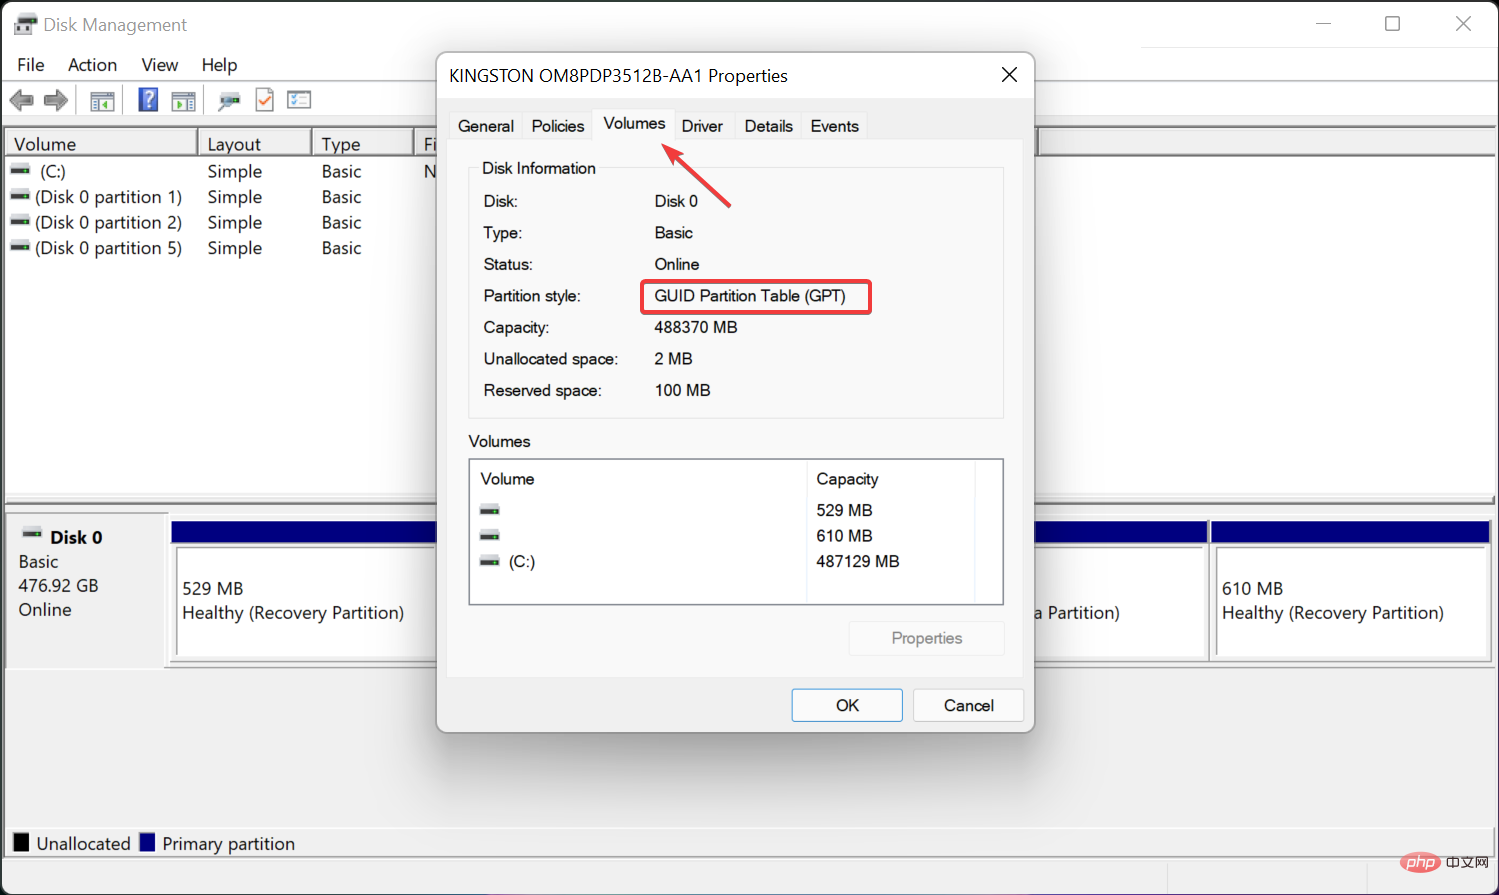 Close the window, click the
 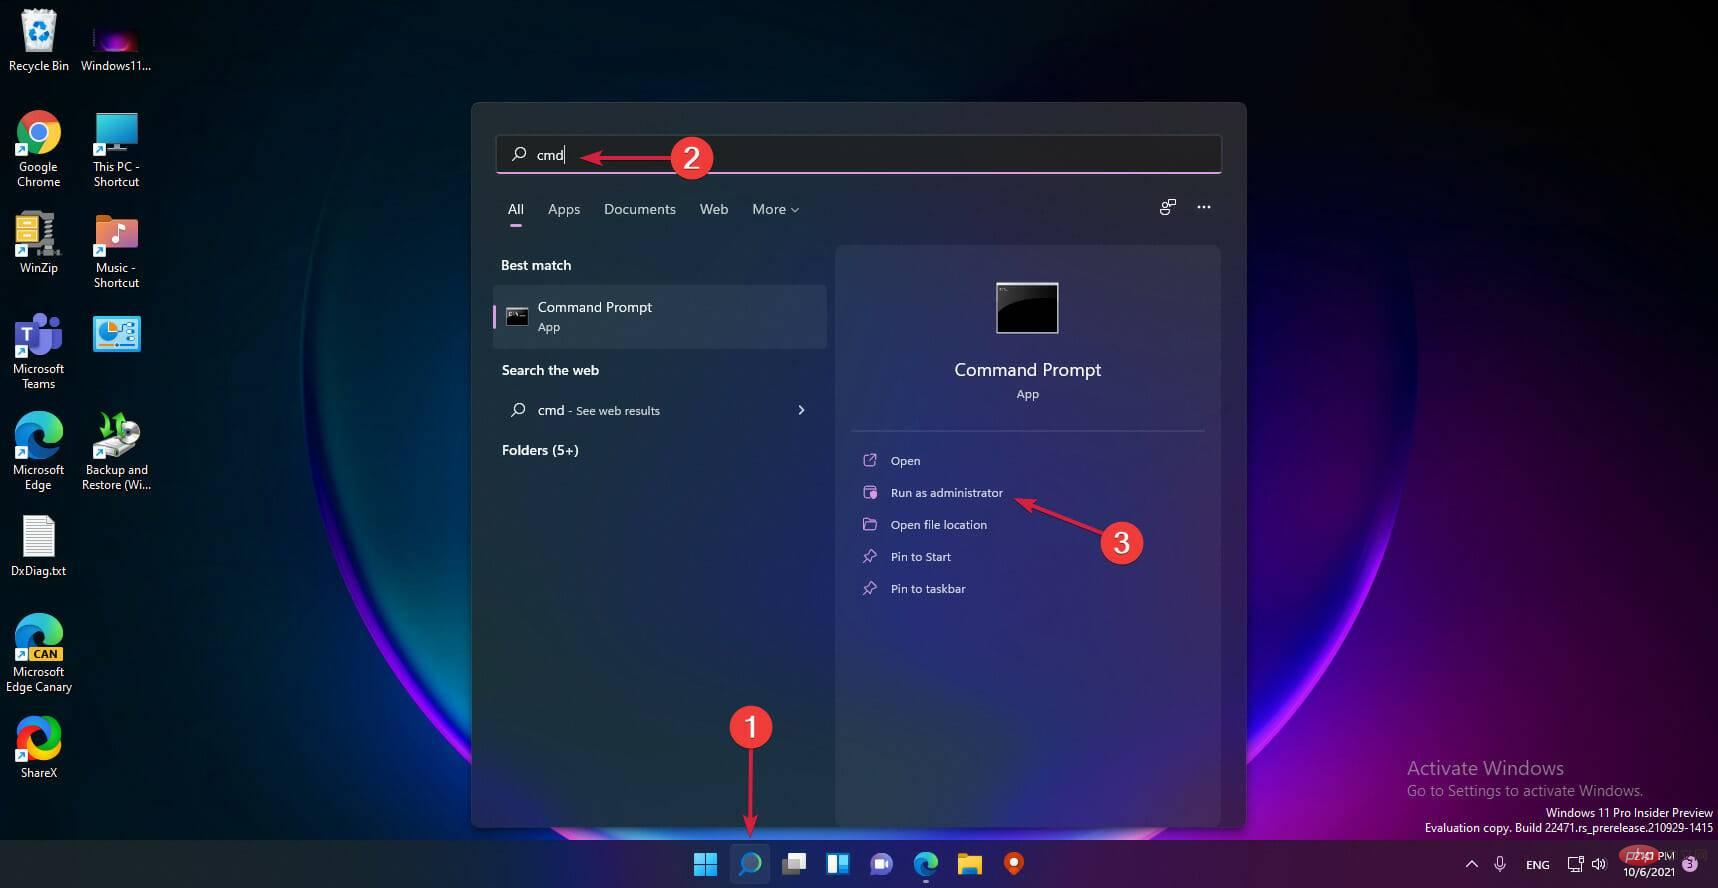 Type the following command and press Enter to run it:
 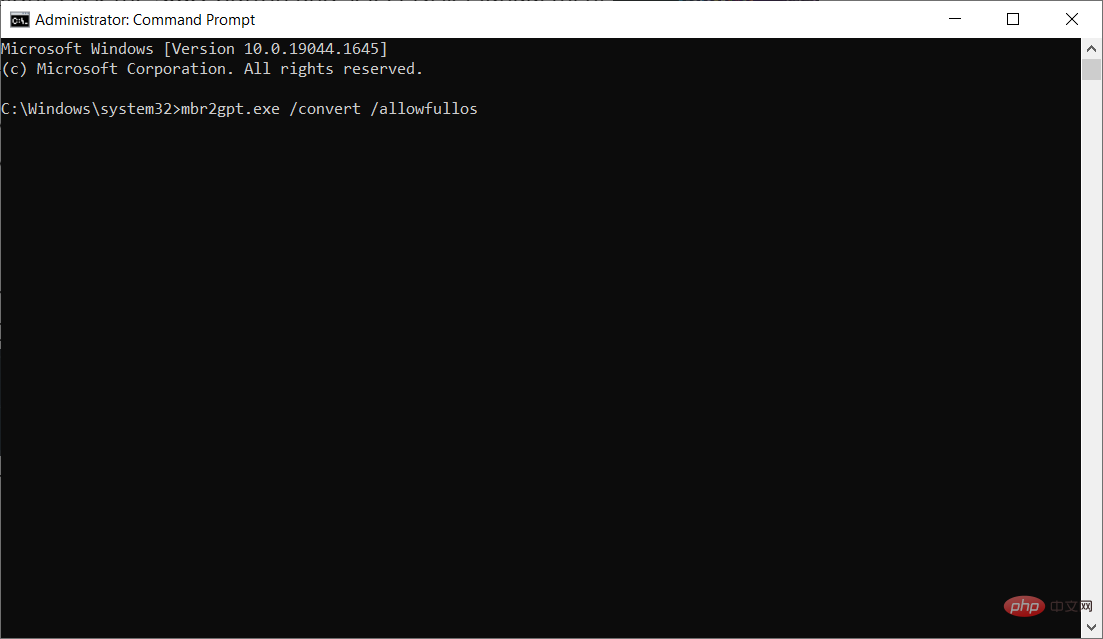 Conversion process completed Finally, follow the instructions above to check the partition style in Disk Management, which should now read the GUID Partition Table (GPT).
 Following these steps ensures that Secure Boot is enabled in user mode in Windows 11, which will also define whether you can install and run certain apps that force use of this feature.
The main reason why applications require TPM 2.0 is for player ID security. TPM controls help prevent hijackers from using cheat codes. TPM is about security and protocols.
When a TPM is applied and they receive a ban, the entire device or hardware ID will be blocked. This prevents scammers from tricking their device into acting as another device with a different ID.
To resolve TPM issues on Windows, simply enable Secure Boot and then enable TPM on your device.
You can also check out Laptop options for Windows 11 to help you better understand compatibility between computers and how Windows 11 will run on them.
The above is the detailed content of Enable Secure Boot in Windows 11 User Mode: 3 Tips. For more information, please follow other related articles on the PHP Chinese website!

Hot AI Tools

Undresser.AI Undress
AI-powered app for creating realistic nude photos

AI Clothes Remover
Online AI tool for removing clothes from photos.

Undress AI Tool
Undress images for free

Clothoff.io
AI clothes remover

Video Face Swap
Swap faces in any video effortlessly with our completely free AI face swap tool!

Hot Article
Hot Tools

Notepad++7.3.1
Easy-to-use and free code editor

SublimeText3 Chinese version
Chinese version, very easy to use

Zend Studio 13.0.1
Powerful PHP integrated development environment

Dreamweaver CS6
Visual web development tools

SublimeText3 Mac version
God-level code editing software (SublimeText3)
Hot Topics


 What is the reason why PS keeps showing loading?
Apr 06, 2025 pm 06:39 PM
What is the reason why PS keeps showing loading?
Apr 06, 2025 pm 06:39 PM
PS "Loading" problems are caused by resource access or processing problems: hard disk reading speed is slow or bad: Use CrystalDiskInfo to check the hard disk health and replace the problematic hard disk. Insufficient memory: Upgrade memory to meet PS's needs for high-resolution images and complex layer processing. Graphics card drivers are outdated or corrupted: Update the drivers to optimize communication between the PS and the graphics card. File paths are too long or file names have special characters: use short paths and avoid special characters. PS's own problem: Reinstall or repair the PS installer.
 How to speed up the loading speed of PS?
Apr 06, 2025 pm 06:27 PM
How to speed up the loading speed of PS?
Apr 06, 2025 pm 06:27 PM
Solving the problem of slow Photoshop startup requires a multi-pronged approach, including: upgrading hardware (memory, solid-state drive, CPU); uninstalling outdated or incompatible plug-ins; cleaning up system garbage and excessive background programs regularly; closing irrelevant programs with caution; avoiding opening a large number of files during startup.
 How to solve the problem of loading when PS is always showing that it is loading?
Apr 06, 2025 pm 06:30 PM
How to solve the problem of loading when PS is always showing that it is loading?
Apr 06, 2025 pm 06:30 PM
PS card is "Loading"? Solutions include: checking the computer configuration (memory, hard disk, processor), cleaning hard disk fragmentation, updating the graphics card driver, adjusting PS settings, reinstalling PS, and developing good programming habits.
 Is slow PS loading related to computer configuration?
Apr 06, 2025 pm 06:24 PM
Is slow PS loading related to computer configuration?
Apr 06, 2025 pm 06:24 PM
The reason for slow PS loading is the combined impact of hardware (CPU, memory, hard disk, graphics card) and software (system, background program). Solutions include: upgrading hardware (especially replacing solid-state drives), optimizing software (cleaning up system garbage, updating drivers, checking PS settings), and processing PS files. Regular computer maintenance can also help improve PS running speed.
 Is PS slow loading related to other programs that are running?
Apr 06, 2025 pm 06:03 PM
Is PS slow loading related to other programs that are running?
Apr 06, 2025 pm 06:03 PM
The secrets to mastering Office software include: understanding different versions and platforms, correctly installing and configuring, proficient in using the software interface, in-depth understanding of feature operations, application collaboration and sharing functions, utilizing templates and styles, mastering advanced skills, and solving common problems. In addition, you need to choose a version that suits your needs, make good use of templates and styles, develop backup habits, and learn shortcut keys and advanced techniques to improve efficiency.
 How to solve the problem of loading when the PS opens the file?
Apr 06, 2025 pm 06:33 PM
How to solve the problem of loading when the PS opens the file?
Apr 06, 2025 pm 06:33 PM
"Loading" stuttering occurs when opening a file on PS. The reasons may include: too large or corrupted file, insufficient memory, slow hard disk speed, graphics card driver problems, PS version or plug-in conflicts. The solutions are: check file size and integrity, increase memory, upgrade hard disk, update graphics card driver, uninstall or disable suspicious plug-ins, and reinstall PS. This problem can be effectively solved by gradually checking and making good use of PS performance settings and developing good file management habits.
 Does mysql need the internet
Apr 08, 2025 pm 02:18 PM
Does mysql need the internet
Apr 08, 2025 pm 02:18 PM
MySQL can run without network connections for basic data storage and management. However, network connection is required for interaction with other systems, remote access, or using advanced features such as replication and clustering. Additionally, security measures (such as firewalls), performance optimization (choose the right network connection), and data backup are critical to connecting to the Internet.
 How to solve the problem of loading when PS is started?
Apr 06, 2025 pm 06:36 PM
How to solve the problem of loading when PS is started?
Apr 06, 2025 pm 06:36 PM
A PS stuck on "Loading" when booting can be caused by various reasons: Disable corrupt or conflicting plugins. Delete or rename a corrupted configuration file. Close unnecessary programs or upgrade memory to avoid insufficient memory. Upgrade to a solid-state drive to speed up hard drive reading. Reinstalling PS to repair corrupt system files or installation package issues. View error information during the startup process of error log analysis.