作为一名办公人员,如果你的单位与一些香港或台湾的客户合作,那么,在制作或编辑合作文档时,通常需要将简体字文档转换成繁体字文档。
因为双方的书写习惯不同,如果你给对方发送一篇简体文档,可能会造成对方阅读困难,会非常麻烦。
所以,如何解决这个问题呢?相信用过Word的伙伴们对于操作方法并不陌生。
当我们用简体字编辑好文档之后,按Ctrl+A键全选所有文字,然后点击【审阅】-【中文简繁转换】-【简转繁】按钮,就可以将简体字全部转成繁体了。
提示:反之,如果需要将繁体字转成简体字,则点击”繁转简”按钮即可。
但需要注意的是,在对文字进行简繁相互转换时,对于极少数特殊词汇或新词汇,由于双方叫法不同,比如,“纸牌”对方称为“接龙”、“盒饭”称为“便当”、“光标”称为“游標”、“数码”称为“数位”等等......Word自身对它们还不能进行辨认,因此还需要我们手动来进行替换。
当一篇文档中需要替换的内容较多时,如果一一手动替换,无疑耗时耗力。这里招大家一招快捷替换方法:将这些词汇自定义到Word词典中。
操作方法为:
Step1:打开编辑好的简单字文档,点击【审阅】-【中文简繁转换】-【简繁转换】按钮。

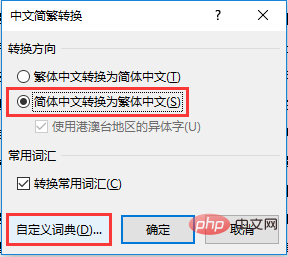
Step2:打开“中文简繁转换”对话框,我们在“转换方向”这栏中选择“简体中文转换为繁体中文”,然后单击“自定义词典”按钮。
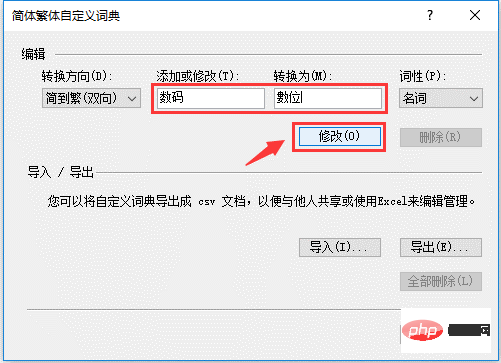
Step3:打开“简体繁体自定义词典”对话框,在“编辑”栏中可根据自己的需要输入相互转换的词组,如,这里我们将“数码”转换为“数位”,然后单击“修改”按钮。
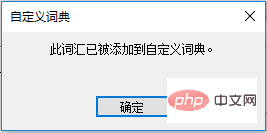
Step4:此时会弹出“自定义词典”提示框,直接单击“确定”按钮即可。
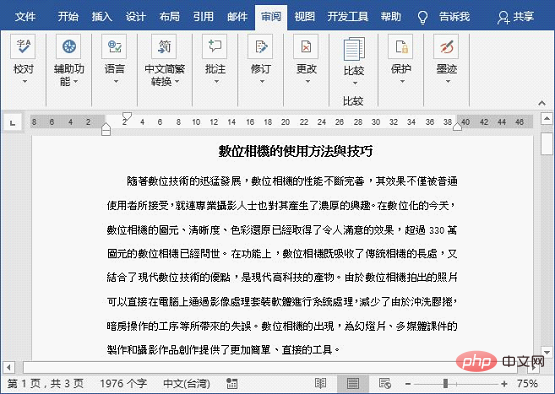
Step5:返回到“简体繁体自定义词典”对话框,单击“关闭”按钮。这时候,Word会自动替换文档中定义过的词组,且文档从简体字转换为繁体字了。
是不是没有想到,竟然还可以这样用,666!
推荐教程:《Word教程》
以上就是实用Word技巧分享:简繁转换功能竟然可以这样用!的详细内容,更多请关注php中文网其它相关文章!

全网最新最细最实用WPS零基础入门到精通全套教程!带你真正掌握WPS办公! 内含Excel基础操作、函数设计、数据透视表等

 广告
广告


Copyright 2014-2025 https://www.php.cn/ All Rights Reserved | php.cn | 湘ICP备2023035733号


 1519
1519