

How to disable the Run Command feature in Windows 11, 10

If you know the path to a program or application, you can start it immediately using the "Run" dialog box. Therefore, the Run dialog is a very useful one-line command line interface that makes your life easier. However, if other people are also using your computer, you may not want them to have the privilege of being able to use the "Run" command box for security reasons. So, is there a way to disable run commands in Windows 11 or 10? Absolutely!
In this article we explain it through 2 different methods (one through Local Group Policy Editor and the other through Registry Editor) How to easily enable and disable run commands in Windows 11 or 10.
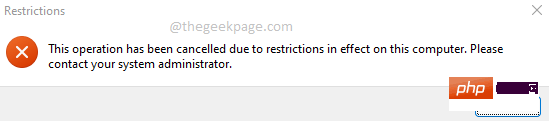
Note: Once the Run command is disabled, you will not be able to launch the Run window from anywhere, including using the Win R hotkey combination, from Start ” menu or via Windows Search, etc. You will see a window called "Restrictions" saying The operation has been canceled due to restrictions on this computer. Please contact your system administrator.
Method 1: Through the Local Group Policy Editor
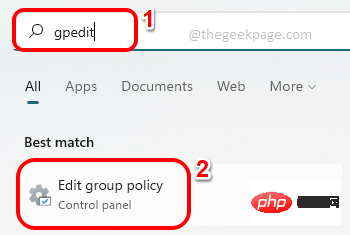
Step 1: Click the Search icon on the taskbar.

Step 2: Enter gpedit on the search bar, and then select from the most Click in the Best Match section to edit the group policy.
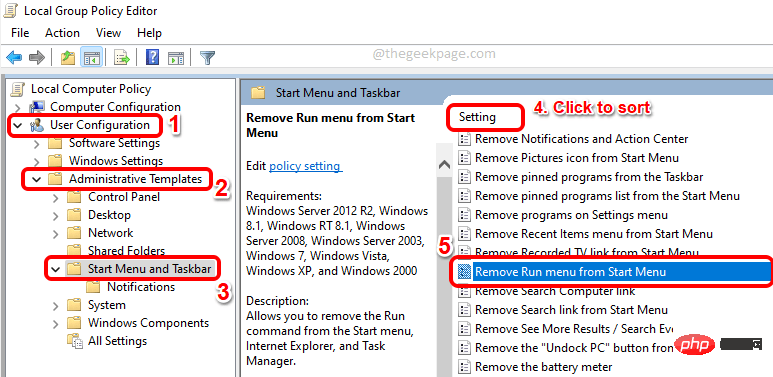
Step 3: Navigate to the following location in the "Local Group Policy Editor" window, method Yes, double-click each folder to expand them.
用户配置 > 管理模板 > 开始菜单和任务栏
Now make sure to select the folder by clicking on it Start menu and taskbar. On the right side of the window , click the column name to set once to sort the list.
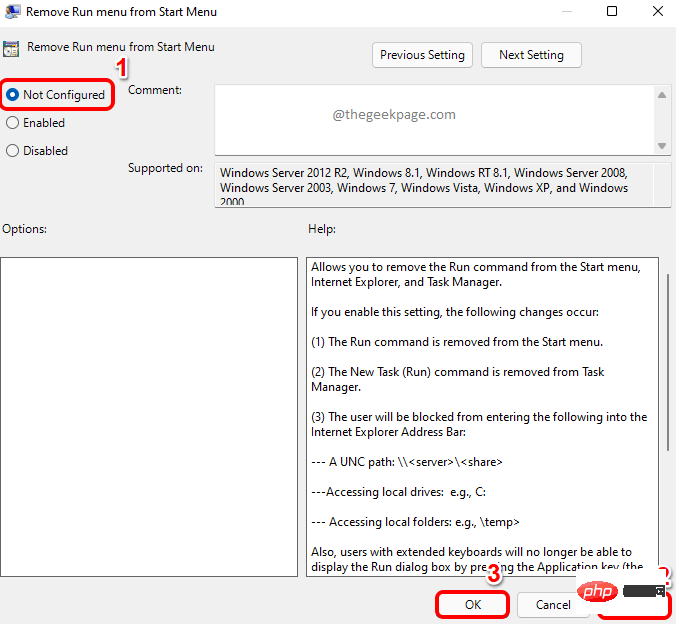
Scroll down to find and double-click the setting named Remove Run menu from Start Menu.
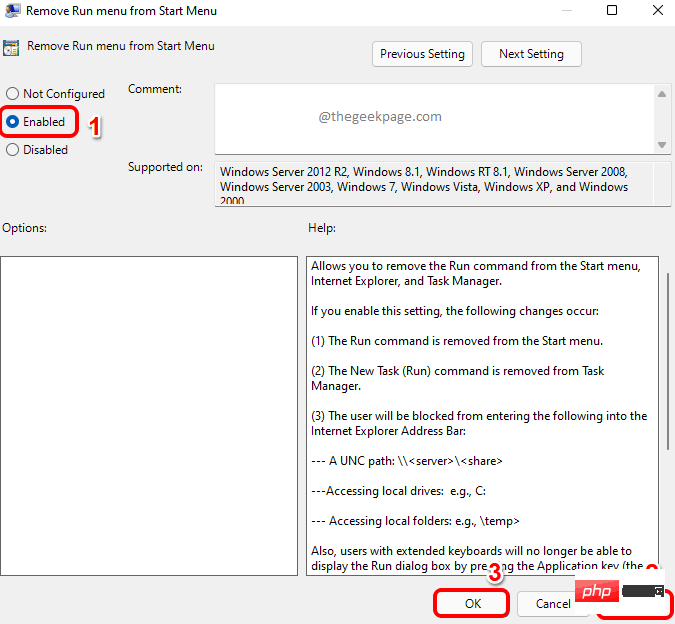
Step 4: To disable the Run window, in the Properties window, click EnabledRadio button.
Click the Apply button, then click the OK button.
Step 5: If you now try to launch the "Run" window, press CTRL R key, you will see the following Restrictions window, preventing you from accessing the run command.
Note: – What to do if you want to enable it again
If you want to enable it again" Run" window, please open the properties window again and select the "Not Configured" option.
Click the Apply button, then click the OK button. Changes will be immediate.
Method Two: Via Registry Editor
In this method we will make slight changes to your registry settings. It is always recommended that you back up your registry keys as incorrect registry settings can cause severe instability in your machine. If something goes wrong, you can always use this backup to restore old registry settings.
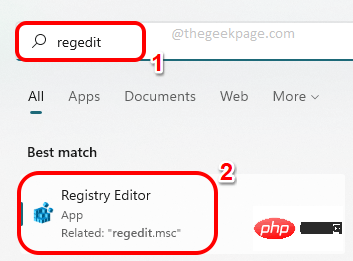
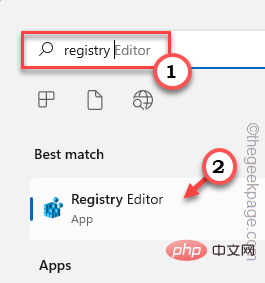
Step 1: On the taskbar, click the "Search" icon.
Step 2 : Search regedit and click from the Best Matches section Registry Editor.
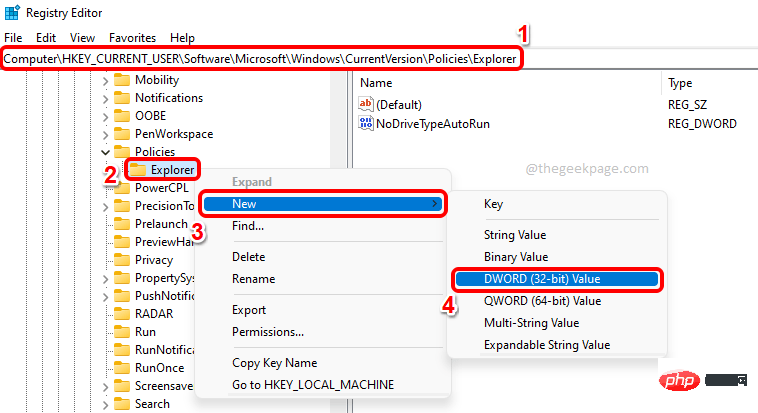
Step 3: In the Registry Editor window, copy and paste the following location Paste into the navigation bar.
HKEY_CURRENT_USER\SOFTWARE\Microsoft\Windows\CurrentVersion\Policies\Explorer
Next, right-click the ResourcesManager folder, click New, and then click OptionsDWORD (32-bit) Value.
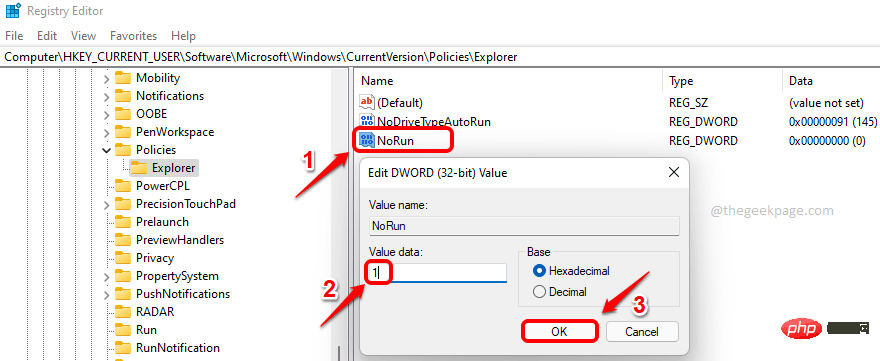
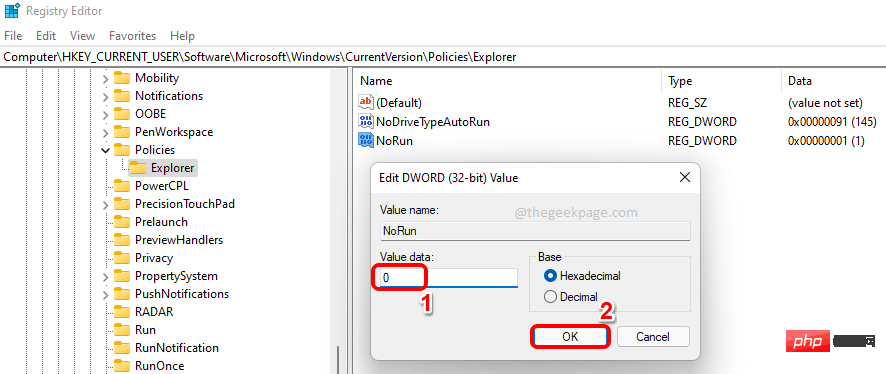
Step 4: Now, click on the newly created DWORD value and press F2KeyRenameit. Give the new name NoRun and double-click it to open its properties.
In the properties window, set the numeric data to 1, and click the OK button.
Step 5: To take over the changes, simply start Windows Explorer.
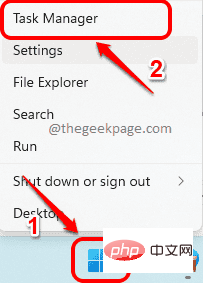
To do this, right-click the WindowsStart Menu icon and click the Task Manager option.
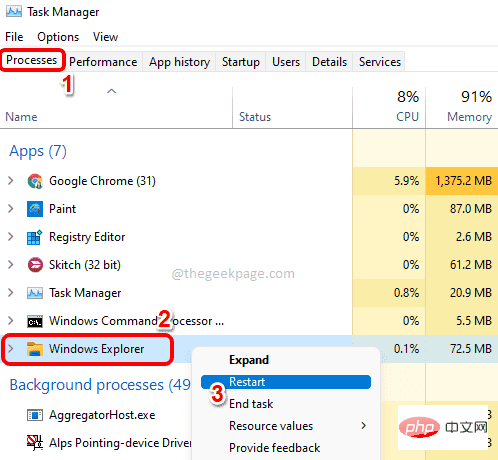
Step 6: Now under the Processes tab, right click on the Applications section under Windows Explorer and click the Restart option.
Step 7: If you now press the CTRL R keys simultaneously, you will see that you can no longer access " Run" window.

Note: – If you want to revert the changes, open the DWORD property again and change Value data is set to 0. Click the OK button.
You can now access the Run dialog box again, just like you did before.
The above is the detailed content of How to disable the Run Command feature in Windows 11, 10. For more information, please follow other related articles on the PHP Chinese website!

Hot AI Tools

Undresser.AI Undress
AI-powered app for creating realistic nude photos

AI Clothes Remover
Online AI tool for removing clothes from photos.

Undress AI Tool
Undress images for free

Clothoff.io
AI clothes remover

Video Face Swap
Swap faces in any video effortlessly with our completely free AI face swap tool!

Hot Article
Hot Tools

Notepad++7.3.1
Easy-to-use and free code editor

SublimeText3 Chinese version
Chinese version, very easy to use

Zend Studio 13.0.1
Powerful PHP integrated development environment

Dreamweaver CS6
Visual web development tools

SublimeText3 Mac version
God-level code editing software (SublimeText3)
Hot Topics


 4 Ways to Enable or Disable Microsoft Store on Windows 11 or 10
May 14, 2023 am 10:46 AM
4 Ways to Enable or Disable Microsoft Store on Windows 11 or 10
May 14, 2023 am 10:46 AM
Here are some possible reasons why you need to disable Microsoft Store: Stop unwanted notifications. Preserves data by limiting the background processes of the Microsoft Store to improve security or privacy Addresses some issues related to the Store or the apps it installs. Restrict children, family members, or other users from downloading applications without permission. Steps to Disable or Enable Windows Store Before following this tutorial, disabling the Microsoft Store will also stop the installation of any apps that require its services. To use the store, users need to enable its service in the same way as blocking it. 1. Block WindowsStore background service Let us from restricting Microsoft Store as
 How to solve the problem of location services being grayed out in Windows 10/11?
Apr 26, 2023 pm 03:49 PM
How to solve the problem of location services being grayed out in Windows 10/11?
Apr 26, 2023 pm 03:49 PM
Location services are an important feature for some applications on Windows, depending on the location of your system. So if you see the Location Services option grayed out on your system, you can't even toggle it manually. Usually, some system glitch causes this issue and you can easily fix it by following these simple solutions. Fix 1 – Adjust the registry You can adjust the registry to fix this greyed out location services issue. 1. Press the Win key and type "Registry". 2. Then, click "Registry Editor" to open the Registry Editor on your system. 3. You will delete a specific registry subdirectory. Usually, it won't affect your system at all. However, it is recommended that you perform a system backup. one. After opening the Registry Editor, click
 How to fix DISM 87 error in Windows 11?
May 09, 2023 am 09:31 AM
How to fix DISM 87 error in Windows 11?
May 09, 2023 am 09:31 AM
Windows 11 users are facing issues dealing with many error codes caused by different issues. DISM error 87 is a command line error. DISM means DeploymentImageServicingManagement, and its main job is to help organize virtual disks. It manages split Windows Image Format (WIM) files, all-flash utility files, virtual hard disks (VHD) and more. You can access the tool on Command Prompt or Windows PowerShell. We use this tool to repair Windows image issues. This article will introduce how to fix the problem in Windows 11
![How to dual-boot Windows 11 and macOS [Complete Guide]](https://img.php.cn/upload/article/000/000/164/168146628429366.jpg?x-oss-process=image/resize,m_fill,h_207,w_330) How to dual-boot Windows 11 and macOS [Complete Guide]
Apr 14, 2023 pm 05:58 PM
How to dual-boot Windows 11 and macOS [Complete Guide]
Apr 14, 2023 pm 05:58 PM
Windows 11 brought some major changes, many of which were widely accepted by users around the world. While you can dual-boot Windows 11 and Windows 10, what about other operating systems? Windows 11 can be used with different operating systems, and you can dual-boot Windows 11 and Linux if needed. Many people often ask, can I dual-boot Windows and macOS? The answer is yes. When it comes to macOS, the situation is no different. You can dual-boot macOS and Windows to use Windows software or play games on your Mac. Some people may use dual boot to try out macOS on their PC. Dual boot Win
 How to install the Group Policy Management Console on Windows 11
May 17, 2023 am 09:59 AM
How to install the Group Policy Management Console on Windows 11
May 17, 2023 am 09:59 AM
Installing the Group Policy Management Console (also known as GPMC) on Windows 11 will be the topic of today’s post. In Windows systems, the tools we are discussing improve the management of Group Policy by making it easier for IT and system administrators to understand. Be careful not to confuse the Local Group Policy Editor (gpedit.msc) with the Group Policy Management Console (GPMC). In terms of local system settings, Gpedit works with the registry, but GPMC works with server management settings for domain-based networks. You need to download and install the Windows Remote Server Administration Tools, sometimes called RSAT, to accomplish this. Use remote server management
 How to fix error: not found when running wmic command
May 08, 2023 pm 12:34 PM
How to fix error: not found when running wmic command
May 08, 2023 pm 12:34 PM
Many times, when the system encounters an error and refuses to boot, you may need to recover the Windows key to prevent reinstallation and activation of the operating system. However, when doing so, many users receive the error when running the wmic command in the command prompt: description = not found. First, to recover the product key you have to use the following command: wmicpathSoftwareLicensingServicegetOA3xOriginalProductKey Copy/paste the command to your system and check if you are able to retrieve the product key. Additionally, most users who encounter this error are accessing the command prompt from the recovery environment as Windows 11 is stuck in a repair loop
 5 Ways to Disable Delivery Optimization Service in Windows
May 17, 2023 am 09:31 AM
5 Ways to Disable Delivery Optimization Service in Windows
May 17, 2023 am 09:31 AM
There are many reasons why you might want to disable the Delivery Optimization service on your Windows computer. However, our readers complained about not knowing the correct steps to follow. This guide discusses how to disable the Delivery Optimization service in a few steps. To learn more about services, you may want to check out our How to open services.msc guide for more information. What does Delivery Optimization Service do? Delivery Optimization Service is an HTTP downloader with cloud hosting solution. It allows Windows devices to download Windows updates, upgrades, applications and other large package files from alternative sources. Additionally, it helps reduce bandwidth consumption by allowing multiple devices in a deployment to download these packages. In addition, Windo
 'Windows 11 Memory Integrity is Off” Issue: How to Fix
Apr 28, 2023 pm 07:34 PM
'Windows 11 Memory Integrity is Off” Issue: How to Fix
Apr 28, 2023 pm 07:34 PM
The security of a Windows PC is critical to its proper functioning. If the system is protected from hackers and malware and its core functionality is stable, then Windows has a secure environment to perform full functionality. Windows has some security features that utilize different components to achieve this, and Memory Integrity is one of them. But these features can sometimes impact system performance, especially if they are forced on you by default. How does memory integrity work? To understand the breadth of how memory integrity works, we need to understand two other features related to it - core isolation and virtual machine platform (VMP). Core Isolation: This is a set of virtualization-based security features by isolating important core processes in memory