

How to configure content adaptive brightness on Windows 11

Adaptive brightness is a feature on Windows 11 computers that adjusts the brightness level of your screen based on the content being displayed or lighting conditions.
Since some users are still getting used to Windows 11’s new interface, they can’t easily find Adaptive Brightness, and some even say that the Adaptive Brightness feature is missing on Windows 11, so this tutorial will clear it all up.
For example, if you are watching a YouTube video and the video suddenly shows a dark scene, Adaptive Brightness will make the screen brighter and increase the contrast level.
This is different from auto-brightness, which is a screen setting that allows your computer, smartphone, or device to adjust brightness levels based on ambient lighting.
There is a special sensor in the front camera to detect light. Adaptive brightness uses machine learning to learn how you or the user adjusts brightness levels and automatically changes when the same conditions are encountered again.
On Windows 11, it has a special name, Content Adaptive Brightness Control, or CABC. Windows 11 computers are generally very good at adaptive brightness and can change it according to your needs.
It can even extend battery life, but sometimes you want to further control your computer's brightness and turn off adaptive brightness.
Why do you need to turn off or configure adaptive brightness?
In short, it can be a bit annoying and distracting. There's also the issue of reducing image quality for things that require color accuracy. Graphic designers and artists need to have monitors that show exactly what they are doing, otherwise there is a risk of producing something wrong.
People who use photo and video apps need the same level of accuracy. Now, if you are a user of Windows 11 desktop version, then battery is not an issue for you. However, if you have a laptop using Windows 11 as its operating system, be aware that turning off adaptive brightness will drain your battery faster.
This tutorial will show you how to turn off and adjust Adaptive Brightness on your Windows 11 computer. It will show you various ways to turn it off by going into the Settings menu or adjusting your graphics card. The tutorial will also mention how to turn it back on.
How to configure adaptive brightness on Windows 11?
1. Make changes through the Settings menu
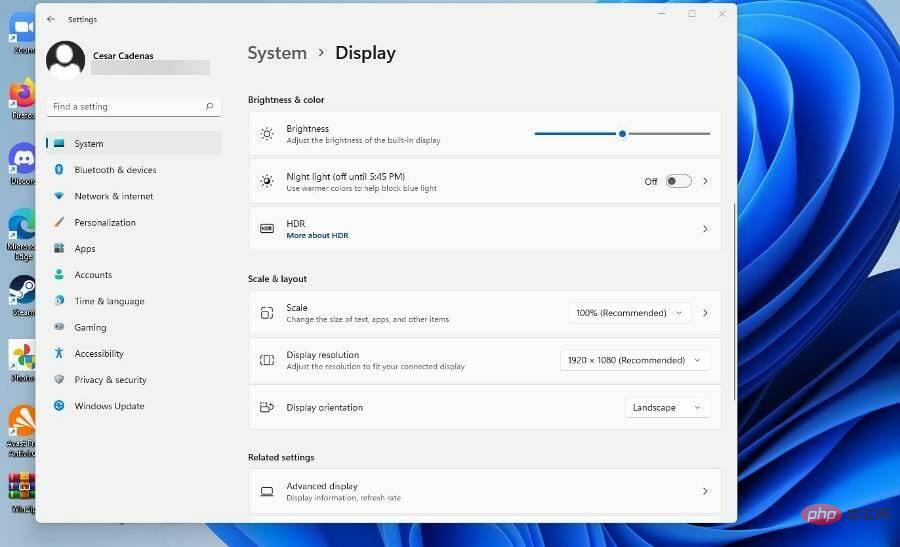
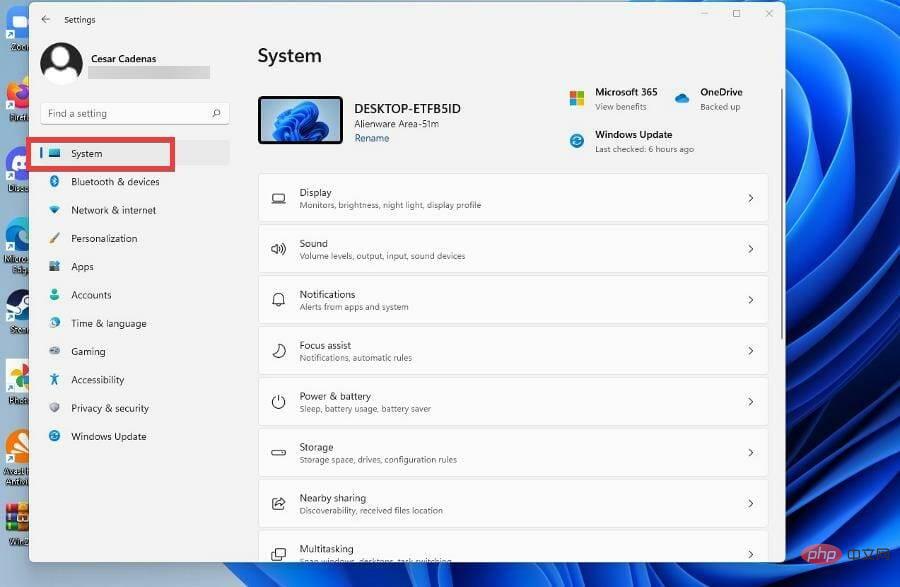
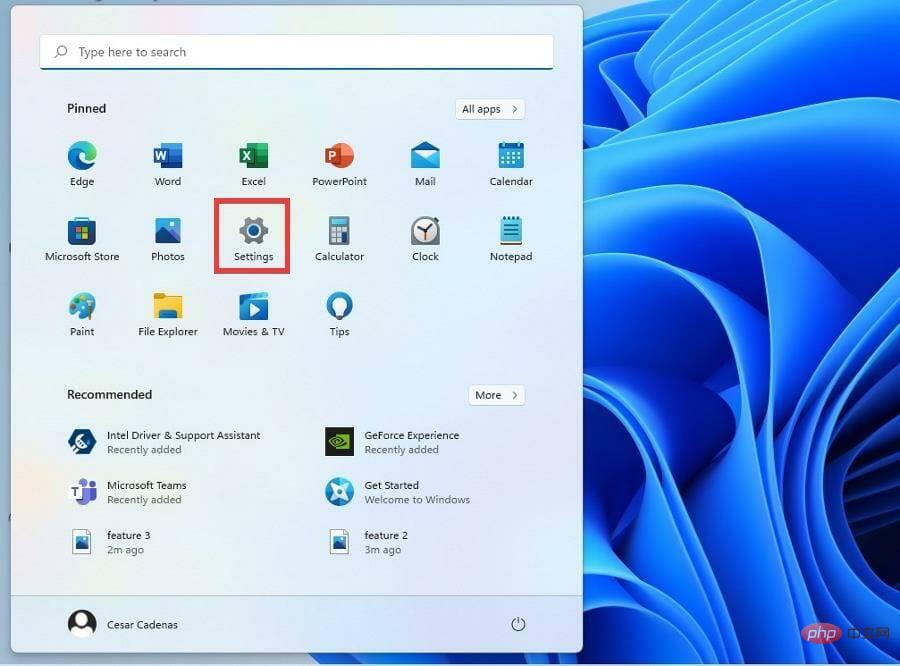
- Click the Start menu in the lower left corner, then click the Settings icon.

- Click the System tab in the upper left corner.
- Click in the System section to display .
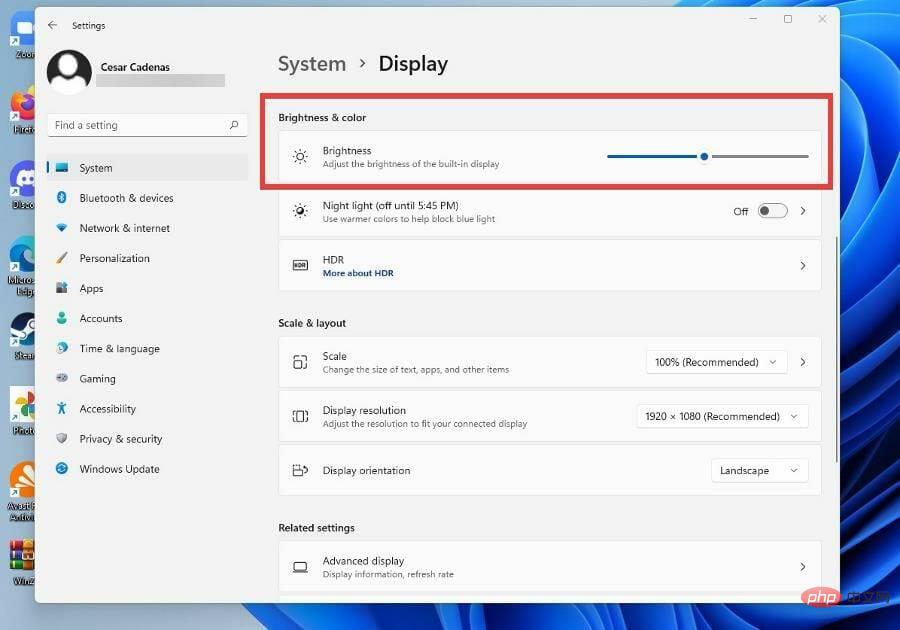
- Under Brightness and Color, adjust the brightness meter by moving the slider to the left or right.
- In some versions of Windows 11, there may be an option that says "Automatically adjust contrast based on display content to help improve battery life."
- If the option exists, click the box next to it to turn it off.
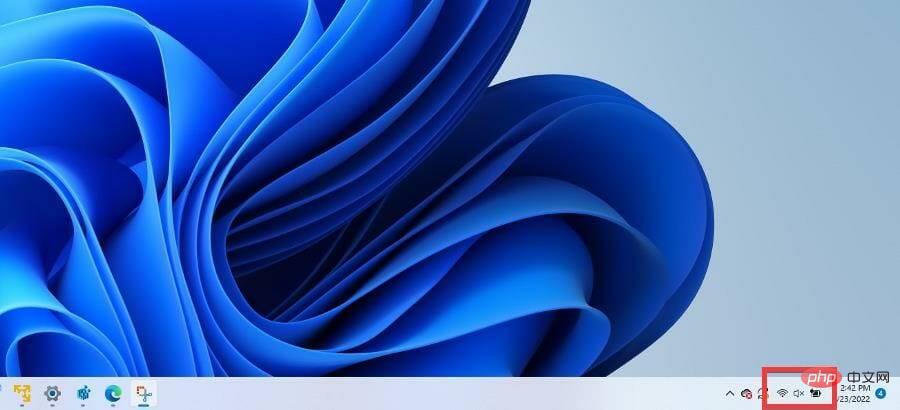
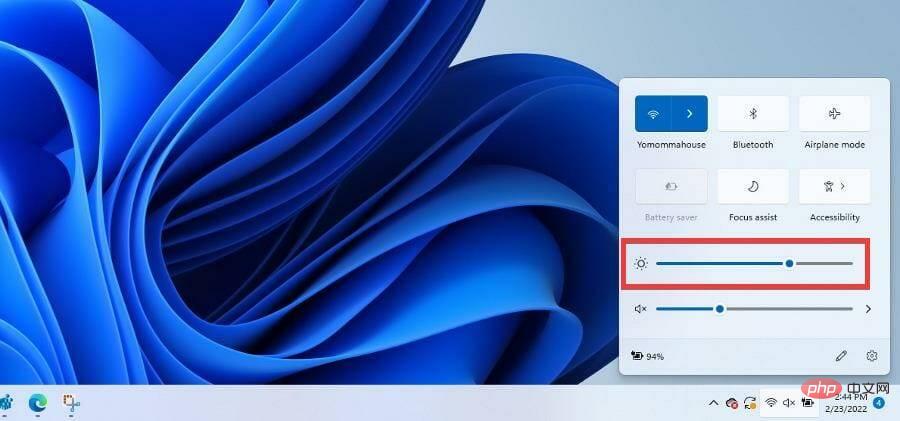
- Instead, you can do the same thing by clicking the battery icon in the lower right corner to bring up the quick access menu.
- In the Quick Access menu, adjust the brightness level by moving the slider, just like in the Settings menu.


2. Via Power and Battery Configuration
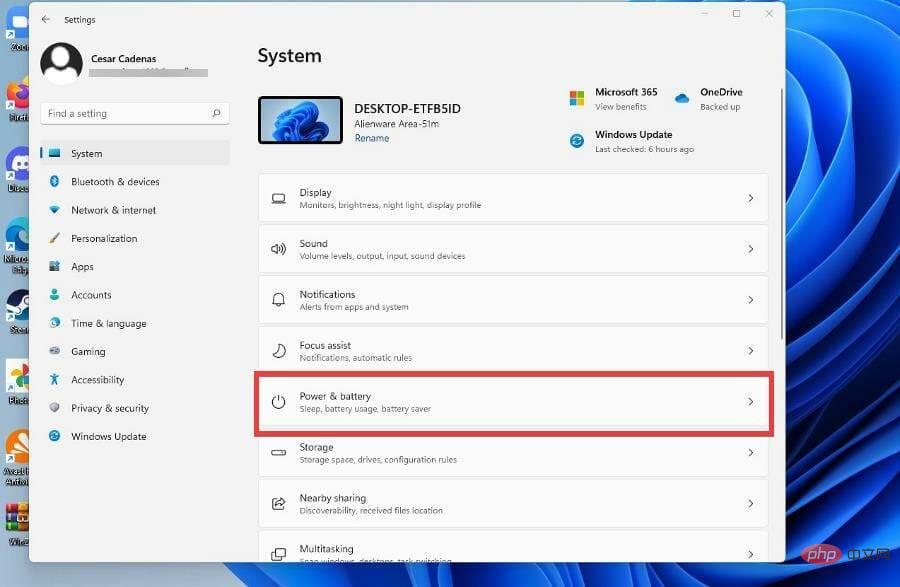
- Open the Settings menu by clicking the icon in the Start menu.
- Under the System tab, click Power & Battery.
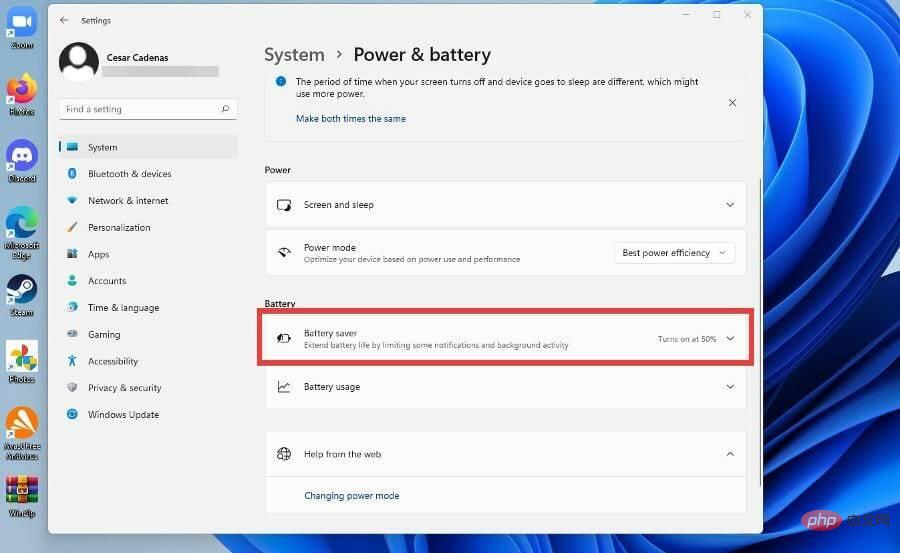
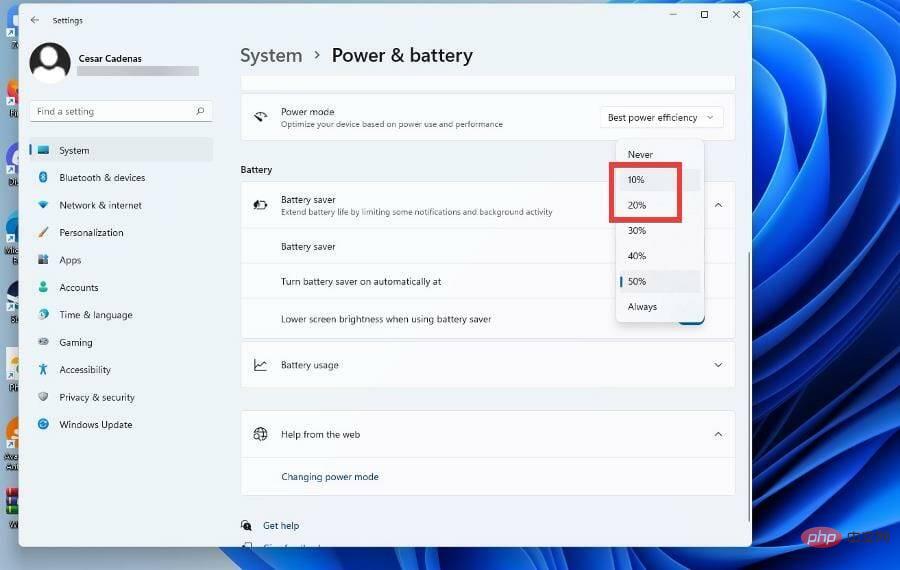
- Under the Power & Battery section, click Power Saving Mode to display the drop-down menu.
-
Click the menu next to Automatically turn on battery saver and select a lower percentage for when adaptive brightness starts.
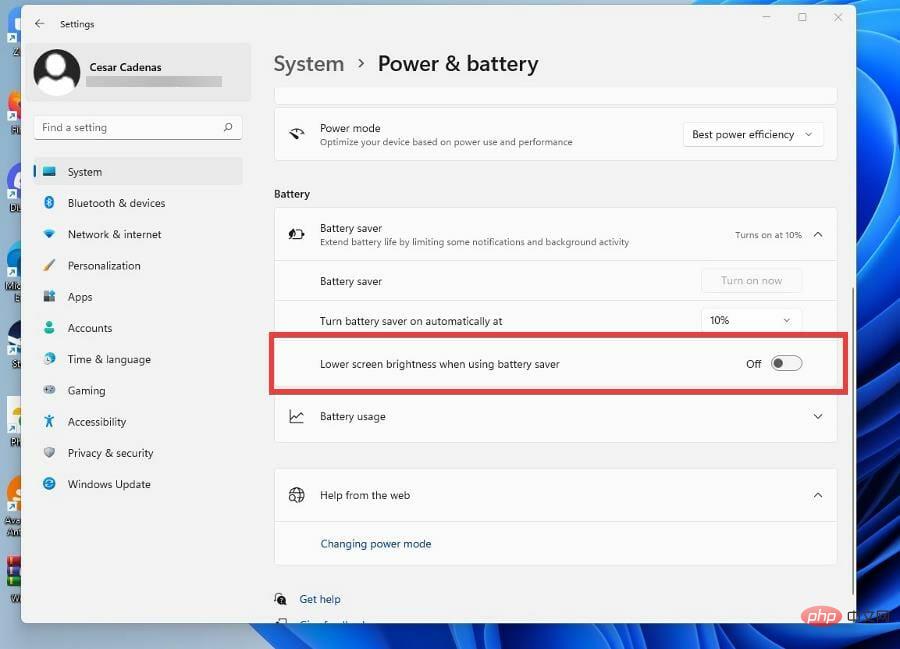
- Alternatively, if you want it to be turned off completely, toggle the switch to turn off Reduce screen brightness when using power saver mode.
How to turn off adaptive brightness on Windows 11?
If you find that you can’t turn off Adaptive Brightness on Windows 11 for any reason, the following steps will ensure you turn it off successfully, so be sure to follow them exactly.
1. Disable via Registry Editor
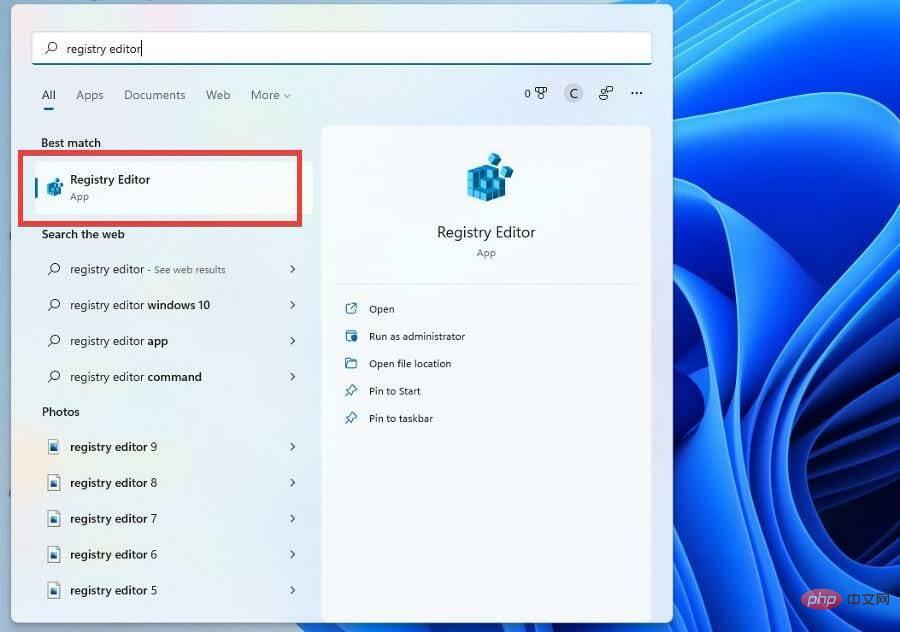
- Click the magnifying glass icon to bring up the search bar.
- Search Windows 11Registry Editor.
- Click on the first entry you see.
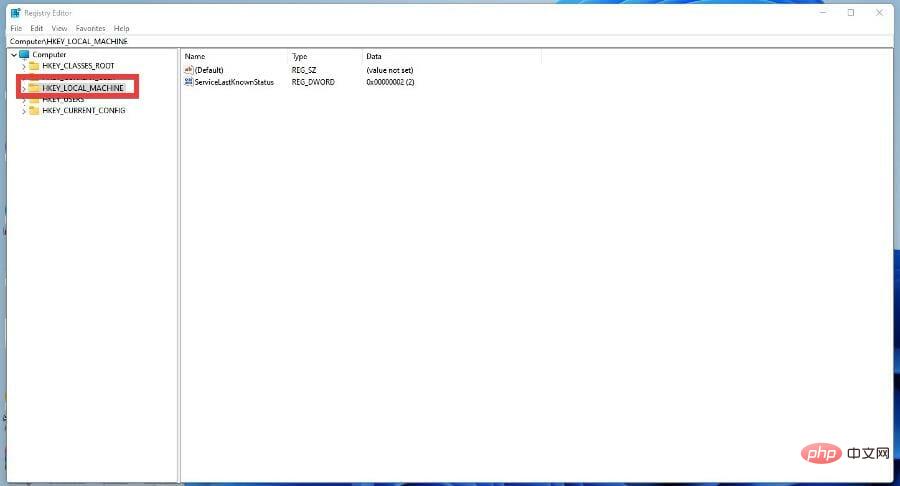
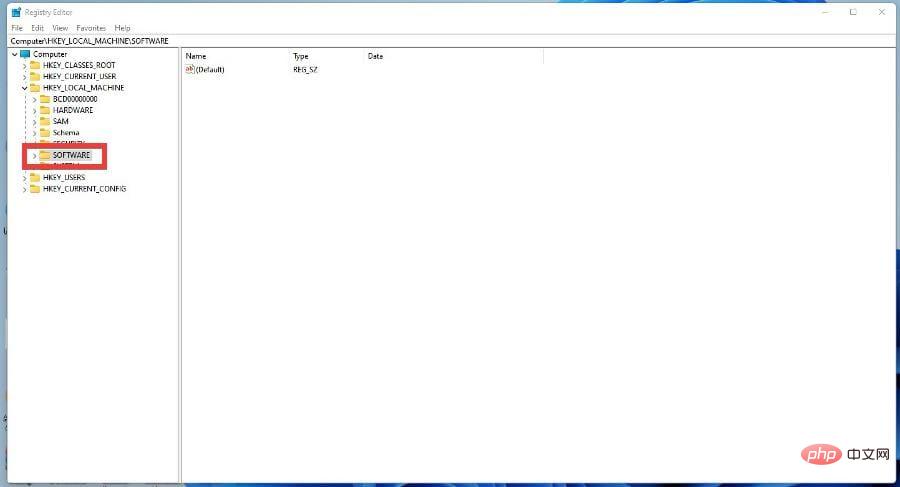
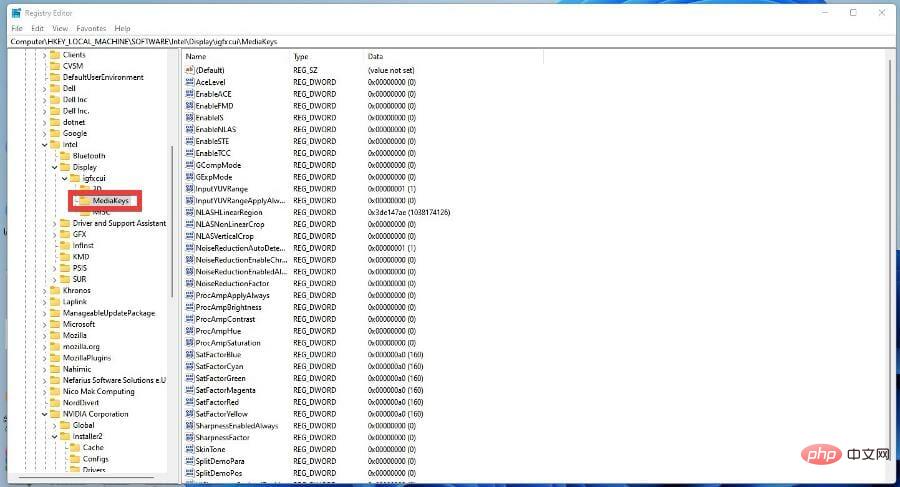
- In Registry Editor, click HKEY_LOCAL_MACHINE.
- Click on the software.
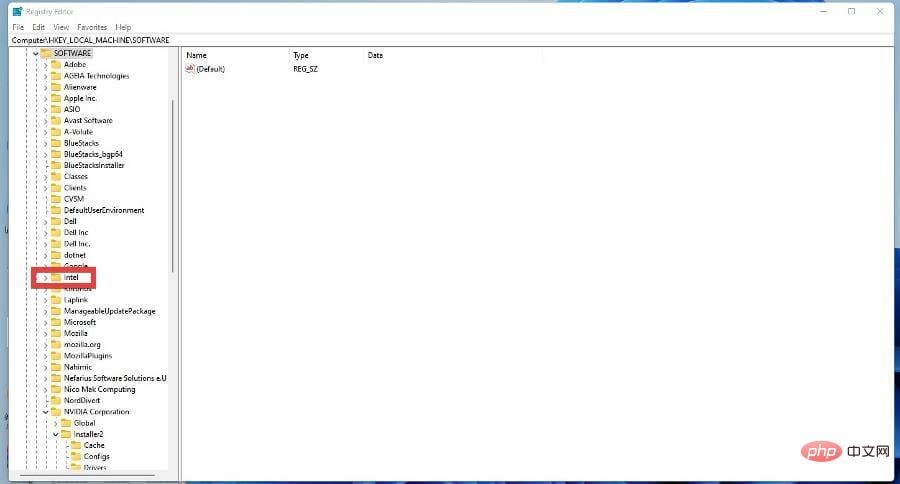
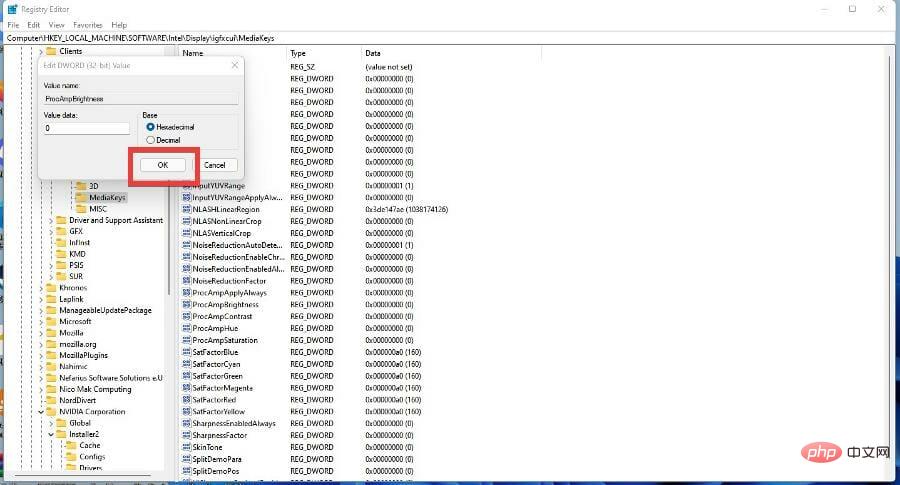
- Under Software, find and click the entry for your computer's graphics card. In this tutorial, Intel is the processor being used.
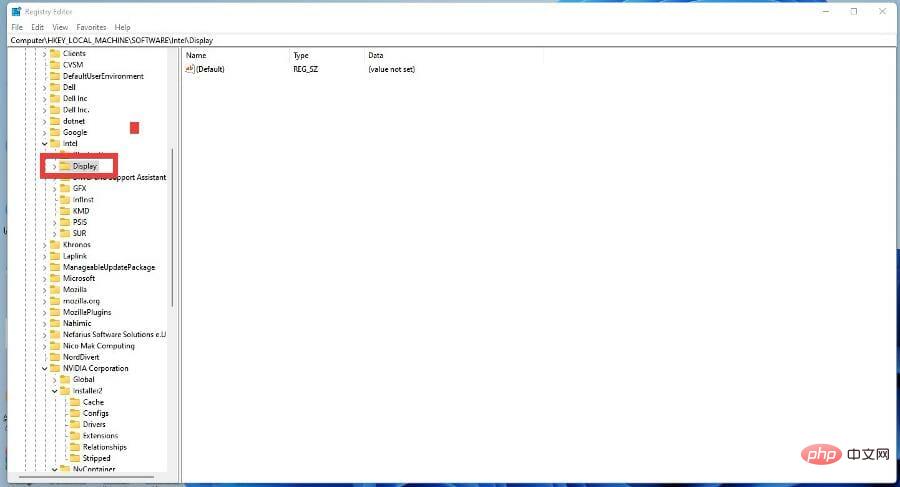
- Click to display.
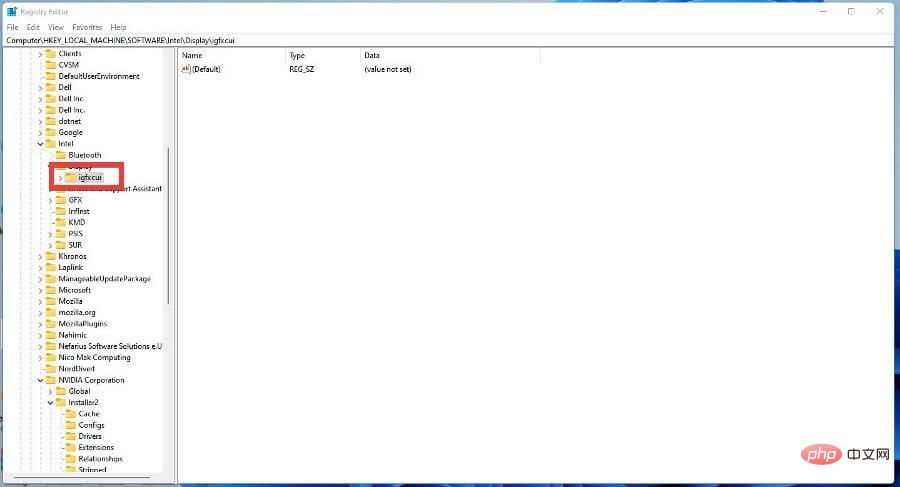
- Click igfxcui to display another menu.
- Select MediaKeys, and a bunch of entries will appear on the right.
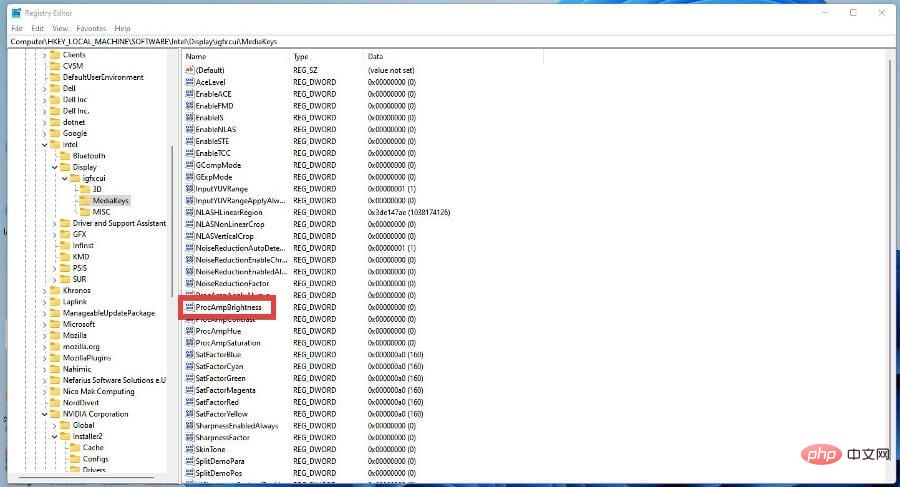
- FindProcAmpBrightness.
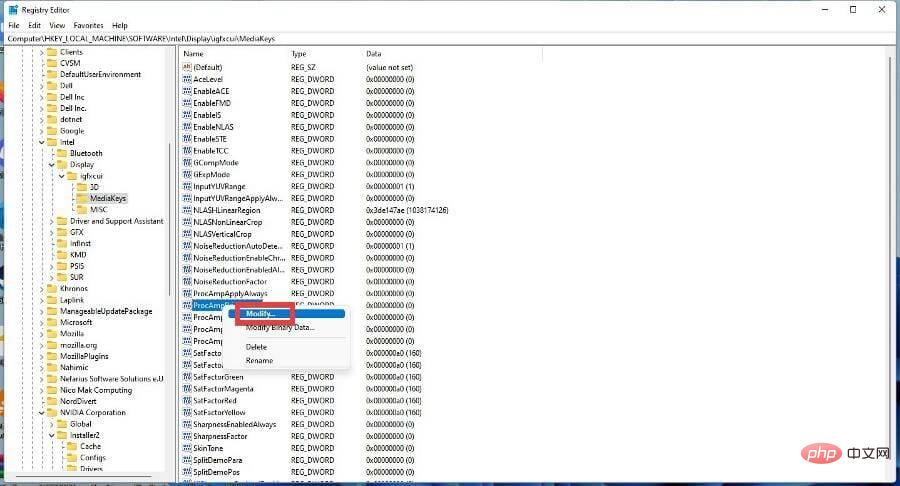
- Right-click to bring up the menu. Select to modify.
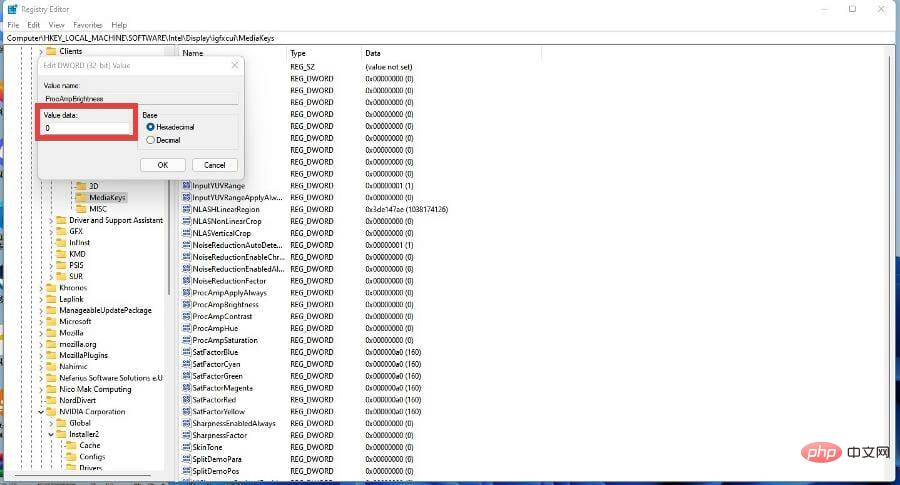
- Set numeric data to "0".
- Click OK and then close Registry Editor.
- Restart your computer.
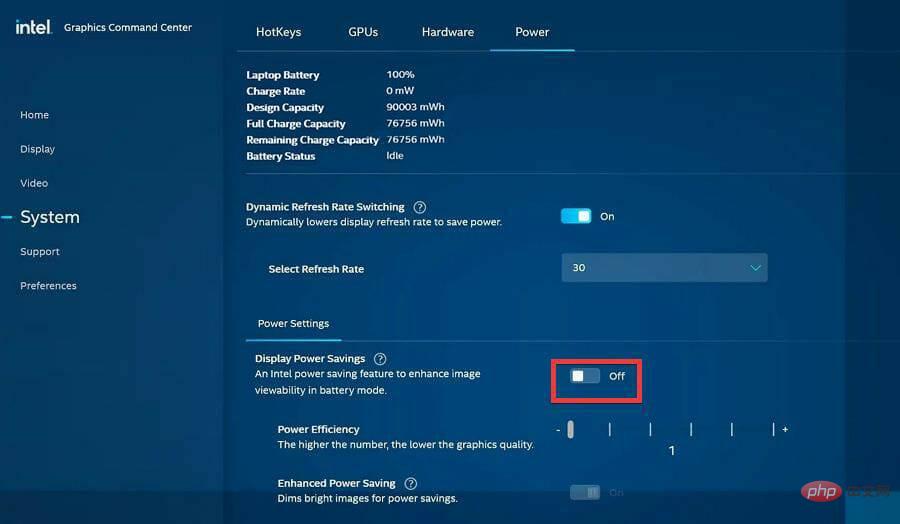
2. Disable via Intel Graphics Command Center
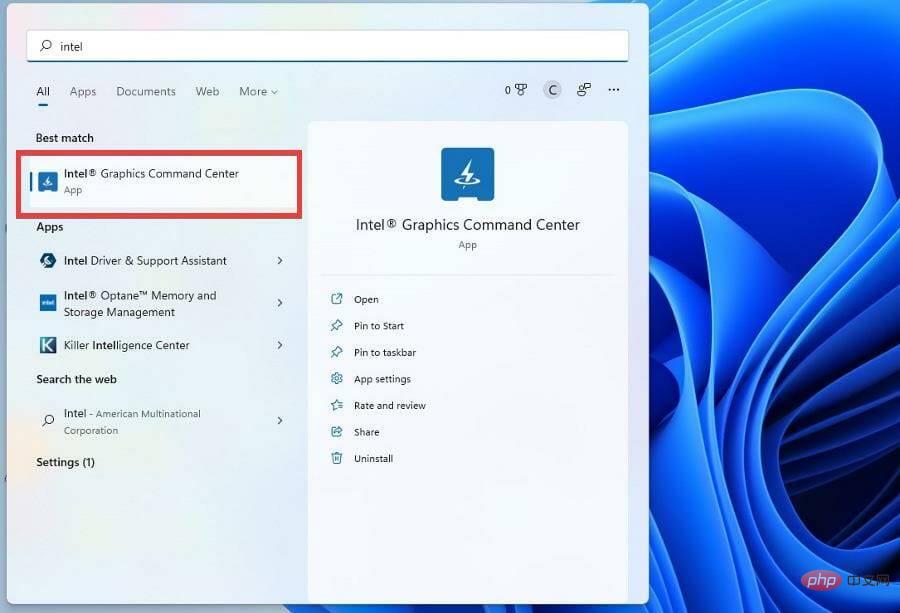
- Click the magnifying glass icon and search for Intel Graphics Command Center.
- Click on the first entry that appears.
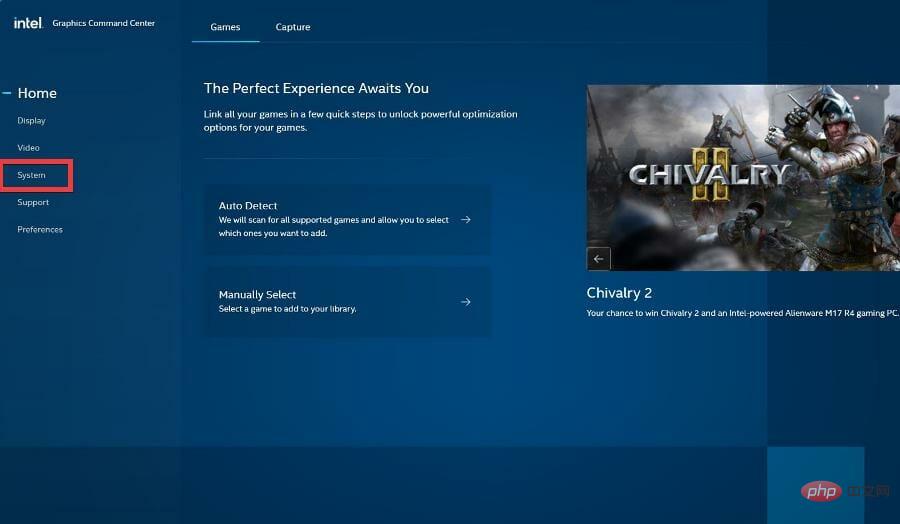
- In the Graphics Command Center, select System in the left menu.
- In the System section, click Power in the top menu bar.
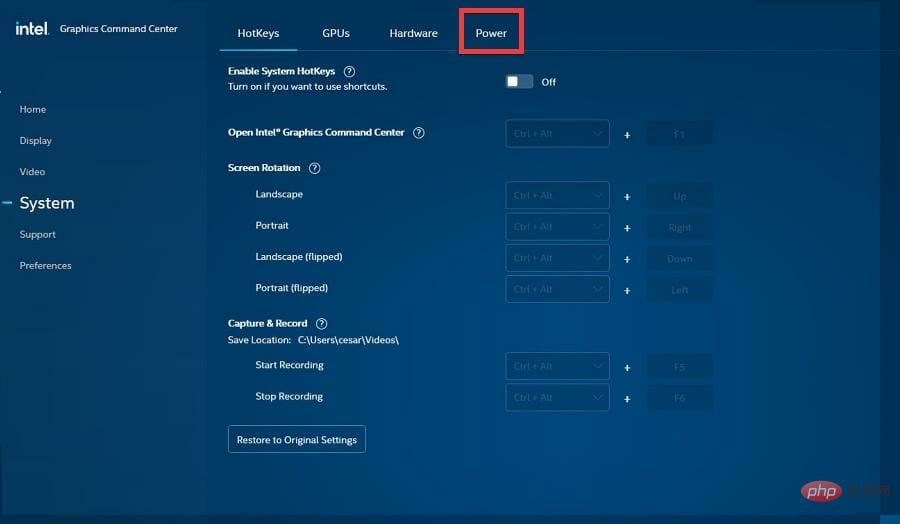
- In the Power section, go to Power Settings.
- Make sure to turn off the Display power saving feature. If it is on, click the toggle switch to turn it off.
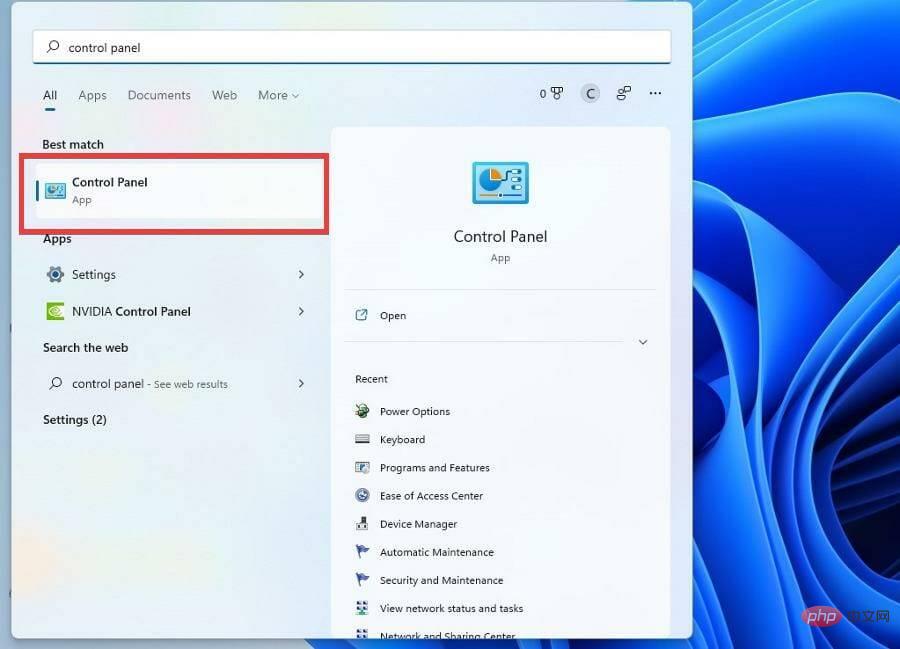
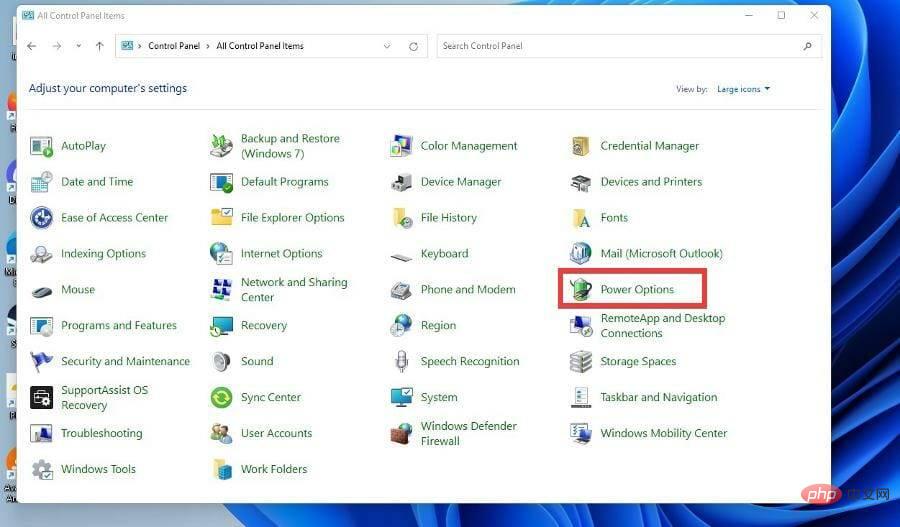
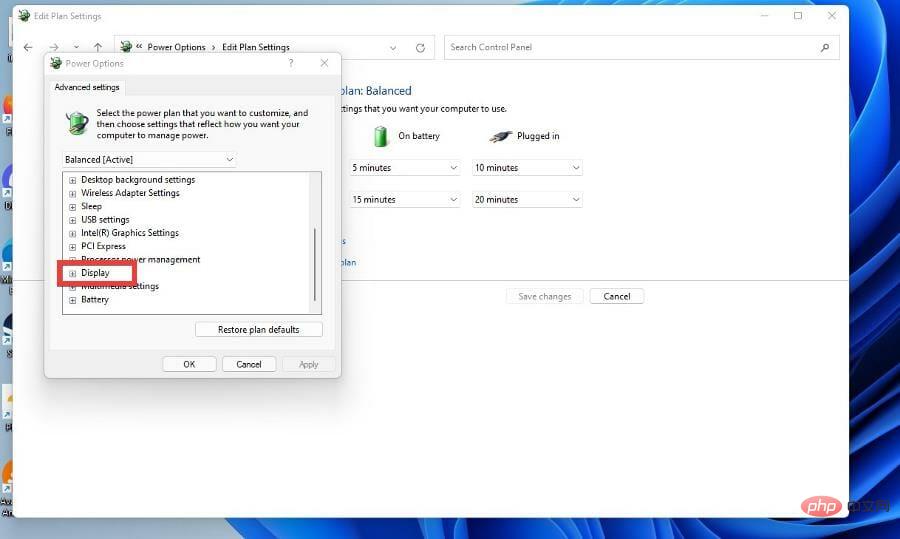
3. Disable via Control Panel
- Bring up the search bar and search for Windows 11 Control Panel.
- Click on the first entry that appears.
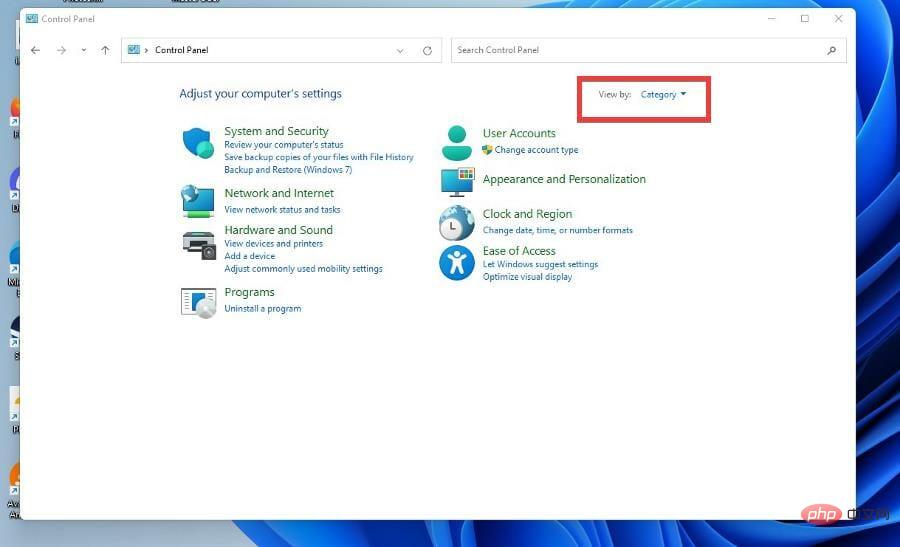
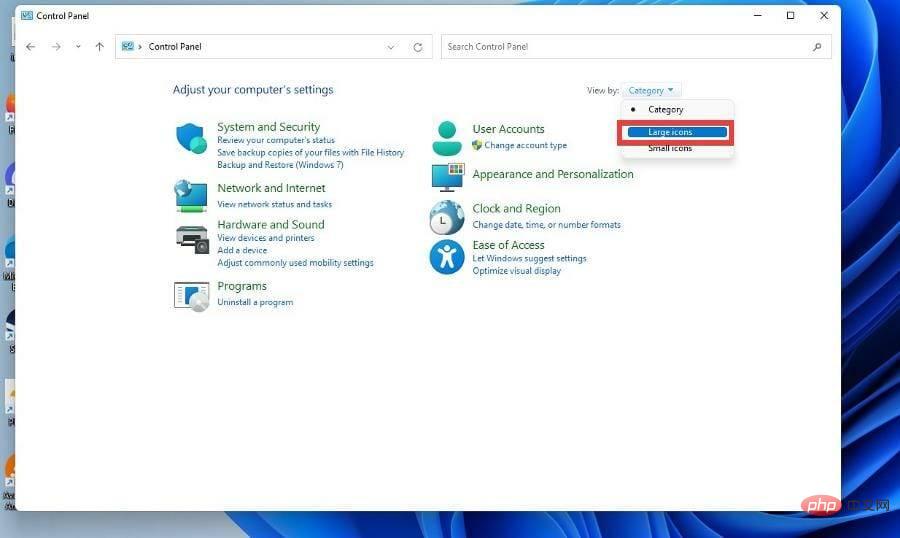
- In Control Panel, click View as.
- Select Large Icon.
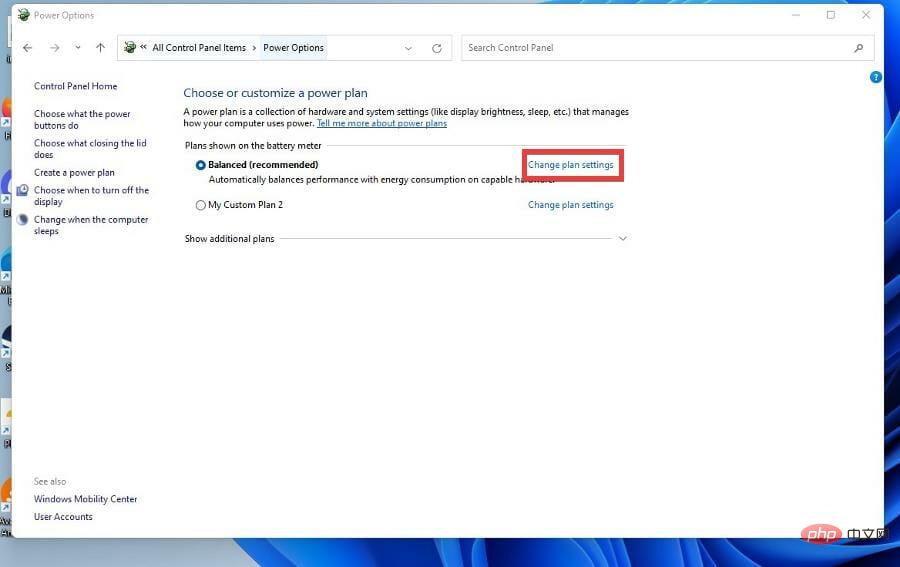
- In this new window, select Power Options.
- Select "Change Plan Settings" in the middle of the window next to "Balance" (recommended).Alternatively, you can create your own power plan.
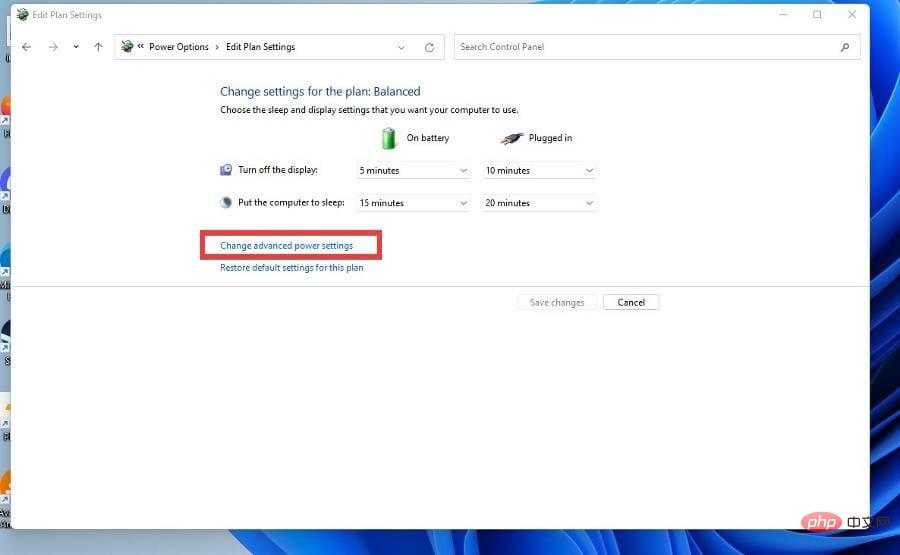
- Click to change advanced power settings.
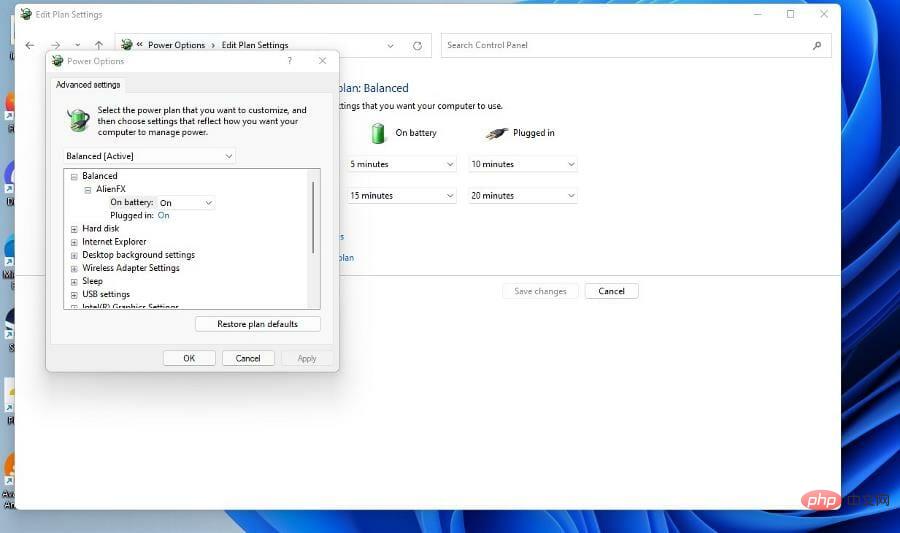
- In the new small window, scroll down and find Display.
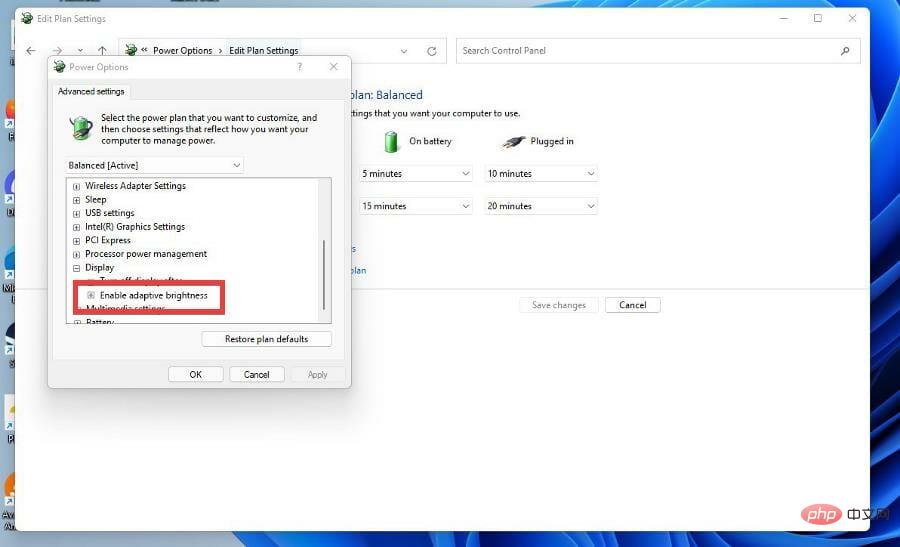
- Click the plus sign to display the menu.
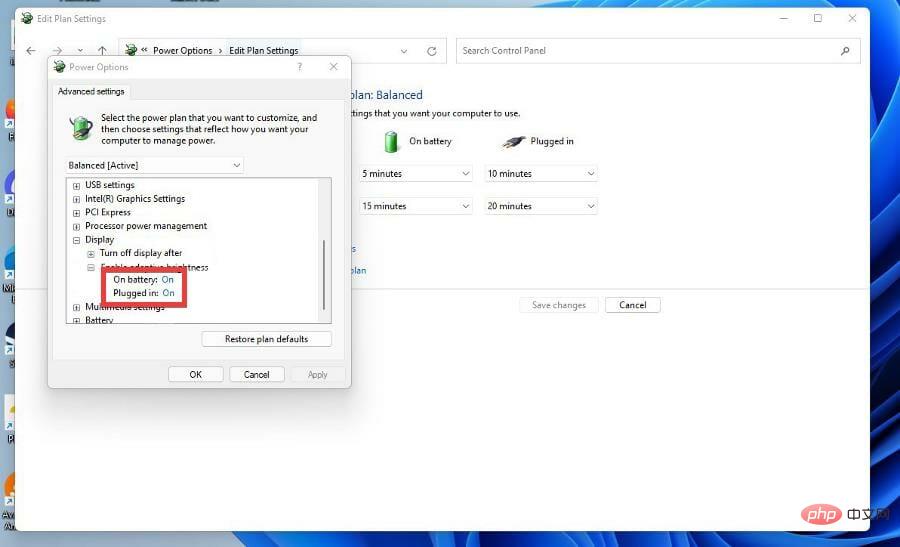
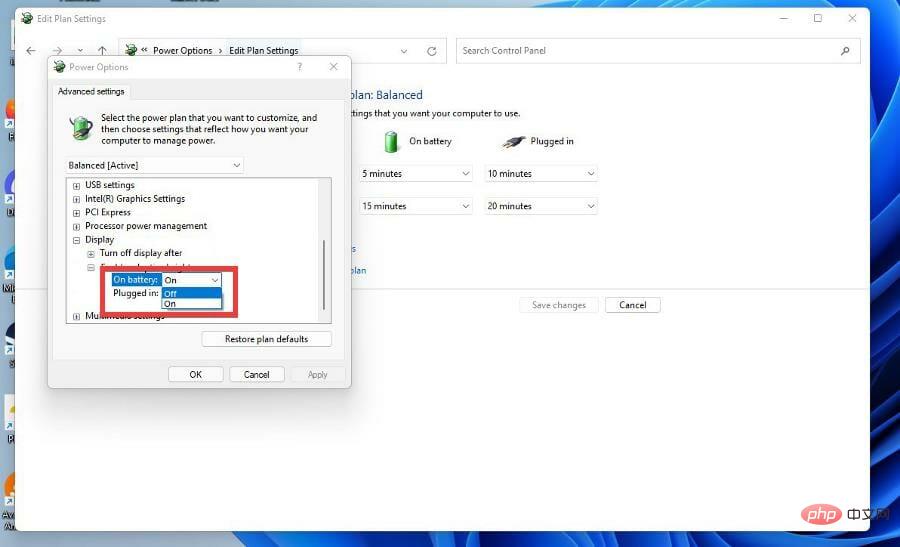
- Click to enable adaptive brightness.
- If you are on the desktop, click On next to Settings . For laptop owners, it will show battery and plugged in.
- Select Off in the drop-down menu to turn off adaptive brightness.
How can I make interacting with my Windows 11 computer easier?
One interesting feature you may not know about is text-to-speech and speech recognition on Windows 11. They're tools that allow you to write in your own voice, which can be useful if you're someone who has trouble putting your thoughts on a screen.
As a writer, writer’s block is a scary thing and something like speech recognition can help you. Conversely, text-to-speech is great if you want a tool that can help you through the steps or if you can't see the screen well.
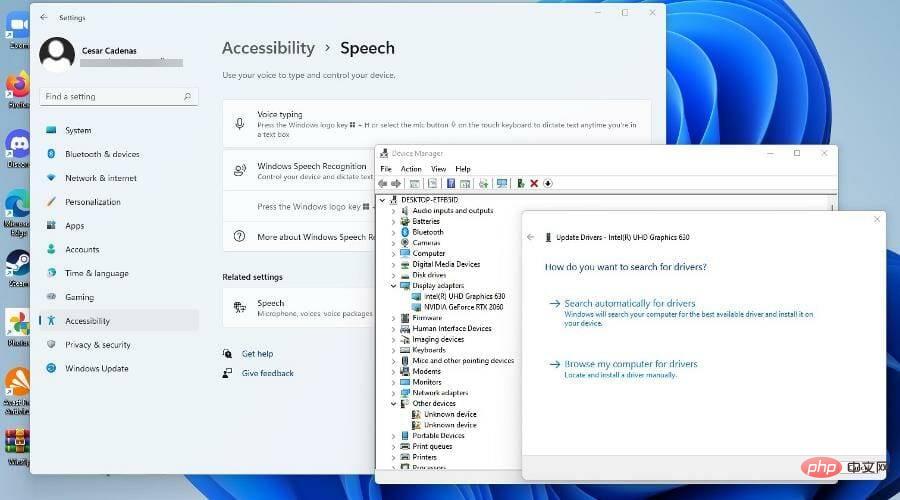
If you are a PC gamer, then you should learn how to update your graphics driver, which is the software that allows your computer to use the GPU.
The above is the detailed content of How to configure content adaptive brightness on Windows 11. For more information, please follow other related articles on the PHP Chinese website!

Hot AI Tools

Undresser.AI Undress
AI-powered app for creating realistic nude photos

AI Clothes Remover
Online AI tool for removing clothes from photos.

Undress AI Tool
Undress images for free

Clothoff.io
AI clothes remover

Video Face Swap
Swap faces in any video effortlessly with our completely free AI face swap tool!

Hot Article
Hot Tools

Notepad++7.3.1
Easy-to-use and free code editor

SublimeText3 Chinese version
Chinese version, very easy to use

Zend Studio 13.0.1
Powerful PHP integrated development environment

Dreamweaver CS6
Visual web development tools

SublimeText3 Mac version
God-level code editing software (SublimeText3)
Hot Topics


 What is the reason why PS keeps showing loading?
Apr 06, 2025 pm 06:39 PM
What is the reason why PS keeps showing loading?
Apr 06, 2025 pm 06:39 PM
PS "Loading" problems are caused by resource access or processing problems: hard disk reading speed is slow or bad: Use CrystalDiskInfo to check the hard disk health and replace the problematic hard disk. Insufficient memory: Upgrade memory to meet PS's needs for high-resolution images and complex layer processing. Graphics card drivers are outdated or corrupted: Update the drivers to optimize communication between the PS and the graphics card. File paths are too long or file names have special characters: use short paths and avoid special characters. PS's own problem: Reinstall or repair the PS installer.
 How to speed up the loading speed of PS?
Apr 06, 2025 pm 06:27 PM
How to speed up the loading speed of PS?
Apr 06, 2025 pm 06:27 PM
Solving the problem of slow Photoshop startup requires a multi-pronged approach, including: upgrading hardware (memory, solid-state drive, CPU); uninstalling outdated or incompatible plug-ins; cleaning up system garbage and excessive background programs regularly; closing irrelevant programs with caution; avoiding opening a large number of files during startup.
 How to solve the problem of loading when PS is always showing that it is loading?
Apr 06, 2025 pm 06:30 PM
How to solve the problem of loading when PS is always showing that it is loading?
Apr 06, 2025 pm 06:30 PM
PS card is "Loading"? Solutions include: checking the computer configuration (memory, hard disk, processor), cleaning hard disk fragmentation, updating the graphics card driver, adjusting PS settings, reinstalling PS, and developing good programming habits.
 Is slow PS loading related to computer configuration?
Apr 06, 2025 pm 06:24 PM
Is slow PS loading related to computer configuration?
Apr 06, 2025 pm 06:24 PM
The reason for slow PS loading is the combined impact of hardware (CPU, memory, hard disk, graphics card) and software (system, background program). Solutions include: upgrading hardware (especially replacing solid-state drives), optimizing software (cleaning up system garbage, updating drivers, checking PS settings), and processing PS files. Regular computer maintenance can also help improve PS running speed.
 Does mysql need the internet
Apr 08, 2025 pm 02:18 PM
Does mysql need the internet
Apr 08, 2025 pm 02:18 PM
MySQL can run without network connections for basic data storage and management. However, network connection is required for interaction with other systems, remote access, or using advanced features such as replication and clustering. Additionally, security measures (such as firewalls), performance optimization (choose the right network connection), and data backup are critical to connecting to the Internet.
 Is PS slow loading related to other programs that are running?
Apr 06, 2025 pm 06:03 PM
Is PS slow loading related to other programs that are running?
Apr 06, 2025 pm 06:03 PM
The secrets to mastering Office software include: understanding different versions and platforms, correctly installing and configuring, proficient in using the software interface, in-depth understanding of feature operations, application collaboration and sharing functions, utilizing templates and styles, mastering advanced skills, and solving common problems. In addition, you need to choose a version that suits your needs, make good use of templates and styles, develop backup habits, and learn shortcut keys and advanced techniques to improve efficiency.
 How to solve the problem of loading when the PS opens the file?
Apr 06, 2025 pm 06:33 PM
How to solve the problem of loading when the PS opens the file?
Apr 06, 2025 pm 06:33 PM
"Loading" stuttering occurs when opening a file on PS. The reasons may include: too large or corrupted file, insufficient memory, slow hard disk speed, graphics card driver problems, PS version or plug-in conflicts. The solutions are: check file size and integrity, increase memory, upgrade hard disk, update graphics card driver, uninstall or disable suspicious plug-ins, and reinstall PS. This problem can be effectively solved by gradually checking and making good use of PS performance settings and developing good file management habits.
 How to set color mode for export PDF on PS
Apr 06, 2025 pm 05:09 PM
How to set color mode for export PDF on PS
Apr 06, 2025 pm 05:09 PM
The secret to export PDFs with accurate colors: choose color mode according to the purpose: RGB for network display, CMYK for professional printing. Check Embed Profiles when exporting to maintain color consistency. Adjust compression settings to balance image quality and file size. For PDFs for networks, use RGB mode; for PDFs for printing, use CMYK mode.