
 Web Front-end
uni-app
Examples to explain how uniapp implements the all-select function of multi-select boxes
Web Front-end
uni-app
Examples to explain how uniapp implements the all-select function of multi-select boxes
Examples to explain how uniapp implements the all-select function of multi-select boxes

This article brings you relevant knowledge about uniapp, which mainly organizes the related issues of implementing the select-all function of the multi-select box. The reason why the select-all cannot be achieved is that the checkbox is dynamically modified. When the field is checked, the status on the interface can change in real time, but the change event of the checkbox-group cannot be triggered. Let's take a look at it. I hope it will be helpful to everyone.

Recommendation: "uniapp tutorial"
uniapp's built-in checkbox is actually as well as checkbox- group was originally very good, but there are two problems:
- Cannot rely on its events to achieve selection all
- The style is fixed and difficult to modify
The reason why they cannot select all is:
When I dynamically modify the checked field of checkbox, the status on the interface can change in real time, but the checkbox cannot be triggered- change event of group. This means that you cannot rely on checkbox-group to manage the selected options.
That is to say: I clicked Select All, and it looked like All was selected on the interface. Then I canceled one of the options and the change event was triggered, but the selected list it fed back to me was wrong. This won't work.
So I came up with a solution to implement the select-all multi-select box.
Implementation ideas
In view of the above problems, we can give up checkbox-group. Then, I gave up checkbox by the way, because I prefer the circle style of radio.
First simulate and generate some data for easy display. The key point of the data is to have a field selected, and the rest is as you like:
<script>
    import { reactive } from "vue";
    // 模拟的数据对象,要是响应式的
    let data = reactive([] as { id: number; text: string; selected: boolean }[]);
    // 生成数据
    for (let i = 0; i < 10; i++) {
        data.push({
            id: i + 5,
            text: "标题" + i,
            selected: false,
        });
}</script>Then we need to have a storage selected The object of data information uses map:
    // 存储已选内容, 因为这个列表是增删很频繁的,所以选用map而不是数组,key对应的是数据的下标。至于value存放什么,完全由自己定
    let selected = reactive(new Map<number>());</number>
Then we have to have an option box click event for selecting data or deselecting:
    // 选项框点击事件,参数是数据的下标
    function checkbox(index: number) {
        // 选中的状态下再次点击,即为取消选中
        if (data[index].selected) {
            data[index].selected = false;
            selected.delete(index); // 然后删除对应key即可
        }
        // 未选中状态下点击
        else {
            data[index].selected = true;
            selected.set(index, data[index].id);
        }
}And then, we have to have a Click event for selecting all:
    // 全选与反选事件
    function allSelect() {
        // 已经全选情况下,就是反选,全选就说明长度一样
        if (selected.size === data.length) {
            selected.clear(); // 全部清除
            data.forEach((element) => {
                element.selected = false; // 全部不选,就行了
            });
        }
        // 还未全选的状态下
        else {
            data.forEach((element, index) => {
                // 因为可能存在部分已经选择了,所以得先判断是否已存在,不存在才需要添加
                if (!selected.has(index)) {
                    selected.set(index, element.id); // key是对应的下标index,而value是可以自定义的
                    element.selected = true; // 设为选中
                }
            });
        }
}In fact, the above two click events are very basic judgments and additions and deletions of data. Now all the functions are available, let’s see how the page is written:
<template>
    <!-- 是个多选列表 -->
    <view>
        <label>
            <radio></radio>{{ item.text }}        </label>
    </view>
    <!-- 全选按钮 -->
<label> <radio></radio>全选</label></template>In fact, there are two sets of radios, one is to display data in a loop, and the other is a select all button.
The complete code connected together:
<template>
    <!-- 是个多选列表 -->
    <view>
        <label>
            <radio></radio>{{ item.text }}
        </label>
    </view>
    <!-- 全选按钮 -->
    <label> <radio></radio>全选</label></template><script>
    import { reactive } from "vue";

    // 模拟的数据对象,要是响应式的
    let data = reactive([] as { id: number; text: string; selected: boolean }[]);
    // 生成数据
    for (let i = 0; i < 10; i++) {
        data.push({
            id: i + 5,
            text: "标题" + i,
            selected: false,
        });
    }

    // 存储已选内容, 因为这个列表是增删很频繁的,所以选用map而不是数组,key对应的是数据的下标。至于value存放什么,完全由自己定
    let selected = reactive(new Map<number, number>());

    // 全选与反选事件
    function allSelect() {
        // 已经全选情况下,就是反选,全选就说明长度一样
        if (selected.size === data.length) {
            selected.clear(); // 全部清除
            data.forEach((element) => {
                element.selected = false; // 全部不选,就行了
            });
        }
        // 还未全选的状态下
        else {
            data.forEach((element, index) => {
                // 因为可能存在部分已经选择了,所以得先判断是否已存在,不存在才需要添加
                if (!selected.has(index)) {
                    selected.set(index, element.id); // key是对应的下标index,而value是可以自定义的
                    element.selected = true; // 设为选中
                }
            });
        }
    }

    // 选项框点击事件,参数是数据的下标
    function checkbox(index: number) {
        // 选中的状态下再次点击,即为取消选中
        if (data[index].selected) {
            data[index].selected = false;
            selected.delete(index); // 然后删除对应key即可
        }
        // 未选中状态下点击
        else {
            data[index].selected = true;
            selected.set(index, data[index].id);
        }
}</script><style></style>It seems like a lot of code, but in fact it is all very basic logical judgments.
The final effect is like this:
Select all: 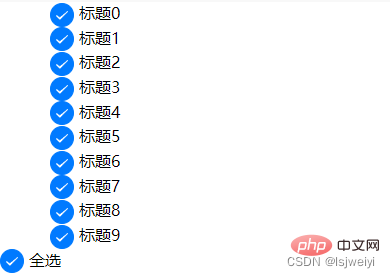
Multiple selection: 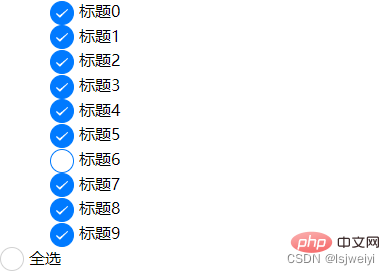
Inverse select all: 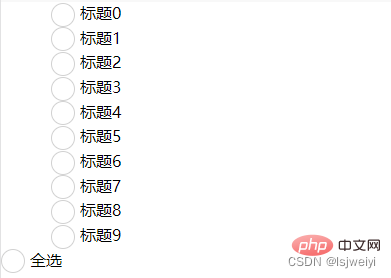
Recommended: "uniapp tutorial"
The above is the detailed content of Examples to explain how uniapp implements the all-select function of multi-select boxes. For more information, please follow other related articles on the PHP Chinese website!

Hot AI Tools

Undresser.AI Undress
AI-powered app for creating realistic nude photos

AI Clothes Remover
Online AI tool for removing clothes from photos.

Undress AI Tool
Undress images for free

Clothoff.io
AI clothes remover

Video Face Swap
Swap faces in any video effortlessly with our completely free AI face swap tool!

Hot Article
Hot Tools

Notepad++7.3.1
Easy-to-use and free code editor

SublimeText3 Chinese version
Chinese version, very easy to use

Zend Studio 13.0.1
Powerful PHP integrated development environment

Dreamweaver CS6
Visual web development tools

SublimeText3 Mac version
God-level code editing software (SublimeText3)
Hot Topics


 How to develop uni-app in VSCode? (Tutorial sharing)
May 13, 2022 pm 08:11 PM
How to develop uni-app in VSCode? (Tutorial sharing)
May 13, 2022 pm 08:11 PM
How to develop uni-app in VSCode? The following article will share with you a tutorial on developing uni-app in VSCode. This may be the best and most detailed tutorial. Come and take a look!
 Use uniapp to develop a simple map navigation
Jun 09, 2022 pm 07:46 PM
Use uniapp to develop a simple map navigation
Jun 09, 2022 pm 07:46 PM
How to use uniapp to develop a simple map navigation? This article will provide you with an idea for making a simple map. I hope it will be helpful to you!
 Let's talk about how to use uniapp to develop a snake game!
May 20, 2022 pm 07:56 PM
Let's talk about how to use uniapp to develop a snake game!
May 20, 2022 pm 07:56 PM
How to use uniapp to develop a snake game? The following article will take you step by step to implement the Snake game in uniapp. I hope it will be helpful to you!
 How to encapsulate uni-app vue3 interface request
May 11, 2023 pm 07:28 PM
How to encapsulate uni-app vue3 interface request
May 11, 2023 pm 07:28 PM
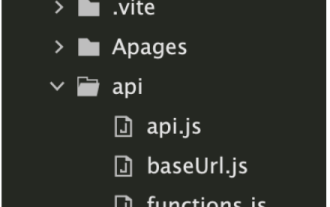
uni-app interface, global method encapsulation 1. Create an api file in the root directory, create api.js, baseUrl.js and http.js files in the api folder 2.baseUrl.js file code exportdefault"https://XXXX .test03.qcw800.com/api/"3.http.js file code exportfunctionhttps(opts,data){lethttpDefaultOpts={url:opts.url,data:data,method:opts.method
 Examples to explain how uniapp implements the all-select function of multi-select boxes
Jun 22, 2022 am 11:57 AM
Examples to explain how uniapp implements the all-select function of multi-select boxes
Jun 22, 2022 am 11:57 AM
This article brings you relevant knowledge about uniapp, which mainly organizes the related issues of implementing the select-all function of the multi-select box. The reason why the select-all function cannot be implemented is that when the checked field of the checkbox is dynamically modified, the status on the interface can Real-time changes, but the change event of checkbox-group cannot be triggered. Let's take a look at it. I hope it will be helpful to everyone.
 Take you step by step to develop a uni-app calendar plug-in (and publish it)
Jun 30, 2022 pm 08:13 PM
Take you step by step to develop a uni-app calendar plug-in (and publish it)
Jun 30, 2022 pm 08:13 PM
This article will guide you step by step in developing a uni-app calendar plug-in, and introduce how the next calendar plug-in is developed from development to release. I hope it will be helpful to you!
 Let's talk about uniapp's scroll-view drop-down loading
Jul 14, 2022 pm 09:07 PM
Let's talk about uniapp's scroll-view drop-down loading
Jul 14, 2022 pm 09:07 PM
How does uniapp implement scroll-view drop-down loading? The following article talks about the drop-down loading of the uniapp WeChat applet scroll-view. I hope it will be helpful to everyone!
 Detailed example of how uniapp implements phone recording function (with code)
Jan 05, 2023 pm 04:41 PM
Detailed example of how uniapp implements phone recording function (with code)
Jan 05, 2023 pm 04:41 PM
This article brings you relevant knowledge about uniapp. It mainly introduces how to use uniapp to make calls and synchronize recording. Friends who are interested should take a look at it. I hope it will be helpful to everyone.
