Introduction to AUTH permission management in THINKPHP

The principle of AUTH permission management
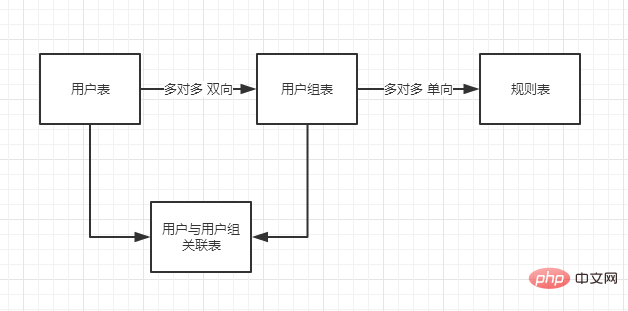
The four simplest data tables of auth permission management are as follows

Each function corresponds to a url path. The rule table actually records the url path and implements permission management through the url
Classification of permission verification timing
Pre-verification
The so-called pre-authentication means that the permissions of the currently accessible internal elements of the page are verified before they are displayed. For example: when visitors visit a web page, they cannot see a certain function menu, but administrators can see it, etc. The user experience of pre-verification is good, but the performance is poor
Post-authentication
The so-called post-authentication is simple, that is, the permissions are verified first when accessing each function . For example, click the 'Add Column' button on the page, verify it first, and then execute the add column function code after passing it. Post-verification user experience is poor, but performance is good
Permission verification code implementation location
After the user successfully logs in to the backend, all menu, navigation, and button operations in the backend will be Permission verification is required
But the backend home page, welcome page, user exit and other functions do not require permission verification, which can be customized according to specific project requirements
The difference between AUTH permission management and RBAC permission management
Similar points: both are role-based permission management
Differences: The design of the data table is different, resulting in more flexible AUTH and more delicate permission management
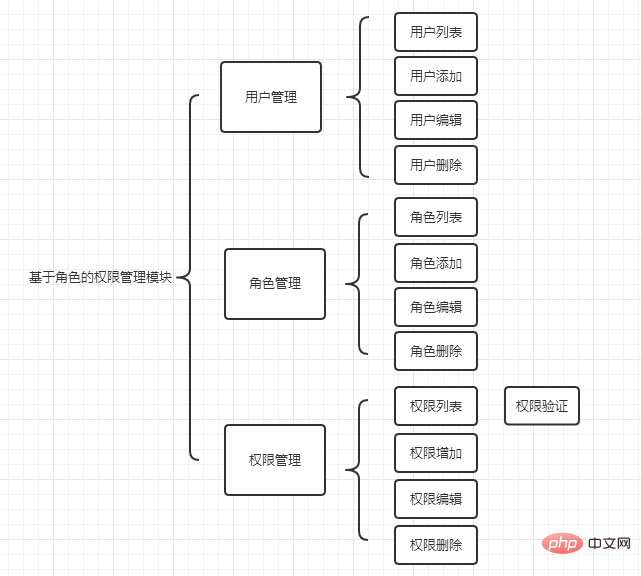
Permission module design

Recommended tutorial: "TP5"
The above is the detailed content of Introduction to AUTH permission management in THINKPHP. For more information, please follow other related articles on the PHP Chinese website!

Hot AI Tools

Undresser.AI Undress
AI-powered app for creating realistic nude photos

AI Clothes Remover
Online AI tool for removing clothes from photos.

Undress AI Tool
Undress images for free

Clothoff.io
AI clothes remover

Video Face Swap
Swap faces in any video effortlessly with our completely free AI face swap tool!

Hot Article

Hot Tools

Notepad++7.3.1
Easy-to-use and free code editor

SublimeText3 Chinese version
Chinese version, very easy to use

Zend Studio 13.0.1
Powerful PHP integrated development environment

Dreamweaver CS6
Visual web development tools

SublimeText3 Mac version
God-level code editing software (SublimeText3)

Hot Topics
 How to run thinkphp project
Apr 09, 2024 pm 05:33 PM
To run the ThinkPHP project, you need to: install Composer; use Composer to create the project; enter the project directory and execute php bin/console serve; visit http://localhost:8000 to view the welcome page.
 There are several versions of thinkphp
Apr 09, 2024 pm 06:09 PM
ThinkPHP has multiple versions designed for different PHP versions. Major versions include 3.2, 5.0, 5.1, and 6.0, while minor versions are used to fix bugs and provide new features. The latest stable version is ThinkPHP 6.0.16. When choosing a version, consider the PHP version, feature requirements, and community support. It is recommended to use the latest stable version for best performance and support.
 How to run thinkphp
Apr 09, 2024 pm 05:39 PM
Steps to run ThinkPHP Framework locally: Download and unzip ThinkPHP Framework to a local directory. Create a virtual host (optional) pointing to the ThinkPHP root directory. Configure database connection parameters. Start the web server. Initialize the ThinkPHP application. Access the ThinkPHP application URL and run it.
 Which one is better, laravel or thinkphp?
Apr 09, 2024 pm 03:18 PM
Performance comparison of Laravel and ThinkPHP frameworks: ThinkPHP generally performs better than Laravel, focusing on optimization and caching. Laravel performs well, but for complex applications, ThinkPHP may be a better fit.
 Development suggestions: How to use the ThinkPHP framework to implement asynchronous tasks
Nov 22, 2023 pm 12:01 PM
"Development Suggestions: How to Use the ThinkPHP Framework to Implement Asynchronous Tasks" With the rapid development of Internet technology, Web applications have increasingly higher requirements for handling a large number of concurrent requests and complex business logic. In order to improve system performance and user experience, developers often consider using asynchronous tasks to perform some time-consuming operations, such as sending emails, processing file uploads, generating reports, etc. In the field of PHP, the ThinkPHP framework, as a popular development framework, provides some convenient ways to implement asynchronous tasks.
 How to install thinkphp
Apr 09, 2024 pm 05:42 PM
ThinkPHP installation steps: Prepare PHP, Composer, and MySQL environments. Create projects using Composer. Install the ThinkPHP framework and dependencies. Configure database connection. Generate application code. Launch the application and visit http://localhost:8000.
 How is the performance of thinkphp?
Apr 09, 2024 pm 05:24 PM
ThinkPHP is a high-performance PHP framework with advantages such as caching mechanism, code optimization, parallel processing and database optimization. Official performance tests show that it can handle more than 10,000 requests per second and is widely used in large-scale websites and enterprise systems such as JD.com and Ctrip in actual applications.
 Development suggestions: How to use the ThinkPHP framework for API development
Nov 22, 2023 pm 05:18 PM
Development suggestions: How to use the ThinkPHP framework for API development. With the continuous development of the Internet, the importance of API (Application Programming Interface) has become increasingly prominent. API is a bridge for communication between different applications. It can realize data sharing, function calling and other operations, and provides developers with a relatively simple and fast development method. As an excellent PHP development framework, the ThinkPHP framework is efficient, scalable and easy to use.


