
 Backend Development
Python Tutorial
A brief introduction to preprocessing and heatmaps in python
Backend Development
Python Tutorial
A brief introduction to preprocessing and heatmaps in python
A brief introduction to preprocessing and heatmaps in python

This article brings you a brief introduction to preprocessing and heat maps in python. It has certain reference value. Friends in need can refer to it. I hope it will be helpful to you.
There are still a lot of things in data analysis. I am just giving a heuristic introduction here. After understanding this aspect, I can find solutions faster when using them. I hope that Helpful to everyone.
This time, we still use the iris data set in sklearn and display it through a heat map.
Preprocessing
sklearn.preprocessing is the preprocessing module in the machine learning library. It can standardize, regularize, etc. the data and use it according to needs. Here its standardized method is used to organize the data. Other methods can be queried by yourself.
Standardization: Adjust the distribution of feature data to a standard normal distribution, also called Gaussian distribution, which means that the mean of the data is 0 and the variance is 1.
The reason for standardization is that if the variance of some features is too large, it will dominate the objective function and prevent the parameter estimator from learning other features correctly.
The standardization process is two steps: decentralization of the mean (the mean becomes 0); scaling of the variance (the variance becomes 1).
A scale method is provided in sklearn.preprocessing to achieve the above functions.
Let’s take an example:
from sklearn import preprocessing
import numpy as np
# 创建一组特征数据,每一行表示一个样本,每一列表示一个特征
xx = np.array([[1., -1., 2.],
              [2., 0., 0.],
              [0., 1., -1.]])
# 将每一列特征标准化为标准正太分布,注意,标准化是针对每一列而言的
xx_scale = preprocessing.scale(xx)
xx_scaleThe result after normalizing the data in each column is:
array([[ 0.        , -1.22474487,  1.33630621],
       [ 1.22474487,  0.        , -0.26726124],
[-1.22474487, 1.22474487, -1.06904497]])You can see that the data inside has occurred The changes, the numerical values are relatively small, maybe someone can see it at a glance, but it doesn’t matter if they can’t see it. Python can easily calculate some of their statistics.
 # 测试一下xx_scale每列的均值方差
 print('均值:', xx_scale.mean(axis=0))  # axis=0指列,axis=1指行
 print('方差:', xx_scale.std(axis=0))
The above has introduced what standardization is to be converted into, and the results are indeed consistent. The results of calculating the mean and variance by column are:
均值: [0. 0. 0.]
方差: [1. 1. 1.]
Of course, for standardization, the variance and mean It doesn’t have to be done together. For example, sometimes you just want to benefit from one of the methods. There is also a way:
with_mean,with_std. Both of these are boolean parameters, and they are both true by default, but It can also be customized to false. That is, do not want mean centering or variance scaling to 1.
heatmap
I will only briefly mention the heatmap here. Because there is already a lot of detailed information about it on the Internet.
In a heat map, the data exists in the form of a matrix, and the attribute range is represented by a gradient of color. Here, pcolor is used to draw the heat map.
小 Lizi
Still start from the import library, then load the data set, process the data, then draw the image, make some annotations and decorations on the image, etc. I am used to making comments in the code. If there is anything you don’t understand, you can leave a message and I will reply in time.
# 导入后续所需要的库
from sklearn.datasets import load_iris
from sklearn.preprocessing import scale
import numpy as np
import matplotlib.pyplot as plt
# 加载数据集
data = load_iris()
x = data['data']
y = data['target']
col_names = data['feature_names']
# 数据预处理
# 根据平均值对数据进行缩放
x = scale(x, with_std=False)
x_ = x[1:26,] # 选取其中25组数据
y_labels = range(1, 26)
# 绘制热图
plt.close('all')
plt.figure(1)
fig, ax = plt.subplots()
ax.pcolor(x_, cmap=plt.cm.Greens, edgecolors='k')
ax.set_xticks(np.arange(0, x_.shape[1])+0.5) # 设置横纵坐标
ax.set_yticks(np.arange(0, x_.shape[0])+0.5)
ax.xaxis.tick_top() # x轴提示显示在图形上方
ax.yaxis.tick_left() # y轴提示显示在图形的左侧
ax.set_xticklabels(col_names, minor=False, fontsize=10) # 传递标签数据
ax.set_yticklabels(y_labels, minor=False, fontsize=10)
plt.show()
So what does the drawn image look like:
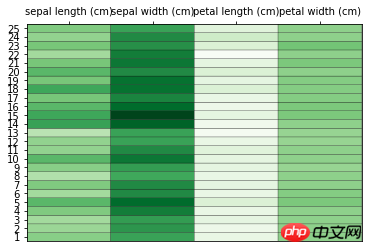
Just follow these simple steps The data draws an intuitive image. Of course, it will not be so simple when it is actually used, and more knowledge needs to be expanded.
The above is the detailed content of A brief introduction to preprocessing and heatmaps in python. For more information, please follow other related articles on the PHP Chinese website!

Hot AI Tools

Undresser.AI Undress
AI-powered app for creating realistic nude photos

AI Clothes Remover
Online AI tool for removing clothes from photos.

Undress AI Tool
Undress images for free

Clothoff.io
AI clothes remover

Video Face Swap
Swap faces in any video effortlessly with our completely free AI face swap tool!

Hot Article
Hot Tools

Notepad++7.3.1
Easy-to-use and free code editor

SublimeText3 Chinese version
Chinese version, very easy to use

Zend Studio 13.0.1
Powerful PHP integrated development environment

Dreamweaver CS6
Visual web development tools

SublimeText3 Mac version
God-level code editing software (SublimeText3)
Hot Topics


 PHP and Python: Different Paradigms Explained
Apr 18, 2025 am 12:26 AM
PHP and Python: Different Paradigms Explained
Apr 18, 2025 am 12:26 AM
PHP is mainly procedural programming, but also supports object-oriented programming (OOP); Python supports a variety of paradigms, including OOP, functional and procedural programming. PHP is suitable for web development, and Python is suitable for a variety of applications such as data analysis and machine learning.
 Choosing Between PHP and Python: A Guide
Apr 18, 2025 am 12:24 AM
Choosing Between PHP and Python: A Guide
Apr 18, 2025 am 12:24 AM
PHP is suitable for web development and rapid prototyping, and Python is suitable for data science and machine learning. 1.PHP is used for dynamic web development, with simple syntax and suitable for rapid development. 2. Python has concise syntax, is suitable for multiple fields, and has a strong library ecosystem.
 Python vs. JavaScript: The Learning Curve and Ease of Use
Apr 16, 2025 am 12:12 AM
Python vs. JavaScript: The Learning Curve and Ease of Use
Apr 16, 2025 am 12:12 AM
Python is more suitable for beginners, with a smooth learning curve and concise syntax; JavaScript is suitable for front-end development, with a steep learning curve and flexible syntax. 1. Python syntax is intuitive and suitable for data science and back-end development. 2. JavaScript is flexible and widely used in front-end and server-side programming.
 PHP and Python: A Deep Dive into Their History
Apr 18, 2025 am 12:25 AM
PHP and Python: A Deep Dive into Their History
Apr 18, 2025 am 12:25 AM
PHP originated in 1994 and was developed by RasmusLerdorf. It was originally used to track website visitors and gradually evolved into a server-side scripting language and was widely used in web development. Python was developed by Guidovan Rossum in the late 1980s and was first released in 1991. It emphasizes code readability and simplicity, and is suitable for scientific computing, data analysis and other fields.
 Can vs code run in Windows 8
Apr 15, 2025 pm 07:24 PM
Can vs code run in Windows 8
Apr 15, 2025 pm 07:24 PM
VS Code can run on Windows 8, but the experience may not be great. First make sure the system has been updated to the latest patch, then download the VS Code installation package that matches the system architecture and install it as prompted. After installation, be aware that some extensions may be incompatible with Windows 8 and need to look for alternative extensions or use newer Windows systems in a virtual machine. Install the necessary extensions to check whether they work properly. Although VS Code is feasible on Windows 8, it is recommended to upgrade to a newer Windows system for a better development experience and security.
 Can visual studio code be used in python
Apr 15, 2025 pm 08:18 PM
Can visual studio code be used in python
Apr 15, 2025 pm 08:18 PM
VS Code can be used to write Python and provides many features that make it an ideal tool for developing Python applications. It allows users to: install Python extensions to get functions such as code completion, syntax highlighting, and debugging. Use the debugger to track code step by step, find and fix errors. Integrate Git for version control. Use code formatting tools to maintain code consistency. Use the Linting tool to spot potential problems ahead of time.
 How to run python with notepad
Apr 16, 2025 pm 07:33 PM
How to run python with notepad
Apr 16, 2025 pm 07:33 PM
Running Python code in Notepad requires the Python executable and NppExec plug-in to be installed. After installing Python and adding PATH to it, configure the command "python" and the parameter "{CURRENT_DIRECTORY}{FILE_NAME}" in the NppExec plug-in to run Python code in Notepad through the shortcut key "F6".
 How to run programs in terminal vscode
Apr 15, 2025 pm 06:42 PM
How to run programs in terminal vscode
Apr 15, 2025 pm 06:42 PM
In VS Code, you can run the program in the terminal through the following steps: Prepare the code and open the integrated terminal to ensure that the code directory is consistent with the terminal working directory. Select the run command according to the programming language (such as Python's python your_file_name.py) to check whether it runs successfully and resolve errors. Use the debugger to improve debugging efficiency.
