How to use vue+mint-ui in the project
This time I will show you how to use vue mint-ui in the project, and what are the precautions for using vue mint-ui in the project. The following is a practical case, let's take a look.
The use of mint-ui in vue is for your reference. The specific content is as follows
First put the mint-ui Chinese document
Recently in Using mint-ui, I found that the explanations of some plug-ins were not very detailed, and the codes used in some examples could not be found. The sharing on github contains all markdown files, and the content is the online document
I happen to be using it myself. The information I can find online is not very detailed, so I write it myself. Keep updating...emmmmm, it should be okay, I'm so lazy. Hope it can help others.
Introduce the features of mint-ui
Feature introduction
- ##Mint UI contains rich CSS and JS components, which can Meet daily mobile development needs. Through it, you can quickly build a page with a unified style and improve development efficiency.
- True loading of components on demand. You can load only the declared components and their style files, without worrying about the file size being too large.
- Taking into account the performance threshold of the mobile terminal, Mint UI uses CSS3 to handle various animations to avoid unnecessary redrawing and rearrangement of the browser, so that users can get a smooth experience. experience.
- Relying on Vue.js’ efficient componentization solution, Mint UI is lightweight. Even if all are imported, the compressed file size is only ~30kb (JS CSS) gzip.
1. How to use cell
First throw a picture ↓
<mt-cell title="开关状态">
 <mt-switch v-model="openValue" @change="changeStatus"></mt-switch>
</mt-cell>

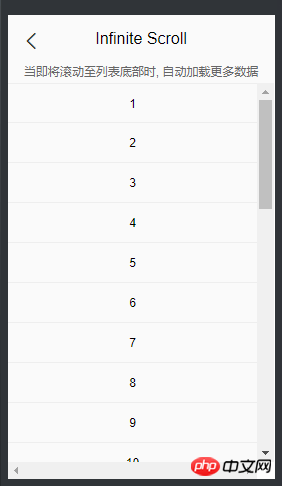
2. Use Infinite scroll with Navbar
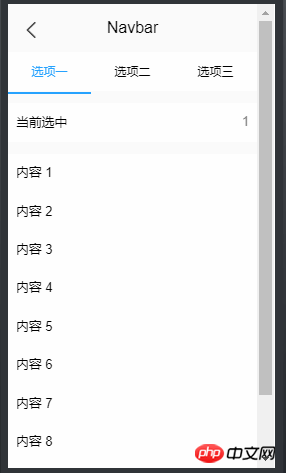
Navbar is like this↓

<mt-navbar v-model="selected" >
 <mt-tab-item id="1">选项一</mt-tab-item>
 <mt-tab-item id="2">选项二</mt-tab-item>
</mt-navbar>
<mt-tab-container v-model="selected">
 <mt-tab-container-item id="1">
 <p v-infinite-scroll="loadMore"
  infinite-scroll-disabled="loading"
  infinite-scroll-distance="10"
  class="content"
 >
 </p>
 </mt-tab-container-item>
 <mt-tab-container-item id="2">
 <p v-infinite-scroll="loadMoreReceive"
  infinite-scroll-disabled="loadingReceive"
  infinite-scroll-distance="10"
  class="content"
 >
 </p>
 </mt-tab-container-item>
</mt-tab-container>

v-if=selected == id, combine Infinite-scroll with the id and selected of the tab, and only when the selected selected corresponds to the id, the corresponding Infinite-Scroll.
The code of Infinite-Scroll is as follows:<p v-infinite-scroll="loadMore" infinite-scroll-disabled="loading" infinite-scroll-distance="10" class="content" v-if="selected == 1" >
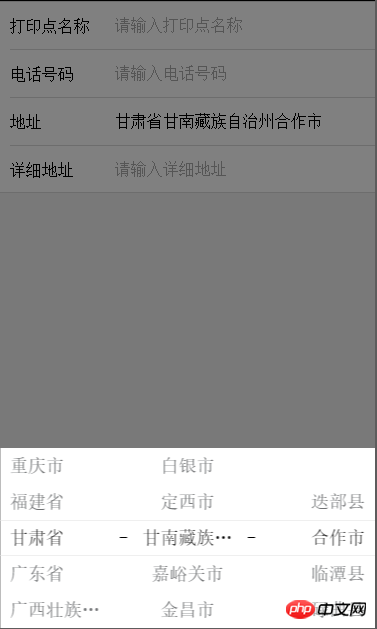
3. Picker, three-level linkage of address
There is a very simple three-level linkage here, but I couldn’t find it when I wanted to use it before. It’s so troublesome to write one myself. Picture first
首先获取地址
getRegion(){
 var root=this;
 <!-- 通过/region 接口获取三级地址,然后存入regionArr -->
 http.get("/region").then(function (data) {
 root.regionArr=data.data.data;
 <!-- 存放省 -->
 for(var i=0;i<root.regionArr.length;i++){
  root.region_province[i]=root.regionArr[i].value;
 }
 <!-- 存放市 -->
 for(var i=0;i<root.regionArr[0].children.length;i++){
  root.region_city[i]=root.regionArr[0].children[i].value;
 }
 <!-- 存放区 -->
 for(var i=0;i<root.regionArr[0].children[0].children.length;i++){
  root.region_zone[i]=root.regionArr[0].children[0].children[i].value;
 }
 root.region=[
  {
  flex: 1,
  values: root.region_province,
  textAlign: 'left',
  className:'picker_Slot'
  },
  {
  pider: true,
  content: '-',
  className: 'slot2'
  },
  {
  flex: 1,
  values: root.region_city,
  textAlign: 'center',
  className:'picker_Slot'
  },
  {
  pider: true,
  content: '-',
  className: 'slot2'
  },
  {
  flex: 1,
  values: root.region_zone,
  textAlign: 'right',
  className:'picker_Slot'
  }
 ]
 });
},然后设置三级地址
onValuesChange(picker, values) {
 var root=this;
 var str_1=[];
 var str_2=[];
 for(var i in root.regionArr){
 // 获取省,并重置市级名称
 if(root.regionArr[i].value == values[0]){
  for(var j in root.regionArr[i].children){
  str_1.push(root.regionArr[i].children[j].value);
  // 获取市级,并重置区级的名称
  if(root.regionArr[i].children[j].value == values[1]){
   // 当市级下不存在区名市,置空。
   if(root.regionArr[i].children[j].children != null){
   for(var k in root.regionArr[i].children[j].children){
    str_2.push(root.regionArr[i].children[j].children[k].value);
   }
   }else{
   str_2.push(" ");
   }
  }
  }
  picker.setSlotValues(1, str_1);
  picker.setSlotValues(2, str_2);
 }
 }
 // 赋值,初始时置为上一页返回的值
 root.$set(root.printerMessage,'province',values[0] == null ? root.printerMessage.province : values[0]);
 root.$set(root.printerMessage,'city',values[1] == null ? root.printerMessage.city : values[1]);
 root.$set(root.printerMessage,'area',values[2] == null ? root.printerMessage.area : values[2]);
}相信看了本文案例你已经掌握了方法,更多精彩请关注php中文网其它相关文章!
推荐阅读:
The above is the detailed content of How to use vue+mint-ui in the project. For more information, please follow other related articles on the PHP Chinese website!

Hot AI Tools

Undresser.AI Undress
AI-powered app for creating realistic nude photos

AI Clothes Remover
Online AI tool for removing clothes from photos.

Undress AI Tool
Undress images for free

Clothoff.io
AI clothes remover

Video Face Swap
Swap faces in any video effortlessly with our completely free AI face swap tool!

Hot Article

Hot Tools

Notepad++7.3.1
Easy-to-use and free code editor

SublimeText3 Chinese version
Chinese version, very easy to use

Zend Studio 13.0.1
Powerful PHP integrated development environment

Dreamweaver CS6
Visual web development tools

SublimeText3 Mac version
God-level code editing software (SublimeText3)

Hot Topics
 How to use bootstrap in vue
Apr 07, 2025 pm 11:33 PM
Using Bootstrap in Vue.js is divided into five steps: Install Bootstrap. Import Bootstrap in main.js. Use the Bootstrap component directly in the template. Optional: Custom style. Optional: Use plug-ins.
 How to add functions to buttons for vue
Apr 08, 2025 am 08:51 AM
You can add a function to the Vue button by binding the button in the HTML template to a method. Define the method and write function logic in the Vue instance.
 How to use watch in vue
Apr 07, 2025 pm 11:36 PM
The watch option in Vue.js allows developers to listen for changes in specific data. When the data changes, watch triggers a callback function to perform update views or other tasks. Its configuration options include immediate, which specifies whether to execute a callback immediately, and deep, which specifies whether to recursively listen to changes to objects or arrays.
 What does vue multi-page development mean?
Apr 07, 2025 pm 11:57 PM
Vue multi-page development is a way to build applications using the Vue.js framework, where the application is divided into separate pages: Code Maintenance: Splitting the application into multiple pages can make the code easier to manage and maintain. Modularity: Each page can be used as a separate module for easy reuse and replacement. Simple routing: Navigation between pages can be managed through simple routing configuration. SEO Optimization: Each page has its own URL, which helps SEO.
 How to reference js file with vue.js
Apr 07, 2025 pm 11:27 PM
There are three ways to refer to JS files in Vue.js: directly specify the path using the <script> tag;; dynamic import using the mounted() lifecycle hook; and importing through the Vuex state management library.
 How to return to previous page by vue
Apr 07, 2025 pm 11:30 PM
Vue.js has four methods to return to the previous page: $router.go(-1)$router.back() uses <router-link to="/" component window.history.back(), and the method selection depends on the scene.
 How to use vue traversal
Apr 07, 2025 pm 11:48 PM
There are three common methods for Vue.js to traverse arrays and objects: the v-for directive is used to traverse each element and render templates; the v-bind directive can be used with v-for to dynamically set attribute values for each element; and the .map method can convert array elements into new arrays.
 How to jump to the div of vue
Apr 08, 2025 am 09:18 AM
There are two ways to jump div elements in Vue: use Vue Router and add router-link component. Add the @click event listener and call this.$router.push() method to jump.


