

How to implement two-way binding of Vue data
这次给大家带来如何进行Vue数据双向绑定实现,进行Vue数据双向绑定实现的注意事项有哪些,下面就是实战案例,一起来看一下。
一、示例
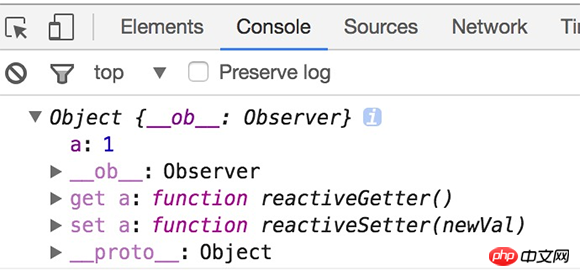
var vm = new Vue({
data: { obj: { a: 1
} },
created: function ()
{ console.log(this.obj);
} });
二、实现原理
vue数据双向绑定是通过数据劫持结合发布者-订阅者模式的方式来实现的.
1)数据劫持、vue是通过Object.defineProperty()来实现数据劫持,其中会有getter()和setter方法;当读取属性值时,就会触发getter()方法,在view中如果数据发生了变化,就会通过Object.defineProperty( )对属性设置一个setter函数,当数据改变了就会来触发这个函数;
三、实现步骤
1、实现Observer
ok, 思路已经整理完毕,也已经比较明确相关逻辑和模块功能了,let's do it
我们知道可以利用Obeject.defineProperty()来监听属性变动
那么将需要observe的数据对象进行递归遍历,包括子属性对象的属性,都加上 setter和getter
这样的话,给这个对象的某个值赋值,就会触发setter,那么就能监听到了数据变化。。相关代码可以是这样:
var data = {name: 'kindeng'};
observe(data);
data.name = 'dmq'; // 哈哈哈,监听到值变化了 kindeng --> dmq
function observe(data) {
 if (!data || typeof data !== 'object') {
  return;
 }
 // 取出所有属性遍历
 Object.keys(data).forEach(function(key) {
  defineReactive(data, key, data[key]);
 });
};
function defineReactive(data, key, val) {
 observe(val); // 监听子属性
 Object.defineProperty(data, key, {
  enumerable: true, // 可枚举
  configurable: false, // 不能再define
  get: function() {
   return val;
  },
  set: function(newVal) {
   console.log('哈哈哈,监听到值变化了 ', val, ' --> ', newVal);
   val = newVal;
  }
 });
}这样我们已经可以监听每个数据的变化了,那么监听到变化之后就是怎么通知订阅者了,所以接下来我们需要实现一个消息订阅器,很简单,维护一个数组,用来收集订阅者,数据变动触发notify,再调用订阅者的update方法,代码改善之后是这样:
// ... 省略
function defineReactive(data, key, val) {
 var dep = new Dep();
 observe(val); // 监听子属性
 Object.defineProperty(data, key, {
  // ... 省略
  set: function(newVal) {
   if (val === newVal) return;
   console.log('哈哈哈,监听到值变化了 ', val, ' --> ', newVal);
   val = newVal;
   dep.notify(); // 通知所有订阅者
  }
 });
}
function Dep() {
 this.subs = [];
}
Dep.prototype = {
 addSub: function(sub) {
  this.subs.push(sub);
 },
 notify: function() {
  this.subs.forEach(function(sub) {
   sub.update();
  });
 }
};那么问题来了,谁是订阅者?怎么往订阅器添加订阅者?
没错,上面的思路整理中我们已经明确订阅者应该是Watcher, 而且var dep = new Dep();是在 defineReactive方法内部定义的,所以想通过dep添加订阅者,就必须要在闭包内操作,所以我们可以在 getter里面动手脚:
// Observer.js
// ...省略
Object.defineProperty(data, key, {
 get: function() {
  // 由于需要在闭包内添加watcher,所以通过Dep定义一个全局target属性,暂存watcher, 添加完移除
  Dep.target && dep.addDep(Dep.target);
  return val;
 }
 // ... 省略
});
// Watcher.js
Watcher.prototype = {
 get: function(key) {
  Dep.target = this;
  this.value = data[key]; // 这里会触发属性的getter,从而添加订阅者
  Dep.target = null;
 }
}这里已经实现了一个Observer了,已经具备了监听数据和数据变化通知订阅者的功能,完整代码。那么接下来就是实现Compile了
2、实现Compile
compile主要做的事情是解析模板指令,将模板中的变量替换成数据,然后初始化渲染页面视图,并将每个指令对应的节点绑定更新函数,添加监听数据的订阅者,一旦数据有变动,收到通知,更新视图,如图所示:
图片描述
因为遍历解析的过程有多次操作dom节点,为提高性能和效率,会先将跟节点el转换成文档碎片fragment进行解析编译操作,解析完成,再将fragment添加回原来的真实dom节点中
function Compile(el) {
 this.$el = this.isElementNode(el) ? el : document.querySelector(el);
 if (this.$el) {
  this.$fragment = this.node2Fragment(this.$el);
  this.init();
  this.$el.appendChild(this.$fragment);
 }
}
Compile.prototype = {
 init: function() { this.compileElement(this.$fragment); },
 node2Fragment: function(el) {
  var fragment = document.createDocumentFragment(), child;
  // 将原生节点拷贝到fragment
  while (child = el.firstChild) {
   fragment.appendChild(child);
  }
  return fragment;
 }
};
compileElement方法将遍历所有节点及其子节点,进行扫描解析编译,调用对应的指令渲染函数进行数据渲染,并调用对应的指令更新函数进行绑定,详看代码及注释说明:
Compile.prototype = {
 // ... 省略
 compileElement: function(el) {
  var childNodes = el.childNodes, me = this;
  [].slice.call(childNodes).forEach(function(node) {
   var text = node.textContent;
   var reg = /\{\{(.*)\}\}/; // 表达式文本
   // 按元素节点方式编译
   if (me.isElementNode(node)) {
    me.compile(node);
   } else if (me.isTextNode(node) && reg.test(text)) {
    me.compileText(node, RegExp.$1);
   }
   // 遍历编译子节点
   if (node.childNodes && node.childNodes.length) {
    me.compileElement(node);
   }
  });
 },
 compile: function(node) {
  var nodeAttrs = node.attributes, me = this;
  [].slice.call(nodeAttrs).forEach(function(attr) {
   // 规定:指令以 v-xxx 命名
   // 如 <span v-text="content"></span> 中指令为 v-text
   var attrName = attr.name; // v-text
   if (me.isDirective(attrName)) {
    var exp = attr.value; // content
    var dir = attrName.substring(2); // text
    if (me.isEventDirective(dir)) {
     // 事件指令, 如 v-on:click
     compileUtil.eventHandler(node, me.$vm, exp, dir);
    } else {
     // 普通指令
     compileUtil[dir] && compileUtil[dir](node, me.$vm, exp);
    }
   }
  });
 }
};
// 指令处理集合
var compileUtil = {
 text: function(node, vm, exp) {
  this.bind(node, vm, exp, 'text');
 },
 // ...省略
 bind: function(node, vm, exp, dir) {
  var updaterFn = updater[dir + 'Updater'];
  // 第一次初始化视图
  updaterFn && updaterFn(node, vm[exp]);
  // 实例化订阅者,此操作会在对应的属性消息订阅器中添加了该订阅者watcher
  new Watcher(vm, exp, function(value, oldValue) {
   // 一旦属性值有变化,会收到通知执行此更新函数,更新视图
   updaterFn && updaterFn(node, value, oldValue);
  });
 }
};
// 更新函数
var updater = {
 textUpdater: function(node, value) {
  node.textContent = typeof value == 'undefined' ? '' : value;
 }
 // ...省略
};这里通过递归遍历保证了每个节点及子节点都会解析编译到,包括了{{}}表达式声明的文本节点。指令的声明规定是通过特定前缀的节点属性来标记,如<span v-text="content" other-attr中v-text便是指令,而other-attr不是指令,只是普通的属性。
监听数据、绑定更新函数的处理是在compileUtil.bind()这个方法中,通过new Watcher()添加回调来接收数据变化的通知
至此,一个简单的Compile就完成了,完整代码。接下来要看看Watcher这个订阅者的具体实现了
3、实现Watcher
Watcher订阅者作为Observer和Compile之间通信的桥梁,主要做的事情是:
1、在自身实例化时往属性订阅器(dep)里面添加自己
2、自身必须有一个update()方法
3、待属性变动dep.notice()通知时,能调用自身的update()方法,并触发Compile中绑定的回调,则功成身退。
如果有点乱,可以回顾下前面的思路整理
function Watcher(vm, exp, cb) {
 this.cb = cb;
 this.vm = vm;
 this.exp = exp;
 // 此处为了触发属性的getter,从而在dep添加自己,结合Observer更易理解
 this.value = this.get();
}
Watcher.prototype = {
 update: function() {
  this.run(); // 属性值变化收到通知
 },
 run: function() {
  var value = this.get(); // 取到最新值
  var oldVal = this.value;
  if (value !== oldVal) {
   this.value = value;
   this.cb.call(this.vm, value, oldVal); // 执行Compile中绑定的回调,更新视图
  }
 },
 get: function() {
  Dep.target = this; // 将当前订阅者指向自己
  var value = this.vm[exp]; // 触发getter,添加自己到属性订阅器中
  Dep.target = null; // 添加完毕,重置
  return value;
 }
};
// 这里再次列出Observer和Dep,方便理解
Object.defineProperty(data, key, {
 get: function() {
  // 由于需要在闭包内添加watcher,所以可以在Dep定义一个全局target属性,暂存watcher, 添加完移除
  Dep.target && dep.addDep(Dep.target);
  return val;
 }
 // ... 省略
});
Dep.prototype = {
 notify: function() {
  this.subs.forEach(function(sub) {
   sub.update(); // 调用订阅者的update方法,通知变化
  });
 }
};实例化Watcher的时候,调用get()方法,通过Dep.target = watcherInstance标记订阅者是当前watcher实例,强行触发属性定义的getter方法,getter方法执行的时候,就会在属性的订阅器dep添加当前watcher实例,从而在属性值有变化的时候,watcherInstance就能收到更新通知。
四、简单实现方法
<script> var obj = {} Object.defineProperty(obj, 'txt', { get: function () { return obj }, set: function (newValue) { document.getElementById('txt').value = newValue document.getElementById('show-txt').innerHTML = newValue } }) document.addEventListener('keyup', function (e) { obj.txt = e.target.value }) </script>
相信看了本文案例你已经掌握了方法,更多精彩请关注php中文网其它相关文章!
推荐阅读:
The above is the detailed content of How to implement two-way binding of Vue data. For more information, please follow other related articles on the PHP Chinese website!

Hot AI Tools

Undresser.AI Undress
AI-powered app for creating realistic nude photos

AI Clothes Remover
Online AI tool for removing clothes from photos.

Undress AI Tool
Undress images for free

Clothoff.io
AI clothes remover

Video Face Swap
Swap faces in any video effortlessly with our completely free AI face swap tool!

Hot Article
Hot Tools

Notepad++7.3.1
Easy-to-use and free code editor

SublimeText3 Chinese version
Chinese version, very easy to use

Zend Studio 13.0.1
Powerful PHP integrated development environment

Dreamweaver CS6
Visual web development tools

SublimeText3 Mac version
God-level code editing software (SublimeText3)
Hot Topics


 Use ddrescue to recover data on Linux
Mar 20, 2024 pm 01:37 PM
Use ddrescue to recover data on Linux
Mar 20, 2024 pm 01:37 PM
DDREASE is a tool for recovering data from file or block devices such as hard drives, SSDs, RAM disks, CDs, DVDs and USB storage devices. It copies data from one block device to another, leaving corrupted data blocks behind and moving only good data blocks. ddreasue is a powerful recovery tool that is fully automated as it does not require any interference during recovery operations. Additionally, thanks to the ddasue map file, it can be stopped and resumed at any time. Other key features of DDREASE are as follows: It does not overwrite recovered data but fills the gaps in case of iterative recovery. However, it can be truncated if the tool is instructed to do so explicitly. Recover data from multiple files or blocks to a single
 Open source! Beyond ZoeDepth! DepthFM: Fast and accurate monocular depth estimation!
Apr 03, 2024 pm 12:04 PM
Open source! Beyond ZoeDepth! DepthFM: Fast and accurate monocular depth estimation!
Apr 03, 2024 pm 12:04 PM
0.What does this article do? We propose DepthFM: a versatile and fast state-of-the-art generative monocular depth estimation model. In addition to traditional depth estimation tasks, DepthFM also demonstrates state-of-the-art capabilities in downstream tasks such as depth inpainting. DepthFM is efficient and can synthesize depth maps within a few inference steps. Let’s read about this work together ~ 1. Paper information title: DepthFM: FastMonocularDepthEstimationwithFlowMatching Author: MingGui, JohannesS.Fischer, UlrichPrestel, PingchuanMa, Dmytr
 Google is ecstatic: JAX performance surpasses Pytorch and TensorFlow! It may become the fastest choice for GPU inference training
Apr 01, 2024 pm 07:46 PM
Google is ecstatic: JAX performance surpasses Pytorch and TensorFlow! It may become the fastest choice for GPU inference training
Apr 01, 2024 pm 07:46 PM
The performance of JAX, promoted by Google, has surpassed that of Pytorch and TensorFlow in recent benchmark tests, ranking first in 7 indicators. And the test was not done on the TPU with the best JAX performance. Although among developers, Pytorch is still more popular than Tensorflow. But in the future, perhaps more large models will be trained and run based on the JAX platform. Models Recently, the Keras team benchmarked three backends (TensorFlow, JAX, PyTorch) with the native PyTorch implementation and Keras2 with TensorFlow. First, they select a set of mainstream
 Slow Cellular Data Internet Speeds on iPhone: Fixes
May 03, 2024 pm 09:01 PM
Slow Cellular Data Internet Speeds on iPhone: Fixes
May 03, 2024 pm 09:01 PM
Facing lag, slow mobile data connection on iPhone? Typically, the strength of cellular internet on your phone depends on several factors such as region, cellular network type, roaming type, etc. There are some things you can do to get a faster, more reliable cellular Internet connection. Fix 1 – Force Restart iPhone Sometimes, force restarting your device just resets a lot of things, including the cellular connection. Step 1 – Just press the volume up key once and release. Next, press the Volume Down key and release it again. Step 2 – The next part of the process is to hold the button on the right side. Let the iPhone finish restarting. Enable cellular data and check network speed. Check again Fix 2 – Change data mode While 5G offers better network speeds, it works better when the signal is weaker
 BTCC tutorial: How to bind and use MetaMask wallet on BTCC exchange?
Apr 26, 2024 am 09:40 AM
BTCC tutorial: How to bind and use MetaMask wallet on BTCC exchange?
Apr 26, 2024 am 09:40 AM
MetaMask (also called Little Fox Wallet in Chinese) is a free and well-received encryption wallet software. Currently, BTCC supports binding to the MetaMask wallet. After binding, you can use the MetaMask wallet to quickly log in, store value, buy coins, etc., and you can also get 20 USDT trial bonus for the first time binding. In the BTCCMetaMask wallet tutorial, we will introduce in detail how to register and use MetaMask, and how to bind and use the Little Fox wallet in BTCC. What is MetaMask wallet? With over 30 million users, MetaMask Little Fox Wallet is one of the most popular cryptocurrency wallets today. It is free to use and can be installed on the network as an extension
 Tesla robots work in factories, Musk: The degree of freedom of hands will reach 22 this year!
May 06, 2024 pm 04:13 PM
Tesla robots work in factories, Musk: The degree of freedom of hands will reach 22 this year!
May 06, 2024 pm 04:13 PM
The latest video of Tesla's robot Optimus is released, and it can already work in the factory. At normal speed, it sorts batteries (Tesla's 4680 batteries) like this: The official also released what it looks like at 20x speed - on a small "workstation", picking and picking and picking: This time it is released One of the highlights of the video is that Optimus completes this work in the factory, completely autonomously, without human intervention throughout the process. And from the perspective of Optimus, it can also pick up and place the crooked battery, focusing on automatic error correction: Regarding Optimus's hand, NVIDIA scientist Jim Fan gave a high evaluation: Optimus's hand is the world's five-fingered robot. One of the most dexterous. Its hands are not only tactile
 The vitality of super intelligence awakens! But with the arrival of self-updating AI, mothers no longer have to worry about data bottlenecks
Apr 29, 2024 pm 06:55 PM
The vitality of super intelligence awakens! But with the arrival of self-updating AI, mothers no longer have to worry about data bottlenecks
Apr 29, 2024 pm 06:55 PM
I cry to death. The world is madly building big models. The data on the Internet is not enough. It is not enough at all. The training model looks like "The Hunger Games", and AI researchers around the world are worrying about how to feed these data voracious eaters. This problem is particularly prominent in multi-modal tasks. At a time when nothing could be done, a start-up team from the Department of Renmin University of China used its own new model to become the first in China to make "model-generated data feed itself" a reality. Moreover, it is a two-pronged approach on the understanding side and the generation side. Both sides can generate high-quality, multi-modal new data and provide data feedback to the model itself. What is a model? Awaker 1.0, a large multi-modal model that just appeared on the Zhongguancun Forum. Who is the team? Sophon engine. Founded by Gao Yizhao, a doctoral student at Renmin University’s Hillhouse School of Artificial Intelligence.
 How to bind a sub-account on Xiaohongshu? How does it check whether the account is normal?
Mar 21, 2024 pm 10:11 PM
How to bind a sub-account on Xiaohongshu? How does it check whether the account is normal?
Mar 21, 2024 pm 10:11 PM
In today's era of information explosion, the construction of personal brand and corporate image has become increasingly important. As the leading fashion life sharing platform in China, Xiaohongshu has attracted a large number of user attention and participation. For those users who want to expand their influence and improve the efficiency of content dissemination, binding sub-accounts has become an effective means. So, how does Xiaohongshu bind a sub-account? How to check whether the account is normal? This article will answer these questions for you in detail. 1. How to bind a sub-account on Xiaohongshu? 1. Log in to your main account: First, you need to log in to your Xiaohongshu main account. 2. Open the settings menu: click "Me" in the upper right corner, and then select "Settings". 3. Enter account management: In the settings menu, find the "Account Management" or "Account Assistant" option and click
