

Detailed explanation of the steps to use Angular route guard
This time I will bring you a detailed explanation of the steps to use Angular routing guard. What are the precautions when using Angular routing guard? The following is a practical case, let's take a look.
1. Route Guard
Users are only allowed to enter or leave a route when they meet certain conditions.
Route guard scenario:
Only when user logs in and has certain permissions, certain routes can be entered.
A wizard composed of multiple forms, such as a registration process. Users can navigate to the next route only if they fill in the required information in the components of the current route.
Remind the user when the user attempts to leave the current navigation without performing a save operation.
Angular provides some hooks to help control entering or leaving routes. These hooks are routing guards, and the above scenarios can be realized through these hooks.
CanActivate: Handles navigation to a route.
CanDeactivate: Handles departure from the current route.
Resolve: Get routing data before routing activation.
Some attributes are used when configuring routing, path, component, outlet, children, routing guards are also routing attributes.
2. CanActivate
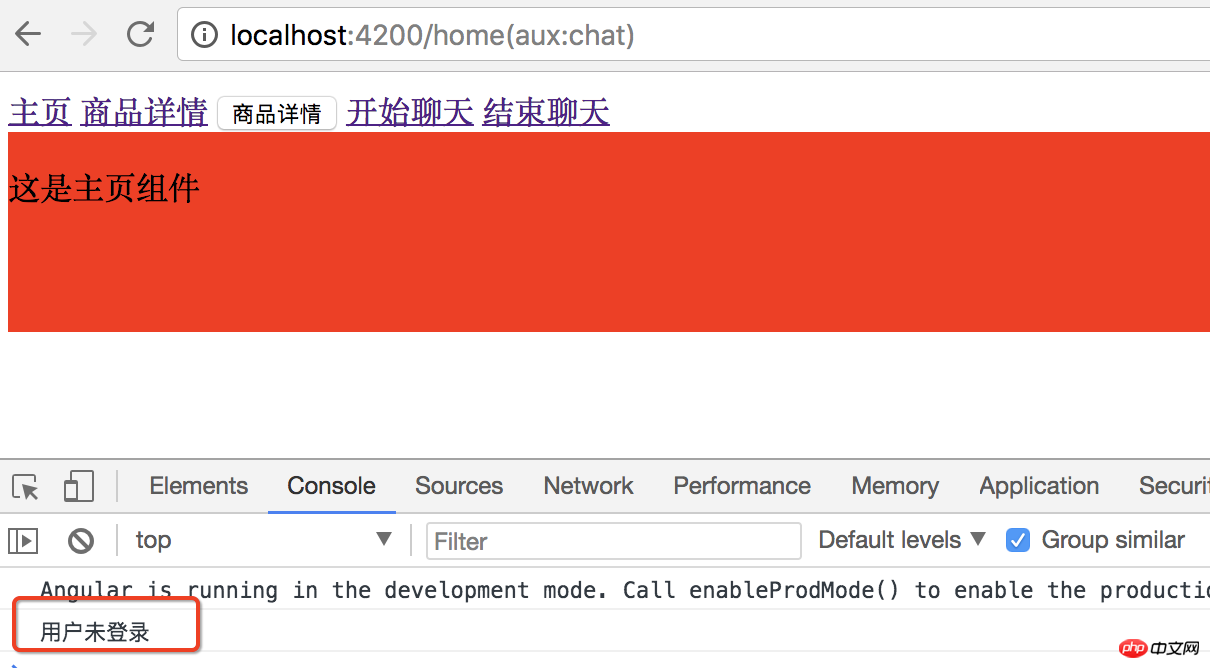
Example: Only allow logged-in users to enter product information routing.
Create a new guard directory. Create a new login.guard.ts in the directory.
The LoginGuard class implements the CanActivate interface and returns true or false. Angular determines whether the request passed or failed based on the return value.
import { CanActivate } from "@angular/router";
export class LoginGuard implements CanActivate{
  canActivate(){
    let loggedIn :boolean= Math.random()<0.5;
    if(!loggedIn){
      console.log("用户未登录");
    }
    return loggedIn;
  }
}Configure product routing. First add LoginGuard to providers and then specify the routing guard.
canActivate can specify multiple guards, and the value is an array.
const routes: Routes = [
 { path: '', redirectTo : 'home',pathMatch:'full' },
 { path: 'chat', component: ChatComponent, outlet: "aux"},//辅助路由
 { path: 'home', component: HomeComponent },
 { path: 'product/:id', component: ProductComponent, children:[
  { path: '', component : ProductDescComponent },
  { path: 'seller/:id', component : SellerInfoComponent }
 ] ,canActivate: [LoginGuard]},
 { path: '**', component: Code404Component }
];Effect: Click the Product details link console to remind the user that they are not logged in and cannot enter the product details route.
3. CanDeactivate
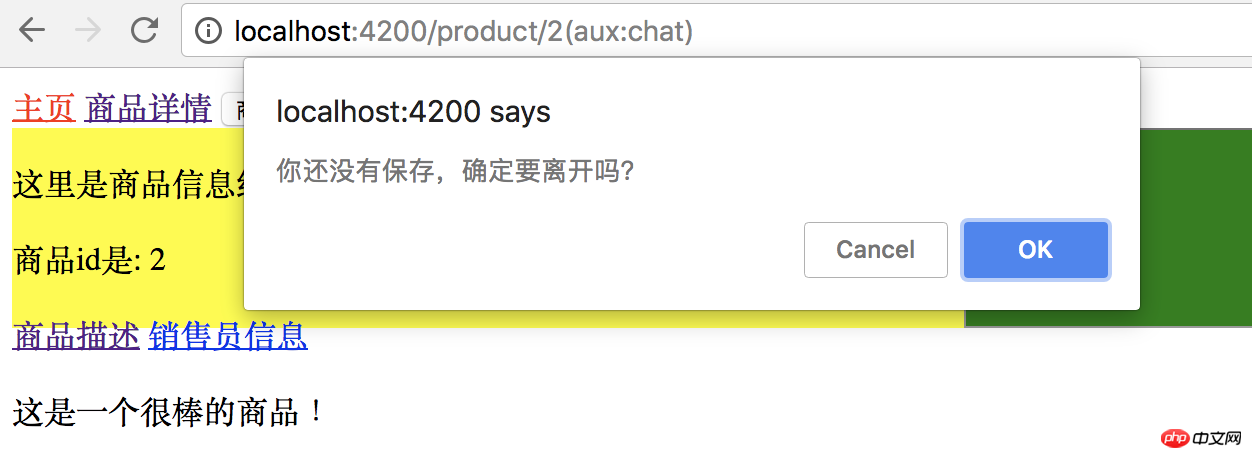
Route guard when leaving. Remind users to save before leaving.
Create a new unsave.guard.ts file in the guard directory.
The CanDeactivate interface has a generic type that specifies the type of the current component.
The first parameter of the CanDeactivate method is the component of the generic type specified by the interface. Based on the status of the component to be protected, or calling a method to determine whether the user can leave.
import { CanDeactivate } from "@angular/router";
import { ProductComponent } from "../product/product.component";
export class UnsaveGuard implements CanDeactivate<ProductComponent>{
  //第一个参数 范型类型的组件
  //根据当前要保护组件 的状态 判断当前用户是否能够离开
  canDeactivate(component: ProductComponent){
    return window.confirm('你还没有保存,确定要离开吗?');
  }
}To configure routing, add it to the provider first, and then configure the routing.
import { NgModule } from '@angular/core';
import { Routes, RouterModule } from '@angular/router';
import { HomeComponent } from './home/home.component';
import { ProductComponent } from './product/product.component';
import { Code404Component } from './code404/code404.component';
import { ProductDescComponent } from './product-desc/product-desc.component';
import { SellerInfoComponent } from './seller-info/seller-info.component';
import { ChatComponent } from './chat/chat.component';
import { LoginGuard } from './guard/login.guard';
import { UnsaveGuard } from './guard/unsave.guard';
const routes: Routes = [
 { path: '', redirectTo : 'home',pathMatch:'full' },
 { path: 'chat', component: ChatComponent, outlet: "aux"},//辅助路由
 { path: 'home', component: HomeComponent },
 { path: 'product/:id', component: ProductComponent, children:[
  { path: '', component : ProductDescComponent },
  { path: 'seller/:id', component : SellerInfoComponent }
 ] ,canActivate: [LoginGuard],
   canDeactivate: [UnsaveGuard]},
 { path: '**', component: Code404Component }
];
@NgModule({
 imports: [RouterModule.forRoot(routes)],
 exports: [RouterModule],
 providers: [LoginGuard,UnsaveGuard]
})
export class AppRoutingModule { }Effect:
Click ok to leave the current page, cancel to stay on the current page.
4. Resolve guard
There is a delay in returning http request data, resulting in the template not being displayed immediately.
Before the data is returned, all places on the template that need to use interpolation Expression to display the value of a controller are empty. The user experience is not good.
resolve Solution: Go to the server to read the data before entering the routing. After reading all the required data, enter the routing with the data and display the data immediately.
Example:
Before entering the product information routing, prepare the product information and then enter the routing. If you cannot get the information, or there is a problem getting the information, you will jump directly to the Error message page, or a prompt will pop up, and you will no longer enter the target route.
First declare the product information type in product.component.ts.
import { NgModule } from '@angular/core';
import { Routes, RouterModule } from '@angular/router';
import { HomeComponent } from './home/home.component';
import { ProductComponent } from './product/product.component';
import { Code404Component } from './code404/code404.component';
import { ProductDescComponent } from './product-desc/product-desc.component';
import { SellerInfoComponent } from './seller-info/seller-info.component';
import { ChatComponent } from './chat/chat.component';
import { LoginGuard } from './guard/login.guard';
import { UnsaveGuard } from './guard/unsave.guard';
const routes: Routes = [
 { path: '', redirectTo : 'home',pathMatch:'full' },
 { path: 'chat', component: ChatComponent, outlet: "aux"},//辅助路由
 { path: 'home', component: HomeComponent },
 { path: 'product/:id', component: ProductComponent, children:[
  { path: '', component : ProductDescComponent },
  { path: 'seller/:id', component : SellerInfoComponent }
 ] ,canActivate: [LoginGuard],
   canDeactivate: [UnsaveGuard]},
 { path: '**', component: Code404Component }
];
@NgModule({
 imports: [RouterModule.forRoot(routes)],
 exports: [RouterModule],
 providers: [LoginGuard,UnsaveGuard]
})
export class AppRoutingModule { }Create new product.resolve.ts in the guard directory. The ProductResolve class implements the Resolve interface.
Resolve must also declare a paradigm, which is the type of data to be parsed by resolve.
import { Resolve, ActivatedRouteSnapshot, RouterStateSnapshot, Router } from "@angular/router";
import { Injectable } from "@angular/core";
import { Observable } from "rxjs/Observable";
import { Product } from "../product/product.component";
@Injectable()
export class ProductResolve implements Resolve<Product>{
  constructor(private router: Router) {
  }
  resolve(route: ActivatedRouteSnapshot, state: RouterStateSnapshot): Observable<any> | Promise<any> | any {
    let productId: number = route.params["id"];
    if (productId == 2) { //正确id
      return new Product(1, "iPhone7");
    } else { //id不是1导航回首页
      this.router.navigate(["/home"]);
      return undefined;
    }
  }
}路由配置:Provider里声明,product路由里配置。
resolve是一个对象,对象里参数的名字就是想传入的参数的名字product,用ProductResolve来解析生成。
import { NgModule } from '@angular/core';
import { Routes, RouterModule } from '@angular/router';
import { HomeComponent } from './home/home.component';
import { ProductComponent } from './product/product.component';
import { Code404Component } from './code404/code404.component';
import { ProductDescComponent } from './product-desc/product-desc.component';
import { SellerInfoComponent } from './seller-info/seller-info.component';
import { ChatComponent } from './chat/chat.component';
import { LoginGuard } from './guard/login.guard';
import { UnsaveGuard } from './guard/unsave.guard';
import { ProductResolve } from './guard/product.resolve';
const routes: Routes = [
 { path: '', redirectTo : 'home',pathMatch:'full' },
 { path: 'chat', component: ChatComponent, outlet: "aux"},//辅助路由
 { path: 'home', component: HomeComponent },
 { path: 'product/:id', component: ProductComponent, children:[
  { path: '', component : ProductDescComponent },
  { path: 'seller/:id', component : SellerInfoComponent }
 ] ,
  // canActivate: [LoginGuard],
  // canDeactivate: [UnsaveGuard],
  resolve:{ //resolve是一个对象
   product : ProductResolve  //想传入product,product由ProductResolve生成
  }},
 { path: '**', component: Code404Component }
];
@NgModule({
 imports: [RouterModule.forRoot(routes)],
 exports: [RouterModule],
 providers: [LoginGuard,UnsaveGuard,ProductResolve]
})
export class AppRoutingModule { }修改一下product.component.ts 和模版,显示商品id和name。
import { Component, OnInit } from '@angular/core';
import { ActivatedRoute, Params } from '@angular/router';
@Component({
 selector: 'app-product',
 templateUrl: './product.component.html',
 styleUrls: ['./product.component.css']
})
export class ProductComponent implements OnInit {
 private productId: number;
 private productName: string;
 constructor(private routeInfo: ActivatedRoute) { }
 ngOnInit() {
  // this.routeInfo.params.subscribe((params: Params)=> this.productId=params["id"]);
  this.routeInfo.data.subscribe(
   (data:{product:Product})=>{
    this.productId=data.product.id;
    this.productName=data.product.name;
   }
  );
 }
}
export class Product{
 constructor(public id:number, public name:string){
 }
}<p class="product">
<p>
这里是商品信息组件
</p>
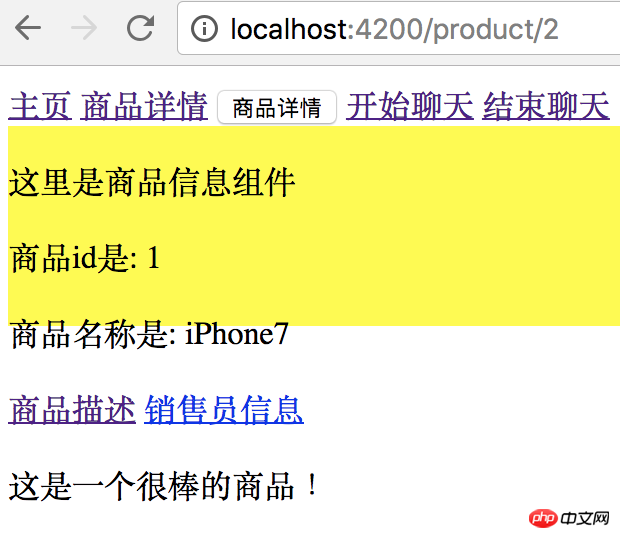
<p>
商品id是: {{productId}}
</p>
<p>
商品名称是: {{productName}}
</p>
<a [routerLink]="['./']">商品描述</a>
<a [routerLink]="['./seller',99]">销售员信息</a>
<router-outlet></router-outlet>
</p>效果:
点商品详情链接,传入商品ID为2,在resolve守卫中是正确id,会返回一条商品数据。
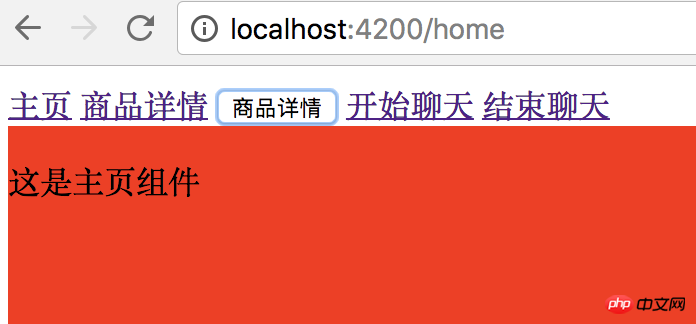
点商品详情按钮,传入商品ID是3,是错误id,会直接跳转到主页。
相信看了本文案例你已经掌握了方法,更多精彩请关注php中文网其它相关文章!
推荐阅读:
The above is the detailed content of Detailed explanation of the steps to use Angular route guard. For more information, please follow other related articles on the PHP Chinese website!

Hot AI Tools

Undresser.AI Undress
AI-powered app for creating realistic nude photos

AI Clothes Remover
Online AI tool for removing clothes from photos.

Undress AI Tool
Undress images for free

Clothoff.io
AI clothes remover

Video Face Swap
Swap faces in any video effortlessly with our completely free AI face swap tool!

Hot Article
Hot Tools

Notepad++7.3.1
Easy-to-use and free code editor

SublimeText3 Chinese version
Chinese version, very easy to use

Zend Studio 13.0.1
Powerful PHP integrated development environment

Dreamweaver CS6
Visual web development tools

SublimeText3 Mac version
God-level code editing software (SublimeText3)
Hot Topics


 How to make Google Maps the default map in iPhone
Apr 17, 2024 pm 07:34 PM
How to make Google Maps the default map in iPhone
Apr 17, 2024 pm 07:34 PM
The default map on the iPhone is Maps, Apple's proprietary geolocation provider. Although the map is getting better, it doesn't work well outside the United States. It has nothing to offer compared to Google Maps. In this article, we discuss the feasible steps to use Google Maps to become the default map on your iPhone. How to Make Google Maps the Default Map in iPhone Setting Google Maps as the default map app on your phone is easier than you think. Follow the steps below – Prerequisite steps – You must have Gmail installed on your phone. Step 1 – Open the AppStore. Step 2 – Search for “Gmail”. Step 3 – Click next to Gmail app
 Steps to upgrade to the latest version of WeChat (Easily master the upgrade method to the latest version of WeChat)
Jun 01, 2024 pm 10:24 PM
Steps to upgrade to the latest version of WeChat (Easily master the upgrade method to the latest version of WeChat)
Jun 01, 2024 pm 10:24 PM
WeChat is one of the social media platforms in China that continuously launches new versions to provide a better user experience. Upgrading WeChat to the latest version is very important to keep in touch with family and colleagues, to stay in touch with friends, and to keep abreast of the latest developments. 1. Understand the features and improvements of the latest version. It is very important to understand the features and improvements of the latest version before upgrading WeChat. For performance improvements and bug fixes, you can learn about the various new features brought by the new version by checking the update notes on the WeChat official website or app store. 2. Check the current WeChat version We need to check the WeChat version currently installed on the mobile phone before upgrading WeChat. Click to open the WeChat application "Me" and then select the menu "About" where you can see the current WeChat version number. 3. Open the app
 This Apple ID is not yet in use in the iTunes Store: Fix
Jun 10, 2024 pm 05:42 PM
This Apple ID is not yet in use in the iTunes Store: Fix
Jun 10, 2024 pm 05:42 PM
When logging into iTunesStore using AppleID, this error saying "This AppleID has not been used in iTunesStore" may be thrown on the screen. There are no error messages to worry about, you can fix them by following these solution sets. Fix 1 – Change Shipping Address The main reason why this prompt appears in iTunes Store is that you don’t have the correct address in your AppleID profile. Step 1 – First, open iPhone Settings on your iPhone. Step 2 – AppleID should be on top of all other settings. So, open it. Step 3 – Once there, open the “Payment & Shipping” option. Step 4 – Verify your access using Face ID. step
 What software is crystaldiskmark? -How to use crystaldiskmark?
Mar 18, 2024 pm 02:58 PM
What software is crystaldiskmark? -How to use crystaldiskmark?
Mar 18, 2024 pm 02:58 PM
CrystalDiskMark is a small HDD benchmark tool for hard drives that quickly measures sequential and random read/write speeds. Next, let the editor introduce CrystalDiskMark to you and how to use crystaldiskmark~ 1. Introduction to CrystalDiskMark CrystalDiskMark is a widely used disk performance testing tool used to evaluate the read and write speed and performance of mechanical hard drives and solid-state drives (SSD). Random I/O performance. It is a free Windows application and provides a user-friendly interface and various test modes to evaluate different aspects of hard drive performance and is widely used in hardware reviews
 Shazam app not working in iPhone: Fix
Jun 08, 2024 pm 12:36 PM
Shazam app not working in iPhone: Fix
Jun 08, 2024 pm 12:36 PM
Having issues with the Shazam app on iPhone? Shazam helps you find songs by listening to them. However, if Shazam isn't working properly or doesn't recognize the song, you'll have to troubleshoot it manually. Repairing the Shazam app won't take long. So, without wasting any more time, follow the steps below to resolve issues with Shazam app. Fix 1 – Disable Bold Text Feature Bold text on iPhone may be the reason why Shazam is not working properly. Step 1 – You can only do this from your iPhone settings. So, open it. Step 2 – Next, open the “Display & Brightness” settings there. Step 3 – If you find that “Bold Text” is enabled
 How to download foobar2000? -How to use foobar2000
Mar 18, 2024 am 10:58 AM
How to download foobar2000? -How to use foobar2000
Mar 18, 2024 am 10:58 AM
foobar2000 is a software that can listen to music resources at any time. It brings you all kinds of music with lossless sound quality. The enhanced version of the music player allows you to get a more comprehensive and comfortable music experience. Its design concept is to play the advanced audio on the computer The device is transplanted to mobile phones to provide a more convenient and efficient music playback experience. The interface design is simple, clear and easy to use. It adopts a minimalist design style without too many decorations and cumbersome operations to get started quickly. It also supports a variety of skins and Theme, personalize settings according to your own preferences, and create an exclusive music player that supports the playback of multiple audio formats. It also supports the audio gain function to adjust the volume according to your own hearing conditions to avoid hearing damage caused by excessive volume. Next, let me help you
 iPhone screenshots not working: How to fix it
May 03, 2024 pm 09:16 PM
iPhone screenshots not working: How to fix it
May 03, 2024 pm 09:16 PM
Screenshot feature not working on your iPhone? Taking a screenshot is very easy as you just need to hold down the Volume Up button and the Power button at the same time to grab your phone screen. However, there are other ways to capture frames on the device. Fix 1 – Using Assistive Touch Take a screenshot using the Assistive Touch feature. Step 1 – Go to your phone settings. Step 2 – Next, tap to open Accessibility settings. Step 3 – Open Touch settings. Step 4 – Next, open the Assistive Touch settings. Step 5 – Turn on Assistive Touch on your phone. Step 6 – Open “Customize Top Menu” to access it. Step 7 – Now you just need to link any of these functions to your screen capture. So click on the first
 Clock app missing in iPhone: How to fix it
May 03, 2024 pm 09:19 PM
Clock app missing in iPhone: How to fix it
May 03, 2024 pm 09:19 PM
Is the clock app missing from your phone? The date and time will still appear on your iPhone's status bar. However, without the Clock app, you won’t be able to use world clock, stopwatch, alarm clock, and many other features. Therefore, fixing missing clock app should be at the top of your to-do list. These solutions can help you resolve this issue. Fix 1 – Place the Clock App If you mistakenly removed the Clock app from your home screen, you can put the Clock app back in its place. Step 1 – Unlock your iPhone and start swiping to the left until you reach the App Library page. Step 2 – Next, search for “clock” in the search box. Step 3 – When you see “Clock” below in the search results, press and hold it and
