Table of Contents
Use webpack plug-in:HtmlWebpackPlugin
Home Web Front-end HTML Tutorial Webpack processing of html files

Webpack processing of html files

May 28, 2018 pm 05:45 PM
html webpack

This article will share with you about webpack's processing of html files. The steps are very detailed. Friends in need can refer to

  • Why to process html File
    All our methods are packaged under the dist folder, and our html is under the folder defined by ourselves. If we manually introduce the js in these dist folders one by one through src, then there are some It’s too unreliable

So the solution is:

Use webpack plug-in:HtmlWebpackPlugin

  • Step 1: Download

npm install --save-dev extract-text-webpack-plugin
Copy after login
Copy after login

Step 2: webpack.config.jsConfiguration

The configuration items of HtmlWebpackPlugin are:

##title{String} Title for the generated HTML documentfilename{String}The file to generate HTML for. You can specify the template file based on the directory template{String}inject{Boolean|String}Inject js resources into which part of the page. The values ​​are: true \ 'head' \ 'body' \ false. When true or 'body' is passed, all JavaScript resources will be Placed at the bottom of the body element. 'head' places the script in the head element favicon{String}Adds the given icon path to the output HTMLhash{Boolean}If true will webpack append a unique compilation hash to all included scripts and CSS files. This is very useful for cache clearingchunks{?}Put in the resource module you need to importexcludeChunks{?}Do not put some of your resource modules
NameTypeDescription

Intended goal: me The project is a project with multiple entry files. I hope that each entry page will introduce the corresponding js module and css

For example, the login page will introduce the login js and css, and the index will introduce the corresponding js and css

webpack.config.jsThe configuration is as follows:

const path = require('path');const webpack = require('webpack')const ExtractTextPlugin = require("extract-text-webpack-plugin");const HtmlWebpackPlugin = require('html-webpack-plugin');const configs = {
  entry:{    'commom':['./src/page/common/index.js'],    'index':['./src/page/index/index.js'],    'login':['./src/page/login/index.js']
  },
  output:{
    path:path.resolve(__dirname, 'dist'),
    filename:'js/[name].js'
  },
  module:{
    rules:[
      {
        test:/\.css$/,
        use:ExtractTextPlugin.extract({
          fallback: "style-loader",
          use: "css-loader"
        })
      }
    ]
  },
  plugins:[    //独立通用模块
    new webpack.optimize.CommonsChunkPlugin({
      name : 'common',
      filename : 'js/base.js'
    }),    //独立打包css
    new ExtractTextPlugin('css/[name].css'),    //对html模板进行处理,生成对应的html,引入需要的资源模块
    new HtmlWebpackPlugin({
      template:'./src/view/index.html',//模板文件
      filename:'view/login/index.html',//目标文件
      chunks:['commom','login'],//对应加载的资源
      inject:true,//资源加入到底部
      hash:true//加入版本号
    })
  ]
}
module.exports= configs
Copy after login
Copy after login

Then the packaging result is as follows


Webpack processing of html files

The generated target file:


Webpack processing of html files

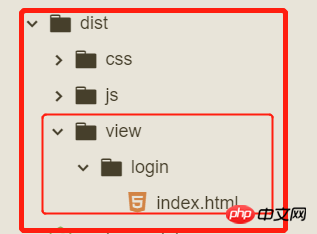
  • Why process html files

    All our methods are packaged under the dist folder, and our html is under the folder defined by ourselves. If we manually go to the src one by one Introducing the js in these dist folders is a bit too unreliable

So the solution is:

Use the webpack plug-in: HtmlWebpackPlugin

  • First step: Download

  • npm install --save-dev extract-text-webpack-plugin
    Copy after login
    Copy after login
Second step:

webpack.config.jsConfiguration

where HtmlWebpackPlugin Configuration items are:

NameTypeDescriptiontitle{String}Title for the generated HTML document##filenametemplateinjectfaviconhashchunksexcludeChunks

预期目标: 我的项目是一个多入口文件的项目,希望每一个入口页面引入对应的js模块和css
比如login页面引入login的js和css、index引入对应js和css

webpack.config.js配置如下:

const path = require('path');const webpack = require('webpack')const ExtractTextPlugin = require("extract-text-webpack-plugin");const HtmlWebpackPlugin = require('html-webpack-plugin');const configs = {
  entry:{    'commom':['./src/page/common/index.js'],    'index':['./src/page/index/index.js'],    'login':['./src/page/login/index.js']
  },
  output:{
    path:path.resolve(__dirname, 'dist'),
    filename:'js/[name].js'
  },
  module:{
    rules:[
      {
        test:/\.css$/,
        use:ExtractTextPlugin.extract({
          fallback: "style-loader",
          use: "css-loader"
        })
      }
    ]
  },
  plugins:[    //独立通用模块
    new webpack.optimize.CommonsChunkPlugin({
      name : 'common',
      filename : 'js/base.js'
    }),    //独立打包css
    new ExtractTextPlugin('css/[name].css'),    //对html模板进行处理,生成对应的html,引入需要的资源模块
    new HtmlWebpackPlugin({
      template:'./src/view/index.html',//模板文件
      filename:'view/login/index.html',//目标文件
      chunks:['commom','login'],//对应加载的资源
      inject:true,//资源加入到底部
      hash:true//加入版本号
    })
  ]
}
module.exports= configs
Copy after login
Copy after login

然后打包结果如下
Webpack processing of html files

其中生成的目标文件:
Webpack processing of html files

相关推荐:

在webpack中使用ECharts详解

Node.js、jade生成静态html文件实例

webpack的插件详解

The above is the detailed content of Webpack processing of html files. For more information, please follow other related articles on the PHP Chinese website!

Statement of this Website
The content of this article is voluntarily contributed by netizens, and the copyright belongs to the original author. This site does not assume corresponding legal responsibility. If you find any content suspected of plagiarism or infringement, please contact admin@php.cn

Hot AI Tools

Undresser.AI Undress

Undresser.AI Undress

AI-powered app for creating realistic nude photos

AI Clothes Remover

AI Clothes Remover

Online AI tool for removing clothes from photos.

Undress AI Tool

Undress AI Tool

Undress images for free

Clothoff.io

Clothoff.io

AI clothes remover

Video Face Swap

Video Face Swap

Swap faces in any video effortlessly with our completely free AI face swap tool!

Hot Tools

Notepad++7.3.1

Notepad++7.3.1

Easy-to-use and free code editor

SublimeText3 Chinese version

SublimeText3 Chinese version

Chinese version, very easy to use

Zend Studio 13.0.1

Zend Studio 13.0.1

Powerful PHP integrated development environment

Dreamweaver CS6

Dreamweaver CS6

Visual web development tools

SublimeText3 Mac version

SublimeText3 Mac version

God-level code editing software (SublimeText3)

Table Border in HTML Table Border in HTML Sep 04, 2024 pm 04:49 PM

Guide to Table Border in HTML. Here we discuss multiple ways for defining table-border with examples of the Table Border in HTML.

Nested Table in HTML Nested Table in HTML Sep 04, 2024 pm 04:49 PM

This is a guide to Nested Table in HTML. Here we discuss how to create a table within the table along with the respective examples.

HTML margin-left HTML margin-left Sep 04, 2024 pm 04:48 PM

Guide to HTML margin-left. Here we discuss a brief overview on HTML margin-left and its Examples along with its Code Implementation.

HTML Table Layout HTML Table Layout Sep 04, 2024 pm 04:54 PM

Guide to HTML Table Layout. Here we discuss the Values of HTML Table Layout along with the examples and outputs n detail.

HTML Input Placeholder HTML Input Placeholder Sep 04, 2024 pm 04:54 PM

Guide to HTML Input Placeholder. Here we discuss the Examples of HTML Input Placeholder along with the codes and outputs.

HTML Ordered List HTML Ordered List Sep 04, 2024 pm 04:43 PM

Guide to the HTML Ordered List. Here we also discuss introduction of HTML Ordered list and types along with their example respectively

Moving Text in HTML Moving Text in HTML Sep 04, 2024 pm 04:45 PM

Guide to Moving Text in HTML. Here we discuss an introduction, how marquee tag work with syntax and examples to implement.

HTML onclick Button HTML onclick Button Sep 04, 2024 pm 04:49 PM

Guide to HTML onclick Button. Here we discuss their introduction, working, examples and onclick Event in various events respectively.

See all articles
{String}The file to generate HTML. You can specify the template file based on the directory
{String}
{Boolean|String}Inject js resources into which part of the page. The values ​​are: true \ 'head' \ 'body' \ false. When true or 'body' is passed, all JavaScript resources will be Placed at the bottom of the body element. 'head' places the script in the head element
{String}Adds the given icon path to the output HTML
{Boolean}If true will webpack append a unique compilation hash to all included scripts and CSS files. This is very useful for cache clearing
{?}Put in the resource module you need to import
{?}Do not put some of your resource modules