

Detailed explanation of webpack plug-ins
This time I will bring you a detailed explanation of the webpack plug-in. What are the precautions for using the webpack plug-in? The following is a practical case, let's take a look.
1. Automatically build HTML, compress spaces, and add version numbers or random numbers to referenced js: html-webpack-plugin2. Process CSS: css-loader and style-loader
3. Processing LESS: less-loade and less
4. Extract css code into css file: extract-text-webpack-plugin
5. Server construction in development environment: webpack-dev-server
6. Parse the ES6 code: babel-core babel-preset-env babel-loader
7. Parse the new object functions of ES6: babel-polyfill
8. Parse the jsx syntax of react: babel-preset-react
9. Convert relative path to absolute path: nodejs path module
10. Add hash value to the file: [chunkhash], [hash]
11. Clear the output file before the output folder: clean-webpack-plugin
12. Module hot replacement: NamedModulesPlugin and HotModuleReplacementPlugin
13. Environment variables
14. Cross-platform use of environment variables: cross-env
15. Processing image paths: file-loader and html-loader
16. Image compression: image-webpack-loader
17. Locate source file code: source-map
18. Separate the production environment and development environment
Configuration file
webpack.config.js is as follows:
module.exports = {
  entry: './src/app.js',
  output: {
    path: dirname + '/dist',
    filename: 'app.bundle.js'
  },
  plugins: [new HtmlWebpackPlugin({
    template: './src/模板文件.html',
    filename: '构建的.html',
    minify: {
      collapseWhitespace: true,
    },
    hash: true,
  })]
};
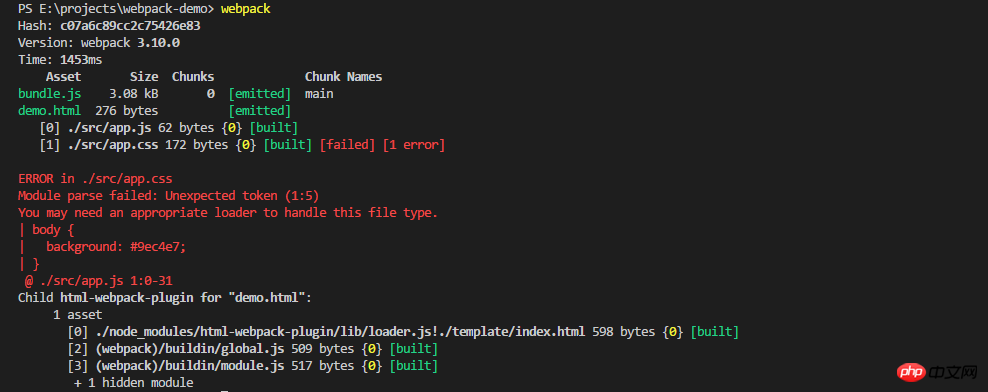
npm install --save-dev css-loader style-loader
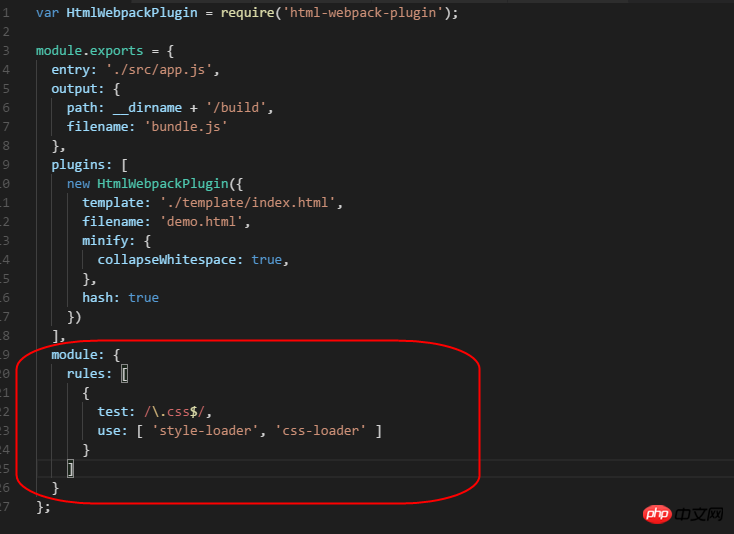
test represents the
regular expression that matches the file to be converted, and the figure shows that it matches all files ending with css. The use array represents which loaders are used to process these matched files.
The css-loader is responsible for loading css and packaging css into js.
The style-loader is responsible for generating: when js is running, the css code is injected into the dom through the style tag.
But using less-loader just converts LESS code into css code. If you want to package files into js, you still need to use the css-loader and style-loader mentioned above.
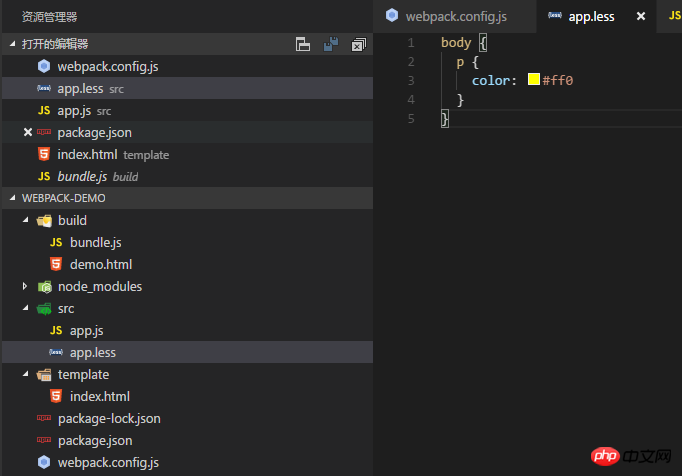
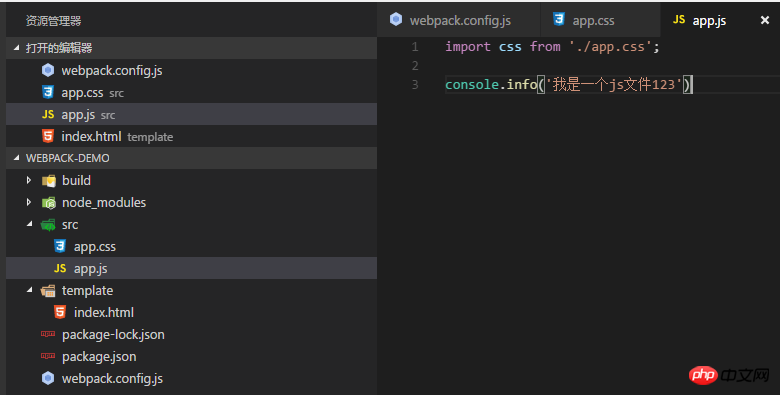
import styles from './app.less';
console.info('我是一个js文件123')npm i --save-dev less less-loader
module: {
  rules: [
    {
      test: /\.less$/,
      use: [ 'style-loader', 'css-loader', 'less-loader' ]
    }
  ]
}The plugin extract-text-webpack-plugin is now available.
First install
npm i --save-dev extract-text-webpack-plugin

与原配置对比可以发现,比html-webpack-plugin这个插件多做了一步,就是在匹配和转换规则里面的use中使用了ExtractTextPlugin.extract。
注意这里的fallback表示,在提取文件失败后,将继续使用style-loader去打包到js中。
此时运行webpack
可以发现输出目录build下生成了一个style.css文件,也就是我们在webpack.config.js中期望生成的文件,并且在生成的demo.html中被引用了。
5.开发环境下的服务器搭建:webpack-dev-server
webpack-dev-server可以在本地搭建一个简单的开发环境用的服务器,自动打开浏览器,而且还可以达到webpack -watch的效果。
首先安装一下:
npm i -g  webpack-dev-server
npm i --save-dev webpack-dev-server
这里不需要改动webpack.config.js,直接运行命令
webpack-dev-server
查看Detailed explanation of webpack plug-ins:
显示项目运行在http://localhost:8080/
webpack的输出目录的路径在/下面
并且这个服务器会自动识别输出目录下名为index的HTML文件,而我们之前输出的文件名为demo.html。
所以还需要将之前html-webpack-plugin中配置的filename改为index.html,或者直接用http://localhost:8080/demo.html也行。
当我们修改了源代码后,打开的网页还会自动更新。
为了更灵活的应用开发环境的服务器,也可以在webpack.config.js中加入如下代码: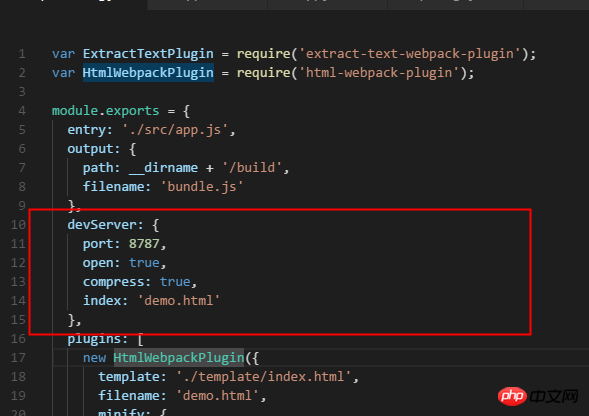
| devServer配置 | 功能 |
|---|---|
| port | 修改端口为8787,而不是默认的8080。 |
| open | 为true表示会自动打开浏览器,而不是需要我们再手动打开浏览器并在里面输入http://localhost:8080。 |
| compress | 对本地server返回的文件提供gzip压缩 |
| index | 指定网站首页映射的文件,默认为index.html |
6.解析ES6代码:babel-core babel-preset-env babel-loader
这里说是ES6,实际上可以认为是ECMAScript的高版本代码,只是代指而已。
babel的作用是将浏览器还未支持的这些高版本js代码转换成可以被指定浏览器支持的js代码。
这里列出可以转换的大致语法: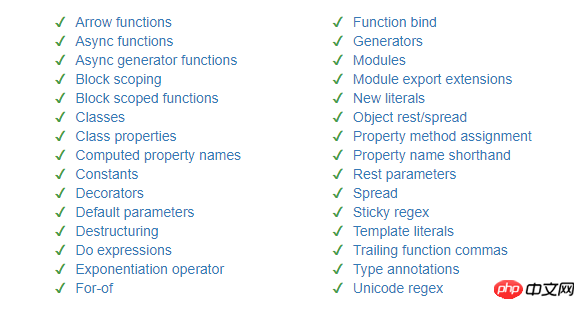
那么首先就需要安装babel
npm install babel-core babel-preset-env --save-dev
然后,为了和webpack结合起来,要用到babel-loader
npm install babel-loader --save-dev
然后在webpack.config.js的rules数组中增加以下代码:
{
  test: /\.js$/,
  exclude: /(node_modules)/,
  use: {
    loader: 'babel-loader',
    options: {
      presets: ['env']
    }
  }
}这行代码的意思是用babel-loader解析除了node_modules文件下的所有js文件。
而babel-loader就是用babel去解析js代码。
options的内容类似于.babelrc文件的配置,有了这个就不需要.babelrc文件了。
presets表示预处理器,现在的babel不像以前需要很多预处理器了,只需要env这一个就够了。
修改之前的app.js中的代码为:
console.info('我是一个js文件123')
const doSomething=() => {
  console.info('do do do')
}使用webpack命令后,可以看到我们最后的打包js文件中代码变成了这样:
7.解析ES6新增的对象函数:babel-polyfill
以下为这些新增函数: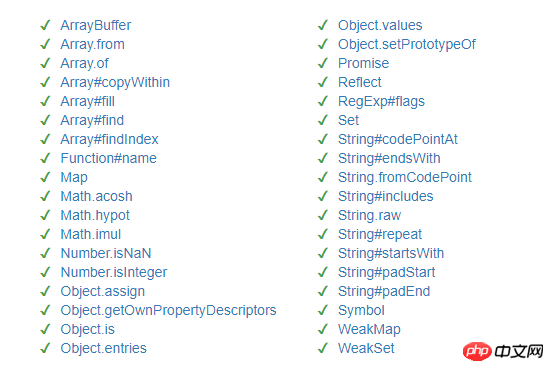
安装:
npm install --save-dev babel-polyfill
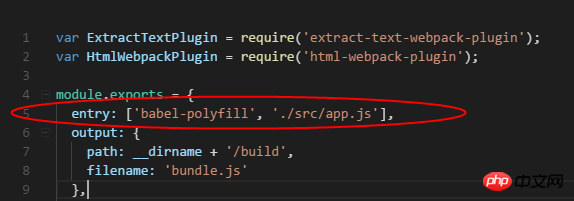
为了确保babel-polyfill被最先加载和解析,所以一般都是讲babel-polyfill在最开始的脚本中引入。
而在webpack中,就是在放到entry中,所以需要修改webpack.config.js中的配置为:
8.解析react的jsx语法:babel-preset-react
安装
npm install --save-dev babel-preset-react
配置: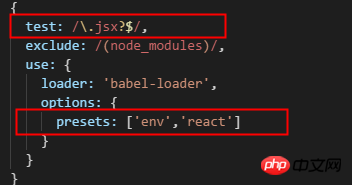
这里是匹配所有以js或者jsx结尾的文件,并用 babel-preset-env和babel-preset-react进行解析
9.转换相对路径到绝度路径:nodejs的path模块
这里首先介绍一下nodejs的path模块的一个功能:resolve。
将相对路径转换为绝对路径。
在最开始引用path模块
var path = require('path');然后可以在输出设置那里修改代码为:
  output: {
    path: path.resolve(dirname, 'build'),
    filename: 'bundle.js'
},和我们原来的代码没有任何区别。
10.给文件加上hash值:[chunkhash],[hash]
hash和chunkhash有区别,hash的话输出的文件用的都是同一个hash值,而chunkhash的话是根据模块来计算的,每个输出文件的hash值都不一样。
直接将输出文件改为
output: {
  path: path.resolve(dirname, 'build'),
  filename: 'bundle.[chunkhash].js'
},[chunkhash]就代表一串随机的hash值
11.清空输出文件夹之前的输出文件:clean-webpack-plugin
当我们像上面一样不断改变输出文件时,之前的输出文件并没有去掉。
为了解决这个问题就需要clean-webpack-plugin。
首先安装
npm i clean-webpack-plugin --save-dev
然后引用插件,并声明每次生成输出需要清空的文件夹
var CleanWebpackPlugin = require('clean-webpack-plugin');
var pathsToClean = [
  'build',
]再在插件配置中加入:
new CleanWebpackPlugin(pathsToClean)
12.模块热替换:NamedModulesPlugin和HotModuleReplacementPlugin
之前的webpack-dev-server提供了监听功能,只要代码改变,浏览器就会刷新。
但是模块热替换是不会刷新浏览器,只刷新修改到的那部分模块。
模块热替换无需安装。
首先需要引入模块
var webpack = require('webpack')其实插件中加入:
new webpack.NamedModulesPlugin(),
new webpack.HotModuleReplacementPlugin()
此时运行webpack可能会报错,我们需要把之前在输出环境中写的[chunkhash]改为[hash]
13.环境变量
可以在脚本中这么写:
"scripts": {
"dev": "webpack-dev-server",
"prod": "set NODE_ENV=production && webpack -p"
},
这样在webpack.config.js中这样修改上面的东西:
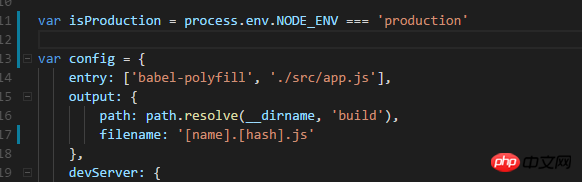
if (isProduction) {
    config.output.filename = 'bundle.[chunkhash].js'
} else {
    config.plugins.push(new webpack.NamedModulesPlugin())
    config.plugins.push(new webpack.HotModuleReplacementPlugin())
}这样就可以根据环境的不同来运行不同的配置
14.跨平台使用环境变量: cross-env
上述设置环境变量的脚本中只有在window下才有效,在linux和mac上需要使用
"prod": "NODE_ENV=production webpack -p"
为了解决这个问题,使得不同平台的人能公用一套代码,我们可以使用cross-env。
首先进行安装:
npm i --save-dev cross-env
然后命令直接使用类似于mac上的用法即可
"prod": "cross-env NODE_ENV=production webpack -p"
15.处理图片路径: file-loader和html-loader
file-loader可以用来处理图片和字体文件在css文件中的路径问题,输出的css文件中会引用输出的文件地址。
html-loader可以用来处理html中,比如img元素的图片路径问题。
首先安装
npm i --save-dev file-loader html-loader
配置:
        {
            test: /\.(gif|png|jpe?g|svg)$/i,
            use: {
                loader: 'file-loader',
                options: {
                    name: '[name].[ext]',
                    outputPath: 'src/images/'
                }
            }
        },
        {
            test: /\.html$/,
            use: [{
                loader: 'html-loader',
                options: {
                    minimize: true
                }
            }],
}16.图片压缩:image-webpack-loader
安装:
npm i --save-dev image-webpack-loader
配置:
    {
            test: /\.(gif|png|jpe?g|svg)$/i,
            use: [{
                    loader: 'file-loader',
                    options: {
                        name: '[name].[ext]',
                        outputPath: 'images/'
                    }
                },
                {
                    loader: 'image-webpack-loader',
                    options: {
                        bypassOnDebug: true,
                    }
                }
            ]
},这里的options中也可以具体配置各个图片类型的压缩质量
17.定位源文件代码:source-map
如果我们用web-dev-server运行我们的输出文件,发现其中有些BUG,然后打开开发者工具取定位文件的时候,只会定位到我们的输出文件。
而这些输出文件是经过处理的,我们只有找到我们的源文件代码,然后进行相应的修改才能解决问题。
于是这里我们需要用到source-map。
很简单,在webpack.config.js中加入如下配置即可:
devtool: 'source-map',
就这么简单,还不需要安装什么插件。
但是这只对js有效,如果我们的css出现错误了呢,答案就是如下配置: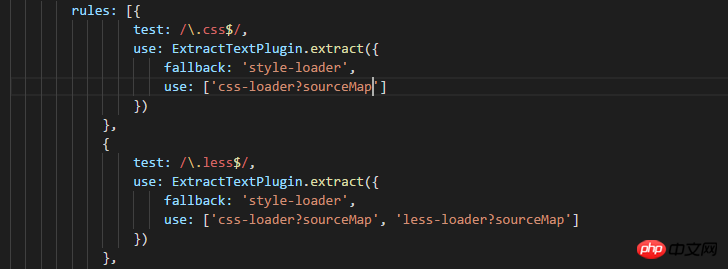
18.分离生产环境和开发环境的配置文件
之前我们通过在命令中设置环境变量,并且通过环境变量来判断环境来进行不同的配置。
现在我们用官方推荐的方法来分离生产环境和开发环境的配置文件。
我们将webpack.config.js分为三个文件
webpack.common.js
webpack.dev.js
webpack.prod.js
其中webpack.common.config.js为生产环境和开发环境共有的配置,dev为开发环境独有的配置,prod为生成环境独有的配置。
而想要合成真正的配置文件,还需要一个工具:webpack-merge。
npm install --save-dev webpack-merge
以下是我们之前的webpack.config.js代码:
var ExtractTextPlugin = require('extract-text-webpack-plugin')
var HtmlWebpackPlugin = require('html-webpack-plugin')
var CleanWebpackPlugin = require('clean-webpack-plugin')
var path = require('path')
var webpack = require('webpack')
var pathsToClean = [
    'build',
]
var isProduction = process.env.NODE_ENV === 'production'
var config = {
    entry: ['babel-polyfill', './src/app.js'],
    output: {
        path: path.resolve(dirname, 'build'),
        filename: '[name].[hash].js'
    },
    devtool: 'source-map',
    devServer: {
        port: 8787,
        open: true,
        compress: true,
        index: 'demo.html'
    },
    plugins: [
        new HtmlWebpackPlugin({
            template: './template/index.html',
            filename: 'demo.html',
            minify: {
                collapseWhitespace: true,
            },
            hash: true
        }),
        new ExtractTextPlugin({ filename: 'style.css', allChunks: false }),
        new CleanWebpackPlugin(pathsToClean)
    ],
    module: {
        rules: [{
                test: /\.css$/,
                use: ExtractTextPlugin.extract({
                    fallback: 'style-loader',
                    use: ['css-loader?sourceMap']
                })
            },
            {
                test: /\.less$/,
                use: ExtractTextPlugin.extract({
                    fallback: 'style-loader',
                    use: ['css-loader?sourceMap', 'less-loader?sourceMap']
                })
            },
            {
                test: /\.jsx?$/,
                exclude: /(node_modules)/,
                use: {
                    loader: 'babel-loader',
                    options: {
                        presets: ['env', 'react']
                    }
                }
            },
            {
                test: /\.(gif|png|jpe?g|svg)$/i,
                use: [{
                        loader: 'file-loader',
                        options: {
                            name: '[name].[ext]',
                            outputPath: 'images/'
                        }
                    },
                    {
                        loader: 'image-webpack-loader',
                        options: {
                            bypassOnDebug: true,
                        }
                    }
                ]
            },
            {
                test: /\.html$/,
                use: [{
                    loader: 'html-loader',
                    options: {
                        minimize: true
                    }
                }],
            }
        ]
    }
};
if (isProduction) {
    config.output.filename = '[name].[chunkhash].js'
} else {
    config.plugins.push(new webpack.NamedModulesPlugin())
    config.plugins.push(new webpack.HotModuleReplacementPlugin())
}
module.exports = config接下来分为三个文件,webpack.common.js:
var ExtractTextPlugin = require('extract-text-webpack-plugin')
var HtmlWebpackPlugin = require('html-webpack-plugin')
var CleanWebpackPlugin = require('clean-webpack-plugin')
var path = require('path')
var webpack = require('webpack')
var pathsToClean = [
    'build',
]
var isProduction = process.env.NODE_ENV === 'production'
module.exports = {
    entry: ['babel-polyfill', './src/app.js'],
    output: {
        path: path.resolve(dirname, 'build'),
        filename: '[name].[chunkhash].js'
    },
    plugins: [
        new HtmlWebpackPlugin({
            template: './template/index.html',
            filename: 'demo.html',
            minify: {
                collapseWhitespace: true,
            },
            hash: isProduction
        }),
        new ExtractTextPlugin({ filename: '[name].[contenthash].css', allChunks: false }),
        new CleanWebpackPlugin(pathsToClean)
    ],
    module: {
        rules: [{
                test: /\.jsx?$/,
                exclude: /(node_modules)/,
                use: {
                    loader: 'babel-loader',
                    options: {
                        presets: ['env', 'react']
                    }
                }
            },
            {
                test: /\.(gif|png|jpe?g|svg)$/i,
                use: [{
                        loader: 'file-loader',
                        options: {
                            name: '[name].[ext]',
                            outputPath: 'images/'
                        }
                    },
                    {
                        loader: 'image-webpack-loader',
                        options: {
                            bypassOnDebug: true,
                        }
                    }
                ]
            },
            {
                test: /\.html$/,
                use: [{
                    loader: 'html-loader',
                    options: {
                        minimize: true
                    }
                }],
            }
        ]
    }
};然后是webpack.dev.js:
const merge = require('webpack-merge');
const common = require('./webpack.common.js');
const webpack = require('webpack');
const ExtractTextPlugin = require('extract-text-webpack-plugin')
module.exports = merge(common, {
    output: {
        filename: '[name].[hash].js'
    },
    devtool: 'source-map',
    devServer: {
        port: 8787,
        open: true,
        compress: true,
        index: 'demo.html'
    },
    plugins: [
        new webpack.NamedModulesPlugin(),
        new webpack.HotModuleReplacementPlugin()
    ],
    module: {
        rules: [{
                test: /\.css$/,
                use: ExtractTextPlugin.extract({
                    fallback: 'style-loader',
                    use: ['css-loader?sourceMap']
                })
            },
            {
                test: /\.less$/,
                use: ExtractTextPlugin.extract({
                    fallback: 'style-loader',
                    use: ['css-loader?sourceMap', 'less-loader?sourceMap']
                })
            }
        ]
    }
});最后是webpack.prod.js:
const merge = require('webpack-merge');
const common = require('./webpack.common.js');
const ExtractTextPlugin = require('extract-text-webpack-plugin')
module.exports = merge(common, {
    module: {
        rules: [{
                test: /\.css$/,
                use: ExtractTextPlugin.extract({
                    fallback: 'style-loader',
                    use: ['css-loader']
                })
            },
            {
                test: /\.less$/,
                use: ExtractTextPlugin.extract({
                    fallback: 'style-loader',
                    use: ['css-loader', 'less-loader']
                })
            }
        ]
    }
});然后修改一下package.json中的脚本即可
  "scripts": {
    "dev": "webpack-dev-server --config webpack.dev.js",
    "prod": "cross-env NODE_ENV=production webpack -p --config webpack.prod.js"
},相信看了本文案例你已经掌握了方法,更多精彩请关注php中文网其它相关文章!
推荐阅读:
The above is the detailed content of Detailed explanation of webpack plug-ins. For more information, please follow other related articles on the PHP Chinese website!

Hot AI Tools

Undresser.AI Undress
AI-powered app for creating realistic nude photos

AI Clothes Remover
Online AI tool for removing clothes from photos.

Undress AI Tool
Undress images for free

Clothoff.io
AI clothes remover

Video Face Swap
Swap faces in any video effortlessly with our completely free AI face swap tool!

Hot Article
Hot Tools

Notepad++7.3.1
Easy-to-use and free code editor

SublimeText3 Chinese version
Chinese version, very easy to use

Zend Studio 13.0.1
Powerful PHP integrated development environment

Dreamweaver CS6
Visual web development tools

SublimeText3 Mac version
God-level code editing software (SublimeText3)
Hot Topics


 PyCharm Beginner's Guide: Comprehensive understanding of plug-in installation!
Feb 25, 2024 pm 11:57 PM
PyCharm Beginner's Guide: Comprehensive understanding of plug-in installation!
Feb 25, 2024 pm 11:57 PM
PyCharm is a powerful and popular Python integrated development environment (IDE) that provides a wealth of functions and tools so that developers can write code more efficiently. The plug-in mechanism of PyCharm is a powerful tool for extending its functions. By installing different plug-ins, various functions and customized features can be added to PyCharm. Therefore, it is crucial for newbies to PyCharm to understand and be proficient in installing plug-ins. This article will give you a detailed introduction to the complete installation of PyCharm plug-in.
![Error loading plugin in Illustrator [Fixed]](https://img.php.cn/upload/article/000/465/014/170831522770626.jpg?x-oss-process=image/resize,m_fill,h_207,w_330) Error loading plugin in Illustrator [Fixed]
Feb 19, 2024 pm 12:00 PM
Error loading plugin in Illustrator [Fixed]
Feb 19, 2024 pm 12:00 PM
When launching Adobe Illustrator, does a message about an error loading the plug-in pop up? Some Illustrator users have encountered this error when opening the application. The message is followed by a list of problematic plugins. This error message indicates that there is a problem with the installed plug-in, but it may also be caused by other reasons such as a damaged Visual C++ DLL file or a damaged preference file. If you encounter this error, we will guide you in this article to fix the problem, so continue reading below. Error loading plug-in in Illustrator If you receive an "Error loading plug-in" error message when trying to launch Adobe Illustrator, you can use the following: As an administrator
 Share three solutions to why Edge browser does not support this plug-in
Mar 13, 2024 pm 04:34 PM
Share three solutions to why Edge browser does not support this plug-in
Mar 13, 2024 pm 04:34 PM
When users use the Edge browser, they may add some plug-ins to meet more of their needs. But when adding a plug-in, it shows that this plug-in is not supported. How to solve this problem? Today, the editor will share with you three solutions. Come and try it. Method 1: Try using another browser. Method 2: The Flash Player on the browser may be out of date or missing, causing the plug-in to be unsupported. You can download the latest version from the official website. Method 3: Press the "Ctrl+Shift+Delete" keys at the same time. Click "Clear Data" and reopen the browser.
 What is the Chrome plug-in extension installation directory?
Mar 08, 2024 am 08:55 AM
What is the Chrome plug-in extension installation directory?
Mar 08, 2024 am 08:55 AM
What is the Chrome plug-in extension installation directory? Under normal circumstances, the default installation directory of Chrome plug-in extensions is as follows: 1. The default installation directory location of chrome plug-ins in windowsxp: C:\DocumentsandSettings\username\LocalSettings\ApplicationData\Google\Chrome\UserData\Default\Extensions2. chrome in windows7 The default installation directory location of the plug-in: C:\Users\username\AppData\Local\Google\Chrome\User
 Does PyCharm Community Edition support enough plugins?
Feb 20, 2024 pm 04:42 PM
Does PyCharm Community Edition support enough plugins?
Feb 20, 2024 pm 04:42 PM
Does PyCharm Community Edition support enough plugins? Need specific code examples As the Python language becomes more and more widely used in the field of software development, PyCharm, as a professional Python integrated development environment (IDE), is favored by developers. PyCharm is divided into two versions: professional version and community version. The community version is provided for free, but its plug-in support is limited compared to the professional version. So the question is, does PyCharm Community Edition support enough plug-ins? This article will use specific code examples to
 Detailed explanation of how to install and set up the EclipseSVN plug-in
Jan 28, 2024 am 08:42 AM
Detailed explanation of how to install and set up the EclipseSVN plug-in
Jan 28, 2024 am 08:42 AM
Detailed explanation of how to install and set up the EclipseSVN plug-in Eclipse is a widely used integrated development environment (IDE) that supports many different plug-ins to extend its functionality. One of them is the EclipseSVN plugin, which enables developers to interact with the Subversion version control system. This article will detail how to install and set up the EclipseSVN plug-in and provide specific code examples. Step 1: Install the EclipseSVN plug-in and open Eclipse
 Where is the pycharm plug-in?
Dec 04, 2023 pm 03:39 PM
Where is the pycharm plug-in?
Dec 04, 2023 pm 03:39 PM
Installation steps: 1. Open PyCharm and click the "File" option in the top menu bar; 2. Select "Settings"; 3. In the settings window, select the "Plugins" option; 4. Click the "Browse repositories..." button. You will see all available plug-ins; 5. Enter the name of the plug-in you want to install in the search box, and then click the "Search button"; 6. Find the plug-in you want to install, and click the "Install" button to the right of the plug-in name; 7 , restart after the installation is complete.
 PyCharm plug-in installation tips are shared to help you get twice the result with half the effort!
Feb 21, 2024 pm 06:36 PM
PyCharm plug-in installation tips are shared to help you get twice the result with half the effort!
Feb 21, 2024 pm 06:36 PM
PyCharm is a powerful Python integrated development environment. By installing plug-ins, you can further improve development efficiency and facilitate developers' work. This article will share some tips on PyCharm plug-in installation, so that you can get twice the result with half the effort, while also providing specific code examples to demonstrate how to use the plug-in. Step 1: Open PyCharm, click "File" in the menu bar, and then select "Settings". Step 2: In the Settings window, click "
