
 Web Front-end
JS Tutorial
How to deploy single-page projects such as vue and react to the server
Web Front-end
JS Tutorial
How to deploy single-page projects such as vue and react to the server
How to deploy single-page projects such as vue and react to the server

It is possible to use vue to build projects locally, but there are many problems when deploying to the server: The resource cannot be found, Direct access to the index.html page is blank, Refresh the current route 404. In this article, we mainly share with you the methods of deploying single-page projects such as vue and react to the server. We hope it can help you.
Due to front-end routing, single-page applications should be placed in web proxy servers such as nginx or apache, tomcat, etc. Do not directly access index.html, and change react according to the project path of your own server. Or the routing address of vue.
If the project is directly following the domain name, such as: http://www.sosout.com, the root route is '/'.
If the project is in a subdirectory directly following the domain name, such as: http://www.sosout.com/children, the root route is '/children', and index.html cannot be accessed directly.
Taking configuring Nginx as an example, the configuration process is roughly as follows: (Assumption:
1. Project file directory: /mnt/html/spa (the file in the spa directory is executed by npm run dist The file in the dist directory generated later)
2. Access domain name: spa.sosout.com)
Enter nginx.conf and add the following configuration:
server {
    listen 80;
    server_name  spa.sosout.com;
    root /mnt/html/spa;
    index index.html;
    location ~ ^/favicon\.ico$ {
        root /mnt/html/spa;
    }

    location / {
        try_files $uri $uri/ /index.html;
        proxy_set_header   Host             $host;
        proxy_set_header   X-Real-IP        $remote_addr;
        proxy_set_header   X-Forwarded-For  $proxy_add_x_forwarded_for;
        proxy_set_header   X-Forwarded-Proto  $scheme;
    }
    access_log  /mnt/logs/nginx/access.log  main;
}Notes: 1. If you configure the domain name, port 80 is required. After success, you can access the project as long as you access the domain name2. If you use react-router In browserHistory mode or vue-router's history mode, you also need to rewrite the route in the nginx configuration:
server {
    listen 80;
    server_name  spa.sosout.com;
    root /mnt/html/spa;
    index index.html;
    location ~ ^/favicon\.ico$ {
        root /mnt/html/spa;
    }

    location / {
        try_files $uri $uri/ @fallback;
        index index.html;
        proxy_set_header   Host             $host;
        proxy_set_header   X-Real-IP        $remote_addr;
        proxy_set_header   X-Forwarded-For  $proxy_add_x_forwarded_for;
        proxy_set_header   X-Forwarded-Proto  $scheme;
    }
    location @fallback {
        rewrite ^.*$ /index.html break;
    }
    access_log  /mnt/logs/nginx/access.log  main;
}Why do you need to rewrite the route? Because our project has only one root entry, when entering a URL similar to /home, if the corresponding page cannot be found, nginx will try to load index.html, which can correctly match our input through react-router. /home route, thereby displaying the correct home page. If the browserHistory mode or history mode project does not configure the above content, a 404 will occur.
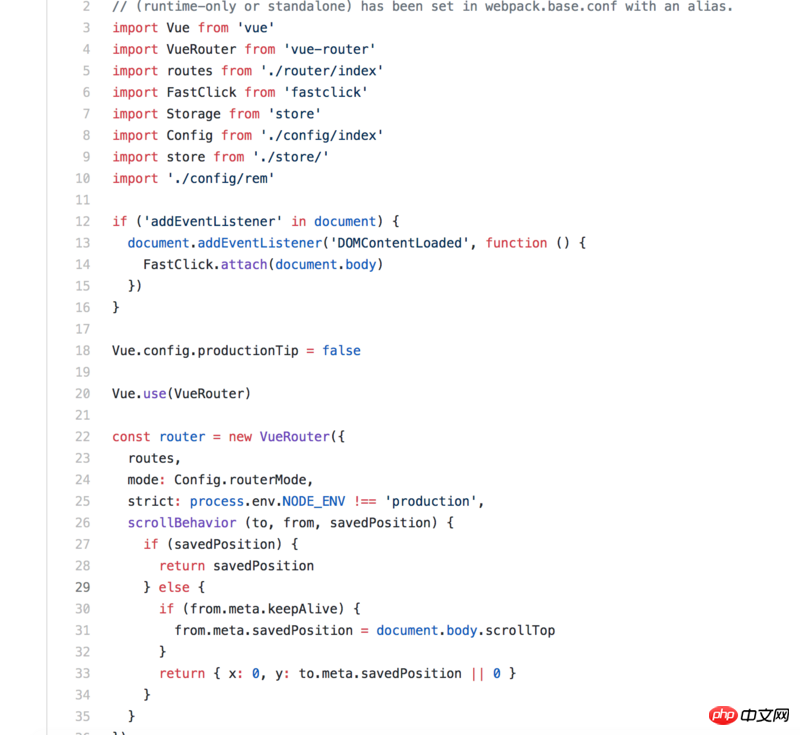
Just give two examples, a vue project and a react project:
vue project:
Domain name: http://tb .sosout.com
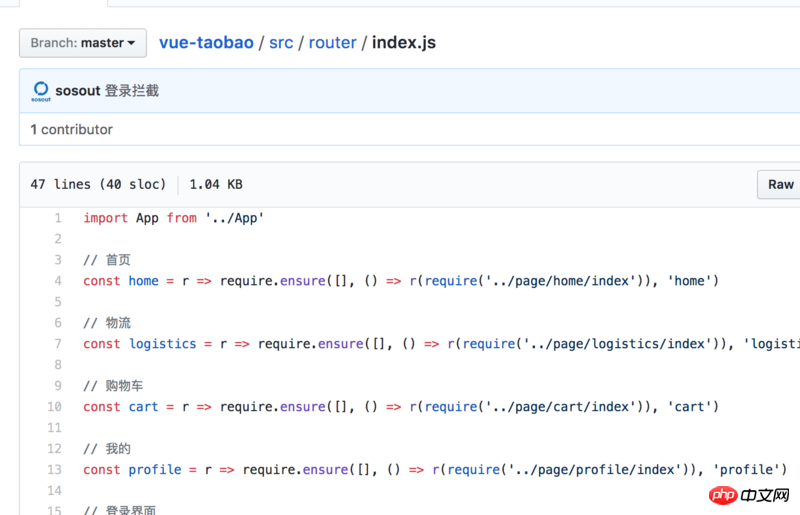
import App from '../App'

// 首页
const home = r => require.ensure([], () => r(require('../page/home/index')), 'home')

// 物流
const logistics = r => require.ensure([], () => r(require('../page/logistics/index')), 'logistics')

// 购物车
const cart = r => require.ensure([], () => r(require('../page/cart/index')), 'cart')

// 我的
const profile = r => require.ensure([], () => r(require('../page/profile/index')), 'profile')

// 登录界面
const login = r => require.ensure([], () => r(require('../page/user/login')), 'login')

export default [{
  path: '/',
  component: App, // 顶层路由,对应index.html
  children: [{
    path: '/home', // 首页
    component: home
  }, {
    path: '/logistics', // 物流
    component: logistics,
    meta: {
      login: true
    }
  }, {
    path: '/cart', // 购物车
    component: cart,
    meta: {
      login: true
    }
  }, {
    path: '/profile', // 我的
    component: profile
  }, {
    path: '/login', // 登录界面
    component: login
  }, {
    path: '*',
    redirect: '/home'
  }]
}]
############
# 其他配置
############

http {
    ############
    # 其他配置
    ############
    server {
        listen 80;
        server_name  tb.sosout.com;
        root /mnt/html/tb;
        index index.html;
        location ~ ^/favicon\.ico$ {
            root /mnt/html/tb;
        }

        location / {
            try_files $uri $uri/ @fallback;
            index index.html;
            proxy_set_header   Host             $host;
            proxy_set_header   X-Real-IP        $remote_addr;
            proxy_set_header   X-Forwarded-For  $proxy_add_x_forwarded_for;
            proxy_set_header   X-Forwarded-Proto  $scheme;
        }
        location @fallback {
            rewrite ^.*$ /index.html break;
        }
        access_log  /mnt/logs/nginx/access.log  main;
    }
    ############
    # 其他配置
    ############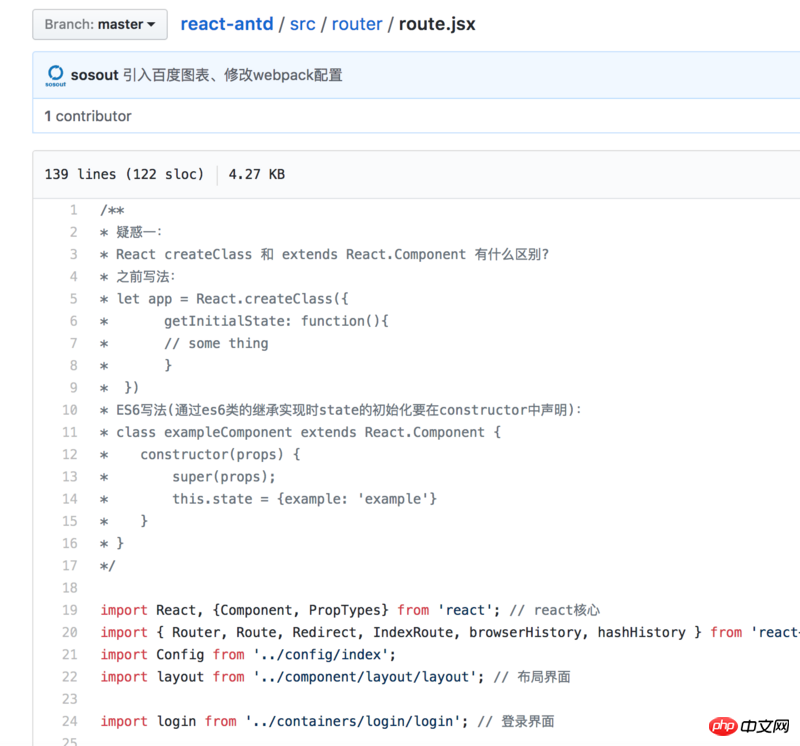
}react project:
Domain name: http://antd.sosout.com
 ##
##
/**
* 疑惑一:
* React createClass 和 extends React.Component 有什么区别?
* 之前写法:
* let app = React.createClass({
*      getInitialState: function(){
*        // some thing
*      }
*  })
* ES6写法(通过es6类的继承实现时state的初始化要在constructor中声明):
* class exampleComponent extends React.Component {
*    constructor(props) {
*        super(props);
*        this.state = {example: 'example'}
*    }
* }
*/

import React, {Component, PropTypes} from 'react'; // react核心
import { Router, Route, Redirect, IndexRoute, browserHistory, hashHistory } from 'react-router'; // 创建route所需
import Config from '../config/index';
import layout from '../component/layout/layout'; // 布局界面

import login from '../containers/login/login'; // 登录界面

/**
 * (路由根目录组件,显示当前符合条件的组件)
 *
 * @class Roots
 * @extends {Component}
 */
class Roots extends Component {
    render() {
        // 这个组件是一个包裹组件,所有的路由跳转的页面都会以this.props.children的形式加载到本组件下
        return (
            <p>{this.props.children}</p>
        );
    }
}

// const history = process.env.NODE_ENV !== 'production' ? browserHistory : hashHistory;

// 快速入门
const home = (location, cb) => {
    require.ensure([], require => {
        cb(null, require('../containers/home/homeIndex').default)
    }, 'home');
}

// 百度图表-折线图
const chartLine = (location, cb) => {
    require.ensure([], require => {
        cb(null, require('../containers/charts/lines').default)
    }, 'chartLine');
}

// 基础组件-按钮
const button = (location, cb) => {
    require.ensure([], require => {
        cb(null, require('../containers/general/buttonIndex').default)
    }, 'button');
}

// 基础组件-图标
const icon = (location, cb) => {
    require.ensure([], require => {
        cb(null, require('../containers/general/iconIndex').default)
    }, 'icon');
}

// 用户管理
const user = (location, cb) => {
    require.ensure([], require => {
        cb(null, require('../containers/user/userIndex').default)
    }, 'user');
}

// 系统设置
const setting = (location, cb) => {
    require.ensure([], require => {
        cb(null, require('../containers/setting/settingIndex').default)
    }, 'setting');
}

// 广告管理
const adver = (location, cb) => {
    require.ensure([], require => {
        cb(null, require('../containers/adver/adverIndex').default)
    }, 'adver');
}

// 组件一
const oneui = (location, cb) => {
    require.ensure([], require => {
        cb(null, require('../containers/ui/oneIndex').default)
    }, 'oneui');
}

// 组件二
const twoui = (location, cb) => {
    require.ensure([], require => {
        cb(null, require('../containers/ui/twoIndex').default)
    }, 'twoui');
}

// 登录验证
const requireAuth = (nextState, replace) => {
    let token = (new Date()).getTime() - Config.localItem('USER_AUTHORIZATION');
    if(token > 7200000) { // 模拟Token保存2个小时
        replace({
            pathname: '/login',
            state: { nextPathname: nextState.location.pathname }
        });
    }
}

const RouteConfig = (
    <Router history={browserHistory}>
        <Route path="/home" component={layout} onEnter={requireAuth}>
            <IndexRoute getComponent={home} onEnter={requireAuth} /> // 默认加载的组件,比如访问www.test.com,会自动跳转到www.test.com/home
            <Route path="/home" getComponent={home} onEnter={requireAuth} />
            <Route path="/chart/line" getComponent={chartLine} onEnter={requireAuth} />
            <Route path="/general/button" getComponent={button} onEnter={requireAuth} />
            <Route path="/general/icon" getComponent={icon} onEnter={requireAuth} />
            <Route path="/user" getComponent={user} onEnter={requireAuth} />
            <Route path="/setting" getComponent={setting} onEnter={requireAuth} />
            <Route path="/adver" getComponent={adver} onEnter={requireAuth} />
            <Route path="/ui/oneui" getComponent={oneui} onEnter={requireAuth} />
            <Route path="/ui/twoui" getComponent={twoui} onEnter={requireAuth} />
        </Route>
        <Route path="/login" component={Roots}> // 所有的访问,都跳转到Roots
            <IndexRoute component={login} /> // 默认加载的组件,比如访问www.test.com,会自动跳转到www.test.com/home
        </Route>
        <Redirect from="*" to="/home" />
    </Router>
);

export default RouteConfig;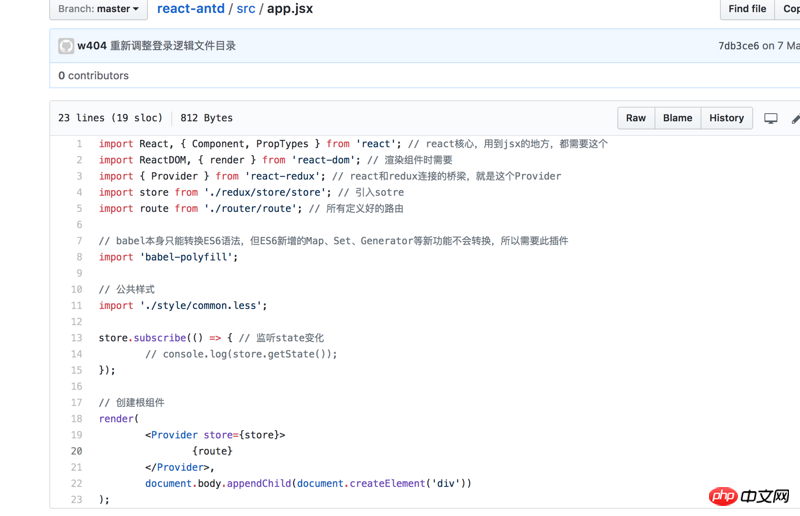
############
# 其他配置
############

http {
    ############
    # 其他配置
    ############
    server {
        listen 80;
        server_name  antd.sosout.com;
        root /mnt/html/reactAntd;
        index index.html;
        location ~ ^/favicon\.ico$ {
            root /mnt/html/reactAntd;
        }

        location / {
            try_files $uri $uri/ @router;
            index index.html;
            proxy_set_header   Host             $host;
            proxy_set_header   X-Real-IP        $remote_addr;
            proxy_set_header   X-Forwarded-For  $proxy_add_x_forwarded_for;
            proxy_set_header   X-Forwarded-Proto  $scheme;
        }
        location @router {
            rewrite ^.*$ /index.html break;
        }
        access_log  /mnt/logs/nginx/access.log  main;
    }

    ############
    # 其他配置
    ############
}How to use Docker to deploy PHP development environment
Examples to explain PHP implementation of git deployment
PHP design pattern container deployment framework based on template engine
The above is the detailed content of How to deploy single-page projects such as vue and react to the server. For more information, please follow other related articles on the PHP Chinese website!

Hot AI Tools

Undresser.AI Undress
AI-powered app for creating realistic nude photos

AI Clothes Remover
Online AI tool for removing clothes from photos.

Undress AI Tool
Undress images for free

Clothoff.io
AI clothes remover

Video Face Swap
Swap faces in any video effortlessly with our completely free AI face swap tool!

Hot Article
Hot Tools

Notepad++7.3.1
Easy-to-use and free code editor

SublimeText3 Chinese version
Chinese version, very easy to use

Zend Studio 13.0.1
Powerful PHP integrated development environment

Dreamweaver CS6
Visual web development tools

SublimeText3 Mac version
God-level code editing software (SublimeText3)
Hot Topics


 How to configure Dnsmasq as a DHCP relay server
Mar 21, 2024 am 08:50 AM
How to configure Dnsmasq as a DHCP relay server
Mar 21, 2024 am 08:50 AM
The role of a DHCP relay is to forward received DHCP packets to another DHCP server on the network, even if the two servers are on different subnets. By using a DHCP relay, you can deploy a centralized DHCP server in the network center and use it to dynamically assign IP addresses to all network subnets/VLANs. Dnsmasq is a commonly used DNS and DHCP protocol server that can be configured as a DHCP relay server to help manage dynamic host configurations in the network. In this article, we will show you how to configure dnsmasq as a DHCP relay server. Content Topics: Network Topology Configuring Static IP Addresses on a DHCP Relay D on a Centralized DHCP Server
 Best Practice Guide for Building IP Proxy Servers with PHP
Mar 11, 2024 am 08:36 AM
Best Practice Guide for Building IP Proxy Servers with PHP
Mar 11, 2024 am 08:36 AM
In network data transmission, IP proxy servers play an important role, helping users hide their real IP addresses, protect privacy, and improve access speeds. In this article, we will introduce the best practice guide on how to build an IP proxy server with PHP and provide specific code examples. What is an IP proxy server? An IP proxy server is an intermediate server located between the user and the target server. It acts as a transfer station between the user and the target server, forwarding the user's requests and responses. By using an IP proxy server
 What should I do if I can't enter the game when the epic server is offline? Solution to why Epic cannot enter the game offline
Mar 13, 2024 pm 04:40 PM
What should I do if I can't enter the game when the epic server is offline? Solution to why Epic cannot enter the game offline
Mar 13, 2024 pm 04:40 PM
What should I do if I can’t enter the game when the epic server is offline? This problem must have been encountered by many friends. When this prompt appears, the genuine game cannot be started. This problem is usually caused by interference from the network and security software. So how should it be solved? The editor of this issue will explain I would like to share the solution with you, I hope today’s software tutorial can help you solve the problem. What to do if the epic server cannot enter the game when it is offline: 1. It may be interfered by security software. Close the game platform and security software and then restart. 2. The second is that the network fluctuates too much. Try restarting the router to see if it works. If the conditions are OK, you can try to use the 5g mobile network to operate. 3. Then there may be more
 PHP, Vue and React: How to choose the most suitable front-end framework?
Mar 15, 2024 pm 05:48 PM
PHP, Vue and React: How to choose the most suitable front-end framework?
Mar 15, 2024 pm 05:48 PM
PHP, Vue and React: How to choose the most suitable front-end framework? With the continuous development of Internet technology, front-end frameworks play a vital role in Web development. PHP, Vue and React are three representative front-end frameworks, each with its own unique characteristics and advantages. When choosing which front-end framework to use, developers need to make an informed decision based on project needs, team skills, and personal preferences. This article will compare the characteristics and uses of the three front-end frameworks PHP, Vue and React.
 Yolov10: Detailed explanation, deployment and application all in one place!
Jun 07, 2024 pm 12:05 PM
Yolov10: Detailed explanation, deployment and application all in one place!
Jun 07, 2024 pm 12:05 PM
1. Introduction Over the past few years, YOLOs have become the dominant paradigm in the field of real-time object detection due to its effective balance between computational cost and detection performance. Researchers have explored YOLO's architectural design, optimization goals, data expansion strategies, etc., and have made significant progress. At the same time, relying on non-maximum suppression (NMS) for post-processing hinders end-to-end deployment of YOLO and adversely affects inference latency. In YOLOs, the design of various components lacks comprehensive and thorough inspection, resulting in significant computational redundancy and limiting the capabilities of the model. It offers suboptimal efficiency, and relatively large potential for performance improvement. In this work, the goal is to further improve the performance efficiency boundary of YOLO from both post-processing and model architecture. to this end
 Integration of Java framework and front-end React framework
Jun 01, 2024 pm 03:16 PM
Integration of Java framework and front-end React framework
Jun 01, 2024 pm 03:16 PM
Integration of Java framework and React framework: Steps: Set up the back-end Java framework. Create project structure. Configure build tools. Create React applications. Write REST API endpoints. Configure the communication mechanism. Practical case (SpringBoot+React): Java code: Define RESTfulAPI controller. React code: Get and display the data returned by the API.
 How to install PHP FFmpeg extension on server?
Mar 28, 2024 pm 02:39 PM
How to install PHP FFmpeg extension on server?
Mar 28, 2024 pm 02:39 PM
How to install PHPFFmpeg extension on server? Installing the PHPFFmpeg extension on the server can help us process audio and video files in PHP projects and implement functions such as encoding, decoding, editing, and processing of audio and video files. This article will introduce how to install the PHPFFmpeg extension on the server, as well as specific code examples. First, we need to ensure that PHP and FFmpeg are installed on the server. If FFmpeg is not installed, you can follow the steps below to install FFmpe
 How to deploy and maintain a website using PHP
May 03, 2024 am 08:54 AM
How to deploy and maintain a website using PHP
May 03, 2024 am 08:54 AM
To successfully deploy and maintain a PHP website, you need to perform the following steps: Select a web server (such as Apache or Nginx) Install PHP Create a database and connect PHP Upload code to the server Set up domain name and DNS Monitoring website maintenance steps include updating PHP and web servers, and backing up the website , monitor error logs and update content.
