

How to create a Windows service in C# (picture)?

这篇文章主要介绍了使用C#创建Windows服务的实例代码,小编觉得挺不错的,现在分享给大家,也给大家做个参考。一起跟随小编过来看看吧
本文介绍了使用C#创建Windows服务的实例代码,分享给大家
一、开发环境
操作系统:Windows 10 X64
开发环境:VS2015
编程语言:C#
.NET版本:.NET Framework 4.0
目标平台:X86
二、创建Windows Service
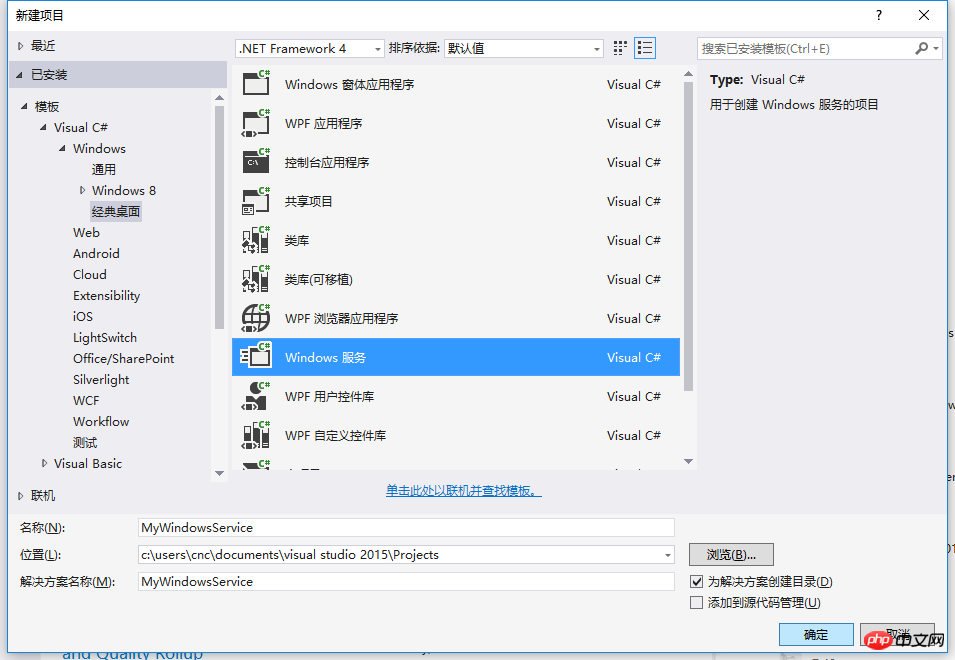
1、新建一个Windows Service,并将项目名称改为“MyWindowsService”,如下图所示:
2、在解决方案资源管理器内将Service1.cs改为MyService1.cs后并点击“查看代码”图标按钮进入代码编辑器界面,如下图所示:

3、在代码编辑器内如入以下代码,如下所示:
using System;
using System.ServiceProcess;
using System.IO;

namespace MyWindowsService
{
  public partial class MyService : ServiceBase
  {
    public MyService()
    {
      InitializeComponent();
    }

    string filePath = @"D:\MyServiceLog.txt";

    protected override void OnStart(string[] args)
    {
      using (FileStream stream = new FileStream(filePath,FileMode.Append))
      using (StreamWriter writer = new StreamWriter(stream))
      {
        writer.WriteLine($"{DateTime.Now},服务启动!");
      }
    }

    protected override void OnStop()
    {
      using (FileStream stream = new FileStream(filePath, FileMode.Append))
      using (StreamWriter writer = new StreamWriter(stream))
      {
        writer.WriteLine($"{DateTime.Now},服务停止!");
      }
    }
  }
}4、双击项目“MyWindowsService”进入“MyService”设计界面,在空白位置右击鼠标弹出上下文菜单,选中“添加安装程序”,如下图所示:

5、此时软件会生成两个组件,分别为“serviceInstaller1”及“serviceProcessInstaller1”,如下图所示:

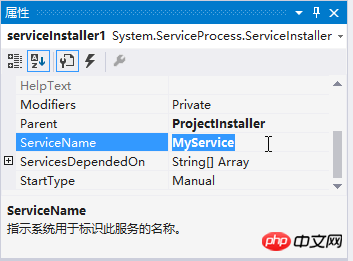
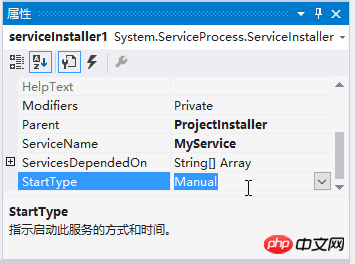
6、点击“serviceInstaller1”,在“属性”窗体将ServiceName改为MyService,Description改为我的服务,StartType保持为Manual,如下图所示:

7、点击“serviceProcessInstaller1”,在“属性”窗体将Account改为LocalSystem(服务属性系统级别),如下图所示:

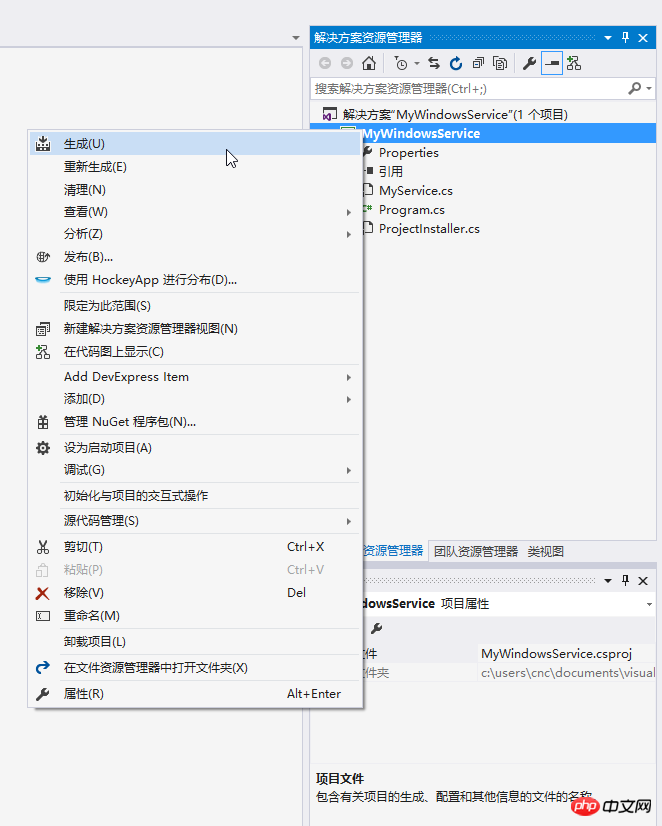
8、鼠标右键点击项目“MyWindowsService”,在弹出的上下文菜单中选择“生成”按钮,如下图所示:
9、至此,Windows服务已经创建完毕。
三、创建安装、启动、停止、卸载服务的Windows窗体
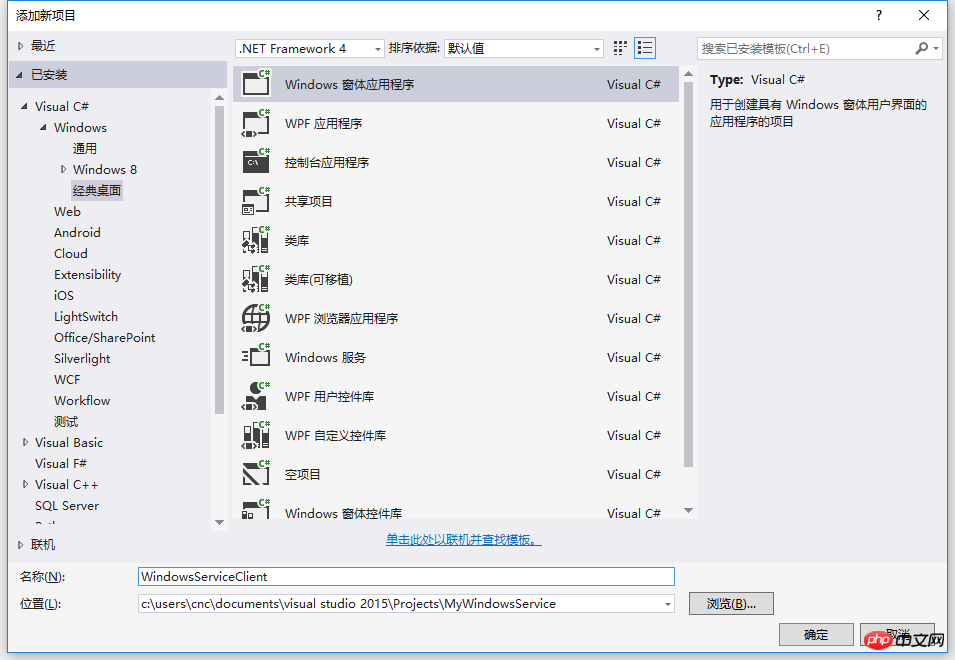
1、在同一个解决方案里新建一个Windows Form项目,并命名为WindowsServiceClient,如下图所示:
2、将该项目设置为启动项目,并在窗体内添加四个按钮,分别为安装服务、启动服务、停止服务及卸载服务,如下图所示:

3、按下F7进入代码编辑界面,引用“System.ServiceProcess”及“System.Configuration.Install”,并输入如下代码:
using System;
using System.Collections;
using System.Windows.Forms;
using System.ServiceProcess;
using System.Configuration.Install;

namespace WindowsServiceClient
{
  public partial class Form1 : Form
  {
    public Form1()
    {
      InitializeComponent();
    }
    string serviceFilePath = $"{Application.StartupPath}\\MyWindowsService.exe";
    string serviceName = "MyService";

    //事件:安装服务
    private void button1_Click(object sender, EventArgs e)
    {
      if (this.IsServiceExisted(serviceName)) this.UninstallService(serviceName);
      this.InstallService(serviceFilePath);
    }

    //事件:启动服务
    private void button2_Click(object sender, EventArgs e)
    {
      if (this.IsServiceExisted(serviceName)) this.ServiceStart(serviceName);
    }

    //事件:停止服务
    private void button4_Click(object sender, EventArgs e)
    {
      if (this.IsServiceExisted(serviceName)) this.ServiceStop(serviceName);
    }

    //事件:卸载服务
    private void button3_Click(object sender, EventArgs e)
    {
      if (this.IsServiceExisted(serviceName))
      {
        this.ServiceStop(serviceName);
        this.UninstallService(serviceFilePath);
      }
    }

    //判断服务是否存在
    private bool IsServiceExisted(string serviceName)
    {
      ServiceController[] services = ServiceController.GetServices();
      foreach (ServiceController sc in services)
      {
        if (sc.ServiceName.ToLower() == serviceName.ToLower())
        {
          return true;
        }
      }
      return false;
    }

    //安装服务
    private void InstallService(string serviceFilePath)
    {
      using (AssemblyInstaller installer = new AssemblyInstaller())
      {
        installer.UseNewContext = true;
        installer.Path = serviceFilePath;
        IDictionary savedState = new Hashtable();
        installer.Install(savedState);
        installer.Commit(savedState);
      }
    }

    //卸载服务
    private void UninstallService(string serviceFilePath)
    {
      using (AssemblyInstaller installer = new AssemblyInstaller())
      {
        installer.UseNewContext = true;
        installer.Path = serviceFilePath;
        installer.Uninstall(null);
      }
    }
    //启动服务
    private void ServiceStart(string serviceName)
    {
      using (ServiceController control = new ServiceController(serviceName))
      {
        if (control.Status == ServiceControllerStatus.Stopped)
        {
          control.Start();
        }
      }
    }

    //停止服务
    private void ServiceStop(string serviceName)
    {
      using (ServiceController control = new ServiceController(serviceName))
      {
        if (control.Status == ServiceControllerStatus.Running)
        {
          control.Stop();
        }
      }
    }
  }
}4、为了后续调试服务及安装卸载服务的需要,将已生成的MyWindowsService.exe引用到本Windows窗体,如下图所示:

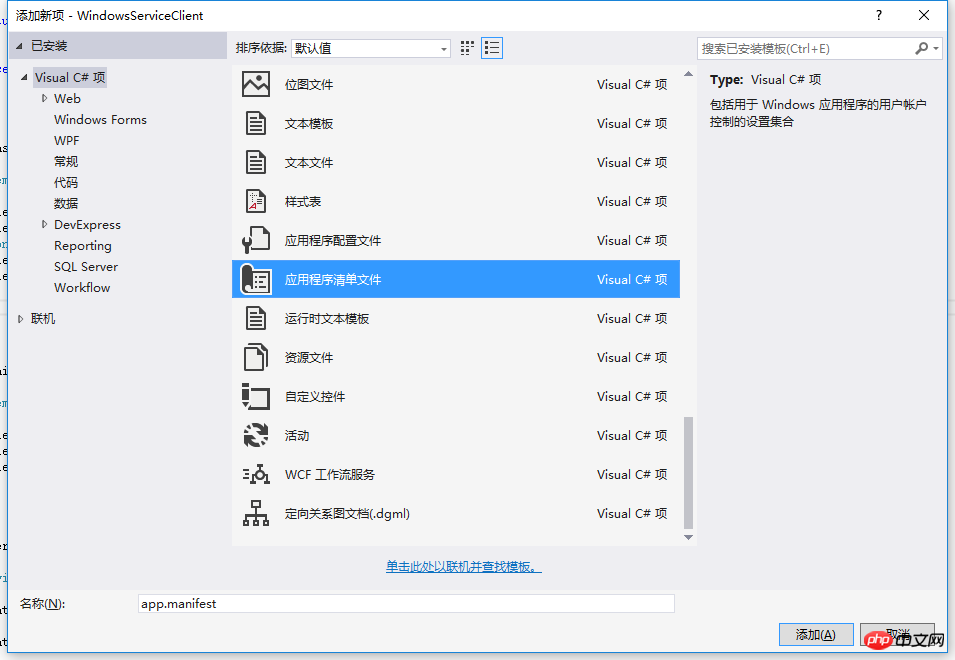
5、由于需要安装服务,故需要使用UAC中Administrator的权限,鼠标右击项目“WindowsServiceClient”,在弹出的上下文菜单中选择“添加”->“新建项”,在弹出的选择窗体中选择“应用程序清单文件”并单击确定,如下图所示:
6、打开该文件,并将

7. After the IDE is started, the following form will pop up (some systems may not display it due to UAC configuration), which needs to be opened with administrator rights:

8. After reopening, run the WindowsServiceClient project in the IDE;
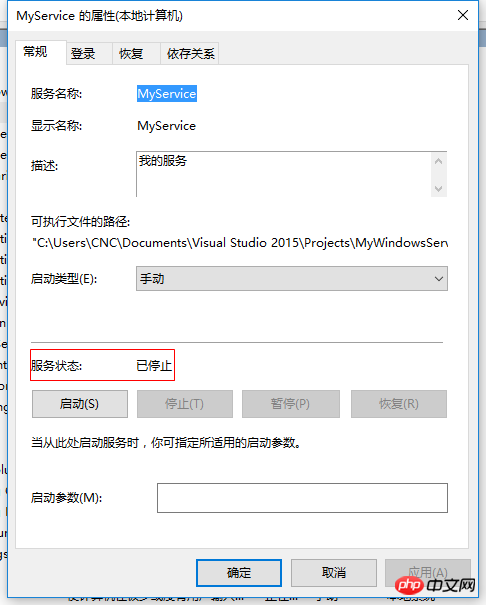
9. Use WIN+R to open the run form and enter services in the form. .msc and open the service, as shown in the figure below:

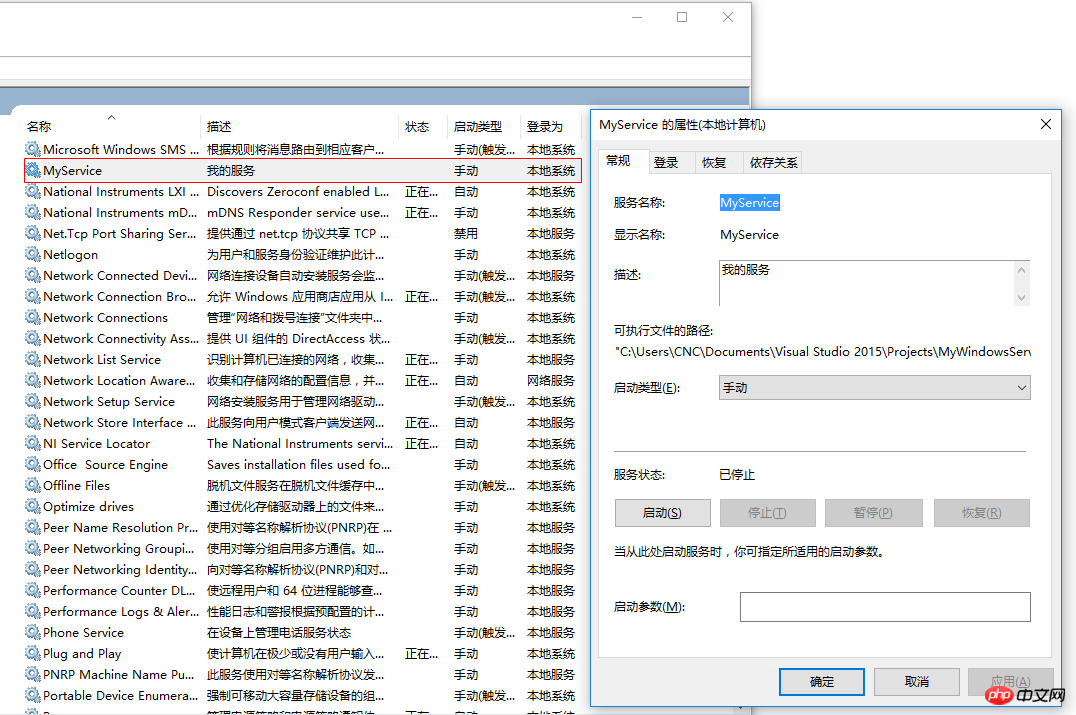
10. Click the "Install Service" button in the form, MyService will appear in the service, as shown in the figure below Display:
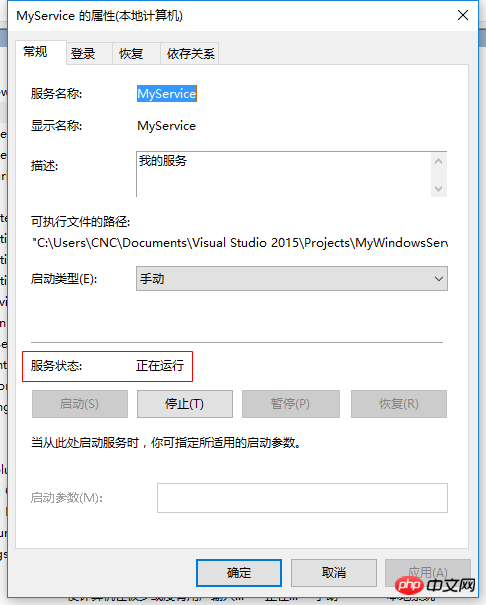
11. Click the "Run Service" button to start and run the service, as shown below:

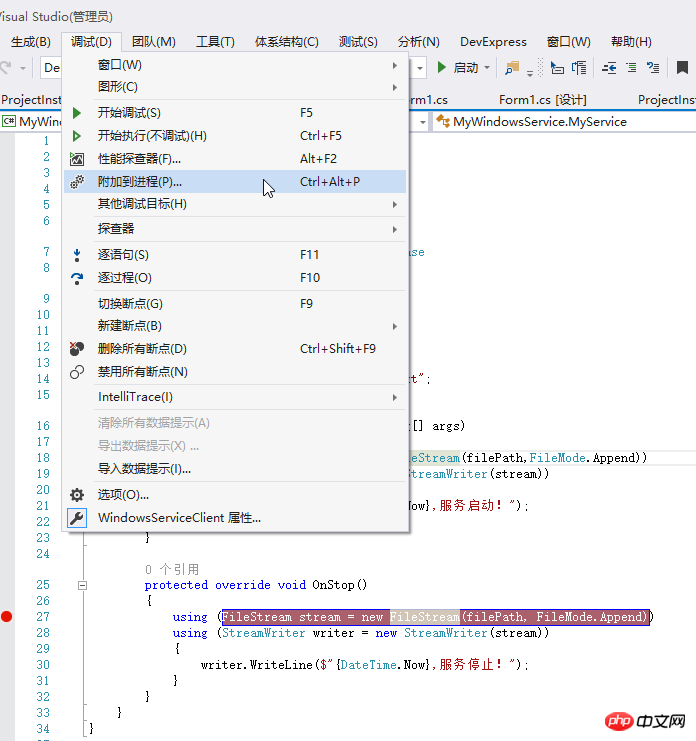
Additional: How to debug the service
1. To debug the service, it is actually very simple. If you need to attach the service process to the project that needs to be debugged, if To debug the service you just built, set a breakpoint in the OnStop event as follows: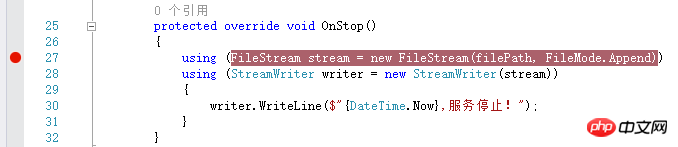


The above is the detailed content of How to create a Windows service in C# (picture)?. For more information, please follow other related articles on the PHP Chinese website!

Hot AI Tools

Undresser.AI Undress
AI-powered app for creating realistic nude photos

AI Clothes Remover
Online AI tool for removing clothes from photos.

Undress AI Tool
Undress images for free

Clothoff.io
AI clothes remover

Video Face Swap
Swap faces in any video effortlessly with our completely free AI face swap tool!

Hot Article
Hot Tools

Notepad++7.3.1
Easy-to-use and free code editor

SublimeText3 Chinese version
Chinese version, very easy to use

Zend Studio 13.0.1
Powerful PHP integrated development environment

Dreamweaver CS6
Visual web development tools

SublimeText3 Mac version
God-level code editing software (SublimeText3)
Hot Topics


 Can I install mysql on Windows 7
Apr 08, 2025 pm 03:21 PM
Can I install mysql on Windows 7
Apr 08, 2025 pm 03:21 PM
Yes, MySQL can be installed on Windows 7, and although Microsoft has stopped supporting Windows 7, MySQL is still compatible with it. However, the following points should be noted during the installation process: Download the MySQL installer for Windows. Select the appropriate version of MySQL (community or enterprise). Select the appropriate installation directory and character set during the installation process. Set the root user password and keep it properly. Connect to the database for testing. Note the compatibility and security issues on Windows 7, and it is recommended to upgrade to a supported operating system.
 Unable to access mysql from terminal
Apr 08, 2025 pm 04:57 PM
Unable to access mysql from terminal
Apr 08, 2025 pm 04:57 PM
Unable to access MySQL from the terminal may be due to: MySQL service not running; connection command error; insufficient permissions; firewall blocks connection; MySQL configuration file error.
 How to copy and paste mysql
Apr 08, 2025 pm 07:18 PM
How to copy and paste mysql
Apr 08, 2025 pm 07:18 PM
Copy and paste in MySQL includes the following steps: select the data, copy with Ctrl C (Windows) or Cmd C (Mac); right-click at the target location, select Paste or use Ctrl V (Windows) or Cmd V (Mac); the copied data is inserted into the target location, or replace existing data (depending on whether the data already exists at the target location).
 Can vs code run in Windows 8
Apr 15, 2025 pm 07:24 PM
Can vs code run in Windows 8
Apr 15, 2025 pm 07:24 PM
VS Code can run on Windows 8, but the experience may not be great. First make sure the system has been updated to the latest patch, then download the VS Code installation package that matches the system architecture and install it as prompted. After installation, be aware that some extensions may be incompatible with Windows 8 and need to look for alternative extensions or use newer Windows systems in a virtual machine. Install the necessary extensions to check whether they work properly. Although VS Code is feasible on Windows 8, it is recommended to upgrade to a newer Windows system for a better development experience and security.
 C# .NET: Exploring Core Concepts and Programming Fundamentals
Apr 10, 2025 am 09:32 AM
C# .NET: Exploring Core Concepts and Programming Fundamentals
Apr 10, 2025 am 09:32 AM
C# is a modern, object-oriented programming language developed by Microsoft and as part of the .NET framework. 1.C# supports object-oriented programming (OOP), including encapsulation, inheritance and polymorphism. 2. Asynchronous programming in C# is implemented through async and await keywords to improve application responsiveness. 3. Use LINQ to process data collections concisely. 4. Common errors include null reference exceptions and index out-of-range exceptions. Debugging skills include using a debugger and exception handling. 5. Performance optimization includes using StringBuilder and avoiding unnecessary packing and unboxing.
 vscode cannot install extension
Apr 15, 2025 pm 07:18 PM
vscode cannot install extension
Apr 15, 2025 pm 07:18 PM
The reasons for the installation of VS Code extensions may be: network instability, insufficient permissions, system compatibility issues, VS Code version is too old, antivirus software or firewall interference. By checking network connections, permissions, log files, updating VS Code, disabling security software, and restarting VS Code or computers, you can gradually troubleshoot and resolve issues.
 Where is the Redis restart service
Apr 10, 2025 pm 02:36 PM
Where is the Redis restart service
Apr 10, 2025 pm 02:36 PM
How to restart the Redis service in different operating systems: Linux/macOS: Use the systemctl command (systemctl restart redis-server) or the service command (service redis-server restart). Windows: Use the services.msc tool (enter "services.msc" in the Run dialog box and press Enter) and right-click the "Redis" service and select "Restart".
 From Web to Desktop: The Versatility of C# .NET
Apr 15, 2025 am 12:07 AM
From Web to Desktop: The Versatility of C# .NET
Apr 15, 2025 am 12:07 AM
C#.NETisversatileforbothwebanddesktopdevelopment.1)Forweb,useASP.NETfordynamicapplications.2)Fordesktop,employWindowsFormsorWPFforrichinterfaces.3)UseXamarinforcross-platformdevelopment,enablingcodesharingacrossWindows,macOS,Linux,andmobiledevices.
