
 Operation and Maintenance
Windows Operation and Maintenance
Detailed introduction to Win10 system
Operation and Maintenance
Windows Operation and Maintenance
Detailed introduction to Win10 system
Detailed introduction to Win10 system

How to set up automatic network search in Win10 system? This article will provide you with a method to turn on automatic network search for everyone to understand. Turn on automatic network search: 1. Return to the traditional desktop location of the win10 system, click to open the start menu of the win10 system, and then click to select the settings option from the start menu. 2. Click to select the "Network and Internet" option and select the network you are currently using. 3. "Find devices and content" switch. If it is turned off, it applies to "Public Network". If it is turned on, it applies to "Home Network". and "Work Network". Under the default settings, the Win10 system automatically turns on "Find devices and content". If you see that this option is turned off, just turn it on manually. In fact, winXP system and win7 system have such a function. However, after upgrading to win8 system or win10 system, in order to protect the user's computer security, Windows system disables this function by default. You can open it through the above method if you have this requirement. Users can open it themselves.
1. How to set up automatic network search in Win 10 system

##Introduction: How to set up automatic network search in Win10 system? This article will provide you with a method to turn on automatic network search for everyone to understand.
2. How to check your IP address in Win10 system

3.
Summary of several methods to open running commands in Win10 system

4.
Mysql5.7.17 is installed under win10 system Graphic tutorial

5.
64-bit Win10 system How to install Mysql5.7.11 (detailed case explanation)_MySQL
Introduction: The editor uses mysql-installer-community-5.7 on a mac book notebook with a 64-bit Win10 system. After installing Mysql5.7.11 in 11.0, I always get stuck and report an error when configuring mysql server. The editor below will share the installation method with you for your reference6.
Solution to the problem that port 80 of Win10 system is occupied by System and Apache cannot start
Introduction:: This article mainly introduces the solution to the problem that port 80 of Win10 system is occupied by System and Apache cannot start. Students who are interested in PHP tutorials can refer to it.7.
Mac system configuration php environment win10 system requirements configuration system configuration diskless system server configuration
Introduction: Mac system, system configuration: Mac system configuration PHP environment: [Write in front - Nao Nao Nao] -_-# Comrades who are in a hurry to configure the environment can take a detour. Recently, the school's laboratory took on a small project - the attendance card swiping system, which uses RFID to obtain the student card ID at the hardware layer, transmits it to the server through wifi, stores the attendance information, and obtains the server data on the mobile phone. I was responsible for the software part and worked with another child who was engaged in hardware to implement this small project. Unfortunately, the child had never written an interface before, and writing communication interfaces in PHP is relatively lightweight and has a relatively complete library, so I chose PHP to write the interface of the app! Without further ado, let’s start the configuration below. us8. Install scrapy-1.1 in win10 system ##Introduction: When installing scrapy in a win10 environment, you cannot directly follow the manual on the official website (http://doc.scrapy.org/en/1.0/intro/install.html) to successfully install it in one go. According to my own installation process, I encountered For the problem, I specially sorted out the installation process 9. php failed to configure xdebug and could not debug Introduction: I configured PHP's xdebug according to the online tutorial, but it is not displayed in phpinfo. Both PHP and xdebug versions are correct. PHP is the 5.6 thread version, and the ports are not conflicting. But I am using the win10 system. Doesn't xdebug support win10? [Xdebug] zend_extension="D:phptoolsphp5.6extphp_xdebug.dll" xdebug.remote_enable = On xdebug.remote_handler = dbgp xdebug.remote_host= local [Related Q&A recommendations]: java - I bought a new computer and there are parameter prompts in the win10 system idea javascript - Options during git installation The 64-bit WIN10 system cannot install node.js again after uninstalling it python - I just created the project django manage.py runserver and reported an error UnicodeEncodeError: 'mbcs'
The above is the detailed content of Detailed introduction to Win10 system. For more information, please follow other related articles on the PHP Chinese website!

Hot AI Tools

Undresser.AI Undress
AI-powered app for creating realistic nude photos

AI Clothes Remover
Online AI tool for removing clothes from photos.

Undress AI Tool
Undress images for free

Clothoff.io
AI clothes remover

Video Face Swap
Swap faces in any video effortlessly with our completely free AI face swap tool!

Hot Article
Hot Tools

Notepad++7.3.1
Easy-to-use and free code editor

SublimeText3 Chinese version
Chinese version, very easy to use

Zend Studio 13.0.1
Powerful PHP integrated development environment

Dreamweaver CS6
Visual web development tools

SublimeText3 Mac version
God-level code editing software (SublimeText3)
Hot Topics


 How to install WinNTSetup into Win11 system_How to install WinNTSetup into Win11 system
May 08, 2024 am 11:19 AM
How to install WinNTSetup into Win11 system_How to install WinNTSetup into Win11 system
May 08, 2024 am 11:19 AM
First download the latest Win11 system ISO image, and then in Win10 system, you can directly right-click on the downloaded ISO image file and select [Load]; if it is under WinPE, WinXP, or Win7 system, you need to use the virtual optical drive tool to load the ISO Image; or you can directly decompress the ISO image file without using a virtual optical drive. Then run WinNTSetup. The software interface is as shown in the figure: First locate the location of the install.wim file. You can find the install.wim file in the sources directory of the Win11 ISO image loaded or decompressed by the virtual optical drive. Then set the location of the boot disk and installation disk. Generally, you are going to put W
 When I turn on the computer, it always stops at the motherboard logo screen. Nothing happens when I press anything, and I can't enter the bios?
Apr 23, 2024 am 09:13 AM
When I turn on the computer, it always stops at the motherboard logo screen. Nothing happens when I press anything, and I can't enter the bios?
Apr 23, 2024 am 09:13 AM
When I turn on the computer, it always stops at the motherboard logo screen. Nothing happens when I press anything, and I can't enter the bios? This is usually because the BIOS battery voltage is too low, and the system time has returned to the BIOS preset time, such as 2000.1.1, 00:00. You can use it after pressing F1 to enter the bios and set the time. Do not turn off the AC power after shutting down at night. Generally, the system time will not be lost when you turn on the computer the next day, and you can still enter the system normally. If the AC power is cut off, the battery voltage cannot sustain the power consumption of the bios, and the computer will be in the same state again the next day when it is turned on. Replacing the bios battery is the ultimate solution. Win11 is stuck on the motherboard logo interface when booting? 1. It is a problem with bios settings. We only need to find the corresponding setting items.
 How to disable automatic backup in Windows 10
Apr 18, 2024 pm 07:49 PM
How to disable automatic backup in Windows 10
Apr 18, 2024 pm 07:49 PM
Some Windows 10 users have found that the system's built-in automatic backup function is activated during use. Although this function helps ensure data security, some users may not feel the need to continue enabling it due to storage space considerations or other reasons. This function. Therefore, if you want to turn off the automatic backup function in Windows 10 system, the correct operation steps are particularly important. Next, this article will introduce in detail how to turn off the automatic backup function of the Win10 system for the reference implementation of users who have this need. Close method 1. Use the "win+i" shortcut key to quickly open the "Settings" page. After entering the new page, you need to click the "Update and Security" option. 2. In the new interface that opens, click in the left column
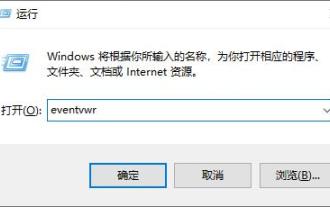 How to check the root cause of Windows 10 system crash
Apr 23, 2024 pm 04:22 PM
How to check the root cause of Windows 10 system crash
Apr 23, 2024 pm 04:22 PM
Faced with the sudden crash problem of Windows 10 system during use, users are often confused and do not know the specific reasons behind it. In order to help you effectively identify and solve this problem, this article will provide in-depth guidance on how to troubleshoot the root cause of the Win10 system crash, and provide a series of practical detection and analysis steps. Whether you are a user who frequently encounters crashes or want to take preventive measures in advance, you may wish to follow the following content to learn more about effective strategies for querying the causes of crashes. Operation method 1. Use the "win+R" shortcut key to start running, enter "eventvwr", and click "OK" to open. 2. After entering the "Event Viewer" page, click the "Windows Log" option in the left column. 3. Then you can choose
 How to open xps file in win10 system
Apr 19, 2024 pm 03:48 PM
How to open xps file in win10 system
Apr 19, 2024 pm 03:48 PM
There are three ways to open XPS files in Windows 10: Use the built-in XPS viewer Use the Microsoft Edge browser Use third-party XPS reader software such as Adobe Acrobat Reader or Foxit Reader
 How to change the default font in WIN10 system
Apr 24, 2024 pm 03:04 PM
How to change the default font in WIN10 system
Apr 24, 2024 pm 03:04 PM
1. Open the device and bring up the registry editor. 2. After the registry editor pops up, navigate to [Computer HKEY_LOCAL_MACHINESOFTWAREMicrosoftWindowsNTCurrentVersionFonts]. 3. Find MicrosoftYaHei&MicrosoftYaHeiUI(TrueType) on the right, which is the system default font. 4. Change the default font name to the font name you need. Specific operations: Change the msyh.ttc at the back to the font you want (right-click the font name you want to change, properties, copy the name above );as the picture shows:
 How to install Windows system on tablet computer
May 03, 2024 pm 01:04 PM
How to install Windows system on tablet computer
May 03, 2024 pm 01:04 PM
How to flash the Windows system on BBK tablet? The first way is to install the system on the hard disk. As long as the computer system does not crash, you can enter the system and download things, you can use the computer hard drive to install the system. The method is as follows: Depending on your computer configuration, you can install the WIN7 operating system. We choose to download Xiaobai's one-click reinstallation system in vivopad to install it. First, select the system version suitable for your computer, and click "Install this system" to next step. Then we wait patiently for the installation resources to be downloaded, and then wait for the environment to be deployed and restarted. The steps to install win11 on vivopad are: first use the software to check whether win11 can be installed. After passing the system detection, enter the system settings. Select the Update & Security option there. Click
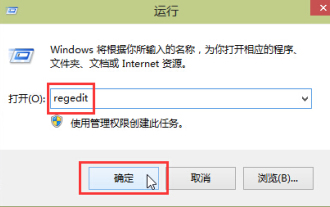 How to improve computer startup speed by modifying Windows 10 registry
Apr 19, 2024 am 08:01 AM
How to improve computer startup speed by modifying Windows 10 registry
Apr 19, 2024 am 08:01 AM
In the process of using the Windows 10 operating system, many users find that it takes a long time to start up their computers, which affects the user experience. In order to optimize the boot speed, some people have suggested that the purpose can be achieved by modifying the system registry. In response to this demand, this article will provide an in-depth analysis of how to effectively improve computer startup speed by properly adjusting Windows 10 registry settings. Let’s take a look below. Operation method 1. Use the "win+R" shortcut key to start running, enter "regedit", and click "OK" to open. 2. After entering the Registry Editor, click "HKEY_CURRENT_USERSoftwareMicrosoftWindowsCurren" in the left column
