

Detailed steps for installing Pymongo in Python3

This article mainly introduces the detailed steps of Python3installationPymongo. The editor thinks it is quite good, so I will share it with you now and give it as a reference. Let’s follow the editor and take a look.
This tutorial shows how to install the Pymongo library. The editor uses pycharm, of course.
Preparation
We use pycharm directly to install the Pymongo library and pycharm's mongodb related management plug-in.
Installing Pymongo
This installation is very simple with the help of pycharm. First open the relevant window according to the menu path below.
Copy code The code is as follows:
pycharm : File > Settings > Project python > Project InterPreter
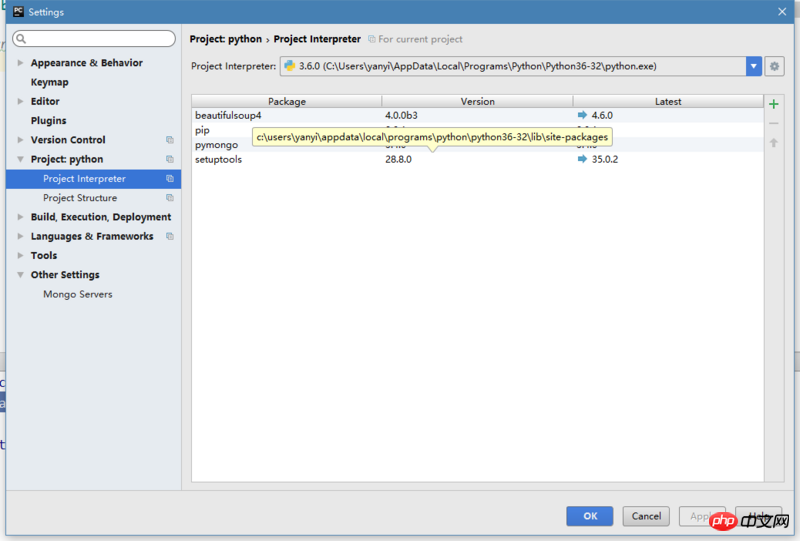
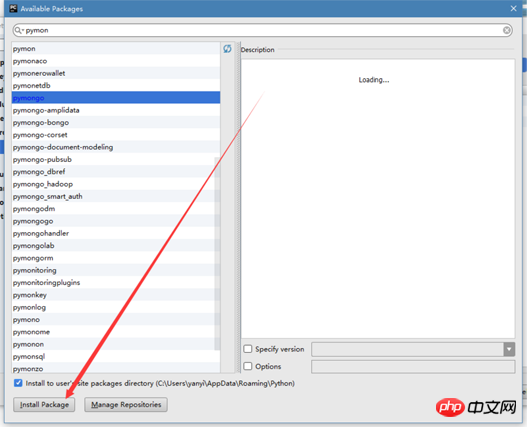
At the above step, you should be able to see a list of libraries. It lists some commonly used installed libraries. Next click on the green plus sign on the right. Open a window of Available Packages and searchkeyword pymongo. Find the relevant library, select it, and then click install package at the bottom left of the window to install it.
Install the Pycharm Mongodb plug-in
Open the window according to the following menu path:
Copy code The code is as follows:
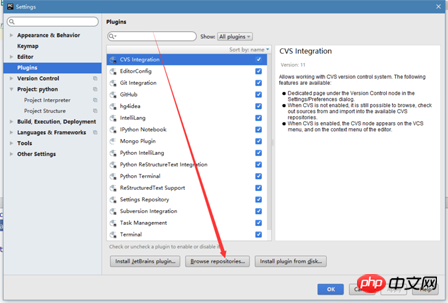
pycharm : File > settings > plugins
At this point, you should see a list of plugins you have installed.
Next click the three buttons below The middle button, Browse repositories... button, to open the list of all plug-ins. Search for mongo, select the Mongo Plugin plug-in, and click on the right window to install it.
Configuring the visual Mongodb tool
The preparation work is completed. Before operating the code, we You need to configure the Mongodb management software first. Otherwise, after operating the database, we will not know what we have done. Tools We use the tools provided by pycharm.
First find a Mongo Exploer button on your page (usually on the left or right side). Click to open the panel and click the settings button.

In the pop-up window, click the small green plus sign on the right to open an information filling window.
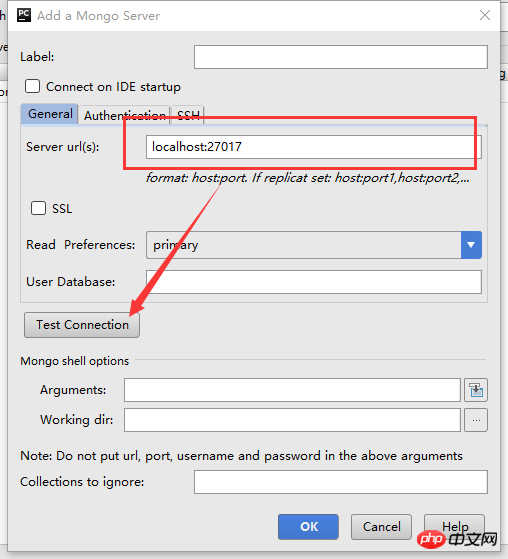
Simply fill in some required fields, click Test Connection, and test whether it is available. If so, that's it.
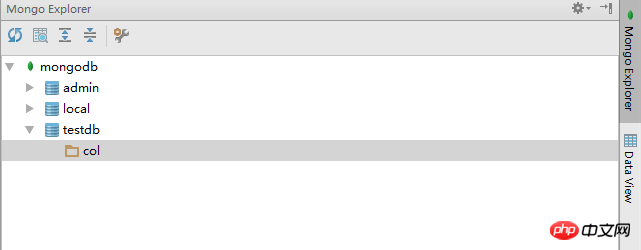
After the configuration is completed, all database information can be displayed.
The above is the detailed content of Detailed steps for installing Pymongo in Python3. For more information, please follow other related articles on the PHP Chinese website!

Hot AI Tools

Undresser.AI Undress
AI-powered app for creating realistic nude photos

AI Clothes Remover
Online AI tool for removing clothes from photos.

Undress AI Tool
Undress images for free

Clothoff.io
AI clothes remover

Video Face Swap
Swap faces in any video effortlessly with our completely free AI face swap tool!

Hot Article
Hot Tools

Notepad++7.3.1
Easy-to-use and free code editor

SublimeText3 Chinese version
Chinese version, very easy to use

Zend Studio 13.0.1
Powerful PHP integrated development environment

Dreamweaver CS6
Visual web development tools

SublimeText3 Mac version
God-level code editing software (SublimeText3)
Hot Topics


 How to solve the permissions problem encountered when viewing Python version in Linux terminal?
Apr 01, 2025 pm 05:09 PM
How to solve the permissions problem encountered when viewing Python version in Linux terminal?
Apr 01, 2025 pm 05:09 PM
Solution to permission issues when viewing Python version in Linux terminal When you try to view Python version in Linux terminal, enter python...
 How to avoid being detected by the browser when using Fiddler Everywhere for man-in-the-middle reading?
Apr 02, 2025 am 07:15 AM
How to avoid being detected by the browser when using Fiddler Everywhere for man-in-the-middle reading?
Apr 02, 2025 am 07:15 AM
How to avoid being detected when using FiddlerEverywhere for man-in-the-middle readings When you use FiddlerEverywhere...
 How to efficiently copy the entire column of one DataFrame into another DataFrame with different structures in Python?
Apr 01, 2025 pm 11:15 PM
How to efficiently copy the entire column of one DataFrame into another DataFrame with different structures in Python?
Apr 01, 2025 pm 11:15 PM
When using Python's pandas library, how to copy whole columns between two DataFrames with different structures is a common problem. Suppose we have two Dats...
 How to teach computer novice programming basics in project and problem-driven methods within 10 hours?
Apr 02, 2025 am 07:18 AM
How to teach computer novice programming basics in project and problem-driven methods within 10 hours?
Apr 02, 2025 am 07:18 AM
How to teach computer novice programming basics within 10 hours? If you only have 10 hours to teach computer novice some programming knowledge, what would you choose to teach...
 How does Uvicorn continuously listen for HTTP requests without serving_forever()?
Apr 01, 2025 pm 10:51 PM
How does Uvicorn continuously listen for HTTP requests without serving_forever()?
Apr 01, 2025 pm 10:51 PM
How does Uvicorn continuously listen for HTTP requests? Uvicorn is a lightweight web server based on ASGI. One of its core functions is to listen for HTTP requests and proceed...
 How to solve permission issues when using python --version command in Linux terminal?
Apr 02, 2025 am 06:36 AM
How to solve permission issues when using python --version command in Linux terminal?
Apr 02, 2025 am 06:36 AM
Using python in Linux terminal...
 How to handle comma-separated list query parameters in FastAPI?
Apr 02, 2025 am 06:51 AM
How to handle comma-separated list query parameters in FastAPI?
Apr 02, 2025 am 06:51 AM
Fastapi ...
 How to get news data bypassing Investing.com's anti-crawler mechanism?
Apr 02, 2025 am 07:03 AM
How to get news data bypassing Investing.com's anti-crawler mechanism?
Apr 02, 2025 am 07:03 AM
Understanding the anti-crawling strategy of Investing.com Many people often try to crawl news data from Investing.com (https://cn.investing.com/news/latest-news)...
