
 Backend Development
PHP Tutorial
Fine Uploader file upload component application introduction_PHP tutorial
Backend Development
PHP Tutorial
Fine Uploader file upload component application introduction_PHP tutorial
Fine Uploader file upload component application introduction_PHP tutorial

Recently, file upload needs to be implemented when processing background data. Considering the browser adaptation, Fine Uploader is used. Fine Uploader uses ajax to upload files. At the same time, it directly supports file drag and drop in the browser [for browsers] The version requirements are similar to IE version 9 or higher [IE10]. It provides a unified user experience in different browsers. This component basically covers all current mainstream browsers. At the same time, it does not rely on any third-party components. It is quite clear. On the server The terminal has covered and supported ASP.NET/ColdFusion/Java/Node.js/Perl/PHP/Python. Upload details such as limiting file size, file type, number of file uploads, etc. are operated through a unified interface and exposed options.
See the Fine Uploader on Github. According to the official statement, the predecessor of Fine Uploader is Ajax Upload. The new version of Fine Uploader mainly adds some new features. Judging from the Realse Note released in version 1.0, the biggest difference between the two is. Fine Uploder is no longer based on Jquery components, and some details are processed more uniformly and strictly. Similar return values are all unified into Json format. Some operation codes for background server operations and front-end Dom objects are all concentrated in Js Script script files. This integration makes the Fine Uploader component It is very simple to use. You only need to add a CSS+JavaScript file to upload files. It greatly simplifies the difficulty of user reference and operation of components.
Fine Uploader features are as follows:
Fine Uploader Features :
A: Supports file upload progress display.
B: File drag and drop browser upload method
C: Ajax page without refreshing.
D: Multiple file upload.
F: Cross-browsing
E: Cross-backend server-side language.
Download the packaging source code on the Fine Uploader on Git Hub. Open the source code in Php Designer 8 and you can see that the source code structure is as follows: 
In the root directory, you can see the files required for Client calls. The Server directory corresponds to different language versions such as Perl/Php/Asp.net[VB]. The test directory contains a complete local Sample Demo. For reference.
How to quickly build a simple Demo? In fact, the official has given a simple demonstration on Basic-Demo-Page. It is built based on Bootstrap.
First create a new blank Html page. Name it FineUploderDemo.html .Add the following CSS reference as follows:
When these two files The .fineuploader.css that must be referenced corresponds to the .fineuploder.css in the Client directory of the downloaded Fine Uploder source code. It provides the CSS styles required in the JS script, mainly including the style of the button, the style of the progress display, and the style of the upload result. Add JavaScript files Quote as follows:
Uploder.js and uploader.basic.js are all the upload functions of the front end All are implemented in this script. They must be quoted.
At the same time, add the two dynamic pictures required for progress display of processing and loading in the client directory. The pictures are called in the fineuploder.css file.
Add in the body The following Code:
<script> <br>function createUploader() { <br>var uploader = new qq.FineUploader({ <br>element: document.getElementById('bootstrapped-fine-uploader'), <br>request: { <br>endpoint: 'server/handlerfunction' <br>}, <br>text: { <br>uploadButton: '<i class="icon-upload icon-white"></i> Click me now and upload a product image' <br>}, <br>template: <br>'<div class="qq-uploader span12">' + <br>'<pre class="qq-upload-drop-area span12"><span>{dragZoneText}</span></pre>' + <br>'<div class="qq-upload-button btn btn-success" style="width: auto;">{uploadButtonText}</div>' + <br>'<span class="qq-drop-processing"><span>{dropProcessingText}</span>'+ <br>'<span class="qq-drop-processing-spinner"></span></span>' + <br>'<ul class="qq-upload-list" style="margin-top: 10px; text-align: center;"></ul>' + <br>'</div>', <br>classes: { <br>success: 'alert alert-success', <br>fail: 'alert alert-error' <br>}, <br>debug: true <br>}); <br>} <br><br>window.onload = createUploader; <br></script>
这是基于Bootstrap实现对Fine Uploader最简单的前端调用.前端一般需要做两件事A:添加Css+Js文件引用.B:在Js中实例化qq.FineUploder对象.运行效果如下:

查看JS构建qq.Fineuploader对象创建过程.首先指定Fine Uploader插件的Dom元素.通过Dom获取操作.request则是对应服务器端实现文件路径.在这建议不要自己构建服务器端处理.而是直接采用官方提供的实现文件修改即可.template则是对应上传文件添加内容模版也可以自己修改.debug是一个布尔值.用来控制是否使用浏览器的控制台打印Fine Uploader的调试信息,默认为false.
qq.FineUploader对象还有如下控制参数:
validation:该参数一般用来在执行上传文件操作前.在客户端做一些验证.验证操作包含文件格式.文件大小.等添加格式如下:
validation:
{
allowedExtensions: ['jpeg', 'jpg', 'gif', 'png'],
sizeLimit: 204800 // 200 kB = 200 * 1024 bytes
}
allowedExtensions控制上传文件的后缀格式数组.
sizeLimit上传文件大小的上限,单位为byte的数值.浏览器不一定支持本设置.也可以在服务器端里设置.
minSizeLimit:上传文件大小的下限,单位为byte的数值.同上有些浏览器存在适配问题.建议统一在服务端设置.
另外针对qq.FineUploder对象在执行上传操作整个过程.定义了五个客户端可控做额外操作的事件.可以再callback参数下设置定义:
callbacks:
{
onSubmit: function(id, fileName) {
$messages.append('');
},
onUpload: function(id, fileName) {
$('#file-' + id).addClass('alert-info')
.html('
 ' +
' + 'Initializing ' +
'“' + fileName + '”');
}
}
onSubmit event: The file starts to be submitted. The calling parameter format is as follows: onSubmit:function(id, fileName){}.
onUpload event: The file starts to be uploaded. The calling parameter format is as follows: onUpload: function(id, fileName) { }.
onProgress event: The file is being uploaded. The calling parameter format is as follows: onProgress:function(id,fileName,loaded,total){}.
onComplete event: The file is uploaded successfully. The calling parameter format is as follows: onComplete:function (id,fileName,responseJSON){}.
onCancel event: Cancel file upload. The calling parameter format is as follows: onCancel:function(id,fileName){}.
The above five events basically cover the entire upload file operation All processes are completely open and can be operated on the client side. The parameters for calling the above events are as follows:
Id: indicates which file to start uploading. The Fine Uploder definition starts counting from 0 by default.
fileName : The file name of the uploaded file.
loaded: Indicates the size of the data that has been uploaded to the server [byte].
total: The size of the file that needs to be uploaded.
responseJSON: Used to return after the upload operation is completed Data in Json format. The object is deserialized through Jquery. It contains an IsSuccess attribute to determine whether the upload is successful.
If you want to transfer data to the server during the upload process, you can control it through the following parameters:
params: used to transfer data to the server. Note that params is stored in a key-value array. It is sent to the server in Post mode. The general format of passing parameters is as follows:
params:
{
argument1: "value1",
argument2: "value2"
},
ok. At this time, the Fine Uploader client initialization and control operation options are basically completed. When we need to upload the operation. If IsAuto=false, we can manually trigger the upload through the uploadStoreFiles() method of the qq.FineUploader object. Operation:
$('#triggerUpload').click(function() {
uploader2.uploadStoredFiles();
});
If we click upload at this time, we will find that the upload failed. Because no processing has been done on the upload server:
request:
{
endpoint: 'server/handlerfunction'
},
At this time we need to specify the Php file for processing file upload in EndPoint [here is phpdemo]. Regarding the server side, if you do not have a mature processing module, it is still recommended that you use the official Server directory. Here I If the php environment is used, select the php.php file. The corresponding client modification is as follows:
request :
{
endpoint: 'controller/php.php'
}
Open php.php and find in the file header that the file uses three classes defined in the file at the same time Used to handle XMLHttpRequest, FormPost, and BasicPost file server-side processing respectively. In the comments at the top of the file:
/****************************************
Example of how to use this uploader class...
You can uncomment the following lines (minus the require) to use
hese as your defaults.
// list of valid extensions, ex. array("jpeg", "xml", "bmp")
$allowedExtensions = array();
// max file size in bytes
$sizeLimit = 10 * 1024 * 1024;
//the input name set in the javascript
$inputName = 'qqfile'
require('valums-file-uploader/server/php.php');
$uploader = new qqFileUploader($allowedExtensions, $sizeLimit, $inputName);
// Call handleUpload() with the name of the folder, relative to PHP's getcwd()
$result = $uploader->handleUpload('uploads/');
// to pass data through iframe you will need to encode all html tags
header("Content-Type: text/plain");
echo htmlspecialchars(json_encode($result), ENT_NOQUOTES);
/******************************************/
The following Class calling method has been described in detail. Add the following Php code to simply Complete server-side processing:
$allowedExtensions = array("jpeg", "jpg", "bmp", "png");
$sizeLimit = 10 * 1024 * 1024;
$uploader = new qqFileUploader($allowedExtensions, $sizeLimit);
$result = $uploader->handleUpload( 'uploads/'); //folder for uploaded files
echo htmlspecialchars(json_encode($result), ENT_NOQUOTES);
allowExtensions defines the format that allows uploading files.
The upper limit of sizeLimit is defined as 10M. Note that the Phpinfo(); method is first used to output the current PHP environment configuration. Generally, the default maximum size of uploaded files is 2M. If you need To upload a larger file, modify the php.ini file configuration parameters which will not be described here.
uploder initializes the qq.Fileuploder object and loads the configuration.
fineuploder calls the upload processing function and passes the server-side storage upload File storage path.
echo wants the server to output the upload result. It is necessary. Otherwise the client will not be able to accept the specified responseJason parameter to determine the upload status.
Let’s take a closer look at how the server handles the upload and find the handleUpload function definition. .
/**
* Handle the uploaded file
* @param string $uploadDirectory
* @param string $replaceOldFile=true
* @returns array('success'=>true) or array('error'=>'error message')
*/
function handleUpload($uploadDirectory, $replaceOldFile = FALSE){
if (!is_writable($uploadDirectory)){
return array('error' => "Server error. Upload directory isn't writable.");
}
if (!$this->file){
return array('error' => 'No files were uploaded.');
}
$size = $this->file->getSize();
if ($size == 0) {
return array('error' => 'File is empty');
}
if ($size > $this->sizeLimit) {
return array('error' => 'File is too large');
}
$pathinfo = pathinfo($this->file->getName());
$filename = $pathinfo['filename'];
//$filename = md5(uniqid());
$ext = @$pathinfo['extension'];// hide notices if extension is empty
if($this->allowedExtensions && !in_array(strtolower($ext), $this-> ;allowedExtensions)){
$these = implode(', ', $this->allowedExtensions);
return array('error' => 'File has an invalid extension, it should be one of ' . $these . '.');
}
$ext = ($ext == '') ? $ext : '.' . $ext;
if(! $replaceOldFile){
/// don't overwrite previous files that were uploaded
while (file_exists($uploadDirectory . DIRECTORY_SEPARATOR . $filename . $ext)) {
$filename .= rand(10, 99);
}
}
$this->uploadName = $filename . $ext;
if ($this->file->save($ uploadDirectory . DIRECTORY_SEPARATOR . $filename . $ext)){
return array('success'=>true);
} else {
return array('error'=> 'Could not save uploaded file.' .
'The upload was canceled, or server error encountered');
}
}
You need to pay attention when calling this processing function. Yes. The passed URL storage path needs to be absolute. Therefore, you need to format the incoming path:
$uploadDirectory = $_SERVER['DOCUMENT_ROOT']."DS".$uploadDirectory;
For is_writeable determines whether the file is writable. I personally think it is not detailed enough. is_writeable mainly determines whether the file or directory exists. It will return true only if it is writable. Therefore, I personally recommend adding a file before is_writable to see whether it exists. This makes it easier to use on the client. Determine the specific situation of server-side file errors:
if (!file_exists($uploadDirectory)) {
return array('error' => "Server error. Upload directory dones't exist.");
}
Before saving the file, you can see that the processing function made four judgments respectively. It judged the number of uploaded files, the size of the file uploaded, whether the file upload size exceeded the upper limit, and during the upload process. If we have more The next time I want to upload the same file to the server, I found that the Fine Uploder processing method is not to rewrite. Instead, it rewrites and names the file with a random number from 10-99 and saves it to the directory. When the file is saved successfully, I want to The server returns a Json data that contains IsSuccess to specify whether the upload operation is successful. The IsSuccess parameter is used as the only parameter for the client to judge the operation at this time.
During the upload operation, many messages appear "increase post_max_size and upload_max_filesize" to 10M" error, in fact, for this problem, the main reason is that the upload file configuration exceeds the default 2M of the PHP environment. You need to change the values of post_max_size and upload_max_filesize in the php.ini file to more than 10M, and then restart Apache. Or Refer to the Php official website to modify the php.ini configuration file for the configuration instructions.
At this point, the entire Fine Uploader configuration process has been completed. When you click to select the file, the following effect will appear:

Prompt that the upload is successful. Of course, more For more information, please refer to the official demo. As above, the implementation principle is analyzed from the perspective of Fine Uploader source code.

Hot AI Tools

Undresser.AI Undress
AI-powered app for creating realistic nude photos

AI Clothes Remover
Online AI tool for removing clothes from photos.

Undress AI Tool
Undress images for free

Clothoff.io
AI clothes remover

Video Face Swap
Swap faces in any video effortlessly with our completely free AI face swap tool!

Hot Article
Hot Tools

Notepad++7.3.1
Easy-to-use and free code editor

SublimeText3 Chinese version
Chinese version, very easy to use

Zend Studio 13.0.1
Powerful PHP integrated development environment

Dreamweaver CS6
Visual web development tools

SublimeText3 Mac version
God-level code editing software (SublimeText3)
Hot Topics


 Open source! Beyond ZoeDepth! DepthFM: Fast and accurate monocular depth estimation!
Apr 03, 2024 pm 12:04 PM
Open source! Beyond ZoeDepth! DepthFM: Fast and accurate monocular depth estimation!
Apr 03, 2024 pm 12:04 PM
0.What does this article do? We propose DepthFM: a versatile and fast state-of-the-art generative monocular depth estimation model. In addition to traditional depth estimation tasks, DepthFM also demonstrates state-of-the-art capabilities in downstream tasks such as depth inpainting. DepthFM is efficient and can synthesize depth maps within a few inference steps. Let’s read about this work together ~ 1. Paper information title: DepthFM: FastMonocularDepthEstimationwithFlowMatching Author: MingGui, JohannesS.Fischer, UlrichPrestel, PingchuanMa, Dmytr
 The operation process of WIN10 service host occupying too much CPU
Mar 27, 2024 pm 02:41 PM
The operation process of WIN10 service host occupying too much CPU
Mar 27, 2024 pm 02:41 PM
1. First, we right-click the blank space of the taskbar and select the [Task Manager] option, or right-click the start logo, and then select the [Task Manager] option. 2. In the opened Task Manager interface, we click the [Services] tab on the far right. 3. In the opened [Service] tab, click the [Open Service] option below. 4. In the [Services] window that opens, right-click the [InternetConnectionSharing(ICS)] service, and then select the [Properties] option. 5. In the properties window that opens, change [Open with] to [Disabled], click [Apply] and then click [OK]. 6. Click the start logo, then click the shutdown button, select [Restart], and complete the computer restart.
 Google is ecstatic: JAX performance surpasses Pytorch and TensorFlow! It may become the fastest choice for GPU inference training
Apr 01, 2024 pm 07:46 PM
Google is ecstatic: JAX performance surpasses Pytorch and TensorFlow! It may become the fastest choice for GPU inference training
Apr 01, 2024 pm 07:46 PM
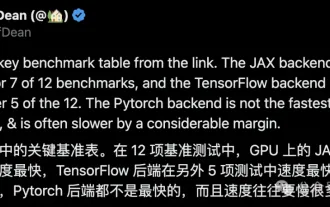
The performance of JAX, promoted by Google, has surpassed that of Pytorch and TensorFlow in recent benchmark tests, ranking first in 7 indicators. And the test was not done on the TPU with the best JAX performance. Although among developers, Pytorch is still more popular than Tensorflow. But in the future, perhaps more large models will be trained and run based on the JAX platform. Models Recently, the Keras team benchmarked three backends (TensorFlow, JAX, PyTorch) with the native PyTorch implementation and Keras2 with TensorFlow. First, they select a set of mainstream
 Slow Cellular Data Internet Speeds on iPhone: Fixes
May 03, 2024 pm 09:01 PM
Slow Cellular Data Internet Speeds on iPhone: Fixes
May 03, 2024 pm 09:01 PM
Facing lag, slow mobile data connection on iPhone? Typically, the strength of cellular internet on your phone depends on several factors such as region, cellular network type, roaming type, etc. There are some things you can do to get a faster, more reliable cellular Internet connection. Fix 1 – Force Restart iPhone Sometimes, force restarting your device just resets a lot of things, including the cellular connection. Step 1 – Just press the volume up key once and release. Next, press the Volume Down key and release it again. Step 2 – The next part of the process is to hold the button on the right side. Let the iPhone finish restarting. Enable cellular data and check network speed. Check again Fix 2 – Change data mode While 5G offers better network speeds, it works better when the signal is weaker
 How to Undo Delete from Home Screen in iPhone
Apr 17, 2024 pm 07:37 PM
How to Undo Delete from Home Screen in iPhone
Apr 17, 2024 pm 07:37 PM
Deleted something important from your home screen and trying to get it back? You can put app icons back on the screen in a variety of ways. We have discussed all the methods you can follow and put the app icon back on the home screen. How to Undo Remove from Home Screen in iPhone As we mentioned before, there are several ways to restore this change on iPhone. Method 1 – Replace App Icon in App Library You can place an app icon on your home screen directly from the App Library. Step 1 – Swipe sideways to find all apps in the app library. Step 2 – Find the app icon you deleted earlier. Step 3 – Simply drag the app icon from the main library to the correct location on the home screen. This is the application diagram
 Tesla robots work in factories, Musk: The degree of freedom of hands will reach 22 this year!
May 06, 2024 pm 04:13 PM
Tesla robots work in factories, Musk: The degree of freedom of hands will reach 22 this year!
May 06, 2024 pm 04:13 PM
The latest video of Tesla's robot Optimus is released, and it can already work in the factory. At normal speed, it sorts batteries (Tesla's 4680 batteries) like this: The official also released what it looks like at 20x speed - on a small "workstation", picking and picking and picking: This time it is released One of the highlights of the video is that Optimus completes this work in the factory, completely autonomously, without human intervention throughout the process. And from the perspective of Optimus, it can also pick up and place the crooked battery, focusing on automatic error correction: Regarding Optimus's hand, NVIDIA scientist Jim Fan gave a high evaluation: Optimus's hand is the world's five-fingered robot. One of the most dexterous. Its hands are not only tactile
 The vitality of super intelligence awakens! But with the arrival of self-updating AI, mothers no longer have to worry about data bottlenecks
Apr 29, 2024 pm 06:55 PM
The vitality of super intelligence awakens! But with the arrival of self-updating AI, mothers no longer have to worry about data bottlenecks
Apr 29, 2024 pm 06:55 PM
I cry to death. The world is madly building big models. The data on the Internet is not enough. It is not enough at all. The training model looks like "The Hunger Games", and AI researchers around the world are worrying about how to feed these data voracious eaters. This problem is particularly prominent in multi-modal tasks. At a time when nothing could be done, a start-up team from the Department of Renmin University of China used its own new model to become the first in China to make "model-generated data feed itself" a reality. Moreover, it is a two-pronged approach on the understanding side and the generation side. Both sides can generate high-quality, multi-modal new data and provide data feedback to the model itself. What is a model? Awaker 1.0, a large multi-modal model that just appeared on the Zhongguancun Forum. Who is the team? Sophon engine. Founded by Gao Yizhao, a doctoral student at Renmin University’s Hillhouse School of Artificial Intelligence.
 Alibaba 7B multi-modal document understanding large model wins new SOTA
Apr 02, 2024 am 11:31 AM
Alibaba 7B multi-modal document understanding large model wins new SOTA
Apr 02, 2024 am 11:31 AM
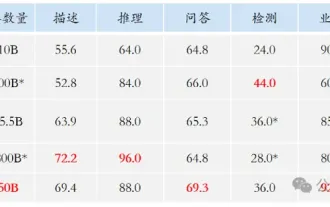
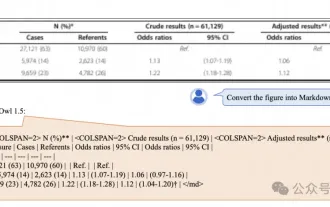
New SOTA for multimodal document understanding capabilities! Alibaba's mPLUG team released the latest open source work mPLUG-DocOwl1.5, which proposed a series of solutions to address the four major challenges of high-resolution image text recognition, general document structure understanding, instruction following, and introduction of external knowledge. Without further ado, let’s look at the effects first. One-click recognition and conversion of charts with complex structures into Markdown format: Charts of different styles are available: More detailed text recognition and positioning can also be easily handled: Detailed explanations of document understanding can also be given: You know, "Document Understanding" is currently An important scenario for the implementation of large language models. There are many products on the market to assist document reading. Some of them mainly use OCR systems for text recognition and cooperate with LLM for text processing.
