

用Python实现QQ游戏大家来找茬辅助工具

好久没写技术相关的文章,这次写篇有意思的,关于一个有意思的游戏——QQ找茬,关于一种有意思的语言——Python,关于一个有意思的库——Qt。
这是一个用于QQ大家来找茬(美女找茬)的辅助外挂,开发的原因是看到老爸天天在玩这个游戏,分数是惨不忍睹的负4000多。他玩游戏有他的乐趣,并不很在意输赢,我做这个也只是自我娱乐,顺便讨他个好,毕竟我们搞编程的实在难有机会在父辈面前露露手。本来是想写个很简单的东西,但由于过程中老爸的多次嘲讽,逼得我不得不尽力完善,最后形成了一个小小的产品。
接触Python是2010年,相见恨晚,去年拿它写了些小玩意,离职前给前公司留下了一个Python+wxPython的工作工具,还挺受欢迎。换公司后努力学习C++&Qt,很后悔当初选择了wxPython而不是PyQt,没能一脉相承。使用Qt越久,不得不越来越喜欢,写这个东西正好就用上了。
话不多说,进入正题。这不是一篇完整的代码讲解,只是过程中的一些技术做个分享,包括后来被放弃的一些技术点。当初搜索这些东西也挺费力的,在这做个笔记,后来者也许能搜到收益。
先上个图:
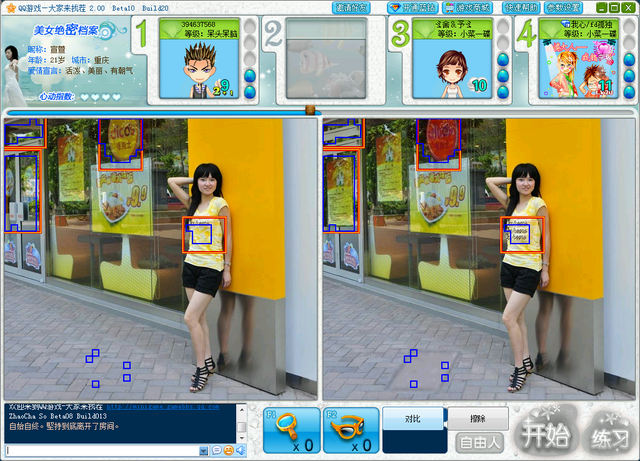
话说这位是游戏中出镜最多的MM,和QQ什么关系啊?
辅助工具在游戏中增加了两个按钮,点击“对比”则自动找“茬”,用蓝色小框标识,点击“擦除”清除标识。
游戏窗口探查
这得用PyWin32库,它是对windows接口的Python封装,VC能做的它基本都行。
下载地址:http://sourceforge.net/projects/pywin32/,但不能直接点Download图标,不然下下来是一个Readme.txt,点“Browse All Files”寻找需要的版本。
#coding=gbk  import win32gui

game_hwnd = win32gui.FindWindow("#32770", "大家来找茬") print game_hwnd
QQ找茬是个对话框窗口,Class是“#32770”,这种窗口桌面上有很多,所以还配合了标题“大家来找茬”匹配,又因为是中文,所以第一行指定了使用gbk编码,否则要么找不到,要么运行出错。
游戏图片提取
提取图片采用了截屏的方式,找到窗口后将窗口提到最前,再作窗口截屏。截屏使用了大名鼎鼎的Python Imaging Library (PIL)库。
import ImageGrab import win32con

win32gui.ShowWindow(game_hwnd, win32con.SW_RESTORE) # 强行显示界面后才好截图 win32gui.SetForegroundWindow(game_hwnd) # 将游戏窗口提到最前  # 裁剪得到全图 game_rect = win32gui.GetWindowRect(game_hwnd)
src_image = ImageGrab.grab((game_rect[0] + 9, game_rect[1] + 190, game_rect[2] - 9, game_rect[1] + 190 + 450)) # src_image.show()  # 分别裁剪左右内容图片 left_box = (9, 0, 500, 450)
right_box = (517, 0, 517 + 500, 450)
image_left = src_image.crop(left_box)
image_right = src_image.crop(right_box) # image_left.show() # image_right.show()
上面用到的坐标都为为了演示代码简单填的,实际上使用了变量参数,而且要区分分辨率什么的。
PIL是一个强大的Python图形库(使用文档),待会的对比分析也须要用到。ImageGrab是PIL的一个模块,用于图像的抓取。不带参数的ImageGrab.grab()进行全屏截屏,返回一个Image对象,也可使用一个元组作为参数指定要截取的范围(左上与右下两点的坐标),这两种截屏都是不带鼠标指针的,还有一个ImageGrab.grabclipboard()可从系统剪贴板采集图像。
得到Image图像后可用show()方法,使用系统默认的图像查看工具打开,方便调试,也可以用save(filename)保存成文件,对应的可以Image.open(filename)打开获得。
grab得到了一个包含左右图片的Image对象后,用crop(box)方法可裁剪得到其中指定的区域,分别拿到左右两个游戏图片。
对比获得两图内容不同的区域
很自然想到把两图裁剪成N个小图片分别对比,左右统一区域对应的小图片不相等则为“茬”区,唯一的问题是怎么判断两个图片内容不一致?
一开始以为很会有些麻烦,直到发现了Image.histogram()函数,该函数用于得到图像的颜色直方图。我平常也爱好摄影,知道直方图可以表示一张图片中各种亮度(或颜色)的数量,两张自然图片的直方图基本是不一样的,除非两图对称、颜色一致但排列不一,但就算如此,将两图继续分割下去,其子图的直方图也会不一样。直方图就是一种图形到数值的转换,对比两图的颜色数值就可知是否存在差异。
一张用RBG颜色格式的图像,histogram()函数将返回一个长度为768的数组,第0-255表示红色的0-255,第256-511表色绿色的0-255,第512-767表色蓝色的0-255,数值表示该颜色像素的个数。因此,histogram()列表所有成员之和等于改图像的像素值 x 3。
写了一个函数,用来获得两图比较的数值差:
ef compare(image_a, image_b): '''返回两图的差异值
  返回两图红绿蓝差值万分比之和''' histogram_a = image_a.histogram()
  histogram_b = image_b.histogram() if len(histogram_a) != 768 or len(histogram_b) != 768: return None
  red_a = 0 red_b = 0 for i in xrange(0, 256):
    red_a += histogram_a[i + 0] * i
    red_b += histogram_b[i + 0] * i
  diff_red = 0 if red_a + red_b > 0:
    diff_red = abs(red_a - red_b) * 10000 / max(red_a, red_b)

  green_a = 0 green_b = 0 for i in xrange(0, 256):
    green_a += histogram_a[i + 256] * i
    green_b += histogram_b[i + 256] * i
  diff_green = 0 if green_a + green_b > 0:
    diff_green = abs(green_a - green_b) * 10000 / max(green_a, green_b)

  blue_a = 0 blue_b = 0 for i in xrange(0, 256):
    blue_a += histogram_a[i + 512] * i
    blue_b += histogram_b[i + 512] * i
  diff_blue = 0 if blue_a + blue_b > 0:
    diff_blue = abs(blue_a - blue_b) * 10000 / max(blue_a, blue_b)
return diff_red, diff_green, diff_blue将函数返回的红绿蓝差值相加,如果超过了预定定的阀值2000,则表示该区域不同。这个计算方式有点“土”,但对这次要解决的问题很有效,就没再继续改进。
将左右大图裁剪成多个小图分别进行对比 result = [[0 for a in xrange(0, 50)] for b in xrange(0, 45)] for col in xrange(0, 50):
  for row in xrange(0, 45):
    clip_box = (col * 10, row * 10, (col + 1) * 10, (row + 1) * 10)
    clip_image_left = image_left.crop(clip_box)
    clip_image_right = image_right.crop(clip_box)
    clip_diff = self.compare(clip_image_left, clip_image_right)

    if sum(clip_diff) > 2000:
      result[row][col] = 1
大图是500x450,分隔成10x10的小块,定义一个50x45的二位数组存储结果,分别比较后将差值大于阀值的数组区域标记为1.
在游戏上标记两边不同的区域
最初我用了PyWin32的一些函数,获得游戏窗口句柄后直接在上面绘制,但我不太熟悉Windows编程,不知道如何解决游戏自身重绘后将我的标记擦除的问题,然后搬来了Qt。用Qt创建了一个和游戏大小一样透明的QWidget窗口,叠加在游戏窗口上,用遮罩来绘制标记。标记数据已记录在result数组中,在指定的位置绘制一个方格则表示该区域左右不同,要注意两个方格间的边界不要绘制,避免格子太多干扰了游戏。除标记外,还绘制了两个按钮来触发对比与擦除。
ef paintEvent(self, event): # 重置遮罩图像 self.pixmap.fill()
 # 创建绘制用的QPainter,笔画粗细为2像素 # 事先已经在Qt窗体上铺了一个蓝色的背景图片,因此投过遮罩图案看下去标记线条是蓝色的 p = QPainter(self.pixmap)
  p.setPen(QPen(QBrush(QColor(0, 0, 0)), 2))
 for row in xrange(len(self.result)): for col in xrange(len(self.result[0])): if self.result[row][col] != 0: # 定一个基点,避免算数太难看 base_l_x = self.ANCHOR_LEFT_X + self.CLIP_WIDTH * col
        base_r_x = self.ANCHOR_RIGHT_X + self.CLIP_WIDTH * col
        base_y = self.ANCHOR_Y + self.CLIP_HEIGHT * row
 if row == 0 or self.result[row - 1][col] == 0: # 如果是第一行,或者上面的格子为空,画一条上边 p.drawLine(base_l_x, base_y, base_l_x + self.CLIP_WIDTH, base_y)
          p.drawLine(base_r_x, base_y, base_r_x + self.CLIP_WIDTH, base_y) if row == len(self.result) - 1 or self.result[row + 1][col] == 0: # 如果是最后一行,或者下面的格子为空,画一条下边 p.drawLine(base_l_x, base_y + self.CLIP_HEIGHT, base_l_x + self.CLIP_WIDTH, base_y + self.CLIP_HEIGHT)
          p.drawLine(base_r_x, base_y + self.CLIP_HEIGHT, base_r_x + self.CLIP_WIDTH, base_y + self.CLIP_HEIGHT) if col == 0 or self.result[row][col - 1] == 0: # 如果是第一列,或者左边的格子为空,画一条左边 p.drawLine(base_l_x, base_y, base_l_x, base_y + self.CLIP_HEIGHT)
          p.drawLine(base_r_x, base_y, base_r_x, base_y + self.CLIP_HEIGHT) if col == len(self.result[0]) - 1 or self.result[row][col + 1] == 0: # 如果是第一列,或者右边的格子为空,画一条右边 p.drawLine(base_l_x + self.CLIP_WIDTH, base_y, base_l_x + self.CLIP_WIDTH, base_y + self.CLIP_HEIGHT)
          p.drawLine(base_r_x + self.CLIP_WIDTH, base_y, base_r_x + self.CLIP_WIDTH, base_y + self.CLIP_HEIGHT)
 # 在遮罩上绘制按钮区域,避免按钮被遮罩挡住看不见 p.fillRect(self.btn_compare.geometry(), QBrush(QColor(0, 0, 0)))
  p.fillRect(self.btn_toggle.geometry(), QBrush(QColor(0, 0, 0)))
 # 将遮罩图像作为遮罩 self.setMask(QBitmap(self.pixmap))
这里我没有替换变量,太麻烦了,能看清楚算法就行。
让PyQt程序在任务栏隐藏
为了让PyQt程序不出现在任务栏,构造QWidget设置了这些属性
self.setWindowFlags(Qt.FramelessWindowHint | Qt.WindowStaysOnTopHint | Qt.Popup | Qt.Tool)
让PyQt程序加入系统托盘、资源文件使用
PyQt添加托盘菜单非常容易,几行代码就可以
创建托盘 self.icon = QIcon(":\icon.png")
 self.trayIcon = QSystemTrayIcon(self) self.trayIcon.setIcon(self.icon) self.trayIcon.setToolTip(u"QQ找茬助手") self.trayIcon.show()
 # 托盘气泡消息 self.trayIcon.showMessage(u"QQ找茬助手", u"QQ找茬助手已经待命,进入游戏即可激活")
 # 托盘菜单 self.action = QAction(u"退出QQ找茬助手", self, triggered = sys.exit) # 触发点击后调用sys.exit()命令,即退出 self.menu = QMenu(self) self.menu.addAction(self.action) self.trayIcon.setContextMenu(self.menu)

最初我是用的托盘图标是一个.ico文件,执行脚本可以正常显示,但打包成exe后执行在托盘上显示为一个空白图标,用Python的idle工具编译运行也是空白。尝试多次后发现:PyQt的托盘图标不能使用.ico文件,否则会显示空白,换成png格式素材就没问题!
PyQt资源文件打包
Qt使用一个.qrc格式的xml文件管理素材,代码用可用:\xxx\xxx.png的方式引用资源文件中的素材,这在PyQt中同样支持。
这里我创建了一个resources.qrc文件
<!DOCTYPE RCC> <RCC version="1.0"> <qresource> <file>icon.png</file> </qresource> </RCC>
然后用
pyrcc4 resources.qrc > resources.py
命令,将资源文件转成一个python模块,在代码中import resources,则可以用这样的方式使用图像素材
self.icon = QIcon(":\icon.png")
打包成可执行程序
这个工具是给别人用的,肯定不能以py脚本的形式发布,我使用了cx_Freeze来打包为可执行程序。
为此要写一个打包命令脚本convert2exe.py
#!Python #coding=gbk  # python转exe脚本 # # 安装cx_Freeze # 执行 python convert2exe.py build # 将自动生成build目录, 其下所有文件都必须打包 #  import sys from cx_Freeze import setup, Executable

base = None if sys.platform == "win32":
  base = "Win32GUI"
buildOptions = dict(
  compressed = True)

setup(
    name = "ZhaoChaAssistant", version = "1.0", description = "ZhaoChaAssistant", options = dict(build_exe = buildOptions), executables = [Executable("zhaochaassistant.py", base = base, icon = "icon.ico")])
最后执行一个命令
python convert2exe.py build
则会在当前路径下创建个build目录,打包的程序就在其中一个exe.win-amd64-2.7的目录中,运行exe即可执行,与Python无二。可惜这个包太大了一些,整个目录达到了30M。
为了让exe程序也有一个好看的图标,在最后一行中的executables参数中指定了icon = "icon.ico",这个图标就最好使用多页的.ico格式(16x16,32x32,48x48...),让程序在各种显示环境下(桌面、文件夹)都有原生的显示。
如果打包的时候必须使用独立的资源,可在buildOptions字典参数中增加一条include_files = ['xxx.dat']配置,这样在打包时会将python脚本目录中的xxx.dat文件拷贝到exe目录中,不写的话就得人工拷贝了。
小技巧:Python获得自己的绝对路径
Python中有个魔术变量可以得到脚本自身的名称,但转换成exe后该变量失效,这时得改用sys.executable获得可执行程序的名称,可用hasattr(sys, "frozen")判断自己是否已被打包,下面是一个方便取绝对路径的函数:
import sys def module_path(): if hasattr(sys, "frozen"): return os.path.dirname(os.path.abspath(unicode(sys.executable, sys.getfilesystemencoding()))) return os.path.dirname(os.path.abspath(unicode(__file__, sys.getfilesystemencoding())))
结束语
Python可能是程序员最好的玩具,什么都能粘起来,日常写点小工具再合适不过了。
文中的第三方模块都可以Google获得下载地址,有些库没有Win7 64位的原始版本(比如PIL),但可到
http://www.lfd.uci.edu/~gohlke/pythonlibs/
下载别人编译好的,也很方便。

Hot AI Tools

Undresser.AI Undress
AI-powered app for creating realistic nude photos

AI Clothes Remover
Online AI tool for removing clothes from photos.

Undress AI Tool
Undress images for free

Clothoff.io
AI clothes remover

Video Face Swap
Swap faces in any video effortlessly with our completely free AI face swap tool!

Hot Article
Hot Tools

Notepad++7.3.1
Easy-to-use and free code editor

SublimeText3 Chinese version
Chinese version, very easy to use

Zend Studio 13.0.1
Powerful PHP integrated development environment

Dreamweaver CS6
Visual web development tools

SublimeText3 Mac version
God-level code editing software (SublimeText3)
Hot Topics


 PHP and Python: Different Paradigms Explained
Apr 18, 2025 am 12:26 AM
PHP and Python: Different Paradigms Explained
Apr 18, 2025 am 12:26 AM
PHP is mainly procedural programming, but also supports object-oriented programming (OOP); Python supports a variety of paradigms, including OOP, functional and procedural programming. PHP is suitable for web development, and Python is suitable for a variety of applications such as data analysis and machine learning.
 Choosing Between PHP and Python: A Guide
Apr 18, 2025 am 12:24 AM
Choosing Between PHP and Python: A Guide
Apr 18, 2025 am 12:24 AM
PHP is suitable for web development and rapid prototyping, and Python is suitable for data science and machine learning. 1.PHP is used for dynamic web development, with simple syntax and suitable for rapid development. 2. Python has concise syntax, is suitable for multiple fields, and has a strong library ecosystem.
 Python vs. JavaScript: The Learning Curve and Ease of Use
Apr 16, 2025 am 12:12 AM
Python vs. JavaScript: The Learning Curve and Ease of Use
Apr 16, 2025 am 12:12 AM
Python is more suitable for beginners, with a smooth learning curve and concise syntax; JavaScript is suitable for front-end development, with a steep learning curve and flexible syntax. 1. Python syntax is intuitive and suitable for data science and back-end development. 2. JavaScript is flexible and widely used in front-end and server-side programming.
 PHP and Python: A Deep Dive into Their History
Apr 18, 2025 am 12:25 AM
PHP and Python: A Deep Dive into Their History
Apr 18, 2025 am 12:25 AM
PHP originated in 1994 and was developed by RasmusLerdorf. It was originally used to track website visitors and gradually evolved into a server-side scripting language and was widely used in web development. Python was developed by Guidovan Rossum in the late 1980s and was first released in 1991. It emphasizes code readability and simplicity, and is suitable for scientific computing, data analysis and other fields.
 Can vs code run in Windows 8
Apr 15, 2025 pm 07:24 PM
Can vs code run in Windows 8
Apr 15, 2025 pm 07:24 PM
VS Code can run on Windows 8, but the experience may not be great. First make sure the system has been updated to the latest patch, then download the VS Code installation package that matches the system architecture and install it as prompted. After installation, be aware that some extensions may be incompatible with Windows 8 and need to look for alternative extensions or use newer Windows systems in a virtual machine. Install the necessary extensions to check whether they work properly. Although VS Code is feasible on Windows 8, it is recommended to upgrade to a newer Windows system for a better development experience and security.
 Can visual studio code be used in python
Apr 15, 2025 pm 08:18 PM
Can visual studio code be used in python
Apr 15, 2025 pm 08:18 PM
VS Code can be used to write Python and provides many features that make it an ideal tool for developing Python applications. It allows users to: install Python extensions to get functions such as code completion, syntax highlighting, and debugging. Use the debugger to track code step by step, find and fix errors. Integrate Git for version control. Use code formatting tools to maintain code consistency. Use the Linting tool to spot potential problems ahead of time.
 How to run python with notepad
Apr 16, 2025 pm 07:33 PM
How to run python with notepad
Apr 16, 2025 pm 07:33 PM
Running Python code in Notepad requires the Python executable and NppExec plug-in to be installed. After installing Python and adding PATH to it, configure the command "python" and the parameter "{CURRENT_DIRECTORY}{FILE_NAME}" in the NppExec plug-in to run Python code in Notepad through the shortcut key "F6".
 How to run programs in terminal vscode
Apr 15, 2025 pm 06:42 PM
How to run programs in terminal vscode
Apr 15, 2025 pm 06:42 PM
In VS Code, you can run the program in the terminal through the following steps: Prepare the code and open the integrated terminal to ensure that the code directory is consistent with the terminal working directory. Select the run command according to the programming language (such as Python's python your_file_name.py) to check whether it runs successfully and resolve errors. Use the debugger to improve debugging efficiency.
