

9 Tips to Get Perfect Excel Printouts

Printing an Excel spreadsheet perfectly can sometimes be more difficult than creating it. Data could get cut off or move to a different page, which wastes your time and incurs extra costs for reprinting. If you frequently encounter this issue, here are some tips to ensure you get it right the first time.
1 Adjust Page Layout and Orientation
Excel lets you print documents in two orientations: Portrait (vertical) and Landscape (horizontal). Selecting the right orientation is important to get a clean printout. Portrait is best for spreadsheets with more rows than columns, while Landscape works well for wider spreadsheets containing large tables or graphs. You can also use both orientations for different pages.
Adjusting the orientation offers two key benefits: it ensures your data won’t be cut off and prevents unnecessary use of extra pages with awkward space. This makes your printout look more polished. To change the orientation, navigate to the "Page Layout" tab, click on "Orientation," and choose either "Portrait" for taller sheets or "Landscape" for wider ones.

2 Scale to Fit for Perfect Page Sizing
Changing the orientation alone won’t solve everything. If your data is too tall or wide, printing without proper scaling can cause it to spill over onto extra sheets or create awkward page breaks. To avoid these issues, you must scale your Excel sheet to fit neatly on a page. Properly resizing your data ensures everything fits on one page.
To do this, navigate to the "Page Layout" tab. In the "Scale to Fit" group, adjust the "Width" and "Height" settings to fit your data on a single page or the specific number of pages you intend to print it on. This helps control the page count and ensures your printout looks clean and professional.

3 Use Print Area to Print Selective Data
Sometimes, I only need to print a specific section of my spreadsheet, and Excel allows me to define a print area to control exactly which part gets printed. This helps avoid printing unnecessary sections, saving both paper and ink. Plus, I don’t have to modify my entire spreadsheet to print a few selected rows and columns, especially if it contains a large dataset.
To set a print area in Excel, highlight the cells you want to include, go to the "Page Layout" tab, click on "Print Area," and select "Set Print Area."

4 Use Page Breaks for Better Control
Using page breaks in a spreadsheet is a smart way to prevent awkward splits in your data and control how your printed document is structured. This feature lets you decide where the data on a new page starts, keeping key sections at the top of the next page instead of awkwardly in the middle of the previous one.
If you want a graph to appear on a specific page, you can simply insert page breaks before and after. To do this, select the row or column where you'd like the break, go to the "Page Layout" tab, click on "Breaks," and choose "Insert Page Break." This feature helps improve the readability and overall presentation of your printed Excel spreadsheets.

5 Preview the Spreadsheet Before Printing
Previewing your spreadsheet before printing is one of the most crucial steps to ensure your data prints exactly as intended. This allows you to spot any issues with layout, alignment, or data visibility and make necessary adjustments, such as scaling or rearranging data, to achieve the desired printout.
To preview how your spreadsheet will appear on paper, click "File" in the top menu and select "Print" to open the print preview window. Review all pages to catch any formatting issues before hitting the print button. This simple step can save you time, paper, and ink by avoiding unnecessary reprints.

6 Save as PDF for Better Formatting
No matter how carefully you format your data in Excel, small adjustments or opening the file in a different Excel version can easily disrupt the layout. To preserve my Excel spreadsheet's formatting, I save it as a PDF, which ensures the layout remains intact. It also helps me confirm how the data will appear on each printed page.
I often use this method when sharing spreadsheets with others, especially if I need them to print the spreadsheet for me. This also restricts them from making any unintended changes to the data. To save a spreadsheet as a PDF, click "File" in the top menu, select "Save As," choose your location, and in the "Save as Type" dropdown, select "PDF." Then, click "Save."

7 Use Custom Margins for Specific Needs
One common mistake Excel beginners make when printing spreadsheets is neglecting to adjust the space between the data and the edges of the paper. This step is important for clean and professional printouts. Using custom margins, you can fit more data on each page or leave space for notes and binding.
This simple adjustment greatly improves both the readability and appearance of your printout. To set built-in or custom margins, go to the "Page Layout" tab, click "Margins," and select "Custom Margins." Then, adjust the top, bottom, left, and right margins to fit your needs. Just be careful not to reduce the margins too much.

8 Print Titles for Multi-Page Spreadsheets
I use the print titles feature in Excel. This ensures that important headers or labels appear on every page of a multi-page spreadsheet, keeping the data easy to follow and interpret throughout. This makes it easier for the recipient of my spreadsheet to understand the data without constantly flipping back to the first page.
To set print titles, go to the "Page Layout" tab, click on "Print Titles," and in the "Rows to repeat at top" or "Columns to repeat at left" box, select the row or column you want to be repeated on every page. If you haven't used this feature before, it will significantly improve the readability of your Excel printouts.

9 Adjust Column Width and Row Height
Finally, you should adjust the column width and row height to ensure that data isn't cut off or wrapped in a way that makes it difficult to read. I always ensure that text, numbers, and other information are clearly visible and there is no overlapping or awkward spacing between the data in the cells.
For columns or rows containing longer text or numbers, you can selectively resize those areas to maintain readability while keeping the overall layout neat and organized. To adjust the column width or row height, highlight the relevant columns or rows, right-click, and choose "Column Width" or "Row Height." Enter your desired dimensions and click "OK."

These are the tips I consistently follow when printing Excel spreadsheets. If your printouts often look messy, I highly recommend using these strategies. By carefully following these steps and previewing your sheets before printing, you'll be able to achieve flawless printouts with confidence.
If the print doesn’t turn out as expected, avoid making hasty adjustments, which can further disrupt formatting. Take your time to fix any issues before attempting another print.
The above is the detailed content of 9 Tips to Get Perfect Excel Printouts. For more information, please follow other related articles on the PHP Chinese website!

Hot AI Tools

Undresser.AI Undress
AI-powered app for creating realistic nude photos

AI Clothes Remover
Online AI tool for removing clothes from photos.

Undress AI Tool
Undress images for free

Clothoff.io
AI clothes remover

Video Face Swap
Swap faces in any video effortlessly with our completely free AI face swap tool!

Hot Article
Hot Tools

Notepad++7.3.1
Easy-to-use and free code editor

SublimeText3 Chinese version
Chinese version, very easy to use

Zend Studio 13.0.1
Powerful PHP integrated development environment

Dreamweaver CS6
Visual web development tools

SublimeText3 Mac version
God-level code editing software (SublimeText3)
Hot Topics


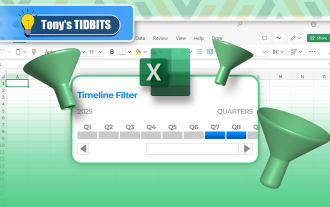 How to Create a Timeline Filter in Excel
Apr 03, 2025 am 03:51 AM
How to Create a Timeline Filter in Excel
Apr 03, 2025 am 03:51 AM
In Excel, using the timeline filter can display data by time period more efficiently, which is more convenient than using the filter button. The Timeline is a dynamic filtering option that allows you to quickly display data for a single date, month, quarter, or year. Step 1: Convert data to pivot table First, convert the original Excel data into a pivot table. Select any cell in the data table (formatted or not) and click PivotTable on the Insert tab of the ribbon. Related: How to Create Pivot Tables in Microsoft Excel Don't be intimidated by the pivot table! We will teach you basic skills that you can master in minutes. Related Articles In the dialog box, make sure the entire data range is selected (
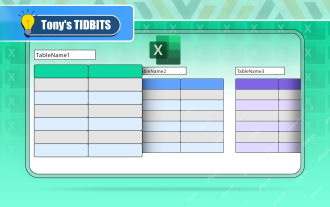 If You Don't Rename Tables in Excel, Today's the Day to Start
Apr 15, 2025 am 12:58 AM
If You Don't Rename Tables in Excel, Today's the Day to Start
Apr 15, 2025 am 12:58 AM
Quick link Why should tables be named in Excel How to name a table in Excel Excel table naming rules and techniques By default, tables in Excel are named Table1, Table2, Table3, and so on. However, you don't have to stick to these tags. In fact, it would be better if you don't! In this quick guide, I will explain why you should always rename tables in Excel and show you how to do this. Why should tables be named in Excel While it may take some time to develop the habit of naming tables in Excel (if you don't usually do this), the following reasons illustrate today
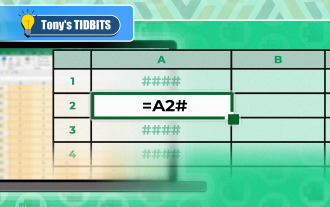 You Need to Know What the Hash Sign Does in Excel Formulas
Apr 08, 2025 am 12:55 AM
You Need to Know What the Hash Sign Does in Excel Formulas
Apr 08, 2025 am 12:55 AM
Excel Overflow Range Operator (#) enables formulas to be automatically adjusted to accommodate changes in overflow range size. This feature is only available for Microsoft 365 Excel for Windows or Mac. Common functions such as UNIQUE, COUNTIF, and SORTBY can be used in conjunction with overflow range operators to generate dynamic sortable lists. The pound sign (#) in the Excel formula is also called the overflow range operator, which instructs the program to consider all results in the overflow range. Therefore, even if the overflow range increases or decreases, the formula containing # will automatically reflect this change. How to list and sort unique values in Microsoft Excel
 How to change Excel table styles and remove table formatting
Apr 19, 2025 am 11:45 AM
How to change Excel table styles and remove table formatting
Apr 19, 2025 am 11:45 AM
This tutorial shows you how to quickly apply, modify, and remove Excel table styles while preserving all table functionalities. Want to make your Excel tables look exactly how you want? Read on! After creating an Excel table, the first step is usual
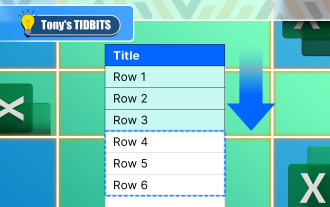 How to Format a Spilled Array in Excel
Apr 10, 2025 pm 12:01 PM
How to Format a Spilled Array in Excel
Apr 10, 2025 pm 12:01 PM
Use formula conditional formatting to handle overflow arrays in Excel Direct formatting of overflow arrays in Excel can cause problems, especially when the data shape or size changes. Formula-based conditional formatting rules allow automatic formatting to be adjusted when data parameters change. Adding a dollar sign ($) before a column reference applies a rule to all rows in the data. In Excel, you can apply direct formatting to the values or background of a cell to make the spreadsheet easier to read. However, when an Excel formula returns a set of values (called overflow arrays), applying direct formatting will cause problems if the size or shape of the data changes. Suppose you have this spreadsheet with overflow results from the PIVOTBY formula,
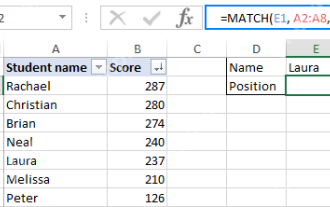 Excel MATCH function with formula examples
Apr 15, 2025 am 11:21 AM
Excel MATCH function with formula examples
Apr 15, 2025 am 11:21 AM
This tutorial explains how to use MATCH function in Excel with formula examples. It also shows how to improve your lookup formulas by a making dynamic formula with VLOOKUP and MATCH. In Microsoft Excel, there are many different lookup/ref
 How to Use Excel's AGGREGATE Function to Refine Calculations
Apr 12, 2025 am 12:54 AM
How to Use Excel's AGGREGATE Function to Refine Calculations
Apr 12, 2025 am 12:54 AM
Quick Links The AGGREGATE Syntax
