


 天蓬老师
天蓬老师批改状态:合格
老师批语:
1、JSON 数据类型
| 序号 | 类型 | 描述 |
|---|---|---|
| 1 | 简单值 | 数值,字符串,布尔,null |
| 1 | 复合值 | 对象,数组 |
注意: 不支持
undefined(因为除 JS 外,其它语言中没有这个东西)
2、JS 解析 JSON 的 API
| 序号 | 方法 | 描述 |
|---|---|---|
| 1 | JSON.stringify() |
将 JS 对象,序列化为 JSON 字符串 |
| 2 | JSON.parse() |
将 JSON 字符串,解析为 JS 对象 |
Ajax即Asynchronous Javascript And XML(异步JavaScript和XML),Ajax是一种用于创建快速动态网页的技术。通过在后台与服务器进行少量数据交换,Ajax可以使网页实现异步更新。这意味着可以在不重新加载整个网页的情况下,对网页的某部分进行更新。而传统的网页(不使用 Ajax)如果需要更新内容,必需重载整个网页面。
1、工作原理
同步提交:当用户发送请求时,当前页面不可以使用,服务器响应页面到客户端,响应完成,用户才可以使用页面。异步提交:当用户发送请求时,当前页面还可以继续使用,当异步请求的数据响应给页面,页面把数据显示出来 。2、XMLHttpRequest 对象
XMLHttpRequest 对象用于在后台与服务器交换数据。XMLHttpRequest是浏览器对象,而非 JS 内置对象,所有现代的浏览器都支持 XMLHttpRequest 对象。
xhr 请求步骤
创建 xhr 对象: const xhr = new XMLHttpRequest()
配置 xhr 参数: xhr.open(type, url)
处理 xhr 响应: xhr.onload = (...) => {...}
发送 xhr 请求: xhr.send(...)
xhr 对象常用属性
| 序号 | 方法 | 描述 |
|---|---|---|
| 1 | responseType |
设置响应类型 |
| 2 | response |
响应正文 |
| 序号 | 方法 | 描述 |
|---|---|---|
| 1 | open(type,url) |
配置请求参数 |
| 2 | send(data/null) |
发送请求 |
| 序号 | 事件 | 描述 |
|---|---|---|
| 1 | load() |
请求成功 |
| 2 | error() |
请求失败 |
3、FormData 对象
FormData是表单数据构造器
| 序号 | 方法 | 描述 |
|---|---|---|
| 1 | append(name,value) |
添加新的键值对 |
| 2 | delete(name) |
删除键值对 |
4、get / post 区别
request body请求体传参5、跨域
html文件代码块:
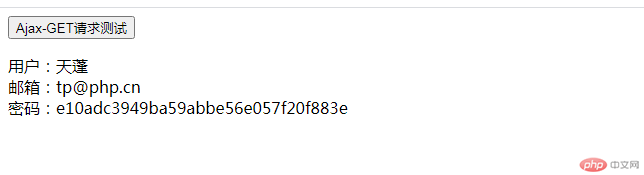
<!DOCTYPE html><html lang="en"><head><meta charset="UTF-8" /><meta http-equiv="X-UA-Compatible" content="IE=edge" /><meta name="viewport" content="width=device-width, initial-scale=1.0" /><title>Ajax-Get方式</title></head><body><button>Ajax-GET请求测试</button><p></p><script>// 获取元素const btn = document.querySelector("button");// 按钮提交事件btn.onclick = () => {// 1. 创建 xhr 对象:const xhr = new XMLHttpRequest();// 2. 配置 xhr 参数:xhr.open("get", "test1.php?id=1");xhr.responseType = "json";// 3. 处理 xhr 响应:xhr.onload = () => {// xhr.response返回处理结果let user = `用户:${xhr.response.name} <br> 邮箱:${xhr.response.email} <br> 密码:${xhr.response.password}`;// 显示到页面元素位置document.querySelector("p").innerHTML = user;};xhr.onerror = () => console.log("Error");// 4. 发送 xhr 请求: `xhr.send(...)`xhr.send(null);};</script></body></html>
php文件代码块:
<?php// 以二维数组模拟数据表信息$users = [['id'=>1, 'name'=>'天蓬','email'=>'tp@php.cn','password' => md5('123456')],['id'=>2, 'name'=>'灭绝','email'=>'mj@php.cn','password' => md5('abc123')],['id'=>3, 'name'=>'西门','email'=>'xm@php.cn','password' => md5('abc888')],];// 查询条件$id = $_GET['id'];// 在id组成的数组中查询是否存在指定的id,并返回对应的键名$key = array_search($id,array_column($users,'id'));// 根据键名返回指定的用户信息echo json_encode($users[$key]);

html文件代码块:
<!DOCTYPE html><html lang="en"><head><meta charset="UTF-8" /><meta http-equiv="X-UA-Compatible" content="IE=edge" /><meta name="viewport" content="width=device-width, initial-scale=1.0" /><title>Ajax-POST方式</title><style>body {background-color: lightcyan;}.login {width: 20em;/*border: 1px solid;*/border-radius: 10px;box-shadow: 0 0 8px #888;padding: 0 1em 1em;background-color: lightseagreen;color: white;margin: 2em auto;display: grid;place-items: center;}.login form {display: grid;grid-template-columns: 3em 1fr;gap: 1em 0;}.login form input {border: none;outline: none;}.login form input:focus,.login form input:hover {box-shadow: 0 0 5px lime;}.login form button {background-color: lightsalmon;color: white;outline: none;border: none;height: 2em;}.login form button:hover {background-color: salmon;cursor: pointer;box-shadow: 0 0 5px lime;}/* 按钮与提示信息显示在第二列 */.login form button,.tips {grid-area: auto / 2;}</style></head><body><div class="login"><p>用户登录</p><form action="" onsubmit="return false"><label for="email">邮箱:</label><input type="email" name="email" id="email" placeholder="demo@email.com" /><label for="password">密码:</label><input type="password" name="password" id="password" placeholder="不少于6位" /><button>提交</button><span class="tips"></span></form></div><script>const form = document.querySelector(".login form");const btn = document.querySelector(".login button");const tips = document.querySelector(".tips");btn.onclick = (ev) => {// FormData: 表单数据的序列化let data = new FormData(form);// console.log(data.get("email"), data.get("password"));// 默认的提交行为ev.preventDefault();// 1. 创建 xhr 对象:const xhr = new XMLHttpRequest();// 2. 配置 xhr 参数:xhr.open("post", "test2.php");// xhr.responseType = "text";// 3. 处理 xhr 响应:xhr.onload = () => {tips.textContent = xhr.response;};xhr.onerror = () => console.log("Error");// 4. 发送 xhr 请求:xhr.send(new FormData(form));};</script></body></html>
php文件代码块:
<?php// 使用二维数组模拟用户数据表信息$users = [['id' => 1, 'name' => '天蓬', 'email' => 'tp@php.cn', 'password' => md5('123456')],['id' => 2, 'name' => '灭绝', 'email' => 'mj@php.cn', 'password' => md5('abc123')],['id' => 3, 'name' => '西门', 'email' => 'xm@php.cn', 'password' => md5('abc888')],];// 将通过post获取的数据保存到临时变量中$email = $_POST['email'];$password = md5($_POST['password']);// 使用数组过滤器查询是否存在指定的用户并返回结果$res = array_filter($users, function ($user) use ($email, $password) {return $user['email'] === $email && $user['password'] === $password;});// 将结果做为请求响应返回到前端echo count($res) === 1 ? '验证成功' : '验证失败';

利用事件代理,实现更换背景图片。html文件代码块:
<!DOCTYPE html><html lang="en"><head><meta charset="UTF-8" /><meta http-equiv="X-UA-Compatible" content="IE=edge" /><meta name="viewport" content="width=device-width, initial-scale=1.0" /><title>一键换肤实例</title><style>.container {width: 300px;display: grid;grid-template-columns: repeat(3, 1fr);column-gap: 10px;}.container > img {width: 100%;border: 3px solid #fff;opacity: 0.6;}.container > img:active {opacity: 1;}.container > img:hover {opacity: 1;cursor: pointer;width: 110%;}body {background-image: url("./images/1.jpg");background-size: cover;background-repeat: no-repeat;}</style></head><body><div class="container"><img src="./images/1.jpg" alt="" /><img src="./images/2.jpg" alt="" /><img src="./images/3.jpg" alt="" /></div><script>// 事件代理const box = document.querySelector(".container");box.onclick = function (ev) {// bodyconst body = document.body;// 新的背景图片let imgUrl = `url('${ev.target.src}')`;body.style.backgroundImage = imgUrl;};// 使用箭头函数来简化// document.querySelector(".container").onclick = (ev) =>// (document.body.style.backgroundImage = `url('${ev.target.src}')`);</script></body></html>


利用事件代理,实现选项卡列表变化。html文件代码块:
<!DOCTYPE html><html lang="en"><head><meta charset="UTF-8" /><meta http-equiv="X-UA-Compatible" content="IE=edge" /><meta name="viewport" content="width=device-width, initial-scale=1.0" /><title>选项卡实例</title><style>* {padding: 0;margin: 0;box-sizing: border-box;}a {text-decoration: none;color: #555;}a:hover {text-decoration: underline;color: red;}li {list-style: none;line-height: 1.6em;}li:hove {cursor: pointer;}.container {width: 360px;height: 300px;margin: 30px;background-color: #fff;display: flex;flex-flow: column;}.tab {display: flex;height: 36px;}.tab li {flex: auto;text-align: center;line-height: 36px;border-radius: 20px 20px 0 0;background-color: #fff;}.tab li.active {background-color: wheat;}.tab li:hover {cursor: pointer;}.item {padding: 20px;display: none;background-color: wheat;}.item.active {display: block;}</style></head><body><div class="container"><!-- 导航 --><ul class="tab"><li data-index="1" class="active">省内</li><li data-index="2">国内</li><li data-index="3">国际</li></ul><!-- 与导航标签对应的列表 --><ul data-index="1" class="item active"><li><a href="">河南特斯拉车主维权最新回应</a></li><li><a href="">五一高速免费吗?哪些路段时段堵</a></li><li><a href="">特斯拉刹车失灵事件持续 行车数据</a></li><li><a href="">共享单车违停费涨到了20元? </a></li><li><a href="">重磅!河南两市最新人事任免发布</a></li></ul><ul data-index="2" class="item"><li><a href="">南海舰队一次性入列三型主战舰艇</a></li><li><a href="">东北虎进村伤人 麻醉针已醒</a></li><li><a href="">特斯拉回应广州一车辆撞墙致死事故</a></li><li><a href="">9秒98!苏炳添击败谢震业夺冠</a></li><li><a href="">中国首辆火星车为何命名“祝融”?寓意深远!</a></li></ul><ul data-index="3" class="item"><li><a href="">日本核废水入海,西方环保人士为何失声</a></li><li><a href="">双标“环保少女”背后“看不见的手”</a></li><li><a href="">印尼潜艇载53人演练沉没,真实原因</a></li><li><a href="">外交部再谈日本核废水排海</a></li><li><a href="">印度疫情 医疗体系已经崩溃</a></li></ul></div><script>// 事件代理实现导航的切换,获取元素const tab = document.querySelector(".tab");const items = document.querySelectorAll(".item");// 点选事件处理tab.onclick = (ev) => {// console.log(ev.currentTarget);// console.log(ev.target);// 1. 清空之前的激活样式,[...tab.children].forEach((item) => item.classList.remove("active")); //清空ev.target.classList.add("active"); //并将当前导航标签设置为激活状态// 2. 根据data-index来确定应该将哪个列表进行激活并显示出来items.forEach((item) => item.classList.remove("active")); //清空// console.log([...items].filter((item) => item.dataset.index === ev.target.dataset.index).pop());[...items].filter((item) => item.dataset.index === ev.target.dataset.index).pop().classList.add("active"); //对应的列表激活};</script></body></html>

Copyright 2014-2025 https://www.php.cn/ All Rights Reserved | php.cn | 湘ICP备2023035733号


