


 天蓬老师
天蓬老师批改状态:合格
老师批语:挺棒的, 原生路由理解了, 那么框架还难吗?
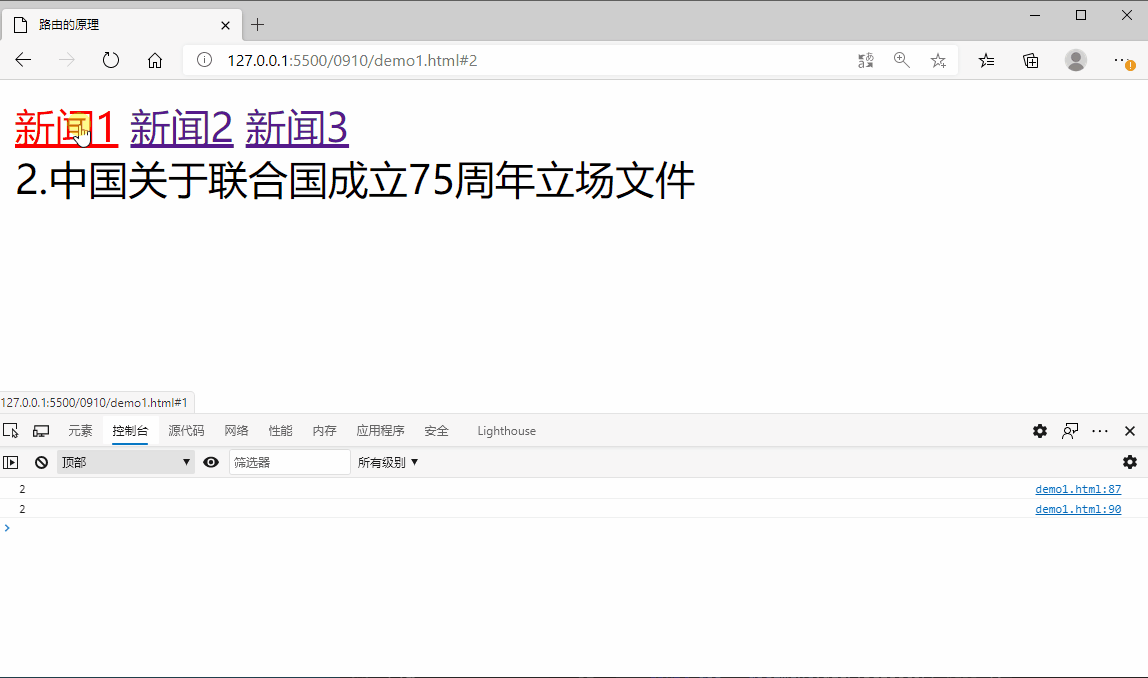
<!DOCTYPE html><html lang="en"><head><meta charset="UTF-8" /><meta name="viewport" content="width=device-width, initial-scale=1.0" /><title>路由的原理</title><script src="lib/vue.js"></script></head><body><a href="#1">新闻1</a><a href="#2">新闻2</a><a href="#3">新闻3</a><!-- 根据路由/锚点不同 --><!-- <h3 id="story1" style="margin-top: 1200px">故事的内容是这样的......</h3><h3 id="story2" style="margin-top: 1900px">故事的内容是这样的......</h3> --><div id="app"></div><!-- 404 --><div id="page404" style="display: none">这个故事说完了!</div></body><script>//原生的SPA(单页面应用)的路由实现方式//基于锚点实现//(一)路由的原理//实现不刷新页面,就可以动态实现数据的加载,达到SPA的效果/* console.log(window.location.hash);获取url中的锚点console.log(document.querySelector("a:first-of-type").href.substr(-2));console.log(document.querySelector("a:nth-of-type(2)").href.substr(-2));console.log(document.querySelector("a:last-of-type").href.substr(-2)); *///window.addEventListener("hashchange", () => console.log("hash变化了"));//(二)路由的实现//1.创建dom节点,并注册到路由表中const app = document.querySelector("#app");const div1 = document.createElement("div");div1.innerHTML = "1.习近平的2020·八月:谋划“新发展阶段”";const div2 = document.createElement("div");div2.innerHTML = "2.中国关于联合国成立75周年立场文件";const div3 = document.createElement("div");div3.innerHTML = "3.习近平总书记关切事丨敬礼!最温暖的陪伴";//2.注册到路由表中//路由表const routeTable = {1: div1,2: div2,3: div3,};//生成路由function route(container) {//1.:获取到路由let num = window.location.hash.substr(1);console.log(num);//2.默认路由num = num || 1;console.log(num);//3.根据路由表获取对应的内容let content = routeTable[num];//4.如果路由表不存在指定的内容,获取到404页面if (!content) content = document.querySelector("#page404");content.style.display = "block";//5.先将容器清空container.innerHTML = null;//6.将路由对应的页面渲染到指定的容器中container.appendChild(content);}//路由的初始化/显示默认页面route(app);//监听路由的变化/监听的锚点的变化window.addEventListener("hashchange", () => route(app));</script></html>
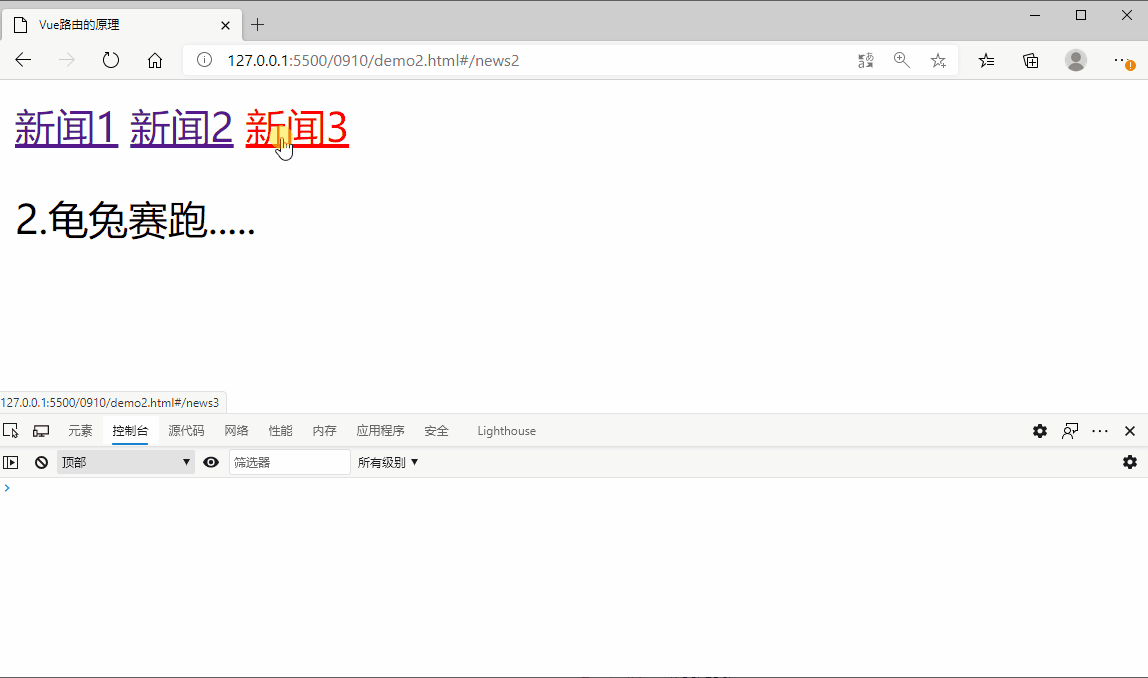
<!DOCTYPE html><html lang="en"><head><meta charset="UTF-8" /><meta name="viewport" content="width=device-width, initial-scale=1.0" /><title>Vue路由的原理</title><script src="lib/vue.js"></script><!-- 路由包 --><script src="lib/vue-router-dev/dist/vue-router.js"></script></head><body><div id="app"><!-- 1.使用router-link组件来生成导航 --><router-link to="/news1">新闻1</router-link><router-link to="/news2">新闻2</router-link><router-link to="/news3">新闻3</router-link><!-- 2.路由内容的渲染 --><router-view></router-view></div></body><script>const news1 = {template: "<p>1.从前有座山.....</p>",};const news2 = {template: "<p>2.龟兔赛跑.....</p>",};const news3 = {template: "<p>3.和氏璧.....</p>",};//注册路由const router = new VueRouter({routes: [//是一个对象数组,每个对象对应一个路由{ path: "/news1", component: news1 },{ path: "/news2", component: news2 },{ path: "/news3", component: news3 },],});//vue实例const vm = new Vue({//将路由注册到挂载点中//当属性名与变量同名,只需要写一个router: router,//router,}).$mount("#app");</script></html>
window.location.hash获取url中的锚点
hashchange参数来监听锚点的变化
实现路由的步骤:
1.创建dom节点
2.注册到路由表中
3.生成路由(获取到路由、设置默认路由、根据路由表获取对应的内容、清空容器、将路由对应的页面渲染到指定的容器中)
4.路由初始化/显示默认页面
5.监听路由的变化/监听的锚点的变化
下载完后解压即可,主要用的是vue-router-dev/dist/vue-router.js
使用router-link组件来生成导航
router-view标签来渲染路由
注册路由:
const router = new VueRouter({routes: [//是一个对象数组,每个对象对应一个路由],});
最后将路由注册到挂载点中
当属性名与变量同名,只需要写一个
$mount():手动挂载
git:免费,开源的分布式版本控制系统
git 中的一些术语:
版本库
工作区
暂存区
git 流程
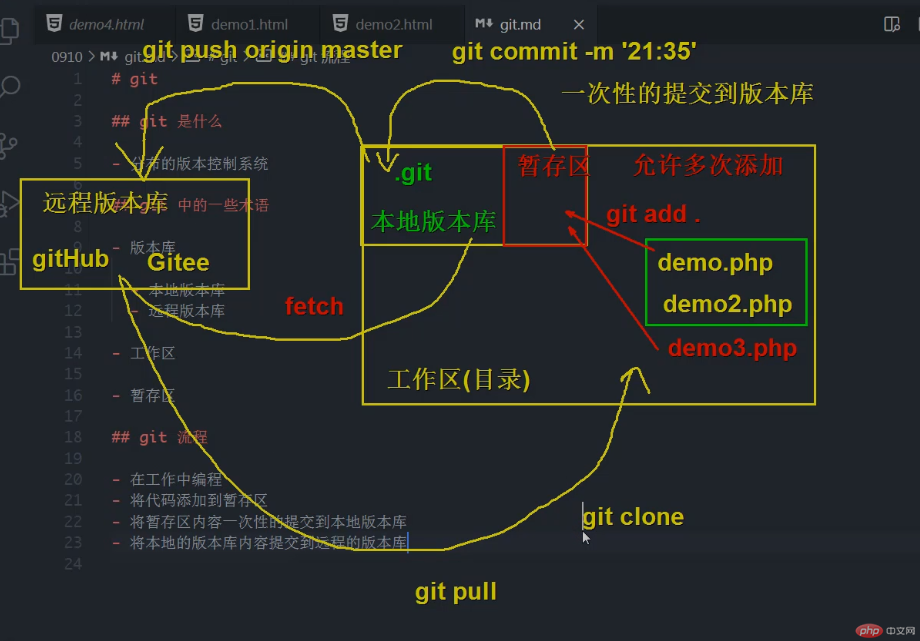
cd 目录 切换到需要使用git进行版本控制的项目目录中
配置用户名和邮箱
git config --global user.name '用户名'git config --global user.email '邮箱'
git init
git add . # 一次性全部提交完毕 add命令可将该文件添加到暂存区git status # 查看状态
git commit -m '2020-09-10 22:02' //'注释'
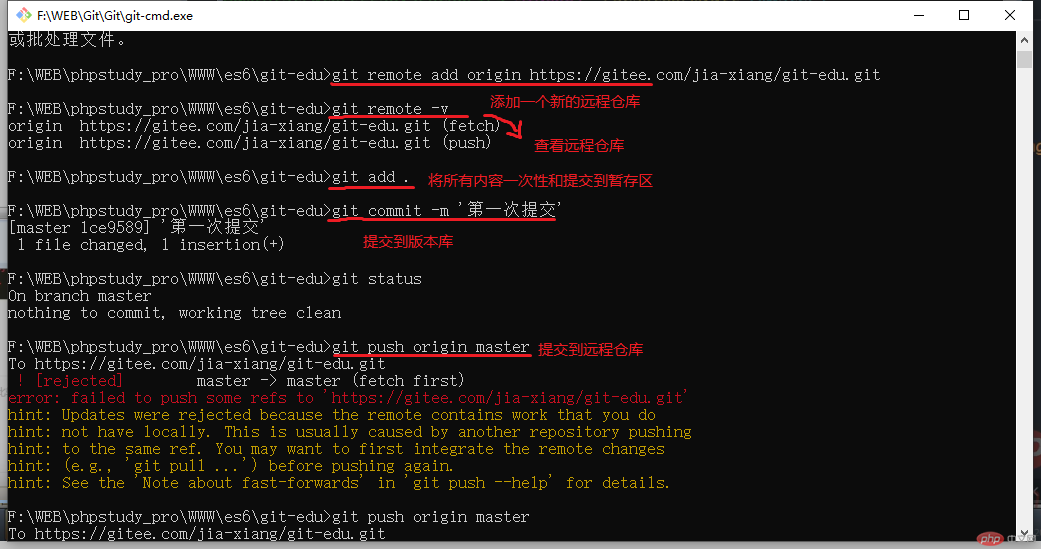
git remote add origin https://gitee.com/bnkt/git-edu.git
git remote -v
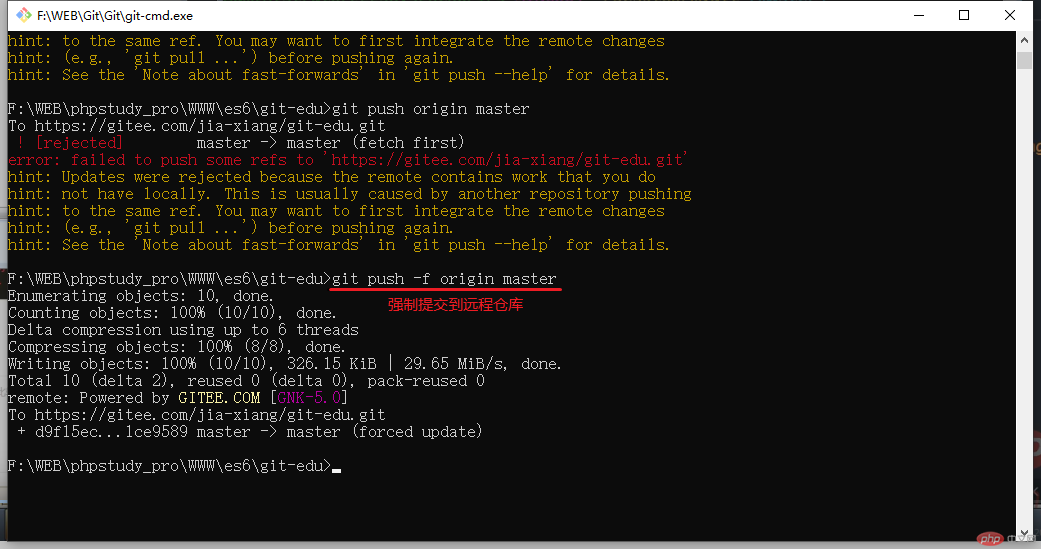
git push origin master //指定远程仓库名和分支名git push -u origin master //将本地的master分支推送到origin主机,同时指定origin为默认主机git push -f origin master //本地强制上传到远程,把远程的覆盖
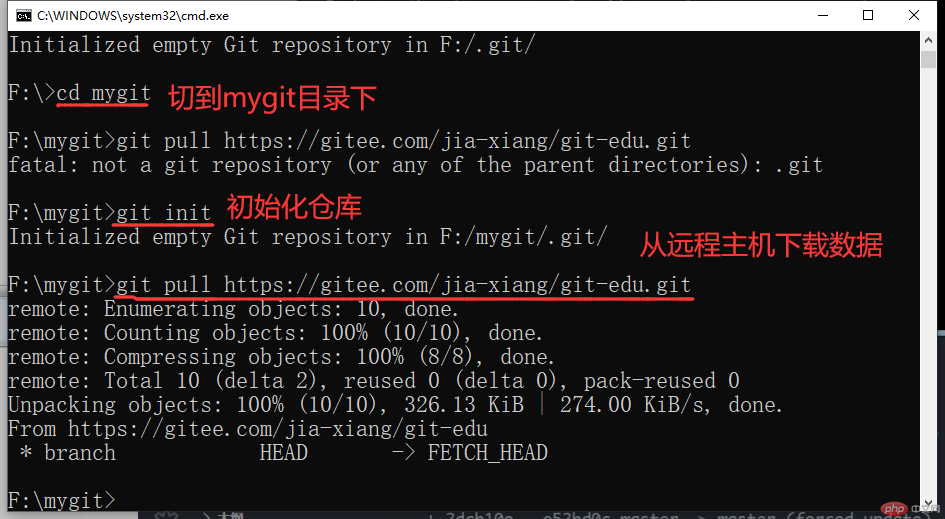
git pull https://gitee.com/jia-xiang/git-edu.gitgit pull origin master

Copyright 2014-2025 https://www.php.cn/ All Rights Reserved | php.cn | 湘ICP备2023035733号


