1、常用选择器
<!DOCTYPE html>
<html>
	<head>
		<meta charset="utf-8">
		<title>选择器</title>
		<link rel="stylesheet" href="css1.css"/>
		<ul>
			<li id="bg-red">1</li>
			<li class="bg-green">2</li>
			<li class="bg-green">3</li>
			<li class="bg-blue">4</li>
			<li id="bg-grey">5</li>
			<li class="bg-blue">6</li>
			<li>7</li>
			<li>8</li>
			<li>9</li>
			<li>10</li>
		</ul>
	</head>
	<body>
	</body>
</html>
以上代码是1-10的十个球用于演示选择器。
ul{
	margin: 0;
	padding-left: 0;
	border: 1px solid red;
}

ul li{
	list-style-type: none;
	width: 40px;
	height: 40px;
	background: wheat;


	/*让文本水平居中,单行文本垂直居中*/
	text-align: center;
	line-height: 40px;

	border-radius: 50%;

	/*把块级元素改为内联元素,否则将独占一行*/
	display:inline-block;

	/*加上阴影*/
	box-shadow: 2px 2px 1px #888;
}

/*id选择器*/
#bg-red{
	background-color: #;
}

#bg-grey{
	background-color: #888888;
}

/*类选择器*/
.bg-green{
	background-color: green;
}

.bg-blue{
	background-color: lightblue;
}

/*属性选择器*/
li[id="bg-red"]{
    border:1px solid black;
}

/*群组选择器*/
#bg-grey,.bg-blue{
	border:1px dotted purple;

}

/*相邻选择器*/
#bg-red + * {
	background-color: -yellow;
}

/*兄弟选择器*/
#bg-grey ~ * {
	background-color: -brown;
}

/*伪类:子元素选择器*/
ul :first-child{
	background-color: blue;
}

ul :last-child{
	background-color: blue;
}

ul :nth-child(7){
	background-color: blue;
}

ul :nth-last-child(3){
	background-color: blue;
}

/*伪类:类型选择器*/
ul li:first-of-type{
	color: white;
}

ul li:last-of-type{
	color: yellow;
}

ul li:nth-of-type(9){
	color:red;
}
以上是用于测试选择器的css文件。
相邻选择器选择的是紧挨着的下一个元素,属于单选;兄弟选择器选择的则是后面所有平级的元素,属于多选。
伪类选择中,子元素选择器nth-child(n)选择的是第n个子元素,n从1开始。此选择器只与位置(排序)有关。
类型选择器nth-of-type(n)选择的是第n个某类型的元素,比如第n个p标签,第n个li标签等;n从1开始,此选择器不仅与位置(排序)有关,而且也跟元素的类型有关。
2、padding对盒子大小的影响
<!DOCTYPE html>
<html>
	<head>
		<meta charset="utf-8">
		<title>padding</title>
		<link rel="stylesheet" href="css1.css">
	</head>
	<body>
		<!--通过重写容器高度宽度的方式使图片在容器居中-->
		<div class="box1">
			<img src="lock.jpg" alt="lock" width="300">
		</div>

		<!--宽度分离-->
		<div class="wrap">
			<div class="box2">
				<img src="lock.jpg" alt="lock" width="300">
			</div>
		</div>

		<!-- box-sizing -->
		<div class="box3">
			<img src="lock.jpg" alt="lock" width="300">
		</div>
	</body>
</html>
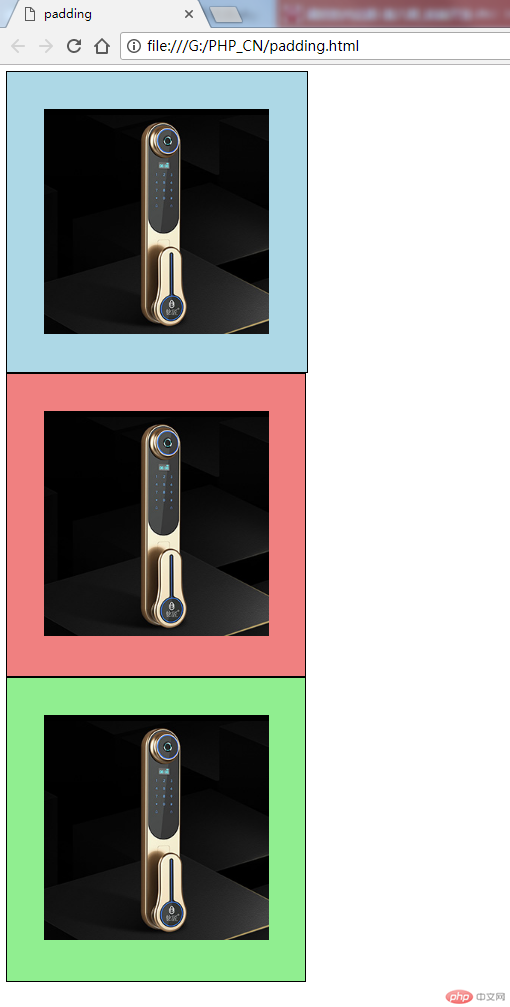
以上写了3个盒子,使用了3种不同的方法让图片在容器内居中显示
.box1{
	width: 400px;
	height: 400px;
	border: 1px solid black;
	background-color: lightblue;

	padding: 50px;
	width: 300px;
	height: 300px;
}

/* 宽度分离 */
.wrap{
	width: 400px;
}

.box2{
	padding: 50px;
	border: 1px solid black;
	background-color: lightcoral;
}

.box3{
	width: 400px;
	box-sizing: border-box;
	padding: 50px;
	border: 1px solid black;
	background-color: lightgreen;
}
以上是css的代码,运行结果如图

第一种方法,写了padding为50之后,盒子会向下和向右把盒子撑大,重新把宽度和高度写回400,图片实现了上下居中。
第二种方法,宽度分离,实际上就是用两个盒子套起来,这样里面这个盒子写了padding为50之后,撑不破外面的盒子,所以图片也实现了居中;
第三种方法,使用box-sizing=border-box,也就是告诉浏览器盒子的大小以border来计算,包含了padding。因为Chrome和firfox这些浏览器默认的计算盒子大小是以content的数据来计算的,而IE则是以border的大小来计算。用这个方法,padding值写了之后就不会撑大盒子了。
3、margin中的同级塌陷、嵌套传递和自动挤压
margin是盒子的外边距,透明的,可以理解为是个相对值。
<!DOCTYPE html>
<html>
	<head>
		<meta charset="utf-8">
		<title>margin</title>
		<link rel="stylesheet" href="css2.css"/>
	</head>

	<body>
		<!-- 1、同级塌陷-->
		<div class="box1">
		</div>
		<div class="box2">
		</div>

		<!-- 2、嵌套传递-->
		<div class="box3">
		    <div class="box4">
		    </div>
		</div>

		<!-- 3、自动挤压-->
		<div class="box5">
		    <div class="box6">
		    </div>
		</div>

	</body>
</html>
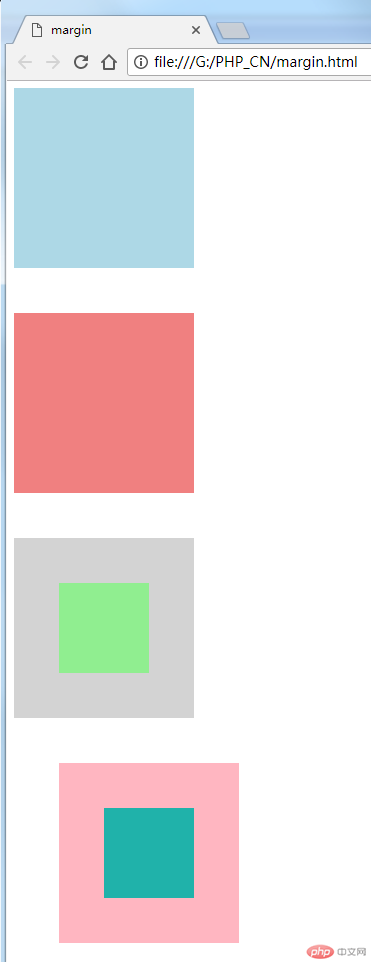
以上实例演示了margin的三种情形,以下是对应的css
.box1{
	background-color: lightblue;
	width: 200px;
	height: 200px;
	margin-bottom: 50px;
}

.box2{
	background-color: lightcoral;
	width: 200px;
	height: 200px;
	margin-top: 30px;
}

.box3{
	background-color: lightgray;
	box-sizing: border-box;
	width: 200px;
	height: 200px;
	margin-top: 50px;
	padding: 50px;

}

.box4{
	background-color: lightgreen;
	width: 100px;
	height: 100px;
}

.box5{
	background-color: lightpink;
	box-sizing: border-box;
	width: 200px;
	height: 200px;
	margin: 50px;
	padding-top: 50px;

}

.box6{
	background-color: lightseagreen;
	width: 100px;
	height: 100px;
	margin: auto;
}
实例运行结果如图:

同级塌陷的意思就是只垂直方向的两个盒子,其外边距以大的为准。因为margin是透明的,所以可以理解为margin是从盒子的border算起的到外部的一个相对值,两个相邻的margin可以重叠。
嵌套传递指的是子元素的margin值会透过父元素向外传递,可以认为盒子嵌套的时候,padding的属性是优先的,如果padding值没有写可以理解为0,那么相当于两个盒子套在一起的时候,是靠左靠上贴合没有间隙的。这时候子元素写了margin值就透过父元素传递到了外面。解决方法是,父元素里用padding值去控制,也就是相当于给两个盒子之间加了填充物,隔开了。但是padding会把盒子撑大,所以可以用box-sizing:border-box;去把父元素盒子的边界固定。
自动挤压是margin值设为auto时的情形,如果margin值只有auto,则正好左右外边距一样,居中了。如果单只左边或右边设为auto,则该侧外边距会变到最大自动挤压元素到另一侧。在最后一个嵌套的盒子当中,给子元素的margin设置为auto正好就左右居中了。

Copyright 2014-2025 https://www.php.cn/ All Rights Reserved | php.cn | 湘ICP备2023035733号