批改状态:合格
老师批语:
表单验证最常用的两种方法:传统验证和ajax验证,而ajax验证最大的好处就是它是异步处理
1、传统验证
当焦点不在对应的文本输入框时,进行里面的非空验证:
<!DOCTYPE html>
<html lang="en">
<head>
    <meta charset="UTF-8">
    <title>传统表单验证</title>
    <style>
    span{
        color: red;
    }
    </style>
</head>
<body>
    <h1>邮箱验证</h1>
    <form action="" method="" id="login">
        <p>
        <label for="email">邮箱:</label>
        <input type="email" id="email" name="email"><span id="span1">*</span><br>
        </p>
        <p>
        <label for="password">密码:</label>
        <input type="password" id="password" name="password"><span id="span2">*</span><br>
        </p>
        <button name="submit">登录</button>

    </form>
    <script>

        //获取表单
        var login=document.forms[0]

        login.email.focus()

        login.onsubmit= function(){
            if(login.email.value.length===0){
                alert("邮箱不能为空")
                login.email.focus()
                return false
            }else if(login.password.value.length===0){
                alert("密码不能为空")
                login.password.focus()
                return false
            }

        }

        var span1 = document.getElementById('span1')
        var span2 = document.getElementById('span2')

        login.email.onblur = function(){

            if(login.email.value.trim().length===0){

                span1.innerHTML="邮箱不能为空"
                this.focus()
            }

        }

            login.email.oninput = function(){

                span1.innerHTML=null
            }

        login.password.onblur = function(){

            if(login.password.value.trim().length===0){

                span2.innerHTML="密码不能为空"
                this.focus()
            }

            }

            login.password.oninput = function(){

                span2.innerHTML=null
            }
    </script>
</body>
</html>点击 "运行实例" 按钮查看在线实例
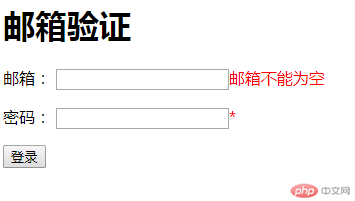
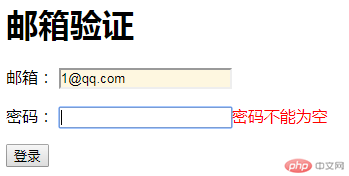
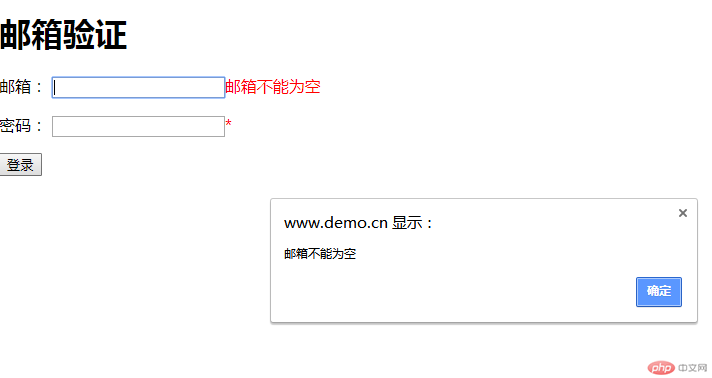
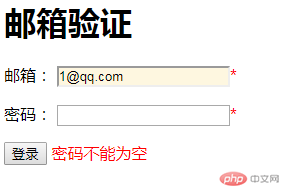
当没有在文本框输入值时,对应文本框后面会有提示信息,无视信息提交后会有弹窗出现
2、ajax验证
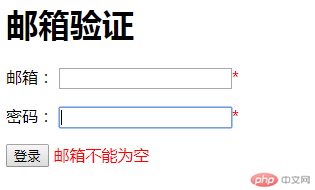
实现的功能如上,但是没有了弹窗提示功能
<!DOCTYPE html>
<html lang="en">
<head>
    <meta charset="UTF-8">
    <title>Ajax表单验证</title>
    <style>
    span{
        color:red;
    }
    </style>
</head>
<body>
    <h1>邮箱验证</h1>
    <form action="check.php" method="POST">
        <p>
        <label for="email">邮箱:</label>
        <input type="email" id="email" name="email"><span>*</span>
        </p>
        <p>
        <label for="password">密码:</label>
        <input type="password" id="password" name="password"><span>*</span>
        </p>
        <button>登录</button>
        <!-- 占位符 -->
        <span  id="span1"></span>
    </form>

    <script>

        var login=document.forms[0]
        var email=document.getElementById('email')
        var password=document.getElementById('password')
        var bt=document.getElementsByTagName('button')[0]
        var span1=document.getElementById('span1')

        // ajax验证
        email.onblur=function(){
            // 创建ajax请求对象
            var request = new XMLHttpRequest()

            //请求成功后的回调处理
            request.onreadystatechange = function(){
                //状态为4,成功获取数据为200
                if(this.readyState === 4 && this.status === 200){
                    //更新提示信息
                    span1.innerHTML=this.responseText
                }
            }
            //设置请求参数
            request.open('POST','check.php',true)

            //设置请求头信息
            request.setRequestHeader('content-type','application/x-www-form-urlencoded')

            //发送请求
            request.send('email='+email.value+'&password='+password.value)

        }

        email.oninput = function(){
            span1.innerHTML=null
        }

        password.oninput = function(){
            span1.innerHTML=null
        }
    </script>

</body>
</html>点击 "运行实例" 按钮查看在线实例
下面是check.php的代码
<?php
//获取数据
    $email=empty($_POST['email']) ? '':$_POST['email'];
    $password=empty($_POST['password']) ? '':$_POST['password'];
//判断
    if(empty($email)){
        echo"邮箱不能为空";
    }
    else if(empty($password)){
        echo"密码不能为空";
    }
?>
总结:
1、ajax验证需要记住这几个步骤:
①创建ajax请求对象
②请求后的回调处理
③设置请求参数
④设置请求头信息
⑤发送请求
2、表单验证结合前后端一起会更好

Copyright 2014-2025 https://www.php.cn/ All Rights Reserved | php.cn | 湘ICP备2023035733号