


批改状态:未批改
老师批语:
1.createElement:新增元素2.append:尾部追加元素3.createDocumentFragment:增加片断4.after:后面插入元素5.before:前同插入元素6.cloneNode(true):克隆元素(深度克隆)7.replaceChild(new,old):替换子元素8.remove:删除元素,自杀, removeChild:被(父元素)删除
<script>/*** 1.createElement:新增元素* 2.append:尾部追加元素* 3.createDocumentFragment:增加片断* 4.after:后面插入元素* 5.before:前同插入元素* 6.cloneNode(true):克隆元素(深度克隆)* 7.replaceChild(new,old):替换子元素* 8.remove:删除元素,自杀, removeChild:被(父元素)删除*///1.createElement()//参数:预定义的html标签字符串//新增元素,第1步创建新元素,保存在变量中const ul = document.createElement("ul")//2.append():追加到页面中//参数:添加的对象或内容// document.querySelector("body").append(ul)document.body.append(ul)//添加多个元素//let li = document.createElement("li")//为新的元素添加文本内容// li.append("item")//ul.append(li)/* for (let i = 1; i <= 5; i++) {let li = document.createElement("li")li.append("item" + i)ul.append(li)} *///3.createDocumentFragment()//无参数//在页面中避免因新加元素频繁,影响页面加载的效率,先将新加的元素存入一个片断中//最后一次性添加到页面中let frag = document.createDocumentFragment()for (let i = 1; i <= 5; i++) {let li = document.createElement("li")li.append("item" + i)frag.append(li)}ul.append(frag)//4.after():后面插入元素//在插入的位置上调用after()方法//参数:插入的元素及内容//先找到插入元素的位置let three = ul.querySelector(":nth-child(3)")console.log(three)//创建要插入的元素let li = document.createElement("li")li.append("new-item-after")//插入three.after(li)//5.before():前面插入元素//在插入的位置上调用before()方法//参数:插入的元素及内容//先找到插入元素的位置three = ul.querySelector(":nth-child(3)")li = document.createElement("li")li.append("new-item-before")three.before(li)//6.cloneNode(true):克隆/复制元素//先找到需要克隆的元素//然后再追加或插入到指定的位置中let last = ul.lastElementChildlet copy = last.cloneNode(true)//参数:true,代表深度克隆,会把子元素及其内容一起复制//不加参数true,只复制元素,不复制元素中的内容ul.append(copy)three.before(copy)//7.replace(new,old):替换子元素//父元素调此方法替换子元素//参数:new元素,old元素let four = ul.querySelector(":nth-child(4)")console.log(four)li = document.createElement("li")li.append("replace-li")ul.replaceChild(li, four)//8.removeChild:父元素删除子元素 remove:自己把自己删除,自杀ul.removeChild(ul.querySelector(":nth-child(2)"))ul.querySelector(":first-child").remove()</script>

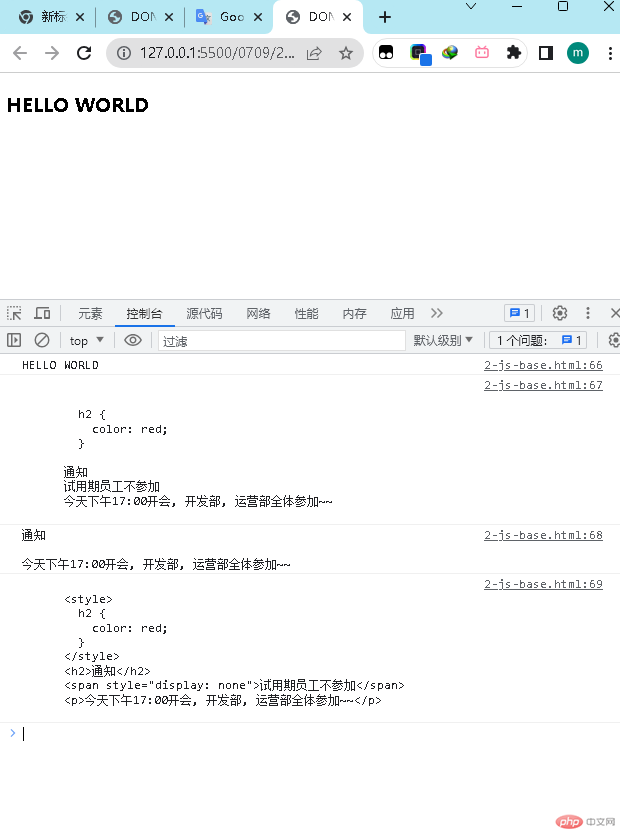
1.textContent:查看元素内容,是全部内容,包括js,css,隐藏内容
2.innerText:查看已渲染的(可见)内容
3.innerHTML:查看/替换/删除子元素内容(html),原样显示出来了
4.outerHTML:查看/替换/删除元素‘自身’(html)及所有的子元素
<body><h3>HELLO WORLD</h3><div class="box"><style>h2 {color: red;}</style><h2>通知</h2><span style="display: none">试用期员工不参加</span><p>今天下午17:00开会, 开发部, 运营部全体参加~~</p></div></body><script>/*** 1.textContent:查看元素内容,是全部内容,包括js,css,隐藏内容* 2.innerText:查看已渲染的(可见)内容* 3.innerHTML:查看/替换元素内容(html),原样显示出来了* 4.outerHTML:替换元素‘自身’(html)*/console.log(document.querySelector("h3").textContent)console.log(document.querySelector(".box").textContent)console.log(document.querySelector(".box").innerText)console.log(document.querySelector(".box").innerHTML)document.querySelector(".box").innerHTML = "<h2>查看/替换元素内容</h2>"//.outerHTML = null === .remove()// document.querySelector(".box").outerHTML = nulldocument.querySelector(".box").remove()</script>
(1) 插入位置1. `beforebegin`:元素自身的前面(起始标签)2. `afterbegin`:插入元素内部的第一个子节点之前3. `beforeend`:插入元素内部的最后一个子节点之后4. `afterend`:元素自身的后面(结束标签)(2) API 方法1. `insertAdjacentElement()`:指定位置插入元素2. `insertAdjacentText()`: 指定位置插入文本节点3. `insertAdjacentHTML()`: 指定位置插入元素节点(DOMString)
<body><ul class="list"><li>item1</li><li>item2</li><li>item3</li><li>item4</li><li>item5</li></ul><script>//1.insertAdjacentElement():指定位置插入元素//有两个参数:1 插入元素的位置 2 插入的元素标签//插入元素的位置const ul = document.querySelector(".list")//插入元素的内容const h3 = document.createElement("h3")h3.append("商品列表")//在ul起始标签的前面插入h3// ul.insertAdjacentElement("beforebegin", h3)//在元素内容的第一个子节点之前 插入h3// ul.insertAdjacentElement("afterbegin", h3)//在元素内容的最后一个子节点之后插入h3// ul.insertAdjacentElement("beforeend", h3)//在元素ul结束标签的后面插入h3//ul.insertAdjacentElement("afterend", h3)//2.insertAdjacentText()//有两个参数:1 插入元素的位置 2 插入的文本内容//在ul起始标签的前面插入文本// ul.insertAdjacentText("beforebegin", "(特价商品)")//在ul元素内容的第一个子节点之前 插入文本内容//ul.insertAdjacentText("afterbegin", "(特价商品)")//在ul元素内容的最后一个子节点后面 插入文本内容//ul.insertAdjacentText("beforeend", "(特价商品)")//在ul结束标签的后面插入文本//ul.insertAdjacentText("afterend", "(特价商品)")// 3.insertAdjacentHTML():指定位置插入元素节点(DOMString)//在指定的位置插入html元素//可以将html字符串,直接解析成html元素let p = `<p style="color:red">商品数量:5件</p>`ul.insertAdjacentHTML("beforebegin", p)ul.insertAdjacentHTML("afterbegin", p)/**指定位置插入* (1)指定位置* 1.beforebegin:元素自身起始标签的前面* 2.afterbegin:插入元素内部的第一个子节点之前* 3.beforeend:插入元素内部的最后一个子节点之后* 4.afterend:元素自身结束标签的后面* (2)插入API方法* 1.insertAdjacentElement():指定位置插入元素* 2.insertAdjacentText():指定位置插入文本节点* 3.insertAdjacentHTML():指定位置插入元素节点(DOMString)*/</script></body>
id,class,style, title...data-前缀data-不要写,蛇形->驼峰
<body><!--1.预定义属性:id,style,class,name...2.自定义属性:data- 前缀的属性有两个方法获取1.通过dataset2.通过getAttribute()--><h3 style="color: red">Hello world</h3><div data-email="abc@qq.com" data-my-name="朱老师">我的邮件地址</div><script>const h3 = document.querySelector("h3")console.log(h3.style.color)const div = document.querySelector("div")//无法使用以下方法获取自定义属性// console.log(div.data - email)//1.通过dataset对象方法获取//省去前缀data- ,dataset.email//my-name:转为小驼峰,myName dataset.myNameconsole.log(div.dataset.email)console.log(div.dataset.myName)//2.使用getAttribute('data-email') getAttribute('data-my-name')console.log(div.getAttribute("data-email"))console.log(div.getAttribute("data-my-name"))</script></body>
只读
<head><meta charset="UTF-8" /><meta name="viewport" content="width=device-width, initial-scale=1.0" /><title>getComputedStyle</title><link rel="stylesheet" href="style.css" /><style>h3 {width: 200px;height: 50px;}</style></head><body><h3 style="color: red">Hello World</h3><script>const h3 = document.querySelector("h3")console.log(h3.style.color)//querySelector 无法获取对除行内样式以外的样式信息console.log(h3.style.width)console.log(window.getComputedStyle(h3).backgroundColor) //rgb(255, 255, 0)console.log(window.getComputedStyle(h3).width) //200pxlet width = window.getComputedStyle(h3).width//返回的是字符串//通过 parseInt()转成数值型width = parseInt(width) + 100 + "px"console.log(width)//通过行内样式改变width的值h3.style.width = parseInt(width) + 100 + "px"/*** getComputedStyle对象* 计算样式:元素上的全部样式,包括行内,文档,外部样式* 返回值:只读,* 想修改样式在行内样式里修改*/</script></body>

Copyright 2014-2025 https://www.php.cn/ All Rights Reserved | php.cn | 湘ICP备2023035733号


