
 Backend Development
Python Tutorial
Share an example of using Python crawler to simulate Zhihu login
Backend Development
Python Tutorial
Share an example of using Python crawler to simulate Zhihu login
Share an example of using Python crawler to simulate Zhihu login

During the crawling process, some pages are prohibited from being crawled before logging in. At this time, you need to simulate the login. The following article mainly introduces how to use the Python crawler to simulate Zhihu login. The method tutorial is very detailed in the article. Friends in need can refer to it. Let’s take a look together.
Preface
Everyone who often writes crawlers knows that some pages are prohibited from crawling before logging in, such as Zhihu’s The topic page requires users to log in to access, and "login" is inseparable from the Cookie technology in HTTP.
Login Principle
The principle of Cookie is very simple, because HTTP is a stateless protocol, so in order to use the stateless HTTP protocol On top of that, the session state is maintained to let the server know which client it is currently dealing with. Cookie technology appeared. Cookie is equivalent to an identifier assigned by the server to the client.
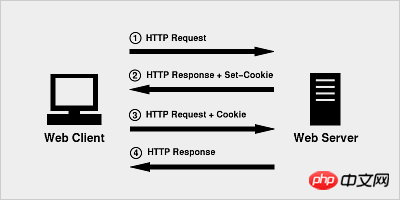
When the browser initiates an HTTP request for the first time, it does not carry any Cookie information
The server The HTTP response, along with a Cookie information, is returned to the browser together
The browser will send the Cookie information returned by the server to the server together with the second request
The server receives the HTTP request and finds that there is a Cookie field in the request header, so it knows that it has dealt with this user before.
Practical application
Anyone who has used Zhihu knows that as long as you provide the user name and password and verification code to log in. Of course, this is just what we see. The technical details hidden behind need to be discovered with the help of a browser. Now let’s use Chrome to see what happens after we fill out the form?
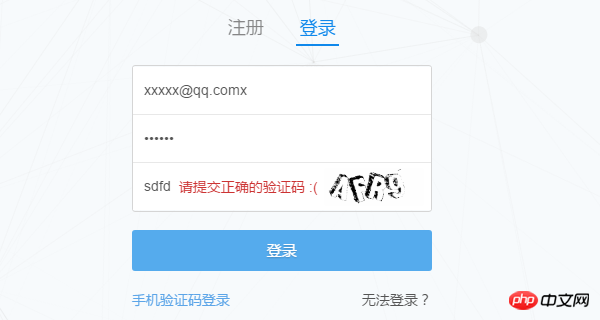
(If you are already logged in, log out first) First enter the Zhihu login page www.zhihu.com/#signin and open the Chrome developer toolbar (press F12 ) First try to enter an incorrect verification code and observe how the browser sends the request.
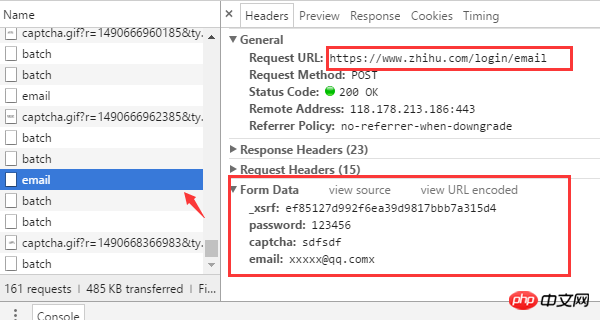
Several key information can be found from the browser request
The login URL address is https://www. zhihu.com/login/email
There are four form data required for login: username (email), password (password), verification code (captcha), and _xsrf.
The URL address to obtain the verification code is https://www.zhihu.com/captcha.gif?r=1490690391695&type=login
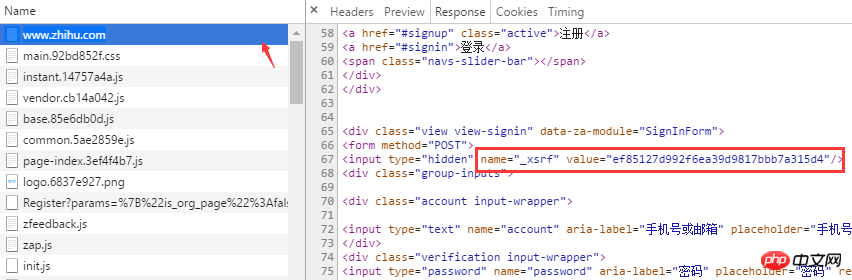
_xsrfWhat is it? If you are very familiar with CSRF (cross-site request forgery) attacks, then you must know its role. xsrf is a string of pseudo-random numbers, which is used to prevent cross-site request forgery. It usually exists in the form form tag of the web page. To confirm this, you can search for "xsrf" on the page. Sure enough, _xsrf is in a hidden input tag
After clarifying how to obtain the data required for browser login, you can now start writing code to simulate browser login using Python. The two third-party libraries relied on when logging in are requests and BeautifulSoup. FirstInstall
pip install beautifulsoup4==4.5.3
pip install requests==2.13.0
http.cookiejar module can be used to automatically process HTTP Cookies. The LWPCookieJar object is the encapsulation of cookies. Supports saving cookies to files and loading them from files.
The session object provides cookie persistence and connection pooling functions. Requests can be sent through the session object.
First load the cookie information from the cookies.txt file, because there is no cookie for the first run. A LoadError exception will occur.
from http import cookiejar
session = requests.session()
session.cookies = cookiejar.LWPCookieJar(filename='cookies.txt')
try:
 session.cookies.load(ignore_discard=True)
except LoadError:
print("load cookies failed")Get xsrf
The tag where xsrf is located has been found earlier, and the value can be obtained very conveniently by using the find method of BeatifulSoup
def get_xsrf():
 response = session.get("https://www.zhihu.com", headers=headers)
 soup = BeautifulSoup(response.content, "html.parser")
 xsrf = soup.find('input', attrs={"name": "_xsrf"}).get("value")
return xsrfGet the verification code
The verification code is returned through the /captcha.gif interface, here we Download and save the verification code image to the current directory for manual identification. Of course, you can use a third-party support library to automatically identify it, such as pytesser.
def get_captcha():
 """
 把验证码图片保存到当前目录,手动识别验证码
 :return:
 """
 t = str(int(time.time() * 1000))
 captcha_url = 'https://www.zhihu.com/captcha.gif?r=' + t + "&type=login"
 r = session.get(captcha_url, headers=headers)
 with open('captcha.jpg', 'wb') as f:
  f.write(r.content)
 captcha = input("验证码:")
return captchaLogin
一切参数准备就绪之后,就可以请求登录接口了。
def login(email, password):
 login_url = 'www.zhihu.com/login/email'
 data = {
  'email': email,
  'password': password,
  '_xsrf': get_xsrf(),
  "captcha": get_captcha(),
  'remember_me': 'true'}
 response = session.post(login_url, data=data, headers=headers)
 login_code = response.json()
 print(login_code['msg'])
 for i in session.cookies:
  print(i)
session.cookies.save()请求成功后,session 会自动把 服务端的返回的cookie 信息填充到 session.cookies 对象中,下次请求时,客户端就可以自动携带这些cookie去访问那些需要登录的页面了。
auto_login.py 示例代码
# encoding: utf-8
# !/usr/bin/env python
"""
作者:liuzhijun
"""
import time
from http import cookiejar

import requests
from bs4 import BeautifulSoup

headers = {
  "Host": "www.zhihu.com",
  "Referer": "www.zhihu.com/",
  'User-Agent': 'Mozilla/5.0 (Macintosh; Intel Mac OS X 10_10_5) AppleWebKit/537.36 (KHTML, like Gecko) Chrome/56.0.2924.87'
}

# 使用登录cookie信息
session = requests.session()
session.cookies = cookiejar.LWPCookieJar(filename='cookies.txt')
try:
  print(session.cookies)
  session.cookies.load(ignore_discard=True)

except:
  print("还没有cookie信息")


def get_xsrf():
  response = session.get("www.zhihu.com", headers=headers)
  soup = BeautifulSoup(response.content, "html.parser")
  xsrf = soup.find('input', attrs={"name": "_xsrf"}).get("value")
  return xsrf


def get_captcha():
  """
  把验证码图片保存到当前目录,手动识别验证码
  :return:
  """
  t = str(int(time.time() * 1000))
  captcha_url = 'www.zhihu.com/captcha.gif?r=' + t + "&type=login"
  r = session.get(captcha_url, headers=headers)
  with open('captcha.jpg', 'wb') as f:
    f.write(r.content)
  captcha = input("验证码:")
  return captcha


def login(email, password):
  login_url = 'www.zhihu.com/login/email'
  data = {
    'email': email,
    'password': password,
    '_xsrf': get_xsrf(),
    "captcha": get_captcha(),
    'remember_me': 'true'}
  response = session.post(login_url, data=data, headers=headers)
  login_code = response.json()
  print(login_code['msg'])
  for i in session.cookies:
    print(i)
  session.cookies.save()


if name == 'main':
  email = "xxxx"
  password = "xxxxx"
login(email, password)【相关推荐】
1. python爬虫入门(4)--详解HTML文本的解析库BeautifulSoup
2. python爬虫入门(3)--利用requests构建知乎API
3. python爬虫入门(2)--HTTP库requests
The above is the detailed content of Share an example of using Python crawler to simulate Zhihu login. For more information, please follow other related articles on the PHP Chinese website!

Hot AI Tools

Undresser.AI Undress
AI-powered app for creating realistic nude photos

AI Clothes Remover
Online AI tool for removing clothes from photos.

Undress AI Tool
Undress images for free

Clothoff.io
AI clothes remover

Video Face Swap
Swap faces in any video effortlessly with our completely free AI face swap tool!

Hot Article
Hot Tools

Notepad++7.3.1
Easy-to-use and free code editor

SublimeText3 Chinese version
Chinese version, very easy to use

Zend Studio 13.0.1
Powerful PHP integrated development environment

Dreamweaver CS6
Visual web development tools

SublimeText3 Mac version
God-level code editing software (SublimeText3)
Hot Topics


 PHP and Python: Different Paradigms Explained
Apr 18, 2025 am 12:26 AM
PHP and Python: Different Paradigms Explained
Apr 18, 2025 am 12:26 AM
PHP is mainly procedural programming, but also supports object-oriented programming (OOP); Python supports a variety of paradigms, including OOP, functional and procedural programming. PHP is suitable for web development, and Python is suitable for a variety of applications such as data analysis and machine learning.
 Choosing Between PHP and Python: A Guide
Apr 18, 2025 am 12:24 AM
Choosing Between PHP and Python: A Guide
Apr 18, 2025 am 12:24 AM
PHP is suitable for web development and rapid prototyping, and Python is suitable for data science and machine learning. 1.PHP is used for dynamic web development, with simple syntax and suitable for rapid development. 2. Python has concise syntax, is suitable for multiple fields, and has a strong library ecosystem.
 Python vs. JavaScript: The Learning Curve and Ease of Use
Apr 16, 2025 am 12:12 AM
Python vs. JavaScript: The Learning Curve and Ease of Use
Apr 16, 2025 am 12:12 AM
Python is more suitable for beginners, with a smooth learning curve and concise syntax; JavaScript is suitable for front-end development, with a steep learning curve and flexible syntax. 1. Python syntax is intuitive and suitable for data science and back-end development. 2. JavaScript is flexible and widely used in front-end and server-side programming.
 PHP and Python: A Deep Dive into Their History
Apr 18, 2025 am 12:25 AM
PHP and Python: A Deep Dive into Their History
Apr 18, 2025 am 12:25 AM
PHP originated in 1994 and was developed by RasmusLerdorf. It was originally used to track website visitors and gradually evolved into a server-side scripting language and was widely used in web development. Python was developed by Guidovan Rossum in the late 1980s and was first released in 1991. It emphasizes code readability and simplicity, and is suitable for scientific computing, data analysis and other fields.
 Can vs code run in Windows 8
Apr 15, 2025 pm 07:24 PM
Can vs code run in Windows 8
Apr 15, 2025 pm 07:24 PM
VS Code can run on Windows 8, but the experience may not be great. First make sure the system has been updated to the latest patch, then download the VS Code installation package that matches the system architecture and install it as prompted. After installation, be aware that some extensions may be incompatible with Windows 8 and need to look for alternative extensions or use newer Windows systems in a virtual machine. Install the necessary extensions to check whether they work properly. Although VS Code is feasible on Windows 8, it is recommended to upgrade to a newer Windows system for a better development experience and security.
 Can visual studio code be used in python
Apr 15, 2025 pm 08:18 PM
Can visual studio code be used in python
Apr 15, 2025 pm 08:18 PM
VS Code can be used to write Python and provides many features that make it an ideal tool for developing Python applications. It allows users to: install Python extensions to get functions such as code completion, syntax highlighting, and debugging. Use the debugger to track code step by step, find and fix errors. Integrate Git for version control. Use code formatting tools to maintain code consistency. Use the Linting tool to spot potential problems ahead of time.
 How to run python with notepad
Apr 16, 2025 pm 07:33 PM
How to run python with notepad
Apr 16, 2025 pm 07:33 PM
Running Python code in Notepad requires the Python executable and NppExec plug-in to be installed. After installing Python and adding PATH to it, configure the command "python" and the parameter "{CURRENT_DIRECTORY}{FILE_NAME}" in the NppExec plug-in to run Python code in Notepad through the shortcut key "F6".
 Is the vscode extension malicious?
Apr 15, 2025 pm 07:57 PM
Is the vscode extension malicious?
Apr 15, 2025 pm 07:57 PM
VS Code extensions pose malicious risks, such as hiding malicious code, exploiting vulnerabilities, and masturbating as legitimate extensions. Methods to identify malicious extensions include: checking publishers, reading comments, checking code, and installing with caution. Security measures also include: security awareness, good habits, regular updates and antivirus software.
