
 Backend Development
PHP Tutorial
Analysis on ThinkPHP watermarking and setting watermark position
Backend Development
PHP Tutorial
Analysis on ThinkPHP watermarking and setting watermark position
Analysis on ThinkPHP watermarking and setting watermark position

This article mainly introduces the method of watermarking and setting watermark position in ThinkPHP. It analyzes the related operation steps and specific implementation skills of thinkPHP printing and setting watermark in the form of examples. Friends in need can refer to the following
The example in this article describes the method of watermarking and setting the watermark position in ThinkPHP. I would like to share it with you for your reference. The details are as follows:
I recently used the watermarking function of Thinkphp and found that it can only be printed in the lower left corner. PHP watermarking is still very easy. The most important thing is to use
bool imagecopymerge ( resource $dst_im , resource $src_im , int $dst_x , int $dst_y , int $src_x , int $src_y , int $src_w , int $src_h , int $pct )
to copy a part of the src_im image whose coordinates start from src_x, src_y, with a width of src_w and a height of src_h to the dst_im image where the coordinates are dst_x and dst_y. position. The two images will be merged based on pct, which ranges from 0 to 100. When pct = 0, it actually does nothing. When it is 100, this function is exactly the same as imagecopy() for palette images. It implements alpha transparency for truecolor images.
Watermark demo picture:

I need to put the watermark in the middle of the picture, check the Thinkphp code. I found that the author actually wrote it to death, I can only make one modification
/**
* 为图片添加水印
* @static public
* @param string $source 原文件名
* @param string $water 水印图片
* @param string $$savename 添加水印后的图片名
* @param string $postion 水印的具体位置 leftbottom rightbottom lefttop righttop center <新增>
* @param string $alpha 水印的透明度
* @return void
*/
static public function water($source, $water, $savename=null,$postion="center", $alpha=80) {
//检查文件是否存在
if (!file_exists($source) || !file_exists($water))
return false;
//图片信息
$sInfo = self::getImageInfo($source);
$wInfo = self::getImageInfo($water);
//如果图片小于水印图片,不生成图片
if ($sInfo["width"] < $wInfo["width"] || $sInfo['height'] < $wInfo['height']) return false; //建立图像 $sCreateFun = "imagecreatefrom" . $sInfo['type']; $sImage = $sCreateFun($source); $wCreateFun = "imagecreatefrom" . $wInfo['type']; $wImage = $wCreateFun($water); //设定图像的混色模式 imagealphablending($wImage, true); //图像位置,默认为右下角右对齐 $posArr = $this->WaterPostion($postion,$sInfo,$wInfo); //新增
//生成混合图像
imagecopymerge($sImage, $wImage, $posArr[0], $posArr[1], 0, 0, $wInfo['width'], $wInfo['height'], $alpha);
//输出图像
$ImageFun = 'Image' . $sInfo['type'];
//如果没有给出保存文件名,默认为原图像名
if (!$savename) {
$savename = $source;
@unlink($source);
}
//保存图像
$ImageFun($sImage, $savename);
imagedestroy($sImage);
}
private function WaterPostion($postion,$sInfo,$wInfo)
{
$posY = $sInfo["height"] - $wInfo["height"];
$posX = $sInfo["width"] - $wInfo["width"];
switch($postion)
{
case "rightbottom":
return array($posX,$posY);
break;
case "leftbottom":
return array($wInfo["width"],$posY);
break;
case "lefttop":
return array($wInfo["width"],$wInfo["height"]);
break;
case "righttop":
return array($posX,$wInfo["height"]);
break;
case "center":
return array($posX/2,$posY/2);
break;
}
}The above is the entire content of this article, I hope it will be helpful to everyone Learning will be helpful. For more related content, please pay attention to the PHP Chinese website!
Related recommendations:
How to use thinkphp to obtain the client IP
About the thinkphp framework's function of adding and displaying data Method
ThinkPHP template output display
##
The above is the detailed content of Analysis on ThinkPHP watermarking and setting watermark position. For more information, please follow other related articles on the PHP Chinese website!

Hot AI Tools

Undresser.AI Undress
AI-powered app for creating realistic nude photos

AI Clothes Remover
Online AI tool for removing clothes from photos.

Undress AI Tool
Undress images for free

Clothoff.io
AI clothes remover

Video Face Swap
Swap faces in any video effortlessly with our completely free AI face swap tool!

Hot Article
Hot Tools

Notepad++7.3.1
Easy-to-use and free code editor

SublimeText3 Chinese version
Chinese version, very easy to use

Zend Studio 13.0.1
Powerful PHP integrated development environment

Dreamweaver CS6
Visual web development tools

SublimeText3 Mac version
God-level code editing software (SublimeText3)
Hot Topics


 How to set the scheduled time for publishing works on Douyin? How does it set the video duration?
Mar 27, 2024 pm 06:11 PM
How to set the scheduled time for publishing works on Douyin? How does it set the video duration?
Mar 27, 2024 pm 06:11 PM
Publishing works on Douyin can attract more attention and likes, but sometimes it may be difficult for us to publish works in real time. In this case, we can use Douyin's scheduled release function. Douyin’s scheduled release function allows users to automatically publish works at a scheduled time, which can better plan the release plan and increase the exposure and influence of the work. 1. How to set the scheduled time for publishing works on Douyin? To set a scheduled release time, first go to Douyin's personal homepage, find the "+" button in the upper right corner, and click to enter the release page. There is a clock icon in the lower right corner of the publishing page. Click to enter the scheduled publishing interface. In the interface, you can choose the type of work you want to publish, including short videos, long videos, and live broadcasts. Next, you need to set a time for your work to be published. TikTok provides
 How to run thinkphp project
Apr 09, 2024 pm 05:33 PM
How to run thinkphp project
Apr 09, 2024 pm 05:33 PM
To run the ThinkPHP project, you need to: install Composer; use Composer to create the project; enter the project directory and execute php bin/console serve; visit http://localhost:8000 to view the welcome page.
 There are several versions of thinkphp
Apr 09, 2024 pm 06:09 PM
There are several versions of thinkphp
Apr 09, 2024 pm 06:09 PM
ThinkPHP has multiple versions designed for different PHP versions. Major versions include 3.2, 5.0, 5.1, and 6.0, while minor versions are used to fix bugs and provide new features. The latest stable version is ThinkPHP 6.0.16. When choosing a version, consider the PHP version, feature requirements, and community support. It is recommended to use the latest stable version for best performance and support.
 How to run thinkphp
Apr 09, 2024 pm 05:39 PM
How to run thinkphp
Apr 09, 2024 pm 05:39 PM
Steps to run ThinkPHP Framework locally: Download and unzip ThinkPHP Framework to a local directory. Create a virtual host (optional) pointing to the ThinkPHP root directory. Configure database connection parameters. Start the web server. Initialize the ThinkPHP application. Access the ThinkPHP application URL and run it.
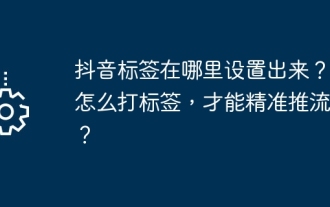 Where is the Douyin tag set? How can it be tagged so that it can be pushed accurately?
Mar 27, 2024 am 11:01 AM
Where is the Douyin tag set? How can it be tagged so that it can be pushed accurately?
Mar 27, 2024 am 11:01 AM
As one of the most popular short video platforms in the world, Douyin allows everyone to become a creator and share every moment of life. For Douyin users, tags are a very important function. It can help users better classify and retrieve content, and also allows the platform to push appropriate content to users more accurately. So, where are the Douyin tags set? This article will explain in detail how to set up and use tags on Douyin. 1. Where is the Douyin tag set? Using tags on Douyin can help users better classify and label their works, making it easier for other users to find and follow them. The method to set the label is as follows: 1. Open the Douyin APP and log in to your account. 2. Click the "+" sign at the bottom of the screen and select the "Publish" button. 3.
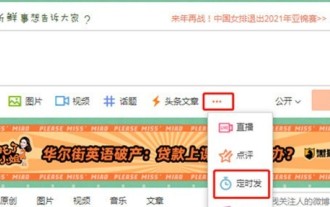 How to set up scheduled publishing on Weibo_Tutorial on how to set up scheduled publishing on Weibo
Mar 29, 2024 pm 03:51 PM
How to set up scheduled publishing on Weibo_Tutorial on how to set up scheduled publishing on Weibo
Mar 29, 2024 pm 03:51 PM
1. Open the Weibo client, click the three little dots on the editing page, and then click Scheduled Post. 2. After clicking on scheduled posting, there will be a time option on the right side of the publishing time. Set the time, edit the article, and click on the yellow words in the lower right corner to schedule posting. 3. The mobile version of Weibo does not currently support scheduled publishing. This function can only be used on the PC client!
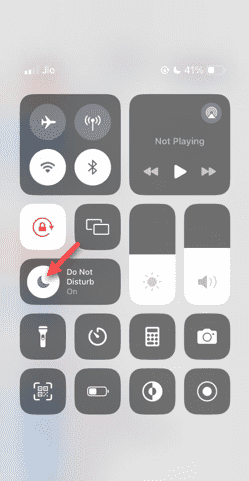 Do Not Disturb Mode Not Working in iPhone: Fix
Apr 24, 2024 pm 04:50 PM
Do Not Disturb Mode Not Working in iPhone: Fix
Apr 24, 2024 pm 04:50 PM
Even answering calls in Do Not Disturb mode can be a very annoying experience. As the name suggests, Do Not Disturb mode turns off all incoming call notifications and alerts from emails, messages, etc. You can follow these solution sets to fix it. Fix 1 – Enable Focus Mode Enable focus mode on your phone. Step 1 – Swipe down from the top to access Control Center. Step 2 – Next, enable “Focus Mode” on your phone. Focus Mode enables Do Not Disturb mode on your phone. It won't cause any incoming call alerts to appear on your phone. Fix 2 – Change Focus Mode Settings If there are some issues in the focus mode settings, you should fix them. Step 1 – Open your iPhone settings window. Step 2 – Next, turn on the Focus mode settings
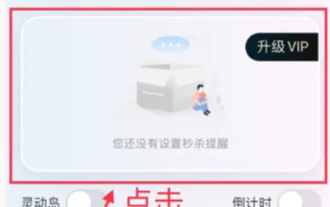 How to set the countdown to grab tickets in Damai
Apr 01, 2024 pm 07:01 PM
How to set the countdown to grab tickets in Damai
Apr 01, 2024 pm 07:01 PM
When buying tickets on Damai.com, in order to ensure that the ticket purchase time can be accurately grasped, users can set a floating clock to grab tickets. The detailed setting method is below, let us learn together. How to bind the floating clock to Damai 1. Click to open the floating clock app on your phone to enter the interface, and click on the location where the flash sale check is set, as shown in the figure below: 2. After coming to the page of adding new records, click on Damai.com Copy the ticket purchase link page copied in. 3. Next, set the flash sale time and notification time below, turn on the switch button behind [Save to Calendar], and click [Save] below. 4. Click to turn on [Countdown], as shown in the figure below: 5. When the reminder time comes, click the [Start Picture-in-Picture] button below. 6. When the ticket purchase time comes
