
 Web Front-end
JS Tutorial
How to implement the file upload function in slices through Vue2.0 combined with webuploader (detailed tutorial)
Web Front-end
JS Tutorial
How to implement the file upload function in slices through Vue2.0 combined with webuploader (detailed tutorial)
How to implement the file upload function in slices through Vue2.0 combined with webuploader (detailed tutorial)
This article mainly introduces the function of Vue2.0 combined with webuploader to implement file segmentation upload. It is very good and has reference value. Friends in need can refer to it
Encountered large file segmentation in the Vue project Regarding the upload problem, I have used webuploader before, so I simply combined Vue2.0 with webuploader to encapsulate a vue upload component, which is more comfortable to use.
Upload, just upload it. Why is it so troublesome to upload in parts?
The combination of fragmentation and concurrency splits a large file into multiple blocks and uploads them concurrently, which greatly improves the upload speed of large files.
When network problems cause transmission errors, only the error fragments need to be retransmitted, not the entire file. In addition, fragmented transmission can track the upload progress in more real-time.
The interface after implementation:
There are mainly two files, the encapsulated upload component and the specific ui page. The upload component code is listed below. The codes of these two pages are put on github: https://github.com/shady-xia/Blog/tree/master/vue-webuploader.
Introduce webuploader into the project
1. First introduce jquery into the system (the plug-in is based on jq, it’s a scam!), if you don’t If you know where to put it, put it in index.html.
2. Download Uploader.swf and webuploader.min.js on the official website, which can be placed under the static directory of the project; introduce webuploader in index.html .min.js.
(无需单独再引入 webuploader.css ,因为没有几行css,我们可以复制到vue组件中。)
<script src="/static/lib/jquery-2.2.3.min.js"></script>
<script src="/static/lib/webuploader/webuploader.min.js"></script>
Points to note:
1. In the vue component, pass import './webuploader' ; import webuploader, the error 'caller', 'callee', and 'arguments' properties may not be accessed on strict mode...' will be reported. This is because your babel uses Strict mode, and callers are prohibited from being used in strict mode. Therefore, you can directly introduce webuploader.js into index.html, or manually solve the 'use strict' problem in babel.
Encapsulating Vue components based on webuploader
The encapsulated component upload.vue is as follows. The interface can be expanded according to specific business.
Note: Function and UI are separated. This component encapsulates the basic functions and does not provide UI. The UI is implemented on specific pages.
<template>
<p class="upload">
</p>
</template>
<script>
export default {
name: 'vue-upload',
props: {
accept: {
type: Object,
default: null,
},
// 上传地址
url: {
type: String,
default: '',
},
// 上传最大数量 默认为100
fileNumLimit: {
type: Number,
default: 100,
},
// 大小限制 默认2M
fileSingleSizeLimit: {
type: Number,
default: 2048000,
},
// 上传时传给后端的参数,一般为token,key等
formData: {
type: Object,
default: null
},
// 生成formData中文件的key,下面只是个例子,具体哪种形式和后端商议
keyGenerator: {
type: Function,
default(file) {
const currentTime = new Date().getTime();
const key = `${currentTime}.${file.name}`;
return key;
},
},
multiple: {
type: Boolean,
default: false,
},
// 上传按钮ID
uploadButton: {
type: String,
default: '',
},
},
data() {
return {
uploader: null
};
},
mounted() {
this.initWebUpload();
},
methods: {
initWebUpload() {
this.uploader = WebUploader.create({
auto: true, // 选完文件后,是否自动上传
swf: '/static/lib/webuploader/Uploader.swf', // swf文件路径
server: this.url, // 文件接收服务端
pick: {
id: this.uploadButton, // 选择文件的按钮
multiple: this.multiple, // 是否多文件上传 默认false
label: '',
},
accept: this.getAccept(this.accept), // 允许选择文件格式。
threads: 3,
fileNumLimit: this.fileNumLimit, // 限制上传个数
//fileSingleSizeLimit: this.fileSingleSizeLimit, // 限制单个上传图片的大小
formData: this.formData, // 上传所需参数
chunked: true, //分片上传
chunkSize: 2048000, //分片大小
duplicate: true, // 重复上传
});
// 当有文件被添加进队列的时候,添加到页面预览
this.uploader.on('fileQueued', (file) => {
this.$emit('fileChange', file);
});
this.uploader.on('uploadStart', (file) => {
// 在这里可以准备好formData的数据
//this.uploader.options.formData.key = this.keyGenerator(file);
});
// 文件上传过程中创建进度条实时显示。
this.uploader.on('uploadProgress', (file, percentage) => {
this.$emit('progress', file, percentage);
});
this.uploader.on('uploadSuccess', (file, response) => {
this.$emit('success', file, response);
});
this.uploader.on('uploadError', (file, reason) => {
console.error(reason);
this.$emit('uploadError', file, reason);
});
this.uploader.on('error', (type) => {
let errorMessage = '';
if (type === 'F_EXCEED_SIZE') {
errorMessage = `文件大小不能超过${this.fileSingleSizeLimit / (1024 * 1000)}M`;
} else if (type === 'Q_EXCEED_NUM_LIMIT') {
errorMessage = '文件上传已达到最大上限数';
} else {
errorMessage = `上传出错!请检查后重新上传!错误代码${type}`;
}
console.error(errorMessage);
this.$emit('error', errorMessage);
});
this.uploader.on('uploadComplete', (file, response) => {
this.$emit('complete', file, response);
});
},
upload(file) {
this.uploader.upload(file);
},
stop(file) {
this.uploader.stop(file);
},
// 取消并中断文件上传
cancelFile(file) {
this.uploader.cancelFile(file);
},
// 在队列中移除文件
removeFile(file, bool) {
this.uploader.removeFile(file, bool);
},
getAccept(accept) {
switch (accept) {
case 'text':
return {
title: 'Texts',
exteensions: 'doc,docx,xls,xlsx,ppt,pptx,pdf,txt',
mimeTypes: '.doc,docx,.xls,.xlsx,.ppt,.pptx,.pdf,.txt'
};
break;
case 'video':
return {
title: 'Videos',
exteensions: 'mp4',
mimeTypes: '.mp4'
};
break;
case 'image':
return {
title: 'Images',
exteensions: 'gif,jpg,jpeg,bmp,png',
mimeTypes: '.gif,.jpg,.jpeg,.bmp,.png'
};
break;
default: return accept
}
},
},
};
</script>
<style lang="scss">
// 直接把官方的css粘过来就行了
</style>Use the encapsulated upload component
Create a new page. The usage examples are as follows:
ui needs to be implemented by yourself. The approximate code can be found here.
<vue-upload
    ref="uploader"
    url="xxxxxx"
    uploadButton="#filePicker"
    multiple
    @fileChange="fileChange"
    @progress="onProgress"
    @success="onSuccess"
></vue-upload>The principle and process of fragmentation
When we upload a large file, it will be fragmented by the plug-in, and the ajax request is as follows:
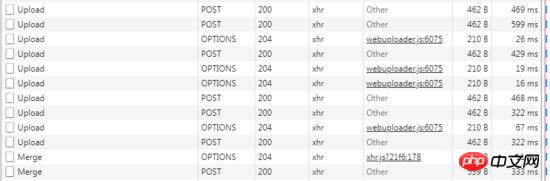
1. Multiple upload requests are all fragmented requests. The large file is divided into multiple small parts and delivered to the server one at a time
2. fragmentation After completion, that is, after the upload is completed, a merge request needs to be passed to the server to let the server combine multiple fragmented files into one file
Fragmentation
You can see that multiple upload requests have been initiated. We Let’s take a look at the specific parameters sent by upload:
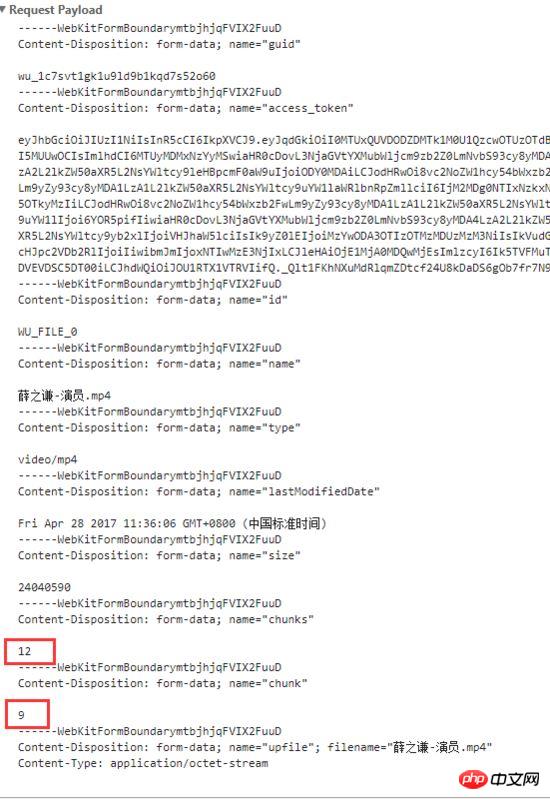
The guid in the first configuration ( content-disposition ) and the access_token in the second configuration , it is the formData in the webuploader configuration, that is, the parameters passed to the server
The following configurations are the file content, id, name, type, size, etc.
chunks is the total fragmentation number, chunk is the current fragment. They are 12 and 9 respectively in the picture. When you see an upload request with chunk 11, it means that this is the last upload request.
Merge
After sharding, the files have not been integrated, and the data probably looks like the following:
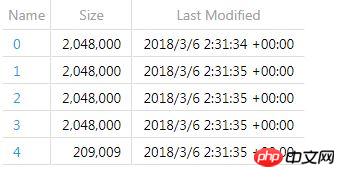
After completing the sharding, the work is not over yet. We have to send another ajax request to the server, telling him to merge the several shards we uploaded into a complete file.
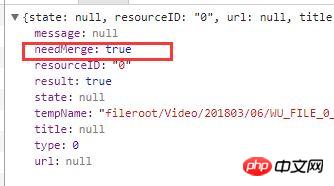
How do I know that the multipart upload is complete and when should I merge it?
webuploaderThe plug-in has an event uploadSuccess , which contains two parameters, file and response returned by the background; when all fragments are uploaded, this event will be triggered ,
We can use the fields returned by the server to determine whether to merge.
For example, needMerge is returned in the background. When we see that it is true, we can send a merge request.
Known issues
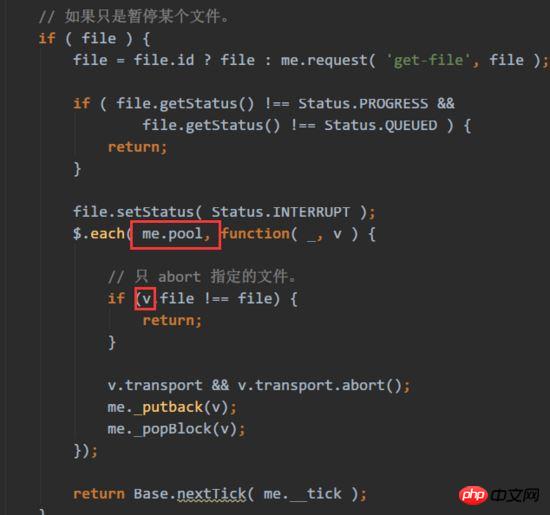
When pausing and continuing to upload a single file, a bug in this plug-in was discovered:
1 . When the set threads>1 is used and the single file upload function is used, that is, when the stop method is passed in file, an error Uncaught TypeError: Cannot read property 'file' of undefined
The source code of the error is as follows: This is because in order to allow the next file to continue to be transferred during the pause, the paused file stream will be popped out of the current pool. A loop is made here, and v is undefined during the last loop.
2. Set threads to 1 and it can be paused normally, but uploading after pausing will fail.
The principle is the same as the previous one. During the pause, all current file streams are popped in the pool. When the file starts to be uploaded, the current pool will be checked. At this time, there are no previously paused file streams.
If it is to pause and continue all files as a whole, the function is normal.
The above is what I compiled for everyone. I hope it will be helpful to everyone in the future.
Related articles:
In-depth understanding of Node module module
Summary of 10 advanced techniques for using Console to debug
About the difference between v-if and v-show in vuejs and the problem that v-show does not work
The above is the detailed content of How to implement the file upload function in slices through Vue2.0 combined with webuploader (detailed tutorial). For more information, please follow other related articles on the PHP Chinese website!

Hot AI Tools

Undresser.AI Undress
AI-powered app for creating realistic nude photos

AI Clothes Remover
Online AI tool for removing clothes from photos.

Undress AI Tool
Undress images for free

Clothoff.io
AI clothes remover

Video Face Swap
Swap faces in any video effortlessly with our completely free AI face swap tool!

Hot Article
Hot Tools

Notepad++7.3.1
Easy-to-use and free code editor

SublimeText3 Chinese version
Chinese version, very easy to use

Zend Studio 13.0.1
Powerful PHP integrated development environment

Dreamweaver CS6
Visual web development tools

SublimeText3 Mac version
God-level code editing software (SublimeText3)
Hot Topics


 How to use python+Flask to realize real-time update and display of logs on web pages
May 17, 2023 am 11:07 AM
How to use python+Flask to realize real-time update and display of logs on web pages
May 17, 2023 am 11:07 AM
1. Log output to file using module: logging can generate a custom level log, and can output the log to a specified path. Log level: debug (debug log) = 5) {clearTimeout (time) // If all results obtained 10 consecutive times are empty Log clearing scheduled task}return}if(data.log_type==2){//If a new log is obtained for(i=0;i
 How to use Nginx web server caddy
May 30, 2023 pm 12:19 PM
How to use Nginx web server caddy
May 30, 2023 pm 12:19 PM
Introduction to Caddy Caddy is a powerful and highly scalable web server that currently has 38K+ stars on Github. Caddy is written in Go language and can be used for static resource hosting and reverse proxy. Caddy has the following main features: Compared with the complex configuration of Nginx, its original Caddyfile configuration is very simple; it can dynamically modify the configuration through the AdminAPI it provides; it supports automated HTTPS configuration by default, and can automatically apply for HTTPS certificates and configure it; it can be expanded to data Tens of thousands of sites; can be executed anywhere with no additional dependencies; written in Go language, memory safety is more guaranteed. First of all, we install it directly in CentO
 How to implement form validation for web applications using Golang
Jun 24, 2023 am 09:08 AM
How to implement form validation for web applications using Golang
Jun 24, 2023 am 09:08 AM
Form validation is a very important link in web application development. It can check the validity of the data before submitting the form data to avoid security vulnerabilities and data errors in the application. Form validation for web applications can be easily implemented using Golang. This article will introduce how to use Golang to implement form validation for web applications. 1. Basic elements of form validation Before introducing how to implement form validation, we need to know what the basic elements of form validation are. Form elements: form elements are
 Using Jetty7 for Web server processing in Java API development
Jun 18, 2023 am 10:42 AM
Using Jetty7 for Web server processing in Java API development
Jun 18, 2023 am 10:42 AM
Using Jetty7 for Web Server Processing in JavaAPI Development With the development of the Internet, the Web server has become the core part of application development and is also the focus of many enterprises. In order to meet the growing business needs, many developers choose to use Jetty for web server development, and its flexibility and scalability are widely recognized. This article will introduce how to use Jetty7 in JavaAPI development for We
 Real-time protection against face-blocking barrages on the web (based on machine learning)
Jun 10, 2023 pm 01:03 PM
Real-time protection against face-blocking barrages on the web (based on machine learning)
Jun 10, 2023 pm 01:03 PM
Face-blocking barrage means that a large number of barrages float by without blocking the person in the video, making it look like they are floating from behind the person. Machine learning has been popular for several years, but many people don’t know that these capabilities can also be run in browsers. This article introduces the practical optimization process in video barrages. At the end of the article, it lists some applicable scenarios for this solution, hoping to open it up. Some ideas. mediapipeDemo (https://google.github.io/mediapipe/) demonstrates the mainstream implementation principle of face-blocking barrage on-demand up upload. The server background calculation extracts the portrait area in the video screen, and converts it into svg storage while the client plays the video. Download svg from the server and combine it with barrage, portrait
 How to configure nginx to ensure that the frps server and web share port 80
Jun 03, 2023 am 08:19 AM
How to configure nginx to ensure that the frps server and web share port 80
Jun 03, 2023 am 08:19 AM
First of all, you will have a doubt, what is frp? Simply put, frp is an intranet penetration tool. After configuring the client, you can access the intranet through the server. Now my server has used nginx as the website, and there is only one port 80. So what should I do if the FRP server also wants to use port 80? After querying, this can be achieved by using nginx's reverse proxy. To add: frps is the server, frpc is the client. Step 1: Modify the nginx.conf configuration file in the server and add the following parameters to http{} in nginx.conf, server{listen80
 What are web standards?
Oct 18, 2023 pm 05:24 PM
What are web standards?
Oct 18, 2023 pm 05:24 PM
Web standards are a set of specifications and guidelines developed by W3C and other related organizations. It includes standardization of HTML, CSS, JavaScript, DOM, Web accessibility and performance optimization. By following these standards, the compatibility of pages can be improved. , accessibility, maintainability and performance. The goal of web standards is to enable web content to be displayed and interacted consistently on different platforms, browsers and devices, providing better user experience and development efficiency.
 How to enable administrative access from the cockpit web UI
Mar 20, 2024 pm 06:56 PM
How to enable administrative access from the cockpit web UI
Mar 20, 2024 pm 06:56 PM
Cockpit is a web-based graphical interface for Linux servers. It is mainly intended to make managing Linux servers easier for new/expert users. In this article, we will discuss Cockpit access modes and how to switch administrative access to Cockpit from CockpitWebUI. Content Topics: Cockpit Entry Modes Finding the Current Cockpit Access Mode Enable Administrative Access for Cockpit from CockpitWebUI Disabling Administrative Access for Cockpit from CockpitWebUI Conclusion Cockpit Entry Modes The cockpit has two access modes: Restricted Access: This is the default for the cockpit access mode. In this access mode you cannot access the web user from the cockpit
